2002 ISUZU AXIOM Service Repair Manual
[x] Cancel search: ACPage 2049 of 2100
SUPPLEMENTAL RESTRAINT SYSTEM9J±35
Installation
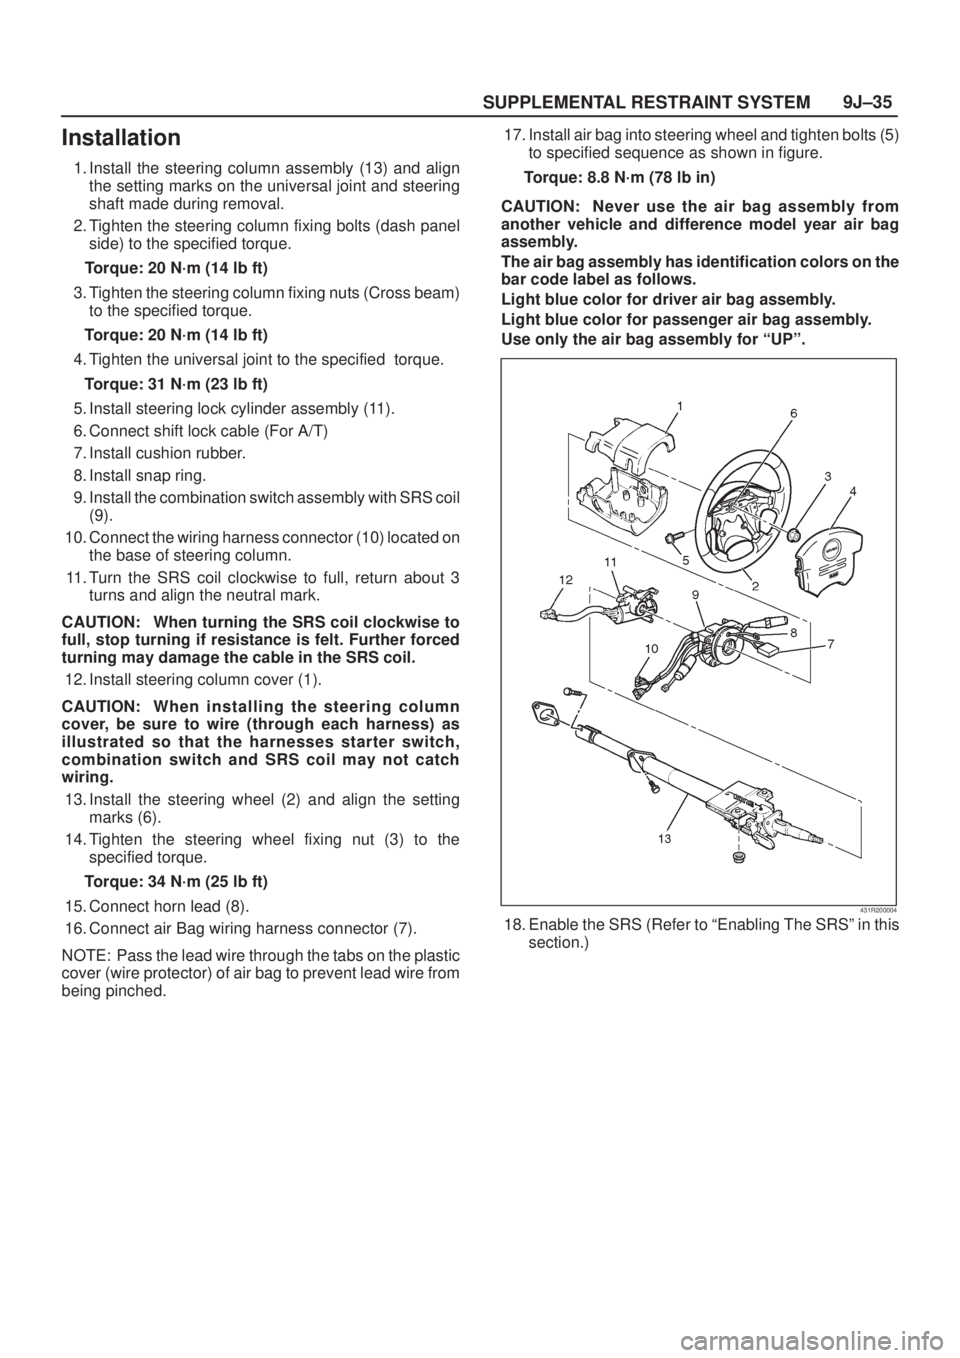
1. Install the steering column assembly (13) and align
the setting marks on the universal joint and steering
shaft made during removal.
2. Tighten the steering column fixing bolts (dash panel
side) to the specified torque.
Torque: 20 N´m (14 lb ft)
3. Tighten the steering column fixing nuts (Cross beam)
to the specified torque.
Torque: 20 N´m (14 lb ft)
4. Tighten the universal joint to the specified torque.
Torque: 31 N´m (23 lb ft)
5. Install steering lock cylinder assembly (11).
6. Connect shift lock cable (For A/T)
7. Install cushion rubber.
8. Install snap ring.
9. Install the combination switch assembly with SRS coil
(9).
10. Connect the wiring harness connector (10) located on
the base of steering column.
11. Turn the SRS coil clockwise to full, return about 3
turns and align the neutral mark.
CAUTION: When turning the SRS coil clockwise to
full, stop turning if resistance is felt. Further forced
turning may damage the cable in the SRS coil.
12. Install steering column cover (1).
CAUTION: When installing the steering column
cover, be sure to wire (through each harness) as
illustrated so that the harnesses starter switch,
combination switch and SRS coil may not catch
wiring.
13. Install the steering wheel (2) and align the setting
marks (6).
14. Tighten the steering wheel fixing nut (3) to the
specified torque.
Torque: 34 N´m (25 lb ft)
15. Connect horn lead (8).
16. Connect air Bag wiring harness connector (7).
NOTE: Pass the lead wire through the tabs on the plastic
cover (wire protector) of air bag to prevent lead wire from
being pinched.17. Install air bag into steering wheel and tighten bolts (5)
to specified sequence as shown in figure.
Torque: 8.8 N´m (78 lb in)
CAUTION: Never use the air bag assembly from
another vehicle and difference model year air bag
assembly.
The air bag assembly has identification colors on the
bar code label as follows.
Light blue color for driver air bag assembly.
Light blue color for passenger air bag assembly.
Use only the air bag assembly for ªUPº.
431R200004
18. Enable the SRS (Refer to ªEnabling The SRSº in this
section.)
Page 2050 of 2100
SUPPLEMENTAL RESTRAINT SYSTEM 9J±36
Passenger Air Bag Assembly
Service Precaution
WARNING: S A F E T Y P R ECAUTIONS MUST BE
FOLLOWED WHEN HANDLING A DEPLOYED AIR
BAG ASSEMBLY. AFTER DEPLOYMENT, THE AIR
BAG ASSEMBLY SURFACE MAY CONTAIN A SMALL
AMOUNT OF SODIUM HYDROXIDE, A BY±PRODUCT
OF THE DEPLOYMENT REACTION, THAT IS
IRRITATING TO THE SKIN AND EYES. MOST OF THE
POWDER ON THE AIR BAG ASSEMBLY IS
HARMLESS. AS A PRECAUTION, WEAR GLOVES
AND SAFETY GLASSES WHEN HANDLING A
DEPLOYED AIR BAG ASSEMBLY, AND WASH YOUR
HANDS WITH MILD SOAP AND WATER
AFTERWARDS.
WARNING: W H E N C A R RY I N G A L I V E A I R B A G
ASSEMBLY, MAKE SURE THE BAG AND TRIM
COVER ARE POINTED AWAY FROM YOU. NEVER
CARRY AIR BAG ASSEMBLY BY THE WIRES OR
CONNECTOR ON THE UNDERSIDE OF MODULE. IN
THE CASE OF AN ACCIDENTAL DEPLOYMENT, THE
BAG WILL THEN DEPLOY WITH MINIMAL CHANCE
OF INJURY. WHEN PLACING A LIVE AIR BAG
ASSEMBLY ON A BENCH OR OTHER SURFACE,
ALWAYS FACE BAG AND TRIM COVER UP, AWAY
FROM THE SURFACE. NEVER REST A STEERING
COLUMN ASSEMBLY ON THE STEERING WHEEL
WITH THE AIR BAG ASSEMBLY FACE DOWN AND
COLUMN VERTICAL. THIS IS NECESSARY SO THAT
A FREE SPACE IS PROVIDED TO ALLOW THE AIR
BAG ASSEMBLY TO EXPAND IN THE UNLIKELY
EVENT OF ACCIDENTAL DEPLOYMENT.
OTHERWISE, PERSONAL INJURY COULD RESULT.
NOTE: In the event deployment has occurred, inspect
coil assembly wire for any signs of scorching, melting or
any other damage due to excessive heat. If the coil has
been damaged, replace it.
Removal
1. Disable the SRS. (Refer to ªDisabling the SRSº in this
section.)
2. Remove glove box assembly.
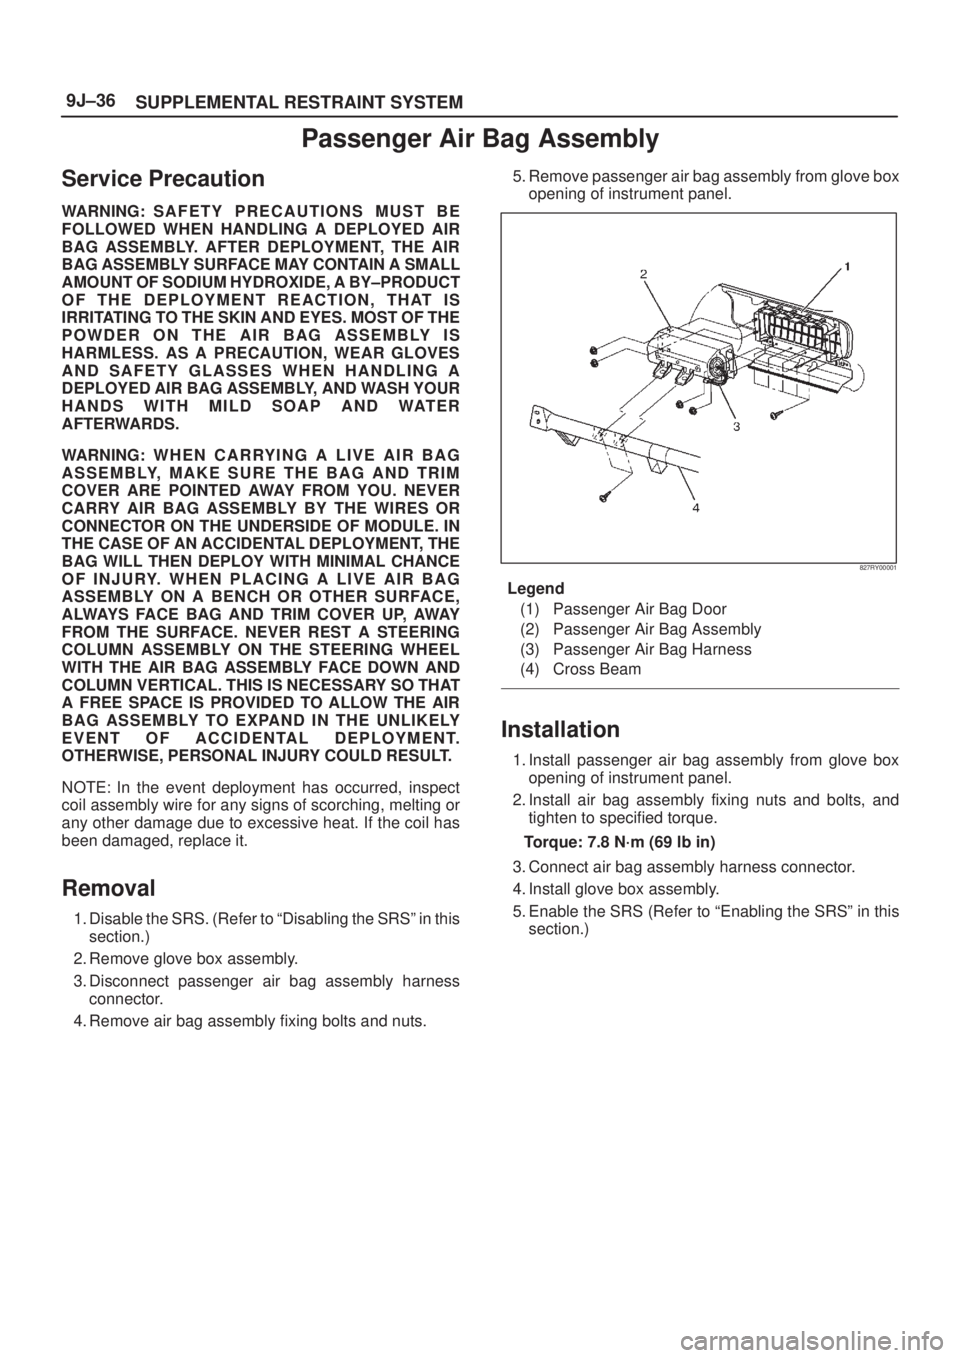
3. Disconnect passenger air bag assembly harness
connector.
4. Remove air bag assembly fixing bolts and nuts.5. Remove passenger air bag assembly from glove box
opening of instrument panel.
827RY00001
Legend
(1) Passenger Air Bag Door
(2) Passenger Air Bag Assembly
(3) Passenger Air Bag Harness
(4) Cross Beam
Installation
1. Install passenger air bag assembly from glove box
opening of instrument panel.
2. Install air bag assembly fixing nuts and bolts, and
tighten to specified torque.
Torque: 7.8 N´m (69 lb in)
3. Connect air bag assembly harness connector.
4. Install glove box assembly.
5. Enable the SRS (Refer to ªEnabling the SRSº in this
section.)
Page 2051 of 2100
9J1±1
RESTRAINT CONTROL SYSTEM
AXIOM
RESTRAINTS
SRS CONTROL SYSTEM
CONTENTS
Service Precaution 9J1±1. . . . . . . . . . . . . . . . . . . . . .
Diagnostic Information 9J1±2. . . . . . . . . . . . . . . . . . .
Diagnostic Procedures 9J1±2. . . . . . . . . . . . . . . . .
Diagnostic Codes 9J1±2. . . . . . . . . . . . . . . . . . . . . .
How To Read Trouble Codes 9J1±2. . . . . . . . . . . .
How To Clear Trouble Codes 9J1±2. . . . . . . . . . . .
Scan Tool Diagnostics 9J1±2. . . . . . . . . . . . . . . . . .
Basic Knowledge Required 9J1±2. . . . . . . . . . . . .
Basic Electrical Circuits 9J1±2. . . . . . . . . . . . . . . . .
ªFlash Codeº Diagnostics 9J1±3. . . . . . . . . . . . . . .
System Schematic 9J1±3. . . . . . . . . . . . . . . . . . . . . .
SRS Diagnostic System Check 9J1±4. . . . . . . . . . . .
Circuit Description 9J1±4. . . . . . . . . . . . . . . . . . . . .
Notes On System Check Chart: 9J1±4. . . . . . . . .
Diagnostic Aids: 9J1±4. . . . . . . . . . . . . . . . . . . . . . .
Chart A SDM Integrity Check 9J1±6. . . . . . . . . . . . .
Chart B ªAIR BAGº Warning Lamp Comes
ªONº Steady 9J1±8. . . . . . . . . . . . . . . . . . . . . . . . . . .
Chart C ªAIR BAGº Warning Lamp Does
Not Comes ªONº Steady 9J1±10. . . . . . . . . . . . . . . . .
DTC 15 Passenger Deployment Loop
Resistance High 9J1±13. . . . . . . . . . . . . . . . . . . . . . . . DTC 16 Passenger Deployment Loop
Resistance Low 9J1±16. . . . . . . . . . . . . . . . . . . . . . . .
DTC 17 Passenger Deployment Loop Open 9J1±19
DTC 18 Passenger Deployment Loop
Short To Ground 9J1±21. . . . . . . . . . . . . . . . . . . . . . . .
DTC 19 Passenger Deployment Loop
Short To Voltage 9J1±23. . . . . . . . . . . . . . . . . . . . . . . .
DTC 21 Driver Deployment Loop
Resistance High 9J1±25. . . . . . . . . . . . . . . . . . . . . . . .
DTC 22 Driver Deployment Loop
Resistance Low 9J1±28. . . . . . . . . . . . . . . . . . . . . . . .
DTC 24 Driver Deployment Loop
Short To Ground 9J1±31. . . . . . . . . . . . . . . . . . . . . . . .
DTC 25 Driver Deployment Loop
Short To Voltage 9J1±33. . . . . . . . . . . . . . . . . . . . . . . .
DTC 26 Driver Deployment Loop Open 9J1±36. . . .
DTC 51 Deployment Event Commanded 9J1±39. . .
DTC 53 Deployment Commanded With
Deployment Loop Fault Or Energy
Reserves Out Of Range 9J1±41. . . . . . . . . . . . . . . . .
DTC 61 Warning Lamp Circuit Failure 9J1±43. . . . .
DTC 71 Internal SDM Fault 9J1±45. . . . . . . . . . . . . .
Service Precaution
WARNING: THIS VEHICLE HAS A SUPPLEMENTAL
RESTRAINT SYSTEM (SRS). REFER TO THE SRS
COMPONENT AND WIRING LOCATION VIEW IN
ORDER TO DETERMINE WHETHER YOU ARE
PERFORMING SERVICE ON OR NEAR THE SRS
COMPONENTS OR THE SRS WIRING. WHEN YOU
ARE PERFORMING SERVICE ON OR NEAR THE SRS
COMPONENTS OR THE SRS WIRING, REFER TO
THE SRS SERVICE INFORMATION. FAILURE TO
FOLLOW WARNINGS COULD RESULT IN POSSIBLE
AIR BAG DEPLOYMENT, PERSONAL INJURY, OR
OTHERWISE UNNEEDED SRS SYSTEM REPAIRS.CAUTION: Always use the correct fastener in the
proper location. When you replace a fastener, use
ONLY the exact part number for that application.
ISUZU will call out those fasteners that require a
replacement after removal. ISUZU will also call out
the fasteners that require thread lockers or thread
sealant. UNLESS OTHERWISE SPECIFIED, do not
use supplemental coatings (Paints, greases, or other
corrosion inhibitors) on threaded fasteners or
fastener joint interfaces. Generally, such coatings
adversely affect the fastener torque and the joint
clamping force, and may damage the fastener. When
you install fasteners, use the correct tightening
sequence and specifications. Following these
instructions can help you avoid damage to parts and
systems.
Page 2052 of 2100
RESTRAINT CONTROL SYSTEM 9J1±2
Diagnostic Information
Diagnostic Procedures
WARNING: W H E N FA S T E N E R S A R E R E M O V E D ,
ALWAYS REINSTALL THEN AT THE SAME
LOCATION FROM WHICH THEY WERE REMOVED. IF
A FASTENER NEEDS TO BE REPLACED, USE THE
CORRECT PART NUMBER FASTENER FOR THAT
APPLICATION. IF THE CORRECT PART NUMBER
FASTENER IS NOT AVAILABLE, A FASTENER OF
EQUAL SIZE AND STRENGTH (OR STRONGER) MAY
BE USED. FASTENERS THAT ARE NOT REUSED,
AND THOSE REQUIRING THREAD LOCKING
COMPOUND WILL BE CALLED OUT. THE CORRECT
TORQUE VALUE MUST BE USED WHEN
INSTALLING FASTENERS THAT REQUIRE IT. IF THE
ABOVE CONDITIONS ARE NOT FOLLOWED, PARTS
OR SYSTEM DAMAGE COULD RESULT.
WARNING: T O AV O I D D E P L O Y M E N T W H E N
TROUBLESHOOTING THE SRS, DO NOT USE
ELECTRICAL TEST EQUIPMENT SUCH AS A
BATTERY±POWERED OR AC±POWERED
VOLTMETER, OHMMETER, ETC., OR ANY TYPE OF
ELECTRICAL EQUIPMENT OTHER THAN THAT
SPECIFIED IN THIS MANUAL. DO NOT USE A
NONPOWERED, PROBE±TYPE TESTER.
INSTRUCTIONS IN THIS MANUAL MUST BE
FOLLOWED CAREFULLY, OTHERWISE PERSONAL
INJURY MAY RESULT.
The diagnostic procedures used in this section are
designed to aid in finding and repairing SRS problems.
Outlined below are the steps to find and repair SRS
problems quickly and effectively. Failure to carefully
follow these procedures may result in extended
diagnostic time, incorrect diagnosis and incorrect parts
Replacement.
1.Perform The ªSRS Diagnostic System Check.º
The ªSRS Diagnostic System Checkº should always be
the starting point of any SRS diagnostics. The ªSRS
Diagnostic System Checkº checks for proper ªAIR BAGº
warning lamp operation and checks for SRS trouble
codes using both ªFlash Codeº and ªScan Toolº Methods.
2.Refer To The Proper Diagnostic Chart As Directed
By The ªSRS Diagnostic System Check.º
The ªSRS Diagnostic System Checkº will lead you to the
correct chart to diagnose any SRS problems. Bypassing
these procedures may result in extended diagnostic time,
incorrect diagnosis and incorrect parts Replacement.
3.Repeat the ªSRS Diagnostic System Checkº After
Any Repair Or Diagnostic Procedures Have Been
Performed.
Performing the ªSRS Diagnostic System Checkº after all
repair or diagnostic procedures will assure that the repair
has been made correctly and that no other conditions
exist.
Diagnostic Codes
The Sensing and Diagnostic Module (SDM) maintains a
history record of all diagnostic codes that have been
detected since the SRS codes were last cleared during
service.
1. Active CodesÐFaults that are presently detected this
ignition cycle. Active codes are stored in RAM
(Random Access Memory).
2. History CodesÐAll faults detected since the last time
the history fault memory was cleared. History codes
are stored in EEPROM. (Electronically Erasable
Programmable Read only Memory)
How To Read Trouble Codes
All codes (Active and history) can be read (or cleared) by
using a scan tool or equivalent.
If a DTC is not available, have the vehicle serviced by
dealer.
How To Clear Trouble Codes
Trouble codes can only be cleared by using a scan tool. If
a scan tool is not available then inform the owner of the
stored codes and suggest that the codes are cleared
upon the next visit to a dealership.
Scan Tool Diagnostics
A scan tool can be used to read current and history codes
and to clear all history codes after a repair is complete.
The scan tool must be updated to communicate with the
SRS through a replaceable cartridge for SRS
diagnostics. To use the scan tool, connect it to the DLC
and turn the ignition switch ªONº. Then follow the
manufacturer's directions for communication with the
SRS. The scan tool reads serial data from the SDM
ªSerial Dataº output (terminal 24) to the DLC.
Basic Knowledge Required
Before using this section of the Service Manual, there is
some basic knowledge which will be required. Without
this knowledge, you will have trouble using the diagnostic
procedures in this section. Use care to prevent harm or
unwanted deployment. Read all cautions in the service
manual and on warning labels attached to SRS
components.
Basic Electrical Circuits
You should understand the basic theory of electricity
including series and parallel circuits, and understand the
voltage drops across series resistors. You should know
the meaning of voltage (volts), current (amps), and
resistance (ohms). You should understand what happens
in a circuit with an open or a shorted wire. You should be
able to read and understand a wiring diagram.
Page 2053 of 2100
9J1±3
RESTRAINT CONTROL SYSTEM
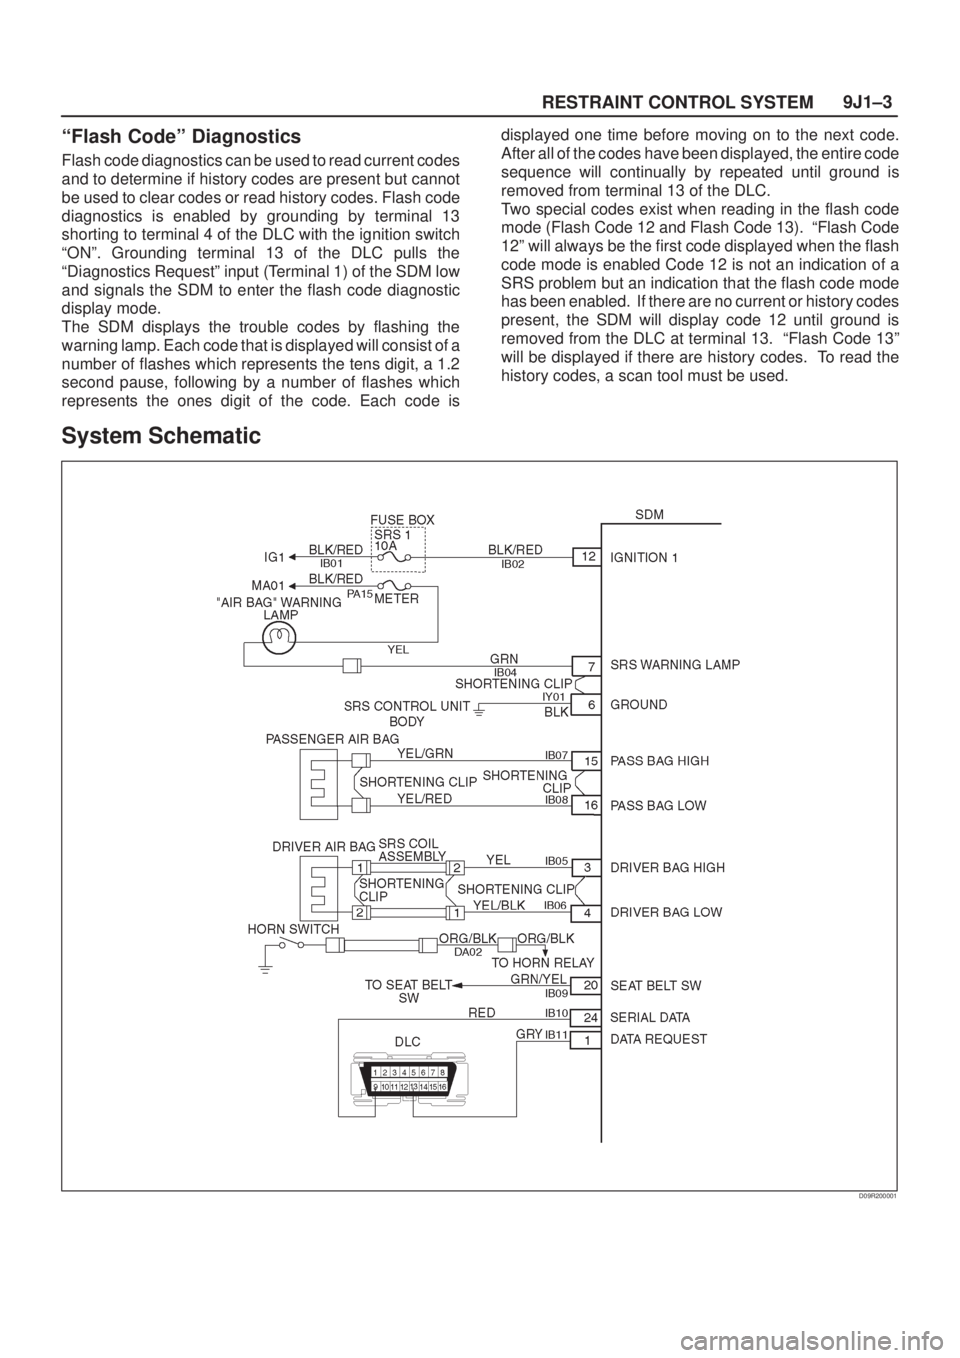
ªFlash Codeº Diagnostics
Flash code diagnostics can be used to read current codes
and to determine if history codes are present but cannot
be used to clear codes or read history codes. Flash code
diagnostics is enabled by grounding by terminal 13
shorting to terminal 4 of the DLC with the ignition switch
ªONº. Grounding terminal 13 of the DLC pulls the
ªDiagnostics Requestº input (Terminal 1) of the SDM low
and signals the SDM to enter the flash code diagnostic
display mode.
The SDM displays the trouble codes by flashing the
warning lamp. Each code that is displayed will consist of a
number of flashes which represents the tens digit, a 1.2
second pause, following by a number of flashes which
represents the ones digit of the code. Each code isdisplayed one time before moving on to the next code.
After all of the codes have been displayed, the entire code
sequence will continually by repeated until ground is
removed from terminal 13 of the DLC.
Two special codes exist when reading in the flash code
mode (Flash Code 12 and Flash Code 13). ªFlash Code
12º will always be the first code displayed when the flash
code mode is enabled Code 12 is not an indication of a
SRS problem but an indication that the flash code mode
has been enabled. If there are no current or history codes
present, the SDM will display code 12 until ground is
removed from the DLC at terminal 13. ªFlash Code 13º
will be displayed if there are history codes. To read the
history codes, a scan tool must be used.
System Schematic
D09R200001
Page 2054 of 2100
RESTRAINT CONTROL SYSTEM 9J1±4
SRS Diagnostic System Check
The diagnostic procedures used in this section are
designed to find and repair SRS malfunctions. To get the
best results, it is important to use the diagnostic charts
and follow the sequence listed below:
A. Perform the ªSRS Diagnostic System Check.º
The ªSRS Diagnostic System Checkº must be the
starting point of any SRS diagnostics. The ªSRS
Diagnostic System Checkº checks for proper ªAIR
BAGº warning lamp operation, the ability of the SDM
to communicate through the ªSerial Dataº line and
whether SRS diagnostic trouble codes exist.
B. Refer to the proper diagnostic chart as directed by the
ªSRS Diagnostic System Check.º
The ªSRS Diagnostic System Checkº will lead you to
the correct chart to diagnose any SRS malfunctions.
Bypassing these procedures may result in extended
diagnostic time, incorrect diagnosis and incorrect
parts replacement.
C. Repeat the ªSRS Diagnostic System Checkº after any
repair or diagnostic procedures have been
performed.
Performing the ªSRS Diagnostic System Checkº after
all repair or diagnostic procedures will ensure that the
repair has been made correctly and that no other
malfunctions exist
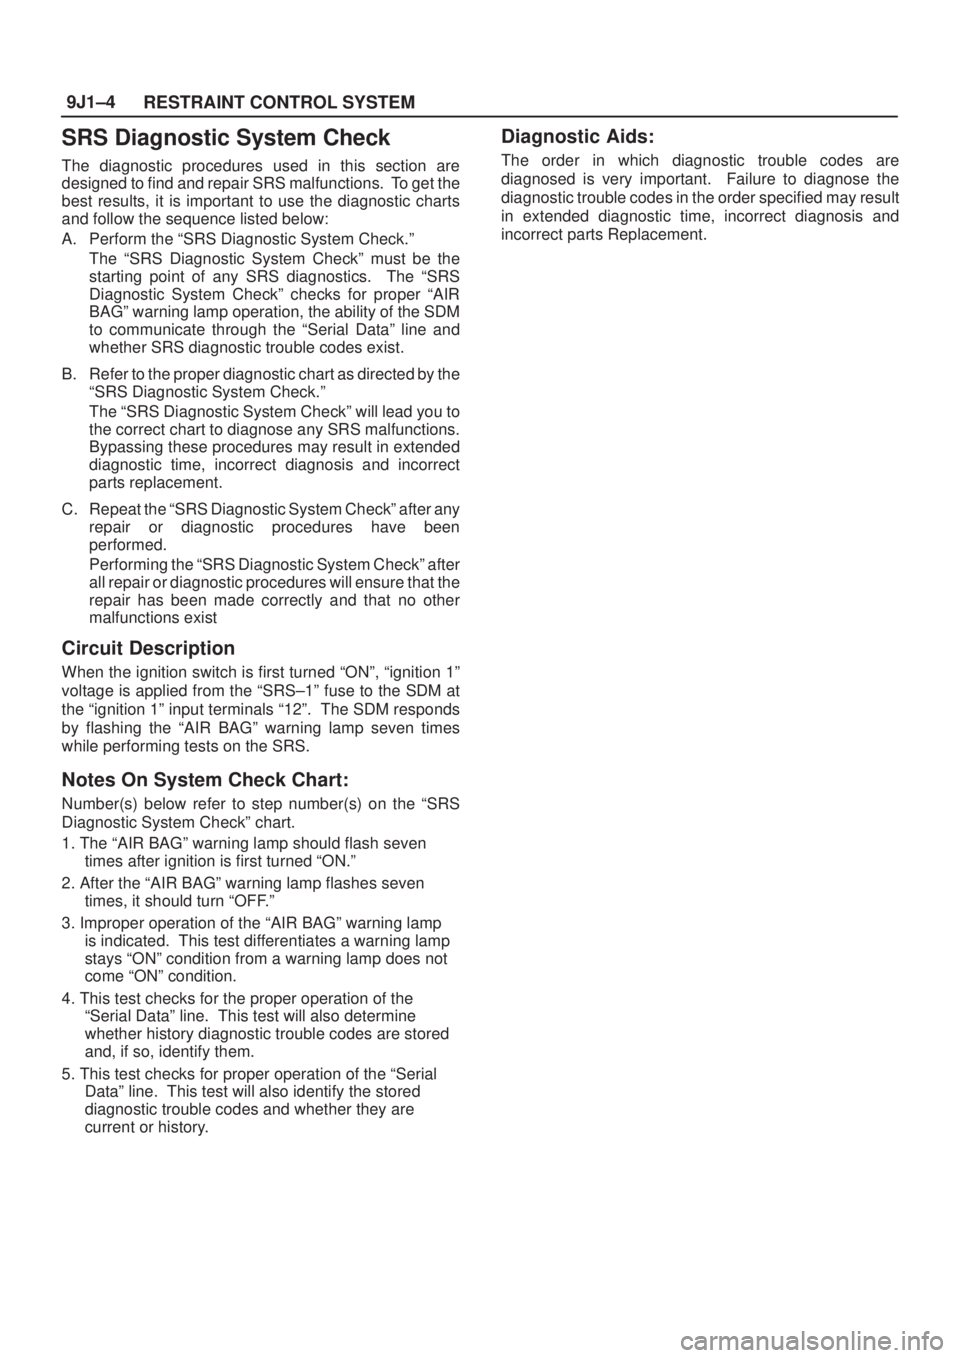
Circuit Description
When the ignition switch is first turned ªONº, ªignition 1º
voltage is applied from the ªSRS±1º fuse to the SDM at
the ªignition 1º input terminals ª12º. The SDM responds
by flashing the ªAIR BAGº warning lamp seven times
while performing tests on the SRS.
Notes On System Check Chart:
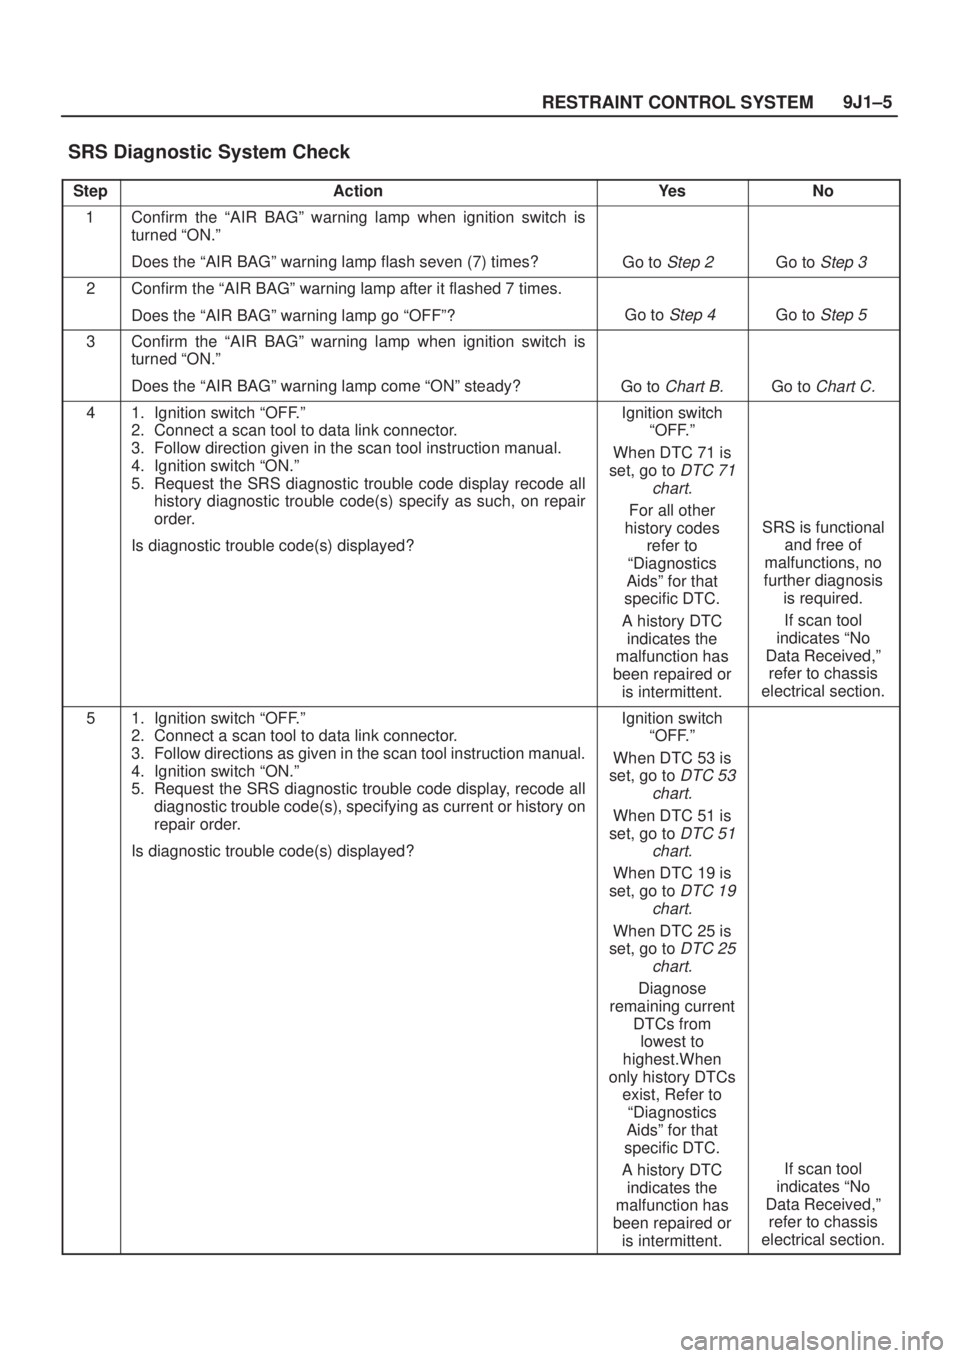
Number(s) below refer to step number(s) on the ªSRS
Diagnostic System Checkº chart.
1. The ªAIR BAGº warning lamp should flash seven
times after ignition is first turned ªON.º
2. After the ªAIR BAGº warning lamp flashes seven
times, it should turn ªOFF.º
3. Improper operation of the ªAIR BAGº warning lamp
is indicated. This test differentiates a warning lamp
stays ªONº condition from a warning lamp does not
come ªONº condition.
4. This test checks for the proper operation of the
ªSerial Dataº line. This test will also determine
whether history diagnostic trouble codes are stored
and, if so, identify them.
5. This test checks for proper operation of the ªSerial
Dataº line. This test will also identify the stored
diagnostic trouble codes and whether they are
current or history.
Diagnostic Aids:
The order in which diagnostic trouble codes are
diagnosed is very important. Failure to diagnose the
diagnostic trouble codes in the order specified may result
in extended diagnostic time, incorrect diagnosis and
incorrect parts Replacement.
Page 2055 of 2100
9J1±5
RESTRAINT CONTROL SYSTEM
SRS Diagnostic System Check
StepActionYe sNo
1Confirm the ªAIR BAGº warning lamp when ignition switch is
turned ªON.º
Does the ªAIR BAGº warning lamp flash seven (7) times?
Go to Step 2 Go to Step 3
2Confirm the ªAIR BAGº warning lamp after it flashed 7 times.
Does the ªAIR BAGº warning lamp go ªOFFº?
Go to Step 4 Go to Step 5
3Confirm the ªAIR BAGº warning lamp when ignition switch is
turned ªON.º
Does the ªAIR BAGº warning lamp come ªONº steady?
Go to Chart B.Go to Chart C.
41. Ignition switch ªOFF.º
2. Connect a scan tool to data link connector.
3. Follow direction given in the scan tool instruction manual.
4. Ignition switch ªON.º
5. Request the SRS diagnostic trouble code display recode all
history diagnostic trouble code(s) specify as such, on repair
order.
Is diagnostic trouble code(s) displayed?Ignition switch
ªOFF.º
When DTC 71 is
set, go to
DTC 71
chart.
For all other
history codes
refer to
ªDiagnostics
Aidsº for that
specific DTC.
A history DTC
indicates the
malfunction has
been repaired or
is intermittent.
SRS is functional
and free of
malfunctions, no
further diagnosis
is required.
If scan tool
indicates ªNo
Data Received,º
refer to chassis
electrical section.
51. Ignition switch ªOFF.º
2. Connect a scan tool to data link connector.
3. Follow directions as given in the scan tool instruction manual.
4. Ignition switch ªON.º
5. Request the SRS diagnostic trouble code display, recode all
diagnostic trouble code(s), specifying as current or history on
repair order.
Is diagnostic trouble code(s) displayed?Ignition switch
ªOFF.º
When DTC 53 is
set, go to
DTC 53
chart.
When DTC 51 is
set, go to
DTC 51
chart.
When DTC 19 is
set, go to
DTC 19
chart.
When DTC 25 is
set, go to
DTC 25
chart.
Diagnose
remaining current
DTCs from
lowest to
highest.When
only history DTCs
exist, Refer to
ªDiagnostics
Aidsº for that
specific DTC.
A history DTC
indicates the
malfunction has
been repaired or
is intermittent.
If scan tool
indicates ªNo
Data Received,º
refer to chassis
electrical section.
Page 2056 of 2100
RESTRAINT CONTROL SYSTEM 9J1±6
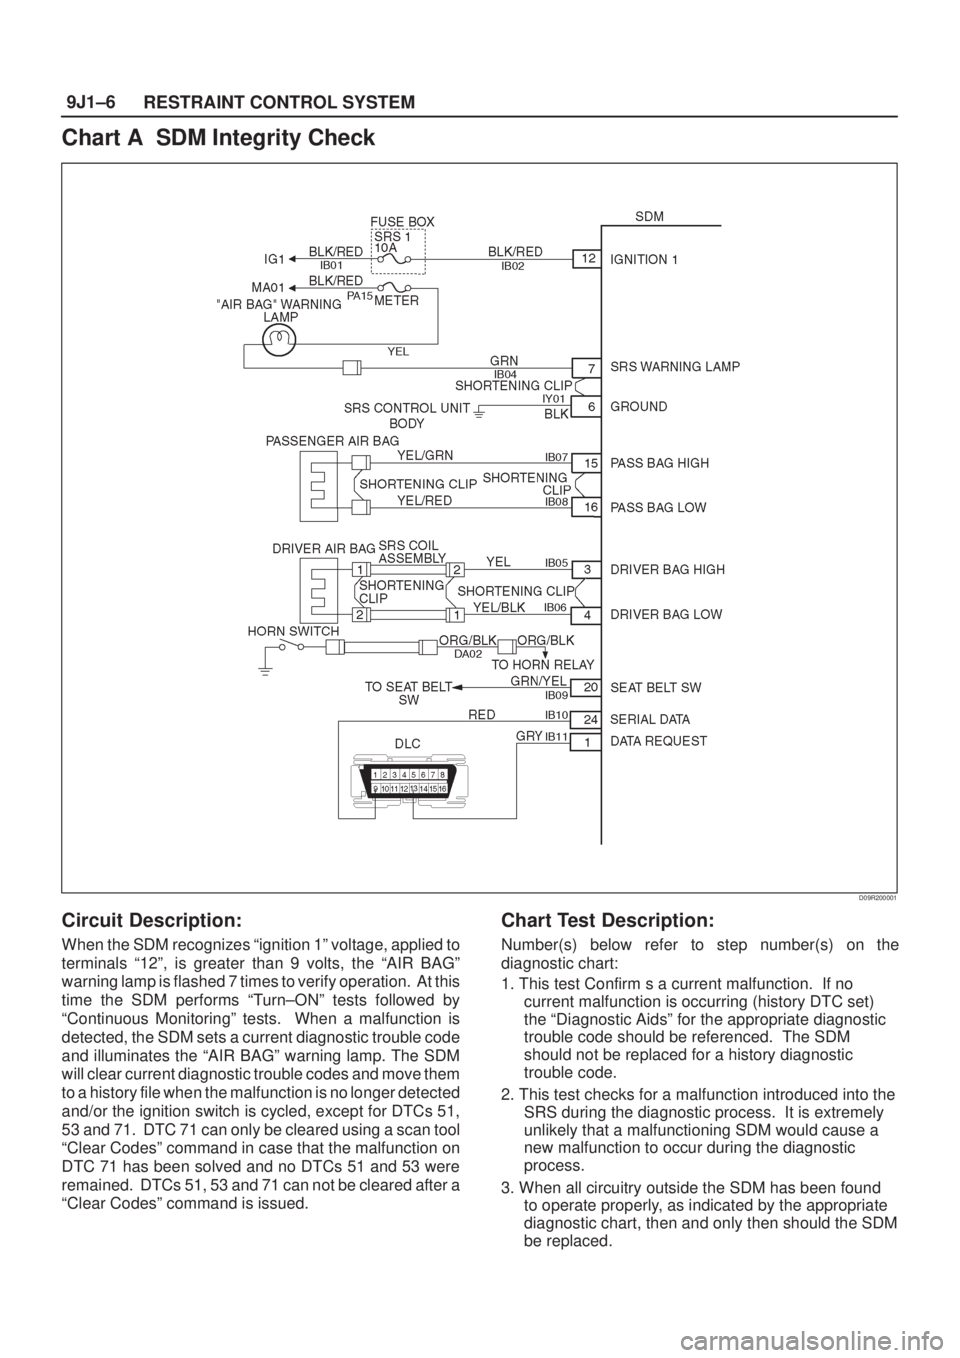
Chart A SDM Integrity Check
D09R200001
Circuit Description:
When the SDM recognizes ªignition 1º voltage, applied to
terminals ª12º, is greater than 9 volts, the ªAIR BAGº
warning lamp is flashed 7 times to verify operation. At this
time the SDM performs ªTurn±ONº tests followed by
ªContinuous Monitoringº tests. When a malfunction is
detected, the SDM sets a current diagnostic trouble code
and illuminates the ªAIR BAGº warning lamp. The SDM
will clear current diagnostic trouble codes and move them
to a history file when the malfunction is no longer detected
and/or the ignition switch is cycled, except for DTCs 51,
53 and 71. DTC 71 can only be cleared using a scan tool
ªClear Codesº command in case that the malfunction on
DTC 71 has been solved and no DTCs 51 and 53 were
remained. DTCs 51, 53 and 71 can not be cleared after a
ªClear Codesº command is issued.
Chart Test Description:
Number(s) below refer to step number(s) on the
diagnostic chart:
1. This test Confirm s a current malfunction. If no
current malfunction is occurring (history DTC set)
the ªDiagnostic Aidsº for the appropriate diagnostic
trouble code should be referenced. The SDM
should not be replaced for a history diagnostic
trouble code.
2. This test checks for a malfunction introduced into the
SRS during the diagnostic process. It is extremely
unlikely that a malfunctioning SDM would cause a
new malfunction to occur during the diagnostic
process.
3. When all circuitry outside the SDM has been found
to operate properly, as indicated by the appropriate
diagnostic chart, then and only then should the SDM
be replaced.