2002 Hyundai Grandeur flat tire
[x] Cancel search: flat tirePage 50 of 230

FEATURES OF YOUR HYUNDAI 1- 37
B240C02Y-GAT SRS Care The SRS is virtually maintenance-free and there are no parts you can safelyservice by yourself. The entire SRSsystem must be inspected by an au-thorized Hyundai dealer 10 years after the date that the vehicle was manufac- tured. Any work on the SRS system, such as removing, installing, repairing, or anywork on the steering wheel must be performed by a qualified Hyundai tech- nician. Improper handling of the SRSsystem may result in serious personalinjury.
o Do not place any objects (an
umbrella, bag, etc.) between thefront door and the front seat.Such objects may become dan-gerous projectiles and cause in-jury if the supplemental side im- pact air bag inflates.
o To prevent unexpected deploy- ment of the side impact air bag that may result in personal in-jury, avoid impact to the sideairbag sensor when the ignition key is on.
o For best protection from the side
airbag system and to avoid being injured by the deploying sideimpact airbag, both front seatoccupants should sit in an up- right position with the seat belt properly fastened. The driver'shands should be placed on thesteering wheel at the 9:00 and3:00 o'clock positions. Thepassenger's arms and hands should be placed in their laps.
o Do not use any accessory seat
covers.
o Use of seat covers could reduce
or prevent the effectiveness of the system.
o Do not install any accessories on
the side or near the side impactairbag.
o Do not use excessive force on
the side of the seat.
o Do not place any objects over the airbag or between the airbag andyourself.
Page 132 of 230

DRIVING YOUR HYUNDAI 2- 3
C020A01A-AAT BEFORE STARTING THE EN- GINE Before you start the engine, you should always:
1. Look around the vehicle to be sure
there are no flat tires, puddles of oil, water or other indications of pos- sible trouble.
2. After entering the car, check to be
sure the parking brake is engaged.
3. Check that all windows, and lights are clean.
4. Check that the interior and exterior
mirrors are clean and in position.
5. Check your seat, seatback and
headrest to be sure they are in theirproper positions.
6. Lock all the doors.
7. Fasten your seat belt and be sure
that all other occupants have fas- tened theirs.
8. Turn off all lights and accessories that are not needed.
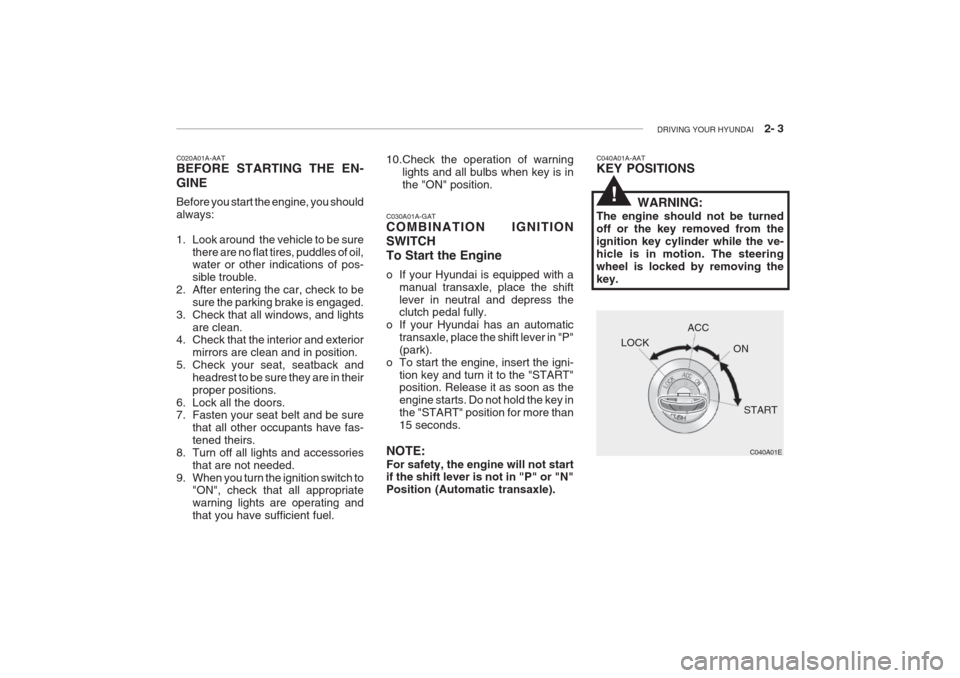
9. When you turn the ignition switch to "ON", check that all appropriatewarning lights are operating andthat you have sufficient fuel. C030A01A-GAT COMBINATION IGNITION SWITCHTo Start the Engine
o If your Hyundai is equipped with a
manual transaxle, place the shift lever in neutral and depress the clutch pedal fully.
o If your Hyundai has an automatic
transaxle, place the shift lever in "P" (park).
o To start the engine, insert the igni- tion key and turn it to the "START" position. Release it as soon as the engine starts. Do not hold the key inthe "START" position for more than15 seconds.
NOTE: For safety, the engine will not start if the shift lever is not in "P" or "N" Position (Automatic transaxle).
10.Check the operation of warning
lights and all bulbs when key is inthe "ON" position.C040A01A-AAT KEY POSITIONS
WARNING:
The engine should not be turned off or the key removed from theignition key cylinder while the ve-hicle is in motion. The steeringwheel is locked by removing thekey.
C040A01E
LOCK
ACC
ON
START
!
Page 142 of 230

DRIVING YOUR HYUNDAI 2- 13
NOTE:
1) When TCS illuminates, traction
control is automatically deacti- vated for safety.
2) This warning function is not pro- vided when in the TCS-OFF mode.
3) When the engine starts, a click is
heard from the engine compart-ment; however, this is only thesound of traction control beingchecked.
4) When moving out of the mud or
fresh snow, pressing the accel-erator pedal may not cause theengine speed to increase.
C300D02L-GAT Indicator and Warning The indicator should illuminate when
the ignition key is turned ON or START but should go out after three seconds. If the indicators do not illuminate or goout after three seconds, have themchecked by an authorized dealer. Should there be any unusual condi- tions in the device, TCS illuminates asa warning.If TCS illuminates, pull your car to asafe place and stop the engine.Then, start the engine again to check if the TCS indicator goes out. If the indicator do not go out after three seconds even after the engine hasbeen started, have your car checkedby an authorized Hyundai dealer. C130A01A-AAT GOOD BRAKING PRACTICES
WARNING:
Nothing should be carried on top of the cargo area cover behind therear seat. If there were an accidentor a sudden stop, such objectscould move forward and cause dam- age to the vehicle or injure the oc- cupants.
o After being parked, check to be sure the parking brake is not engaged and that the parking brake indicator light is out before driving away.
o Driving through water may get the brakes wet. They can also get wet when the car is washed. Wet brakescan be dangerous! Your car will notstop as quickly if the brakes are wet. Wet brakes cause the car to pull toone side. To dry the brakes, applythe brakes lightly until the braking
action returns to normal, taking careto keep the car under control at all times. If the braking action does not return to normal, stop as soon as it
is safe to do so and call your Hyundaidealer for assistance.
o Don't coast down hills with the car out of gear. This is extremely haz- ardous. Keep the car in gear at all times, use the brakes to slow down,then shift to a lower gear so thatengine braking will help you main-tain a safe speed.
o Don't "ride" the brake pedal. Rest- ing your foot on the brake pedalwhile driving can be dangerous be-cause it can result in the brakes
overheating and losing their effec-tiveness. It also increases the wearof the brake components.
o If a tire goes flat while you are
driving, apply the brakes gently and
keep the car pointed straight aheadwhile you slow down. When you are
moving slowly enough for it to besafe to do so, pull off the road and stop in a safe place.
!
Page 143 of 230

2- 14 DRIVING YOUR HYUNDAI
o Drive at a moderate speed. The
faster you drive, the more fuel your car uses. Driving at a moderatespeed, especially on the highway, isone of the most effective ways to reduce fuel consumption.
o Don't "ride" the brake or clutch pedal. This can increase fuel consumption and also increase wear on thesecomponents. In addition, driving withyour foot resting on the brake pedal may cause the brakes to overheat, which reduces their effectivenessand may lead to more serious con-sequences.
o Take care of your tires. Keep them
inflated to the recommended pres- sure. Incorrect inflation, either too much or too little, results in unnec-essary tire wear. Check the tire pres-sures at least once a month.
o Be sure that the wheels are aligned correctly. Improper alignment can result from hitting curbs or driving too fast over irregular surfaces. Pooralignment causes faster tire wearand may also result in other prob-lems as well as greater fuel con-sumption.
transaxle) and block the rear wheelsso the car cannot roll. Then releasethe parking brake.
o Do not hold the vehicle on the up- grade with the accelerator pedal. This can cause the transaxle to overheat. Always use the brakepedal or parking brake.
C140A01A-AAT DRIVING FOR ECONOMY You can save fuel and get more miles from your car if you follow these sug-gestions:
o Drive smoothly. Accelerate at a moderate rate. Don't make "jack- rabbit" starts or full-throttle shiftsand maintain a steady cruisingspeed. Don't race between stop-lights. Try to adjust your speed tothat of the other traffic so you don't have to change speeds unneces- sarily. Avoid heavy traffic wheneverpossible. Always maintain a safedistance from other vehicles so youcan avoid unnecessary braking. Thisalso reduces brake wear.
o If your car is equipped with an auto-
matic transaxle, don't let your carcreep forward. To avoid creepingforward, keep your foot on the brake
pedal when the car is stopped.
o Use caution when parking on a hill.
Engage the parking brake and placethe gear selector lever in "P" (auto-matic transaxle) or in first or reversegear (manual transaxle). If your caris facing downhill, turn the front wheels into the curb to help keep the car from rolling. If your car is facinguphill, turn the front wheels awayfrom the curb to help keep the carfrom rolling.If there is no curb or if it is required by other conditions to keep the car from rolling, block the wheels.
o Under some conditions your park-
ing brake can freeze in the engagedposition. This is most likely to hap-pen when there is an accumulation of snow or ice around or near the rear brakes or if the brakes are wet.If there is a risk that the parkingbrake may freeze, apply it only tem-porarily while you put the gear se-lector lever in "P" (automatic) or in first or reverse gear (manual
Page 146 of 230

DRIVING YOUR HYUNDAI 2- 17
C160I01A-AAT Don't Let Your Parking Brake Freeze Under some conditions your parking brake can freeze in the engaged posi-tion. This is most likely to happenwhen there is an accumulation of snow or ice around or near the rear brakes or if the brakes are wet. If there is a riskthe parking brake may freeze, apply itonly temporarily while you put the gearselector lever in "P" (automatic) or infirst or reverse gear (manual transaxle) and block the rear wheels so the car cannot roll. Then release the parkingbrake.
C160H01A-AAT Use Approved Anti-Freeze in Window Washer System To keep the water in the window washer system from freezing, add an approvedanti-freeze solution in accordance withinstructions on the container. Windowwasher anti-freeze is available fromHyundai dealers and most auto parts outlets. Do not use engine coolant or other types of anti-freeze as thesemay damage the finish.
C160K01A-AAT Carry Emergency Equipment Depending on the severity of the weather where you drive your car, youshould carry appropriate emergency equipment. Some of the items you may want to carry include tire chains,tow straps or chains, flashlight, emer-gency flares, sand, a shovel, jumpercables, a window scraper, gloves,ground cloth, coveralls, a blanket, etc.
C160J01A-AAT Don't Let Ice and Snow Accumu- late Underneath Under some conditions, snow and ice can build up under the fenders andinterfere with the steering. When driv-ing in severe winter conditions wherethis may happen, you should periodi- cally check underneath the car to be sure the movement of the front wheelsand the steering components is notobstructed.
C170A01A-AAT HIGH SPEED MOTORING Pre-Trip Inspections 1. Tires: Adjust the tire inflation pressures tospecification. Low tire inflation pres-sures will result in overheating andpossible failure of the tires. Avoid using worn or damaged tires which may result in reduced traction ortire failure. NOTE: Never exceed the maximum tire in- flation pressure shown on the tires. 2. Fuel, engine coolant and engine oil: High speed travel consumes 1.5 timesmore fuel than urban motoring. Do notforget to check both engine coolantand engine oil. 3. Drive belt: A loose or damaged drive belt mayresult in overheating of the engine.
Page 151 of 230

3. WHAT TO DO IN AN EMERGENCY
If the Engine Will not Start .............................................................. 3-2
Jump Starting .................................................................................. 3-2
If the Engine Overheats .................................................................. 3-4
Spare Tire ....................................................................................... 3-5
If You Have a Flat Tire .................................................................... 3-5
If Your Car Must Be Towed ..........................................................3-10
Emergency Towing ....................................................................... 3-12
If You Lose Your Keys .................................................................. 3-12
3
Page 155 of 230

WHAT TO DO IN AN EMERGENCY 3- 5
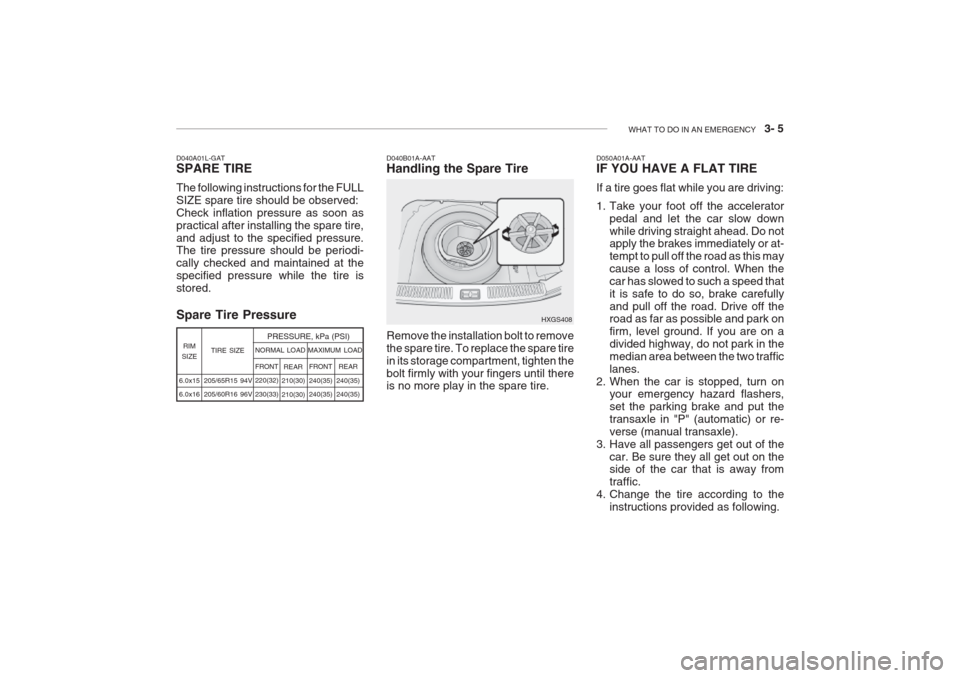
Spare Tire Pressure D040B01A-AAT Handling the Spare Tire Remove the installation bolt to remove the spare tire. To replace the spare tirein its storage compartment, tighten thebolt firmly with your fingers until there is no more play in the spare tire.D050A01A-AAT IF YOU HAVE A FLAT TIRE If a tire goes flat while you are driving:
1. Take your foot off the accelerator
pedal and let the car slow down while driving straight ahead. Do not apply the brakes immediately or at- tempt to pull off the road as this maycause a loss of control. When thecar has slowed to such a speed thatit is safe to do so, brake carefullyand pull off the road. Drive off the road as far as possible and park on firm, level ground. If you are on adivided highway, do not park in themedian area between the two trafficlanes.
2. When the car is stopped, turn on your emergency hazard flashers,set the parking brake and put thetransaxle in "P" (automatic) or re-verse (manual transaxle).
3. Have all passengers get out of the
car. Be sure they all get out on the side of the car that is away from traffic.
4. Change the tire according to the
instructions provided as following.
HXGS408
D040A01L-GAT SPARE TIRE The following instructions for the FULL SIZE spare tire should be observed:Check inflation pressure as soon aspractical after installing the spare tire,and adjust to the specified pressure. The tire pressure should be periodi- cally checked and maintained at thespecified pressure while the tire isstored.
6.0x15 6.0x16 TIRE SIZE
RIM
SIZE PRESSURE, kPa (PSI)
205/65R15 94V205/60R16 96V REAR
210(30) 210(30) FRONT240(35) 240(35)
NORMAL LOAD MAXIMUM LOAD
REAR
240(35)240(35)
FRONT220(32) 230(33)
Page 156 of 230

3- 6 WHAT TO DO IN AN EMERGENCY
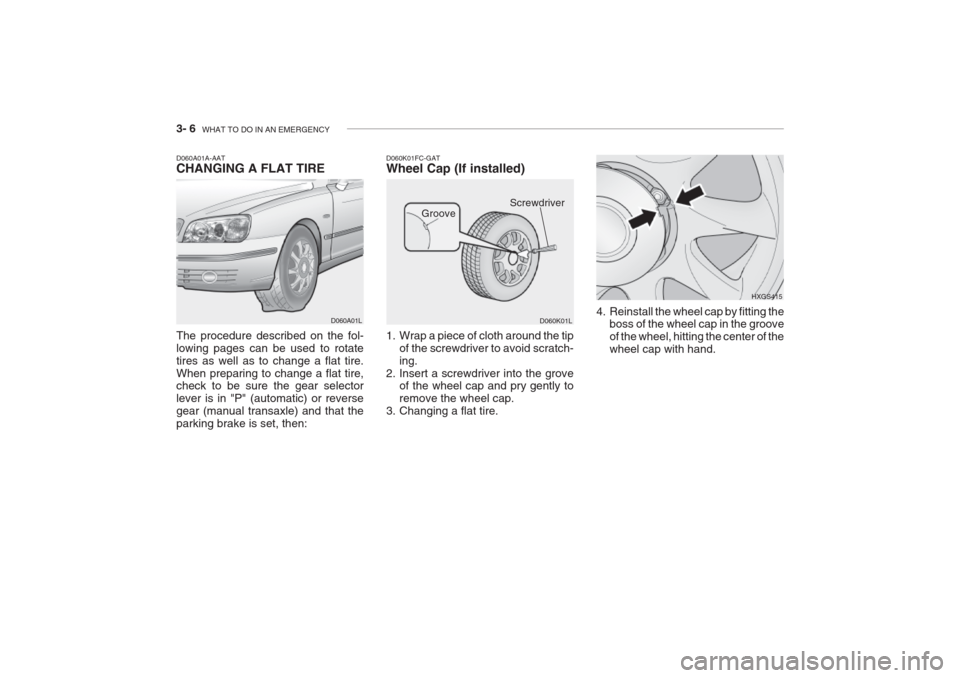
D060K01FC-GAT Wheel Cap (If installed)
D060K01L HXGS415
1. Wrap a piece of cloth around the tip of the screwdriver to avoid scratch- ing.
2. Insert a screwdriver into the grove of the wheel cap and pry gently toremove the wheel cap.
3. Changing a flat tire. 4. Reinstall the wheel cap by fitting the
boss of the wheel cap in the grooveof the wheel, hitting the center of thewheel cap with hand.
D060A01A-AAT CHANGING A FLAT TIRE The procedure described on the fol- lowing pages can be used to rotatetires as well as to change a flat tire.When preparing to change a flat tire, check to be sure the gear selector lever is in "P" (automatic) or reversegear (manual transaxle) and that theparking brake is set, then:
D060A01L Screwdriver
Groove