2002 Hyundai Grandeur lights
[x] Cancel search: lightsPage 182 of 230

DO-IT-YOURSELF MAINTENANCE 6- 5
G020A02A-AAT
GENERAL CHECKS Engine Compartment
The following should be checked regu- larly:
o Engine oil level and condition
o Transaxle fluid level and condition
o Brake fluid level
o Clutch fluid level
o Coolant level
o Windshield washer fluid level
o Accessory drive belt condition
o Coolant hose condition
o Fluid leaks (on or below compo- nents)
o Power steering fluid level and con- dition
o Battery condition
o Air filter condition G020C01A-AAT Vehicle Interior The following should be checked each time when the vehicle is driven:
o Lights operation
o Windshield wiper operation
o Horn operation
o Defroster, heater system operation
(and air conditioning, if installed)
o Steering operation and condition
o Mirror condition and operation
o Turn signal operation
o Accelerator pedal operation
o Brake operation, including parking
brake
o Manual transaxle operation, includ- ing clutch operation
o Automatic transaxle operation, in- cluding "Park" mechanism opera-tion
o Seat control condition and opera- tion
o Seat belt condition and operation
o Sunvisor operation If you notice anything that does not operate correctly or appears to befunctioning incorrectly, inspect it care- fully and seek assistance from your Hyundai dealer if service is needed.
G020B01A-AAT
Vehicle Exterior
The following should be checked
monthly:
o Overall appearance and condition
o Wheel condition and wheel nut torgue
o Exhaust system condition
o Light condition and operation
o Windshield glass condition
o Wiper blade condition
o Paint condition and body corrosion
o Fluid leaks
o Door and hood lock condition
o Tire pressure and condition (including spare tire)
Page 199 of 230
6- 22 DO-IT-YOURSELF MAINTENANCE
strument panel junction box you will find a list showing the circuits pro- tected by each fuse.
If any of your car's lights or other
electrical accessories stop working, ablown fuse could be the reason. If the fuse has burned out, you will see that the metal strip inside the fuse hasburned through. If you suspect a blown fuse, follow this procedure:
1. Turn off the ignition and all other switches.
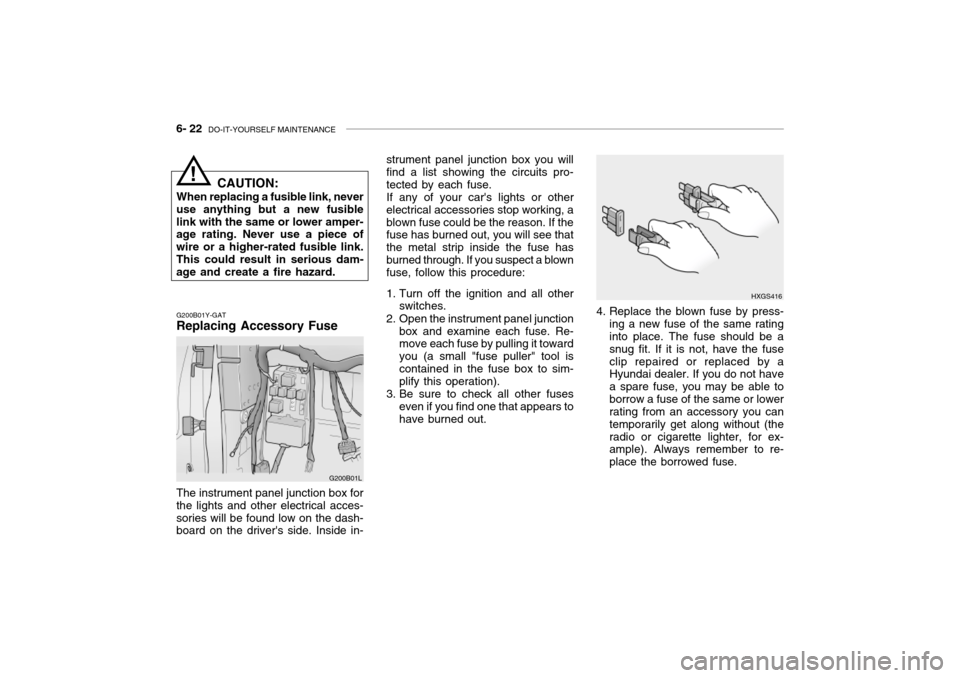
2. Open the instrument panel junction box and examine each fuse. Re- move each fuse by pulling it toward you (a small "fuse puller" tool iscontained in the fuse box to sim- plify this operation).
3. Be sure to check all other fuses even if you find one that appears to have burned out.
HXGS416
4. Replace the blown fuse by press- ing a new fuse of the same rating into place. The fuse should be a snug fit. If it is not, have the fuseclip repaired or replaced by a Hyundai dealer. If you do not have a spare fuse, you may be able toborrow a fuse of the same or lower rating from an accessory you can temporarily get along without (theradio or cigarette lighter, for ex- ample). Always remember to re- place the borrowed fuse.
G200B01Y-GAT Replacing Accessory Fuse
G200B01L
The instrument panel junction box for the lights and other electrical acces-sories will be found low on the dash- board on the driver's side. Inside in- CAUTION:
When replacing a fusible link, never
use anything but a new fusible link with the same or lower amper- age rating. Never use a piece of wire or a higher-rated fusible link.This could result in serious dam- age and create a fire hazard.
!
Page 202 of 230
DO-IT-YOURSELF MAINTENANCE 6- 25
G290A02L-GAT
HEADLIGHT AIMING ADJUST- MENT
HID Type (If installed)
WARNING:
If you need headlight aiming ad- justment, have your vehicle in- spected by your Hyundai Dealer. Don't attempt to replace or inspect the HID headlight bulb to prevent danger of an electric shock.
Vertical Aiming HorizontalAiming
Before performing aiming adjustment, make sure of the following.
1. Keep all tires inflated to the correct pressure.
2. Place the vehicle on level ground
and press the front bumper & rear bumper down several times. Place the vehicle at a distance of 3 m (118 in.) from the test wall.
3. See that the vehicle is unloaded (except for full levels of coolant,engine oil and fuel, and spare tire,jack, and tools). Have the driver or equivalent weight placed in driver's seat.
4. Clean the head light lenses and
turn on the headlights (low beam).
5. Open the hood.
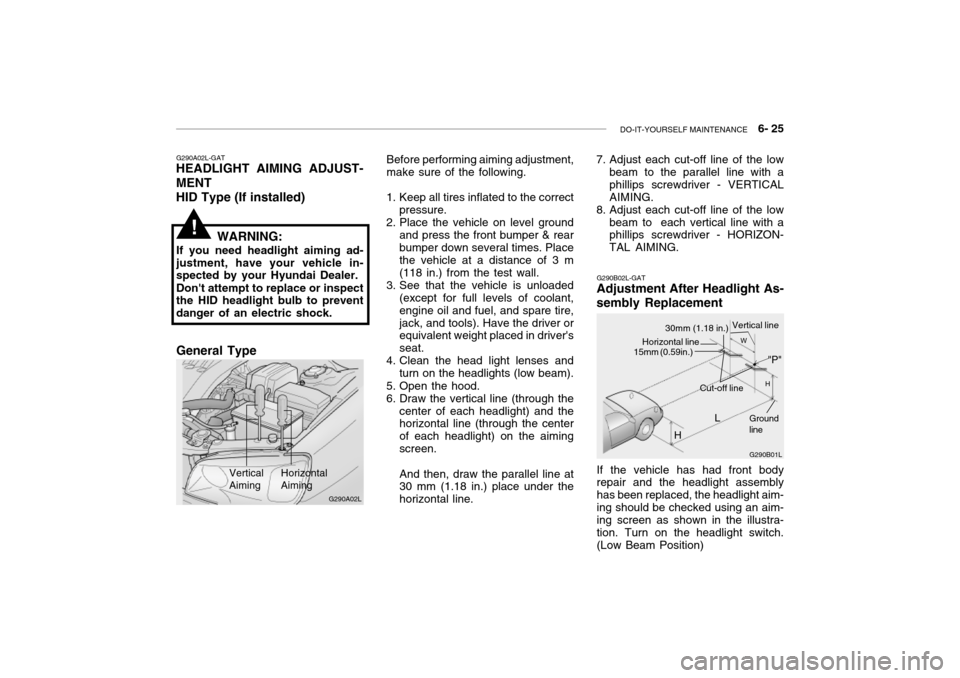
6. Draw the vertical line (through the center of each headlight) and the horizontal line (through the center of each headlight) on the aimingscreen. And then, draw the parallel line at 30 mm (1.18 in.) place under the horizontal line.
!
G290B02L-GAT
Adjustment After Headlight As- sembly Replacement
G290B01L
LW
H
H Cut-off line
Ground line
If the vehicle has had front body repair and the headlight assembly has been replaced, the headlight aim-ing should be checked using an aim- ing screen as shown in the illustra- tion. Turn on the headlight switch.(Low Beam Position)
"P"
Horizontal line15mm (0.59in.)
30mm (1.18 in.) Vertical line
7. Adjust each cut-off line of the low
beam to the parallel line with a phillips screwdriver - VERTICALAIMING.
8. Adjust each cut-off line of the low
beam to each vertical line with a phillips screwdriver - HORIZON- TAL AIMING.
G290A02L
General Type
Page 203 of 230
6- 26 DO-IT-YOURSELF MAINTENANCE
Replacement instructions:
1. Allow the bulb to cool. Wear eye protection.
2. Always grasp the bulb by its plastic base, avoid touching the glass.
G260A01L-GAT
REPLACEMENT OF LIGHT BULBS
Before attempting to replace a light
bulb, be sure the switch is turned to the "OFF" position. The next paragraph shows how to
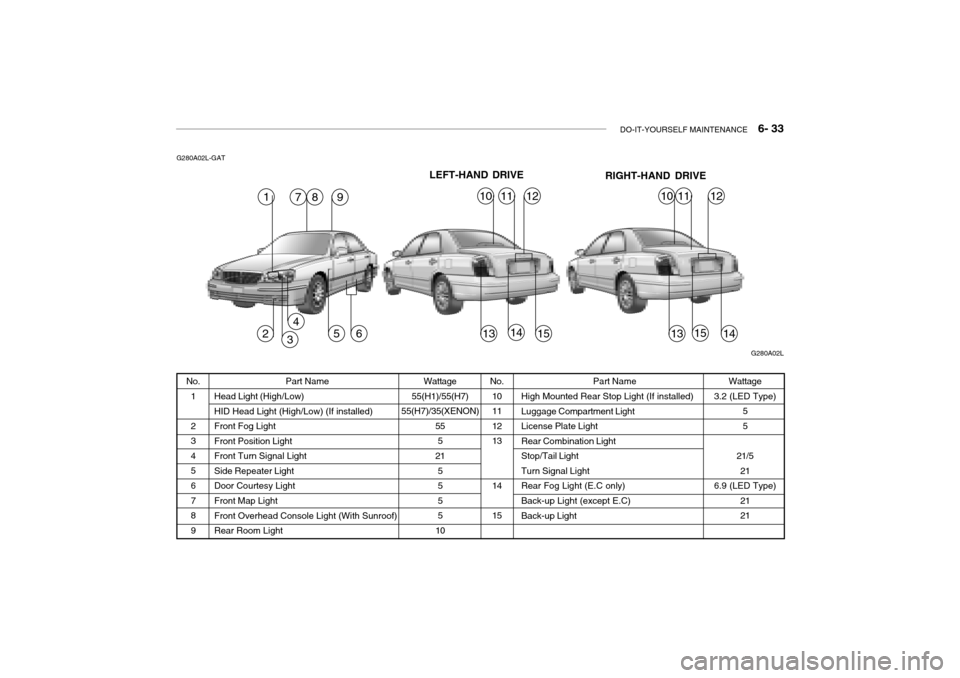
reach the light bulbs so they may be changed. Be sure to replace the burned-out bulb with one of the samenumber and wattage rating. See page 6-33 for the wattage de-
scriptions.
G270A03L
G270A01L-GAT
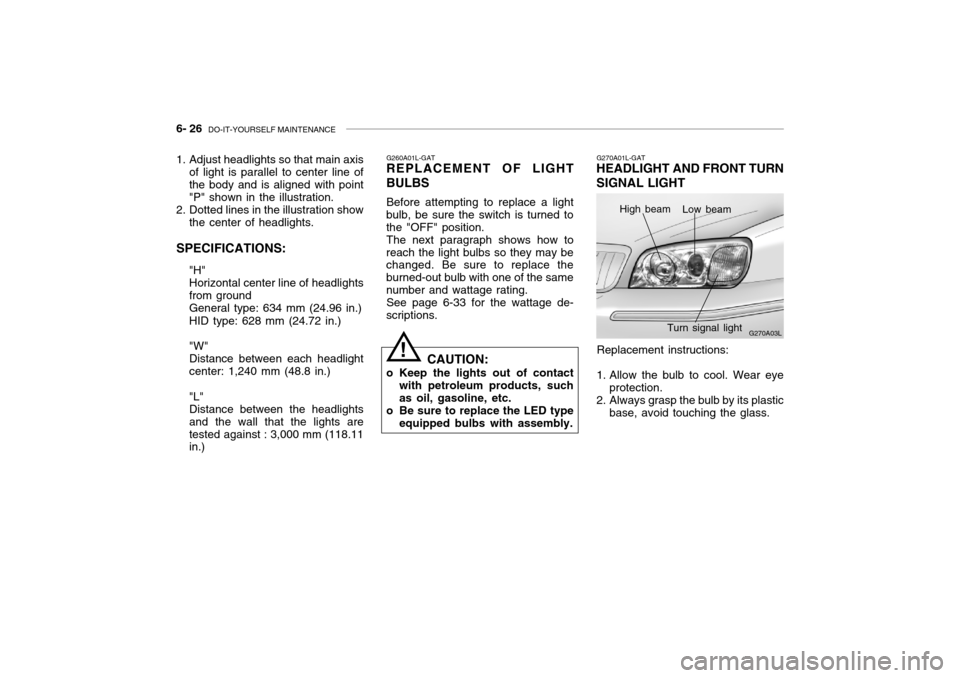
HEADLIGHT AND FRONT TURN SIGNAL LIGHT
High beam Low beam
Turn signal light
! CAUTION:
o Keep the lights out of contact with petroleum products, such as oil, gasoline, etc.
o Be sure to replace the LED type equipped bulbs with assembly.
1. Adjust headlights so that main axis
of light is parallel to center line ofthe body and is aligned with point"P" shown in the illustration.
2. Dotted lines in the illustration show
the center of headlights.
SPECIFICATIONS: "H"Horizontal center line of headlightsfrom groundGeneral type: 634 mm (24.96 in.) HID type: 628 mm (24.72 in.) "W" Distance between each headlightcenter: 1,240 mm (48.8 in.) "L" Distance between the headlightsand the wall that the lights aretested against : 3,000 mm (118.11 in.)
Page 210 of 230
DO-IT-YOURSELF MAINTENANCE 6- 33
1456
4
Part Name
Head Light (High/Low) HID Head Light (High/Low) (If installed) Front Fog LightFront Position LightFront Turn Signal LightSide Repeater LightDoor Courtesy Light Front Map Light Front Overhead Console Light (With Sunroof)Rear Room Light Wattage
55(H1)/55(H7)
55(H7)/35(XENON) 555
21 5555
10
G280A02L-GAT
Wattage
3.2 (LED Type) 5 5
21/5 21
6.9 (LED Type) 2121
No.
1 2 345 6 789 No.
10111213 14 15 Part Name
High Mounted Rear Stop Light (If installed) Luggage Compartment Light License Plate LightRear Combination LightStop/Tail LightTurn Signal LightRear Fog Light (E.C only) Back-up Light (except E.C) Back-up Light
G280A02L
1978
231315
101112
LEFT-HAND DRIVE RIGHT-HAND DRIVE
151413
101112
Page 212 of 230

DO-IT-YOURSELF MAINTENANCE 6- 35
FUSE RATING
25A 20A10A15A10A10A10A15A10A10A15A 10A 10A 10A20A10A 15A 10A15A10A10A15A10A20A 10A 10A 10A 10A10A10A 10A 10A PROTECTED COMPONENTS
Power seat
Seat warmerEPS controls
ETS relay
(HID) Head lights, DRL controls, AQS sensor
Blower & A/C controls
Turn & Hazard controlsNot used
Cruise switch, Instrument cluster
Head light leveling switch, Rain sensor, IMS controls
Rain sensor relay, Wiper & Washer controls
Home link connector, Left (Right) vanity lights, Sunroof, Blower & A/C controls,Electronic chrome mirrorNot used
Audio
Front (Rear) cigarette lighter, Accessory socket
IMS controls, Driver door module, RheostatNot used
Rear for light relay
Stop lights, Left (Right) personal lights, Left (Right) rear door lights
Door warning & Ignition key illumination, Courtesy lightsInstrument clusterSRS controls
Automatic transaxle controls, Back-up light switch, Vehicle speed sensor
Fuel filler door & Trunk lid opener, Driver (Assister) door module
Multipurpose check connector, Audio, lmmobiilizer controls, Trip computers, Digital
clock, Blower & A/C controls, Instrument cluster
Left (Right) inside lights, (HID) Head lights, Fog light relay, Right HID turn signal light,Right rear combination light
Stop light failure relay
Immobilizer controls, TCS switch, Trip computers, Instrument cluster
ETACM, Hazard switch, Auto light sensor
Antenna, Blower & A/C controls, Left (Right) outside mirror motor & Folding motor
(HID) Head lights, Front (Rear) cigarette lighters, Left (Right) license lights, Left HID
Turn signal light, Left rear combination lightBurglar alarm relay, Transaxle range switch, Start relay, ETS controlsDESCRIPTION P/SEAT
S/HTR EPSETS
H/LP
A/CON SW HAZARDSPARE
CRUISE IMS
WIPER
ETACS
SPARE AUDIO
C/LIGHTER MIRRORSPARE
RR FOG
STOP LP
ROOM LP
A/BAG IND A/BAGB/UP
T/LID
D/CLOCK
RH TAILSPARE
CLUSTER T/SIG
RR HTD IND
LH TAIL
START
G200D01L-GAT
Instrument Panel Junction Box
G200D01L
Page 228 of 230
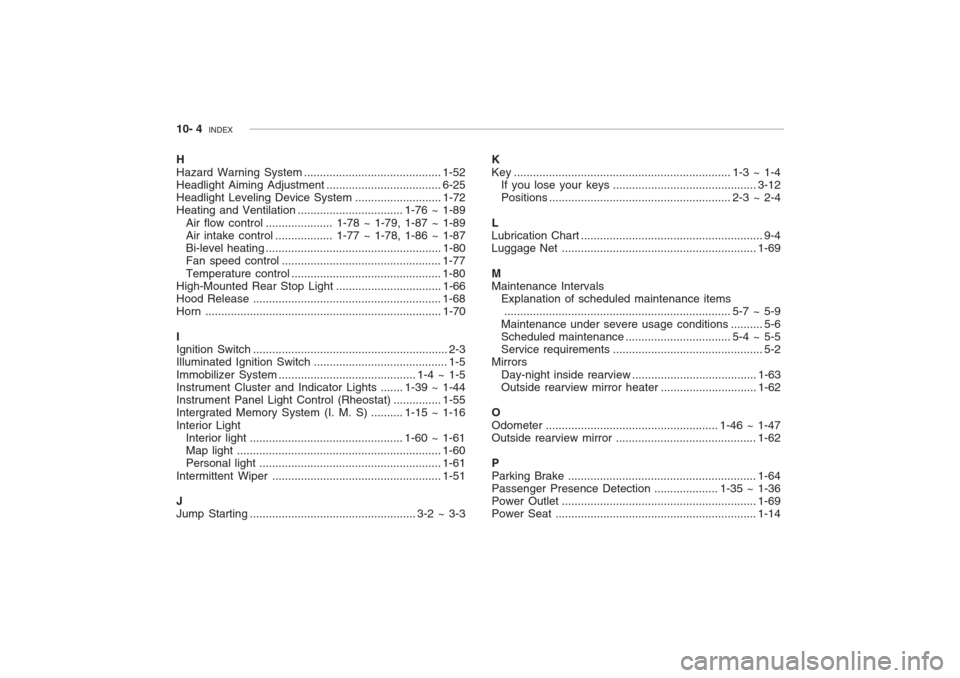
10- 4 INDEX
H Hazard Warning System........................................... 1-52
Headlight Aiming Adjustment .................................... 6-25
Headlight Leveling Device Syst em ...........................1-72
Heating and Ventilation ................................. 1-76 ~ 1-89
Air flow control ..................... 1-78 ~ 1-79, 1-87 ~ 1-89
Air intake control .................. 1-77 ~ 1-78, 1-86 ~ 1-87
Bi-level heating ....................................................... 1-80
Fan speed control .................................................. 1-77
Temperature control ............................................... 1-80
High-Mounted Rear Stop L ight .................................1-66
Hood Release ........................................................... 1-68
Horn .......................................................................... 1-70
I Ignition Switch ............................................................. 2-3
Illuminated Ignition Switch .......................................... 1-5 Immobilizer Sy stem ........................................... 1-4 ~ 1-5
Instrument Cluster and Indicator Lights ....... 1-39 ~ 1-44
Instrument Panel Light Control (Rheost at) ............... 1-55
Intergrated Memory System (I. M. S) .......... 1-15 ~ 1-16 Interior Light Interior light ................................................ 1-60 ~ 1-61
Map light ................................................................ 1-60
Personal light ......................................................... 1-61
Intermittent Wiper ..................................................... 1-51
J Jump Starting .................................................... 3-2 ~ 3-3 K
Key .................................................................... 1-3 ~ 1-4
If you lose your keys ............................................. 3-12
Positions ......................................................... 2-3 ~ 2-4
L Lubrication Chart ......................................................... 9-4
Luggage Net ............................................................. 1-69
MMaintenance Intervals Explanation of scheduled maintenance items....................................................................... 5-7 ~ 5-9
Maintenance under severe usage cond itions .......... 5-6
Scheduled maintenance ................................. 5-4 ~ 5-5
Service requ irements............................................... 5-2
Mirrors
Day-night inside rearview ....................................... 1-63
Outside rearview mirror heat er ..............................1-62
O
Odometer ...................................................... 1-46 ~ 1-47 Outside rearview mirror ............................................ 1-62
P Parking Brake ........................................................... 1-64
Passenger Presence Detec tion .................... 1-35 ~ 1-36
Power Outle t ............................................................. 1-69
Power Seat ............................................................... 1-14
Page 230 of 230
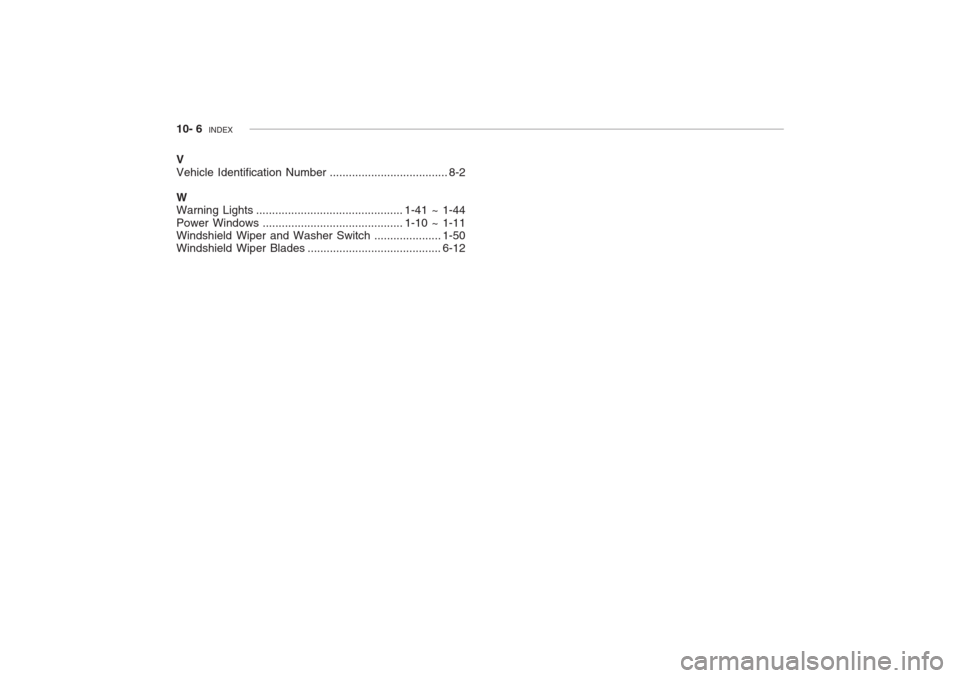
10- 6 INDEX
V Vehicle Identification Nu mber..................................... 8-2
W Warning Lights .............................................. 1-41 ~ 1-44
Power Windows ............................................ 1-10 ~ 1-11
Windshield Wiper and Washer Switc h ..................... 1-50
Windshield Wiper Blades .......................................... 6-12