2002 Hyundai Atos oil level
[x] Cancel search: oil levelPage 28 of 249

FEATURES OF YOUR HYUNDAI
FEATURES OF YOUR HYUNDAI FEATURES OF YOUR HYUNDAI
FEATURES OF YOUR HYUNDAI
FEATURES OF YOUR HYUNDAI
1- 19
B260B01X-GAT
INSTRUMENT CLUSTER AND INDICATOR
INSTRUMENT CLUSTER AND INDICATOR INSTRUMENT CLUSTER AND INDICATOR
INSTRUMENT CLUSTER AND INDICATOR
INSTRUMENT CLUSTER AND INDICATOR
1. Temperature Gauge
2. Turn Signal Indicator Light
3. Speedometer
4. Odometer
5. Trip Odometer
6. Trip Odometer Reset button
7. Fuel Gauge 8. Immobilizer Warning Indicator Light
9. Door Ajar Warning Light
10. Seat Belt Warning Light
11. Malfunction Indicator Lamp (MIL) (If installed)
12. Low Fuel Warning Light
13. High Beam Indicator Light
14. ABS Service Reminder Indicator (If installed) 15. Parking Brake/Brake Fluid Level Warning
Light
16. SRS Service Reminder Indicator (If installed)
17. Charging System Warning Light
18. Oil Pressure Warning Light
19. Overdrive Off Indicator Light (Auto T/A only)
13 56
981011 12 13B260A03X
2427
141516171819
Page 29 of 249

FEATURES OF YOUR HYUNDAI
FEATURES OF YOUR HYUNDAI FEATURES OF YOUR HYUNDAI
FEATURES OF YOUR HYUNDAI
FEATURES OF YOUR HYUNDAI
1- 20
B260P02Y-AAT ABS Service Reminder Indica- tor (SRI) (If installed)
When the key is turned to the "ON" position, the ABS SRI will come on and then go off in a fewseconds. If the ABS SRI remains on, comes onwhile driving, or does not come on when the keyis turned to the "ON" position, this indicates thatthere may be a problem with the ABS. If this occurs, have your vehicle checked by your Hyundai dealer as soon as possible. The normalbraking system will still be operational, but with-out the assistance of the anti-lock brake system.
B260D01A-AAT
Turn Signal Indicator Lights
The blinking green arrows on the instrumentpanel show the direction indicated by the turnsignals. If the arrow comes on but does notilluminate, blinks more rapidly than normal, ordoes not illuminate at all, a malfunction in the turnsignal system is indicated. Your dealer should beconsulted for repairs. B260G01A-AAT
Oil Pressure Warning Light
CAUTION: If the oil pressure warning light stays on while the engine is running, serious enginedamage may result. The oil pressure warninglight comes on whenever there is insufficientoil pressure. In normal operation, it shouldcome on when the ignition switch is turnedon, then go out when the engine is started. Ifthe oil pressure warning light stays on whilethe engine is running, there is a seriousmalfunction.If this happens, stop the car as soon as it issafe to do so, turn off the engine and checkthe oil level. If the oil level is low, fill the engineoil to the proper level and start the engineagain. If the light stays on with the enginerunning, turn the engine off immediately. Inany instance where the oil light stays onwhen the engine is running, the engine shouldbe checked by an Hyundai dealer before thecar is driven again.
B260E02A-GAT Seat Belt Reminder Light
The seat belt reminder light comes on until your seat belt is fastened when the ignition key isturned from the "OFF" position to "ON" or"START".B260H03A-AAT Parking Brake/Brake Fluid Level Warning Light
WARNING: If you suspect brake trouble, have your brakes checked by a Hyundai dealer as soon aspossible. Driving your car with a problem ineither the brake electrical system or brake
B260F01A-AAT High Beam Indicator Light
The high beam indicator light comes on when- ever the headlights are switched to the highbeam or flash position.
B260C01A-AAT O/D OFF Indicator
O/D OFF Indicator O/D OFF Indicator
O/D OFF Indicator
O/D OFF Indicator (If installed)
When the overdrive switch is turned on, the overdrive off indicator will go out. This amberindicator will be illuminated when the overdriveswitch is turned off. (Auto T/A only)
CAUTION: If the both ABS SRI and Parking Brake/Brakefluid level warning lights remain "ON" orcome on while driving, there may be a prob-lem with E.B.D (Electronic Brake Force Dis-tribution).If this occurs, avoid sudden stops and haveyour vehicle checked by your Hyundai dealeras soon as possible.
Page 73 of 249

DRIVING YOUR HYUNDAI
DRIVING YOUR HYUNDAI DRIVING YOUR HYUNDAI
DRIVING YOUR HYUNDAI
DRIVING YOUR HYUNDAI
2- 10 ice. If the lock is frozen internally, you may be able to thaw it out by using a heated key.Handle the heated key with care to avoid burn-ing your fingers.
NOTE:
NOTE: NOTE:
NOTE:
NOTE:
The proper temperature for using the immo-
The proper temperature for using the immo- The proper temperature for using the immo-
The proper temperature for using the immo-
The proper temperature for using the immo-
bilizer key is from -40°C to 80°C. If you heat
bilizer key is from -40°C to 80°C. If you heat bilizer key is from -40°C to 80°C. If you heat
bilizer key is from -40°C to 80°C. If you heat
bilizer key is from -40°C to 80°C. If you heat
the immobilizer key over 80°C to open the
the immobilizer key over 80°C to open the the immobilizer key over 80°C to open the
the immobilizer key over 80°C to open the
the immobilizer key over 80°C to open the
frozen lock,
frozen lock, frozen lock,
frozen lock,
frozen lock, it may cause damage to the
it may cause damage to the it may cause damage to the
it may cause damage to the
it may cause damage to the
transponder in its head.
transponder in its head. transponder in its head.
transponder in its head.
transponder in its head. C160H01A-AAT
Use Approved Anti-Freeze in Window
Use Approved Anti-Freeze in Window Use Approved Anti-Freeze in Window
Use Approved Anti-Freeze in Window
Use Approved Anti-Freeze in Window
Washer System
Washer System Washer System
Washer System
Washer System
To keep the water in the window washer sys- tem from freezing, add an approved anti-freezesolution in accordance with instructions on thecontainer. Window washer anti-freeze is avail-able from Hyundai dealers and most auto partsoutlets. Do not use engine coolant or othertypes of anti-freeze as these may damage thefinish. C160I01X-GAT
Don't Let Your Parking Brake Freeze
Don't Let Your Parking Brake Freeze Don't Let Your Parking Brake Freeze
Don't Let Your Parking Brake Freeze
Don't Let Your Parking Brake Freeze
Under some conditions your parking brake can freeze in the engaged position. This is mostlikely to happen when there is an accumulationof snow or ice around or near the rear brakes orif the brakes are wet. If there is a risk theparking brake may freeze, apply it only tempo-
C160F01A-AAT
Check Spark Plugs and Ignition
Check Spark Plugs and Ignition Check Spark Plugs and Ignition
Check Spark Plugs and Ignition
Check Spark Plugs and Ignition
System
System System
System
System
Inspect your spark plugs as described in Sec-tion 6 and replace them if necessary. Alsocheck all ignition wiring and components to besure they are not cracked, worn or damaged inany way.
C160D01A-AAT
Check Battery and Cables
Check Battery and Cables Check Battery and Cables
Check Battery and Cables
Check Battery and Cables
Winter puts additional burdens on the batterysystem. Visually inspect the battery and cablesas described in Section 6. The level of chargein your battery can be checked by your Hyundaidealer or a service station. C160E01A-AATChange to "Winter Weight" Oil if
Change to "Winter Weight" Oil if Change to "Winter Weight" Oil if
Change to "Winter Weight" Oil if
Change to "Winter Weight" Oil if
Necessary
Necessary Necessary
Necessary
Necessary
In some climates it is recommended that a lower viscosity "winter weight" oil be used dur-ing cold weather. See Section 9 for recommen-dations. If you aren't sure what weight oil youshould use, consult your Hyundai dealer. C160G01A-GAT
To Keep Locks from Freezing
To Keep Locks from Freezing To Keep Locks from Freezing
To Keep Locks from Freezing
To Keep Locks from Freezing
To keep the locks from freezing, squirt an approved de-icer fluid or glycerine into the keyopening. If a lock is covered with ice, squirt itwith an approved de-icing fluid to remove the
Failure to do so may adversely affect the safety
and handling of your car. Speeding, rapid accel-eration, sudden brake applications, and sharpturns are potentially very hazardous practices.During deceleration, use engine braking to thefullest extent. Sudden brake applications onsnowy or icy roads may cause skids to occur.
You need to keep sufficient distance betweenthe vehicle in front and your vehicle. Also, applythe brake gently.
It should be noted that installing tire chains on
the tire will provide a greater driving force, butwill not prevent side skids.
NOTE:
NOTE: NOTE:
NOTE:
NOTE:
Tire chains are not legal in all provinces.
Tire chains are not legal in all provinces. Tire chains are not legal in all provinces.
Tire chains are not legal in all provinces.
Tire chains are not legal in all provinces. Check
Check Check
Check
Check province laws before fitting tire
province laws before fitting tire province laws before fitting tire
province laws before fitting tire
province laws before fitting tire
chains.
chains. chains.
chains.
chains.
C160C01A-AATUse High Quality Ethylene Glycol
Use High Quality Ethylene Glycol Use High Quality Ethylene Glycol
Use High Quality Ethylene Glycol
Use High Quality Ethylene Glycol
Coolant
Coolant Coolant
Coolant
Coolant
Your Hyundai is delivered with high quality
ethylene glycol coolant in the cooling system. It is the only type of coolant that should be usedbecause it helps prevent corrosion in the cool-ing system, lubricates the water pump andprevents freezing. Be sure to replace or replen-ish your coolant in accordance with the main-tenance schedule in Section 5. Before winter,have your coolant tested to assure that itsfreezing point is sufficient for the temperaturesanticipated during the winter.
Page 78 of 249
WHAT TO DO IN AN EMERGENCY
WHAT TO DO IN AN EMERGENCY WHAT TO DO IN AN EMERGENCY
WHAT TO DO IN AN EMERGENCY
WHAT TO DO IN AN EMERGENCY
3-1
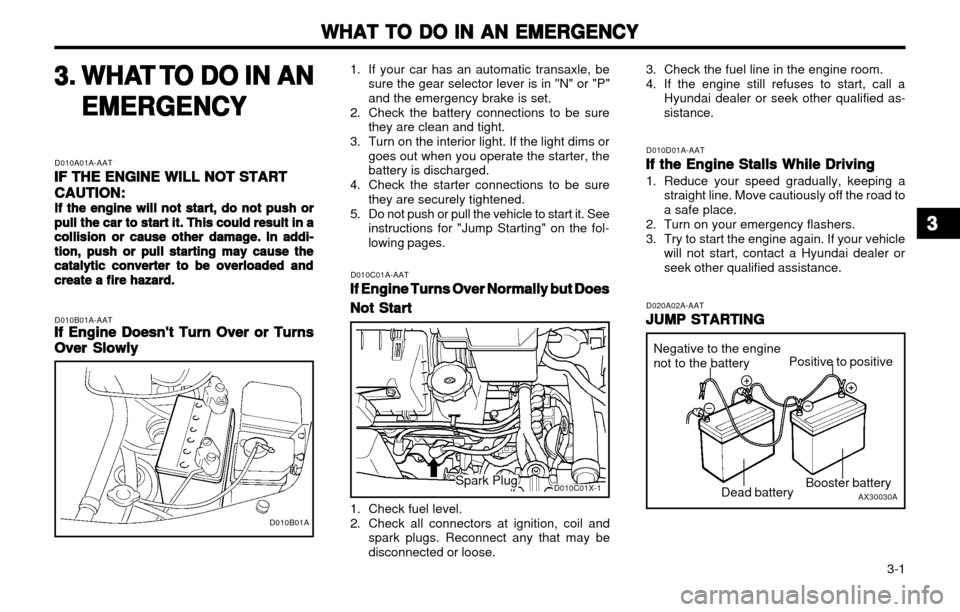
D010B01A-AATIf Engine Doesn't Turn Over or Turns
If Engine Doesn't Turn Over or Turns If Engine Doesn't Turn Over or Turns
If Engine Doesn't Turn Over or Turns
If Engine Doesn't Turn Over or Turns
Over Slowly
Over Slowly Over Slowly
Over Slowly
Over Slowly 3.3.
3.3.
3.
WHA
WHA WHA
WHA
WHA
T
T T
T
T
TT
TT
T
O DO IN AN
O DO IN AN O DO IN AN
O DO IN AN
O DO IN AN
EMERGENCY
EMERGENCY EMERGENCY
EMERGENCY
EMERGENCY
D010A01A-AAT IF THE ENGINE WILL NOT START
IF THE ENGINE WILL NOT START IF THE ENGINE WILL NOT START
IF THE ENGINE WILL NOT START
IF THE ENGINE WILL NOT START
CAUTION:
CAUTION: CAUTION:
CAUTION:
CAUTION:
If the engine will not start, do not push or
If the engine will not start, do not push or If the engine will not start, do not push or
If the engine will not start, do not push or
If the engine will not start, do not push or pull the car to
pull the car to pull the car to
pull the car to
pull the car to start it. This could result in a
start it. This could result in a start it. This could result in a
start it. This could result in a
start it. This could result in a
collision or cause other damage. In addi-
collision or cause other damage. In addi- collision or cause other damage. In addi-
collision or cause other damage. In addi-
collision or cause other damage. In addi-
tion,
tion, tion,
tion,
tion, push or pull starting may cause the
push or pull starting may cause the push or pull starting may cause the
push or pull starting may cause the
push or pull starting may cause the
catalytic converter to be overloaded and
catalytic converter to be overloaded and catalytic converter to be overloaded and
catalytic converter to be overloaded and
catalytic converter to be overloaded and
create a fire hazard.
create a fire hazard. create a fire hazard.
create a fire hazard.
create a fire hazard. 1. If your car has an automatic transaxle, be
sure the gear selector lever is in "N" or "P" and the emergency brake is set.
2. Check the battery connections to be sure they are clean and tight.
3. Turn on the interior light. If the light dims or goes out when you operate the starter, thebattery is discharged.
4. Check the starter connections to be sure they are securely tightened.
5. Do not push or pull the vehicle to start it. See instructions for "Jump Starting" on the fol-lowing pages.
D010C01A-AAT If Engine Turns Over Normally but Does
If Engine Turns Over Normally but Does If Engine Turns Over Normally but Does
If Engine Turns Over Normally but Does
If Engine Turns Over Normally but Does
Not Start
Not Start Not Start
Not Start
Not Start
1. Check fuel level.
2. Check all connectors at ignition, coil and
spark plugs. Reconnect any that may be disconnected or loose. D010D01A-AAT
If the Engine Stalls While Driving
If the Engine Stalls While Driving If the Engine Stalls While Driving
If the Engine Stalls While Driving
If the Engine Stalls While Driving
1. Reduce your speed gradually, keeping a
straight line. Move cautiously off the road to a safe place.
2. Turn on your emergency flashers.
3. Try to start the engine again. If your vehicle will not start, contact a Hyundai dealer or seek other qualified assistance.
D010B01A
3. Check the fuel line in the engine room.
4. If the engine still refuses to start, call aHyundai dealer or seek other qualified as- sistance.
D020A02A-AAT JUMP STARTING
JUMP STARTING JUMP STARTING
JUMP STARTING
JUMP STARTING
AX30030A
Negative to the engine not to the battery
Booster battery
Positive to positive
Dead battery
D010C01X-1Spark Plug
33
33
3
Page 95 of 249
VEHICLE MAINTENANCE REQUIREMENTS
VEHICLE MAINTENANCE REQUIREMENTS VEHICLE MAINTENANCE REQUIREMENTS
VEHICLE MAINTENANCE REQUIREMENTS
VEHICLE MAINTENANCE REQUIREMENTS
5- 6 F070B01A-GAT
oo
oo
o Cooling System
Cooling System Cooling System
Cooling System
Cooling System
Check the cooling system part, such as radia-
tor, coolant reservoir, hoses and connections for leakage and damage. Replace any dam-aged parts.
F070C01A-AAToo
oo
o
Engine coolant
Engine coolant Engine coolant
Engine coolant
Engine coolant
The coolant should be changed at the
intervals specified in the maintenance sched-ule.
F070D02X-GAToo
oo
o Manual transaxle oil
Manual transaxle oil Manual transaxle oil
Manual transaxle oil
Manual transaxle oil
Inspect the manual transaxle oil according to
the maintenance schedule.
NOTE:
NOTE: NOTE:
NOTE:
NOTE:
If the oil level is low, check for possible
If the oil level is low, check for possible If the oil level is low, check for possible
If the oil level is low, check for possible
If the oil level is low, check for possible leaks before adding oil. Do not overfill.
leaks before adding oil. Do not overfill. leaks before adding oil. Do not overfill.
leaks before adding oil. Do not overfill.
leaks before adding oil. Do not overfill.
F070E01X-GAToo
oo
o
Automatic transaxle fluid
Automatic transaxle fluid Automatic transaxle fluid
Automatic transaxle fluid
Automatic transaxle fluid
The fluid level should be in the "HOT" range of
the dipstick, after the engine and transaxle are at normal operating temperature. Check theAutomatic Transaxle Fluid level with the engine
running and the transaxle in neutral, with theparking brake properly applied. Use ESSO JWS-3314 when adding or changing fluid. F070F01A-AAT
oo
oo
o Brake hoses and lines
Brake hoses and lines Brake hoses and lines
Brake hoses and lines
Brake hoses and lines
Visually check for proper installation, chafing,
cracks, deterioration and any leakage. Replaceany deteriorated or damaged parts immediate-ly. F070G01A-AAT
oo
oo
o Brake fluid
Brake fluid Brake fluid
Brake fluid
Brake fluid
Check brake fluid level in the brake fluid reser- voir. The level should be between "MIN" and"MAX" marks on the side of the reservoir. Use only hydraulic brake fluid conforming to DOT 3 or DOT 4. F070H01A-AAT oo
oo
o
Rear brake drums/linings, parking
Rear brake drums/linings, parking Rear brake drums/linings, parking
Rear brake drums/linings, parking
Rear brake drums/linings, parking
brake
brake brake
brake
brake
Check the rear brake drums and linings for
scoring, burning, leaking fluid, broken parts,and excessive wear. Inspect the parking brake
system including the parking brake lever andcables. For detailed service procedures, referto the Shop Manual. F070J01A-AAT
oo
oo
o
Brake pads, calipers and rotors
Brake pads, calipers and rotors Brake pads, calipers and rotors
Brake pads, calipers and rotors
Brake pads, calipers and rotors
Check the pads for excessive wear, discs for
run out and wear, and calipers for fluid leakage. F070L01A-AAT
oo
oo
o Suspension mounting bolts
Suspension mounting bolts Suspension mounting bolts
Suspension mounting bolts
Suspension mounting bolts
Check the suspension connections for loose-ness or damage. Retighten to the specifiedtorque.
F070K01A-AAT
oo
oo
o Exhaust pipe and muffler
Exhaust pipe and muffler Exhaust pipe and muffler
Exhaust pipe and muffler
Exhaust pipe and muffler
Visually inspect the exhaust pipes, muffler andhangers for cracks, deterioration, or damage.Start the engine and listen carefully for any
exhaust gas leakage. Tighten connections orreplace parts as necessary. F070M01A-AAT oo
oo
o
Steering gear box, linkage & boots/
Steering gear box, linkage & boots/ Steering gear box, linkage & boots/
Steering gear box, linkage & boots/
Steering gear box, linkage & boots/
lower
lower lower
lower
lower arm ball joint
arm ball joint arm ball joint
arm ball joint
arm ball joint
With the vehicle stopped and engine off, check for excessive free-play in the steering wheel.Check the linkage for bends or damage. Check
the dust boots and ball joints for deterioration,
cracks, or damage. Replace any damaged parts. F070N01A-AAT oo
oo
o Power steering pump, belt and
Power steering pump, belt and Power steering pump, belt and
Power steering pump, belt and
Power steering pump, belt and
hoses
hoses hoses
hoses
hoses
Check the power steering pump and hoses for leakage and damage. Replace any damaged orleaking parts immediately. Inspect the powersteering belt for evidence of cuts, cracks, ex-
cessive wear, oiliness and proper tension. Re-place or adjust it if necessary.
Page 97 of 249
DO-IT-YOURSELF MAINTENANCE
DO-IT-YOURSELF MAINTENANCE DO-IT-YOURSELF MAINTENANCE
DO-IT-YOURSELF MAINTENANCE
DO-IT-YOURSELF MAINTENANCE
6-1
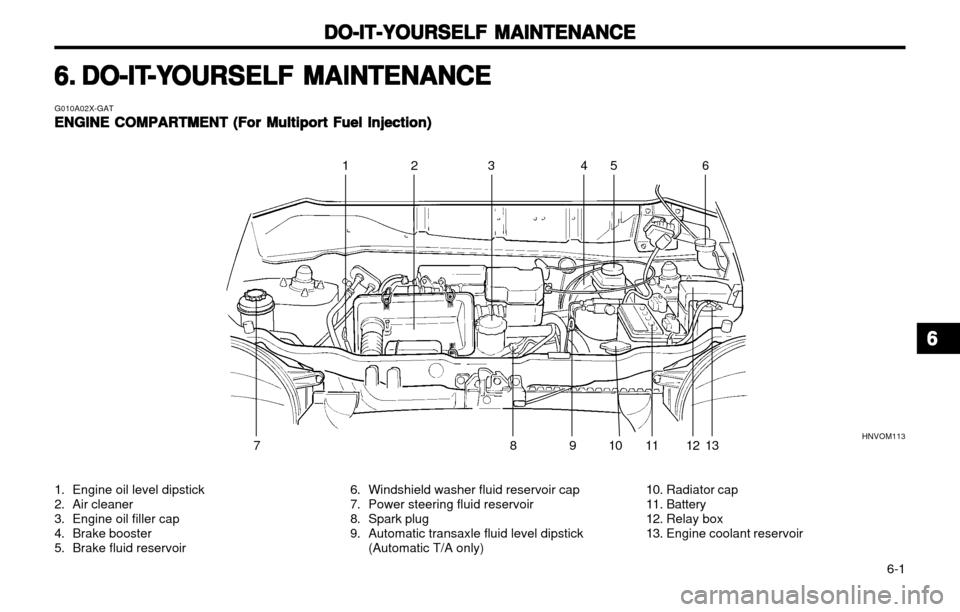
G010A02X-GATENGINE COMPARTMENT (For Multiport Fuel Injection)
ENGINE COMPARTMENT (For Multiport Fuel Injection) ENGINE COMPARTMENT (For Multiport Fuel Injection)
ENGINE COMPARTMENT (For Multiport Fuel Injection)
ENGINE COMPARTMENT (For Multiport Fuel Injection)
1. Engine oil level dipstick
2. Air cleaner
3. Engine oil filler cap
4. Brake booster
5. Brake fluid reservoir 6. Windshield washer fluid reservoir cap
7. Power steering fluid reservoir
8. Spark plug
9. Automatic transaxle fluid level dipstick
(Automatic T/A only) 10. Radiator cap
11. Battery
12. Relay box
13. Engine coolant reservoir
6.6.
6.6.
6.
DO-IT
DO-IT DO-IT
DO-IT
DO-IT
-Y
-Y -Y
-Y
-Y
OURSELF MAINTENANCE
OURSELF MAINTENANCE OURSELF MAINTENANCE
OURSELF MAINTENANCE
OURSELF MAINTENANCE
12 4 5 6
HNVOM113
81 011 13
12
79 3
66
66
6
Page 98 of 249
DO-IT-YOURSELF MAINTENANCE
DO-IT-YOURSELF MAINTENANCE DO-IT-YOURSELF MAINTENANCE
DO-IT-YOURSELF MAINTENANCE
DO-IT-YOURSELF MAINTENANCE
6-2 G020A01A-AAT
GENERAL CHECKS
GENERAL CHECKS GENERAL CHECKS
GENERAL CHECKS
GENERAL CHECKS
Engine Compartment
Engine Compartment Engine Compartment
Engine Compartment
Engine Compartment The following should be checked regularly:
o Engine oil level and condition
o Transaxle fluid level and condition
o Brake fluid level
o Clutch fluid level
o Engine coolant level
o Windshield washer fluid level
o Accessory drive belt condition
o Engine coolant hose condition
o Fluid leaks (on or below components)
o Power steering fluid level
o Battery Condition G020C01X-GAT
Vehicle Interior
Vehicle Interior Vehicle Interior
Vehicle Interior
Vehicle Interior
The following should be checked each time
when the vehicle is driven:
o Lights operation
o Windshield wipers operation
o Horn operation
o Defroster, heating system operation (and air conditioning, if installed)
o Steering operation and condition
o Mirror condition and operation
o Turn signal operation
o Accelerator pedal operation
o Brake operation, including parking brake
o Manual transaxle operation, including clutch operation
o Automatic transaxle operation, including "Park" mechanism operation
o Seat control condition and operation
o Seat belt condition and operation
o Sunvisor operation
If you notice anything that does not operate
correctly or appears to be functioning in cor-rectly, inspect it carefully and seek assistancefrom your Hyundai dealer if service is needed. G030A01A-AAT
CHECKING THE ENGINE OIL
CHECKING THE ENGINE OIL CHECKING THE ENGINE OIL
CHECKING THE ENGINE OIL
CHECKING THE ENGINE OIL
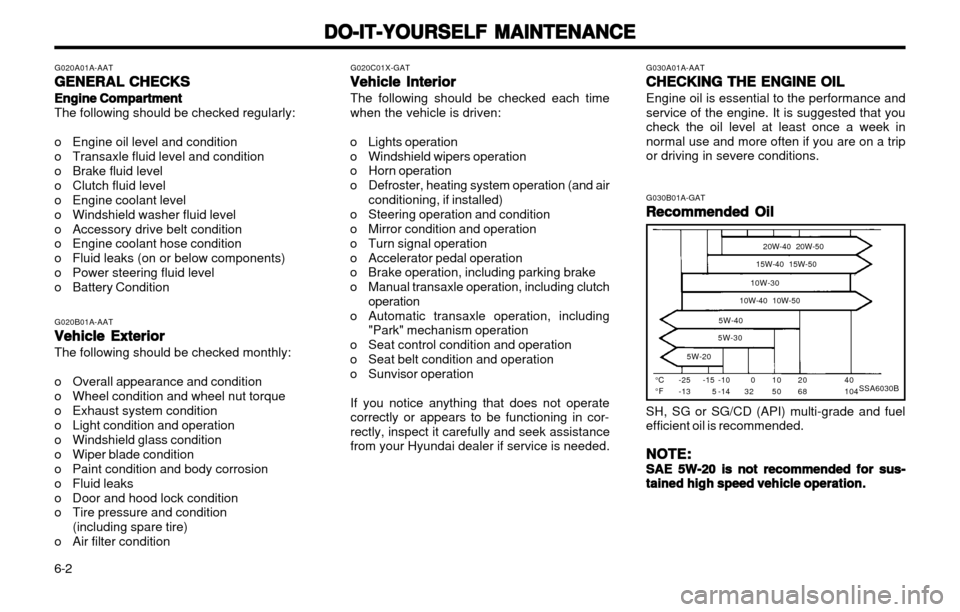
Engine oil is essential to the performance andservice of the engine. It is suggested that youcheck the oil level at least once a week innormal use and more often if you are on a tripor driving in severe conditions. G030B01A-GAT
Recommended Oil
Recommended Oil Recommended Oil
Recommended Oil
Recommended Oil
SSA6030B°C °F -25-13 20W-40 20W-50
15W-40 15W-50
10W-30
10W-40 10W-50
5W-40
5W-30
5W-2040 104
2068
1050
032
-15 5 -10-14
SH, SG or SG/CD (API) multi-grade and fuel efficient oil is recommended.
NOTE:
NOTE: NOTE:
NOTE:
NOTE:
SAE 5W-20 is not recommended for sus-
SAE 5W-20 is not recommended for sus- SAE 5W-20 is not recommended for sus-
SAE 5W-20 is not recommended for sus-
SAE 5W-20 is not recommended for sus-
tained high speed vehicle operation.
tained high speed vehicle operation. tained high speed vehicle operation.
tained high speed vehicle operation.
tained high speed vehicle operation.
G020B01A-AAT
Vehicle Exterior
Vehicle Exterior Vehicle Exterior
Vehicle Exterior
Vehicle Exterior The following should be checked monthly:
o Overall appearance and condition
o Wheel condition and wheel nut torque
o Exhaust system condition
o Light condition and operation
o Windshield glass condition
o Wiper blade condition
o Paint condition and body corrosion
o Fluid leaks
o Door and hood lock condition
o Tire pressure and condition
(including spare tire)
o Air filter condition
Page 99 of 249
DO-IT-YOURSELF MAINTENANCE
DO-IT-YOURSELF MAINTENANCE DO-IT-YOURSELF MAINTENANCE
DO-IT-YOURSELF MAINTENANCE
DO-IT-YOURSELF MAINTENANCE
6-3
G030C01A-AAT
To Check the Oil Level
To Check the Oil Level To Check the Oil Level
To Check the Oil Level
To Check the Oil Level G030D01A-GAT
Adding Oil
Adding Oil Adding Oil
Adding Oil
Adding Oil
AS60050A
L
F
Before checking the oil, warm up the engine to
the normal operating temperature and be sure your car is parked on level ground. Turn theengine off.
Wait a minute, then remove the dipstick, wipe it
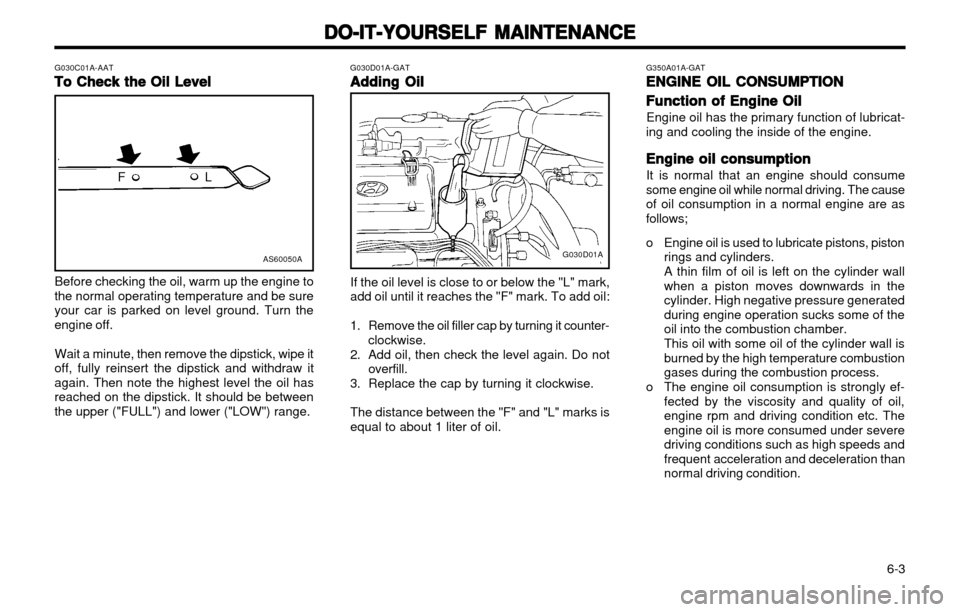
off, fully reinsert the dipstick and withdraw itagain. Then note the highest level the oil hasreached on the dipstick. It should be betweenthe upper ("FULL") and lower ("LOW") range. If the oil level is close to or below the "L" mark,add oil until it reaches the "F" mark. To add oil:
1. Remove the oil filler cap by turning it counter-
clockwise.
2. Add oil, then check the level again. Do not overfill.
3. Replace the cap by turning it clockwise. The distance between the "F" and "L" marks is equal to about 1 liter of oil. G350A01A-GAT
ENGINE OIL CONSUMPTION
ENGINE OIL CONSUMPTION ENGINE OIL CONSUMPTION
ENGINE OIL CONSUMPTION
ENGINE OIL CONSUMPTION
Function of Engine Oil
Function of Engine Oil Function of Engine Oil
Function of Engine Oil
Function of Engine Oil
Engine oil has the primary function of lubricat-
ing and cooling the inside of the engine.
Engine oil consumption
Engine oil consumption Engine oil consumption
Engine oil consumption
Engine oil consumption
It is normal that an engine should consume
some engine oil while normal driving. The causeof oil consumption in a normal engine are asfollows;
o Engine oil is used to lubricate pistons, piston rings and cylinders. A thin film of oil is left on the cylinder wall when a piston moves downwards in thecylinder. High negative pressure generated
during engine operation sucks some of theoil into the combustion chamber. This oil with some oil of the cylinder wall is
burned by the high temperature combustiongases during the combustion process.
o The engine oil consumption is strongly ef- fected by the viscosity and quality of oil,engine rpm and driving condition etc. Theengine oil is more consumed under severedriving conditions such as high speeds and
frequent acceleration and deceleration thannormal driving condition.
G030D01A