2002 Hyundai Atos wheel torque
[x] Cancel search: wheel torquePage 83 of 249
WHAT TO DO IN AN EMERGENCY
WHAT TO DO IN AN EMERGENCY WHAT TO DO IN AN EMERGENCY
WHAT TO DO IN AN EMERGENCY
WHAT TO DO IN AN EMERGENCY
3-6
AS30130A
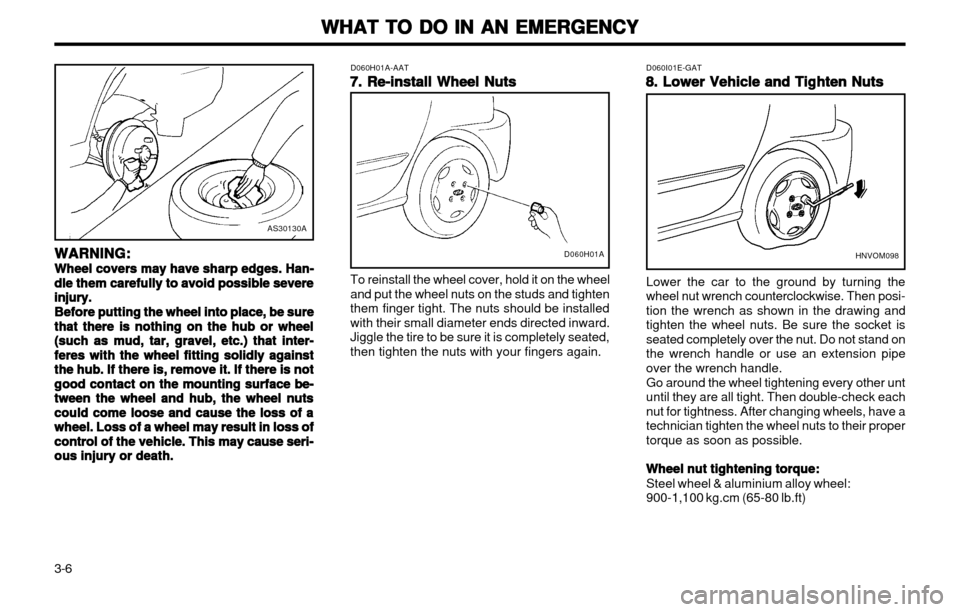
WARNING:
WARNING: WARNING:
WARNING:
WARNING:
Wheel covers may have sharp edges. Han-
Wheel covers may have sharp edges. Han- Wheel covers may have sharp edges. Han-
Wheel covers may have sharp edges. Han-
Wheel covers may have sharp edges. Han- dle them carefully to avoid possible severe
dle them carefully to avoid possible severe dle them carefully to avoid possible severe
dle them carefully to avoid possible severe
dle them carefully to avoid possible severe
injury.
injury. injury.
injury.
injury.
Before putting the wheel into place, be sure
Before putting the wheel into place, be sure Before putting the wheel into place, be sure
Before putting the wheel into place, be sure
Before putting the wheel into place, be surethat there is nothing on the hub or wheel
that there is nothing on the hub or wheel that there is nothing on the hub or wheel
that there is nothing on the hub or wheel
that there is nothing on the hub or wheel
(such as mud, tar, gravel, etc.) that inter-
(such as mud, tar, gravel, etc.) that inter- (such as mud, tar, gravel, etc.) that inter-
(such as mud, tar, gravel, etc.) that inter-
(such as mud, tar, gravel, etc.) that inter-
feres with the wheel fitting solidly against
feres with the wheel fitting solidly against feres with the wheel fitting solidly against
feres with the wheel fitting solidly against
feres with the wheel fitting solidly against
the hub. If there is, remove it. If there is not
the hub. If there is, remove it. If there is not the hub. If there is, remove it. If there is not
the hub. If there is, remove it. If there is not
the hub. If there is, remove it. If there is not
good contact on the mounting surface be-
good contact on the mounting surface be- good contact on the mounting surface be-
good contact on the mounting surface be-
good contact on the mounting surface be-
tween the wheel and hub, the wheel nuts
tween the wheel and hub, the wheel nuts tween the wheel and hub, the wheel nuts
tween the wheel and hub, the wheel nuts
tween the wheel and hub, the wheel nuts
could come loose and cause the loss of a
could come loose and cause the loss of a could come loose and cause the loss of a
could come loose and cause the loss of a
could come loose and cause the loss of a
wheel. Loss of a wheel may result in loss of
wheel. Loss of a wheel may result in loss of wheel. Loss of a wheel may result in loss of
wheel. Loss of a wheel may result in loss of
wheel. Loss of a wheel may result in loss of
control of the vehicle. This may cause seri-
control of the vehicle. This may cause seri- control of the vehicle. This may cause seri-
control of the vehicle. This may cause seri-
control of the vehicle. This may cause seri-
ous injury or death.
ous injury or death. ous injury or death.
ous injury or death.
ous injury or death. D060I01E-GAT
8. Lower Vehicle and Tighten Nuts
8. Lower Vehicle and Tighten Nuts 8. Lower Vehicle and Tighten Nuts
8. Lower Vehicle and Tighten Nuts
8. Lower Vehicle and Tighten Nuts
D060H01A-AAT
7. Re-install Wheel Nuts
7. Re-install Wheel Nuts 7. Re-install Wheel Nuts
7. Re-install Wheel Nuts
7. Re-install Wheel Nuts
To reinstall the wheel cover, hold it on the wheel and put the wheel nuts on the studs and tightenthem finger tight. The nuts should be installedwith their small diameter ends directed inward.Jiggle the tire to be sure it is completely seated,then tighten the nuts with your fingers again. Lower the car to the ground by turning thewheel nut wrench counterclockwise. Then posi-tion the wrench as shown in the drawing andtighten the wheel nuts. Be sure the socket isseated completely over the nut. Do not stand onthe wrench handle or use an extension pipeover the wrench handle. Go around the wheel tightening every other unt until they are all tight. Then double-check eachnut for tightness. After changing wheels, have atechnician tighten the wheel nuts to their propertorque as soon as possible.
Wheel nut tightening torque:
Wheel nut tightening torque: Wheel nut tightening torque:
Wheel nut tightening torque:
Wheel nut tightening torque: Steel wheel & aluminium alloy wheel: 900-1,100 kg.cm (65-80 lb.ft)
D060H01AHNVOM098
Page 95 of 249
VEHICLE MAINTENANCE REQUIREMENTS
VEHICLE MAINTENANCE REQUIREMENTS VEHICLE MAINTENANCE REQUIREMENTS
VEHICLE MAINTENANCE REQUIREMENTS
VEHICLE MAINTENANCE REQUIREMENTS
5- 6 F070B01A-GAT
oo
oo
o Cooling System
Cooling System Cooling System
Cooling System
Cooling System
Check the cooling system part, such as radia-
tor, coolant reservoir, hoses and connections for leakage and damage. Replace any dam-aged parts.
F070C01A-AAToo
oo
o
Engine coolant
Engine coolant Engine coolant
Engine coolant
Engine coolant
The coolant should be changed at the
intervals specified in the maintenance sched-ule.
F070D02X-GAToo
oo
o Manual transaxle oil
Manual transaxle oil Manual transaxle oil
Manual transaxle oil
Manual transaxle oil
Inspect the manual transaxle oil according to
the maintenance schedule.
NOTE:
NOTE: NOTE:
NOTE:
NOTE:
If the oil level is low, check for possible
If the oil level is low, check for possible If the oil level is low, check for possible
If the oil level is low, check for possible
If the oil level is low, check for possible leaks before adding oil. Do not overfill.
leaks before adding oil. Do not overfill. leaks before adding oil. Do not overfill.
leaks before adding oil. Do not overfill.
leaks before adding oil. Do not overfill.
F070E01X-GAToo
oo
o
Automatic transaxle fluid
Automatic transaxle fluid Automatic transaxle fluid
Automatic transaxle fluid
Automatic transaxle fluid
The fluid level should be in the "HOT" range of
the dipstick, after the engine and transaxle are at normal operating temperature. Check theAutomatic Transaxle Fluid level with the engine
running and the transaxle in neutral, with theparking brake properly applied. Use ESSO JWS-3314 when adding or changing fluid. F070F01A-AAT
oo
oo
o Brake hoses and lines
Brake hoses and lines Brake hoses and lines
Brake hoses and lines
Brake hoses and lines
Visually check for proper installation, chafing,
cracks, deterioration and any leakage. Replaceany deteriorated or damaged parts immediate-ly. F070G01A-AAT
oo
oo
o Brake fluid
Brake fluid Brake fluid
Brake fluid
Brake fluid
Check brake fluid level in the brake fluid reser- voir. The level should be between "MIN" and"MAX" marks on the side of the reservoir. Use only hydraulic brake fluid conforming to DOT 3 or DOT 4. F070H01A-AAT oo
oo
o
Rear brake drums/linings, parking
Rear brake drums/linings, parking Rear brake drums/linings, parking
Rear brake drums/linings, parking
Rear brake drums/linings, parking
brake
brake brake
brake
brake
Check the rear brake drums and linings for
scoring, burning, leaking fluid, broken parts,and excessive wear. Inspect the parking brake
system including the parking brake lever andcables. For detailed service procedures, referto the Shop Manual. F070J01A-AAT
oo
oo
o
Brake pads, calipers and rotors
Brake pads, calipers and rotors Brake pads, calipers and rotors
Brake pads, calipers and rotors
Brake pads, calipers and rotors
Check the pads for excessive wear, discs for
run out and wear, and calipers for fluid leakage. F070L01A-AAT
oo
oo
o Suspension mounting bolts
Suspension mounting bolts Suspension mounting bolts
Suspension mounting bolts
Suspension mounting bolts
Check the suspension connections for loose-ness or damage. Retighten to the specifiedtorque.
F070K01A-AAT
oo
oo
o Exhaust pipe and muffler
Exhaust pipe and muffler Exhaust pipe and muffler
Exhaust pipe and muffler
Exhaust pipe and muffler
Visually inspect the exhaust pipes, muffler andhangers for cracks, deterioration, or damage.Start the engine and listen carefully for any
exhaust gas leakage. Tighten connections orreplace parts as necessary. F070M01A-AAT oo
oo
o
Steering gear box, linkage & boots/
Steering gear box, linkage & boots/ Steering gear box, linkage & boots/
Steering gear box, linkage & boots/
Steering gear box, linkage & boots/
lower
lower lower
lower
lower arm ball joint
arm ball joint arm ball joint
arm ball joint
arm ball joint
With the vehicle stopped and engine off, check for excessive free-play in the steering wheel.Check the linkage for bends or damage. Check
the dust boots and ball joints for deterioration,
cracks, or damage. Replace any damaged parts. F070N01A-AAT oo
oo
o Power steering pump, belt and
Power steering pump, belt and Power steering pump, belt and
Power steering pump, belt and
Power steering pump, belt and
hoses
hoses hoses
hoses
hoses
Check the power steering pump and hoses for leakage and damage. Replace any damaged orleaking parts immediately. Inspect the powersteering belt for evidence of cuts, cracks, ex-
cessive wear, oiliness and proper tension. Re-place or adjust it if necessary.
Page 98 of 249
DO-IT-YOURSELF MAINTENANCE
DO-IT-YOURSELF MAINTENANCE DO-IT-YOURSELF MAINTENANCE
DO-IT-YOURSELF MAINTENANCE
DO-IT-YOURSELF MAINTENANCE
6-2 G020A01A-AAT
GENERAL CHECKS
GENERAL CHECKS GENERAL CHECKS
GENERAL CHECKS
GENERAL CHECKS
Engine Compartment
Engine Compartment Engine Compartment
Engine Compartment
Engine Compartment The following should be checked regularly:
o Engine oil level and condition
o Transaxle fluid level and condition
o Brake fluid level
o Clutch fluid level
o Engine coolant level
o Windshield washer fluid level
o Accessory drive belt condition
o Engine coolant hose condition
o Fluid leaks (on or below components)
o Power steering fluid level
o Battery Condition G020C01X-GAT
Vehicle Interior
Vehicle Interior Vehicle Interior
Vehicle Interior
Vehicle Interior
The following should be checked each time
when the vehicle is driven:
o Lights operation
o Windshield wipers operation
o Horn operation
o Defroster, heating system operation (and air conditioning, if installed)
o Steering operation and condition
o Mirror condition and operation
o Turn signal operation
o Accelerator pedal operation
o Brake operation, including parking brake
o Manual transaxle operation, including clutch operation
o Automatic transaxle operation, including "Park" mechanism operation
o Seat control condition and operation
o Seat belt condition and operation
o Sunvisor operation
If you notice anything that does not operate
correctly or appears to be functioning in cor-rectly, inspect it carefully and seek assistancefrom your Hyundai dealer if service is needed. G030A01A-AAT
CHECKING THE ENGINE OIL
CHECKING THE ENGINE OIL CHECKING THE ENGINE OIL
CHECKING THE ENGINE OIL
CHECKING THE ENGINE OIL
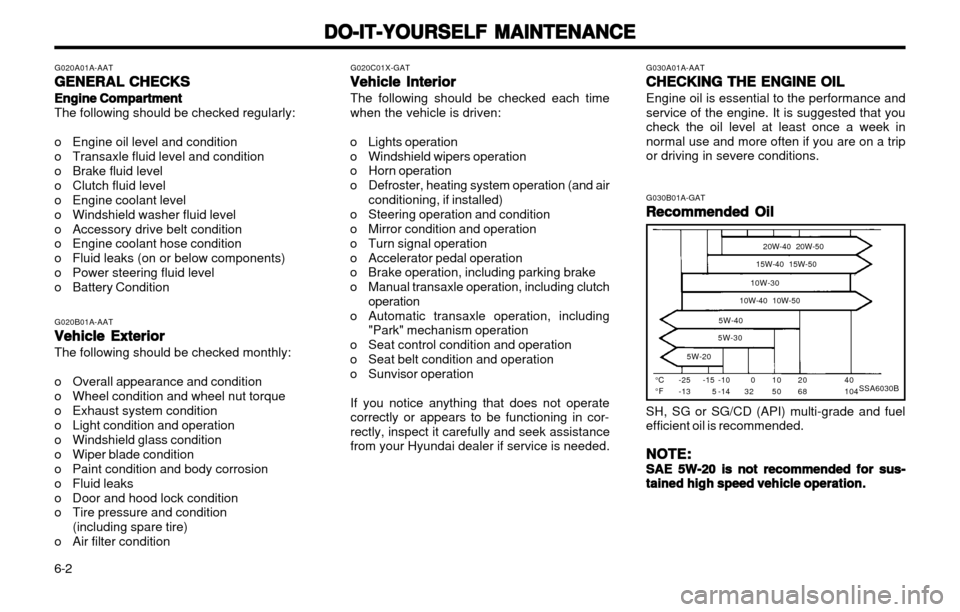
Engine oil is essential to the performance andservice of the engine. It is suggested that youcheck the oil level at least once a week innormal use and more often if you are on a tripor driving in severe conditions. G030B01A-GAT
Recommended Oil
Recommended Oil Recommended Oil
Recommended Oil
Recommended Oil
SSA6030B°C °F -25-13 20W-40 20W-50
15W-40 15W-50
10W-30
10W-40 10W-50
5W-40
5W-30
5W-2040 104
2068
1050
032
-15 5 -10-14
SH, SG or SG/CD (API) multi-grade and fuel efficient oil is recommended.
NOTE:
NOTE: NOTE:
NOTE:
NOTE:
SAE 5W-20 is not recommended for sus-
SAE 5W-20 is not recommended for sus- SAE 5W-20 is not recommended for sus-
SAE 5W-20 is not recommended for sus-
SAE 5W-20 is not recommended for sus-
tained high speed vehicle operation.
tained high speed vehicle operation. tained high speed vehicle operation.
tained high speed vehicle operation.
tained high speed vehicle operation.
G020B01A-AAT
Vehicle Exterior
Vehicle Exterior Vehicle Exterior
Vehicle Exterior
Vehicle Exterior The following should be checked monthly:
o Overall appearance and condition
o Wheel condition and wheel nut torque
o Exhaust system condition
o Light condition and operation
o Windshield glass condition
o Wiper blade condition
o Paint condition and body corrosion
o Fluid leaks
o Door and hood lock condition
o Tire pressure and condition
(including spare tire)
o Air filter condition
Page 207 of 249
WHAT TO DO IN AN EMERGENCY
3-6 SD070I1-E
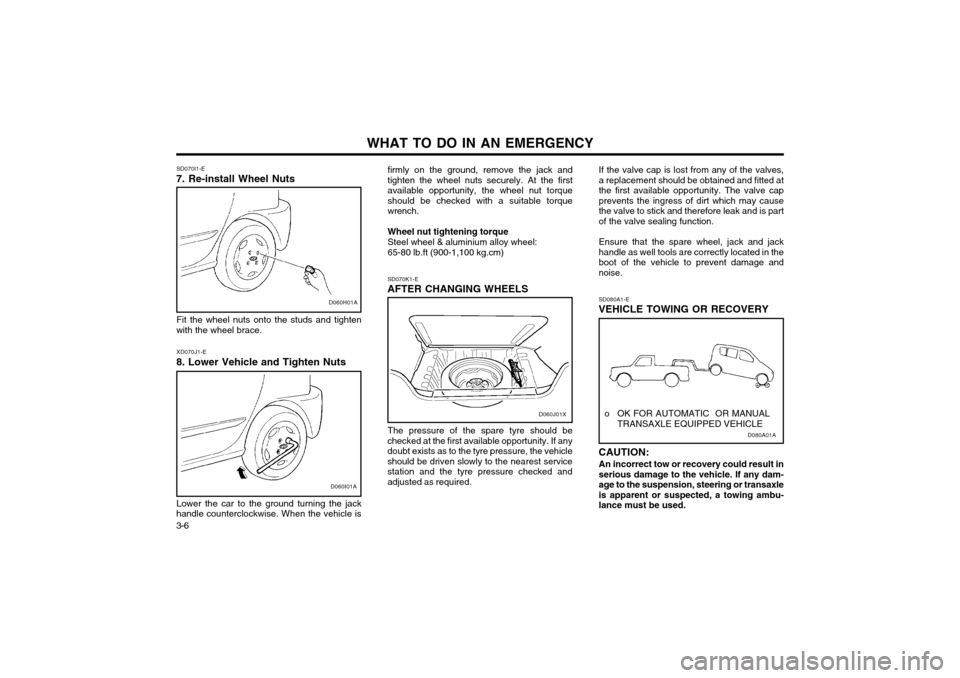
7. Re-install Wheel Nuts
D060H01A
Fit the wheel nuts onto the studs and tighten
with the wheel brace.
D060I01A
XD070J1-E
8. Lower Vehicle and Tighten Nuts
Lower the car to the ground turning the jack
handle counterclockwise. When the vehicle is firmly on the ground, remove the jack and tighten the wheel nuts securely. At the firstavailable opportunity, the wheel nut torqueshould be checked with a suitable torquewrench. Wheel nut tightening torque Steel wheel & aluminium alloy wheel:65-80 lb.ft (900-1,100 kg.cm) SD070K1-E
AFTER CHANGING WHEELS
The pressure of the spare tyre should be
checked at the first available opportunity. If any doubt exists as to the tyre pressure, the vehicleshould be driven slowly to the nearest servicestation and the tyre pressure checked andadjusted as required. If the valve cap is lost from any of the valves,a replacement should be obtained and fitted atthe first available opportunity. The valve capprevents the ingress of dirt which may causethe valve to stick and therefore leak and is partof the valve sealing function. Ensure that the spare wheel, jack and jack handle as well tools are correctly located in theboot of the vehicle to prevent damage andnoise.
D080A01A
o OK FOR AUTOMATIC OR MANUAL
TRANSAXLE EQUIPPED VEHICLE
SD080A1-E
VEHICLE TOWING OR RECOVERY CAUTION:
An incorrect tow or recovery could result in serious damage to the vehicle. If any dam-age to the suspension, steering or transaxleis apparent or suspected, a towing ambu-lance must be used.D060J01X
Page 217 of 249
VEHICLE MAINTENANCE REQUIREMENTS
5-6 F070B01A-GAT
o Cooling SystemCheck the cooling system part, such as radia-
tor, coolant reservoir, hoses and connections for leakage and damage. Replace any dam-aged parts.
F070C01A-AAT
o Engine coolant The coolant should be changed at the intervals
specified in the maintenance schedule.
F070D01X-GAT
o Manual or semi-automatic transaxle
oil
Inspect the manual or semi-automatic transaxle
oil according to the maintenance schedule.
NOTE: If the oil level is low, check for possible
leaks before adding oil. Do not overfill.
F070E01X-AAT
o Automatic transaxle fluidThe fluid level should be in the “HOT” range of
the dipstick, after engine and transaxle are at
normal operating temperature. Check the Auto-matic Transaxle Fluid level with the engine
running and the transaxle in neutral, with theparking brake properly applied. Use ESSOJWS3314 when adding or changing fluid. F070F01A-AAT o Brake hoses and linesVisually check for proper installation, chafing, cracks, deterioration and any leakage. Replaceany deteriorated or damaged parts immediate-ly. F070G02A-AAT
o Brake fluid Check brake fluid level in the brake fluid reser- voir. The level should be between "MIN" and"MAX" marks on the side of the reservoir. Use only hydraulic brake fluid conforming to DOT 3 or DOT 4. F070H01A-AAT
o Rear brake drums/linings, parking
brake
Check the rear brake drums and linings for
scoring, burning, leaking fluid, broken parts,and excessive wear. Inspect the parking brake
system including the parking brake lever andcables. For detailed service procedures, referto the Shop Manual. F070J01A-AAT
o Brake pads, calipers and rotorsCheck the pads for excessive wear, discs for run out and wear, and calipers for fluid leakage. F070K01A-AAT
o Exhaust pipe and mufflerVisually inspect the exhaust pipes, muffler and hangers for cracks, deterioration, or damage.Start the engine and listen carefully for any
exhaust gas leakage. Tighten connections orreplace parts as necessary. F070L01A-AAT
o Suspension mounting bolts Check the suspension connections for loose- ness or damage. Retighten to the specifiedtorque. F070M01A-AAT
o Steering gear box, linkage & boots/
lower arm ball joint
With the vehicle stopped and engine off, check for excessive free-play in the steering wheel.Check the linkage for bends or damage. Check
the dust boots and ball joints for deterioration,cracks, or damage. Replace any damagedparts. F070N01A-AAT
o Power steering pump, belt and hos-
es
Check the power steering pump and hoses for leakage and damage. Replace any damagedor leaking parts immediately. Inspect the powersteering belt for evidence of cuts, cracks, ex-cessive wear, oiliness and proper tension.Replace or adjust it if necessary.