2002 FORD EXPLORER SPORT TRAC service
[x] Cancel search: servicePage 9 of 200

Anti-lock brake system:If the
ABS light stays illuminated or
continues to flash, a malfunction has
been detected, have the system
serviced immediately. Normal
braking is still functional unless the brake warning light also is
illuminated.
Air bag readiness:If this light fails
to illuminate when ignition is turned
to ON, continues to flash or remains
on, have the system serviced
immediately. A chime will also
sound when a malfunction in the supplemental restraint system has been
detected.
Safety belt:Reminds you to fasten
your safety belt. A chime will also
sound to remind you to fasten your
safety belt.
Charging system:Illuminates when
the battery is not charging properly.
Check gage:Illuminates when any
of the following conditions has
occurred:
•The engine coolant temperature
is high.
•The engine oil pressure is low.
•The fuel gauge is at or near empty.
Door ajar:Illuminates when the
ignition is in the ON position and
any door is open.
Overdrive off:Illuminates when
the overdrive function of the
transmission has been turned off,
refer to theDrivingchapter. If the
light flashes steadily, have the system serviced immediately.
ABS
CHECK
GAGE
DOOR
AJAR
O/D
OFF
Instrument Cluster
9
Page 35 of 200

AIMING THE HEADLAMPS
The headlamps on your vehicle are properly aimed before leaving the
assembly plant. If your vehicle is involved in an accident or if you have
problems fixing the alignment of your headlamps, have them checked by
a qualified service technician.
Headlamp aim adjustment
The headlamps on your vehicle can only be vertically adjusted. Your
vehicle does not require horizontal aim adjustments.
To adjust the headlamps:
1. Park your vehicle on a level
surface about 7.6 meters (25 feet)
away from a vertical plain surface
(3). Check your headlamp alignment
at night or in a dark area so that
you can see the headlamp beam
pattern.
•(1) Eight feet
•(2) Center height of lamp to
ground
•(3) Twenty-five feet
•(4) Horizontal reference line
2. The center of the headlamp has a 3.0 mm circle on the lens. Measure
the height from the center of your headlamp to the ground (2) and mark
a 2.4 meter (8 foot) long horizontal line on the plain surface (1) at this
height (masking tape work well).
3. Turn on the low beam headlamps.
The brightness part of the light
should be below the horizontal line
(4). If its above the line the
headlamp will need to be adjusted.
4. Open the hood.
Lights
35
Page 47 of 200

Normal Operation
If an“up”command is selected and the ignition is switched to OFF or
START during window travel, the window will:
•stop if it is between the vent position and fully closed or
•continue to move up to the vent position if it is between vent and fully
open.
If a“down”or“vent”command is selected and the ignition is switched to
OFF or START during window travel, the window will move to the fully
open or vent position and then stop.
The“down”command is the only one allowed after the ignition has been
switched to OFF or START while the window is moving.
Bounce-Back
When the back window is moving upward and an obstacle interferes with
the window’s movement, the back window will reverse direction and
move toward the fully open position. This is known as“bounce-back”.
Security Override
If, during a bounce-back condition, the control is held in the clockwise
(“up”) direction for at least two seconds,the back window will travel
up with no bounce-back protection.If the control is released before
the window reaches fully closed or the ignition is switched to OFF or
START, the back window will reverse direction with bounce-back
re-enabled.
The following are possible reasons for using the security override:
•Ice on the window causing a restriction.
•Window unexpectedly reverses.
Position recovery mode
If the window fails to operate in“normal”operation mode, the control
can be turned and held in the active position (up or down window
direction) which will move the window in increments of approximately
15mm (0.6 inches) in the selected direction. (The“vent”feature is
inoperable in this mode.) This feature allows the window to be closed.
Once the window has reached the full closed position, the window
should again operate in the“normal”operation mode. If the window still
does not operate correctly, see your dealer for service.
Driver Controls
47
Page 85 of 200

Do not attempt to service, repair, or modify the air bag
supplemental restraint systems or its fuses. See your Ford or
Lincoln Mercury dealer.
Modifying or adding equipment to the front end of the vehicle
(including frame, bumper, front end body structure and tow
hooks) may affect the performance of the air bag system, increasing
the risk of injury. Do not modify the front end of the vehicle.
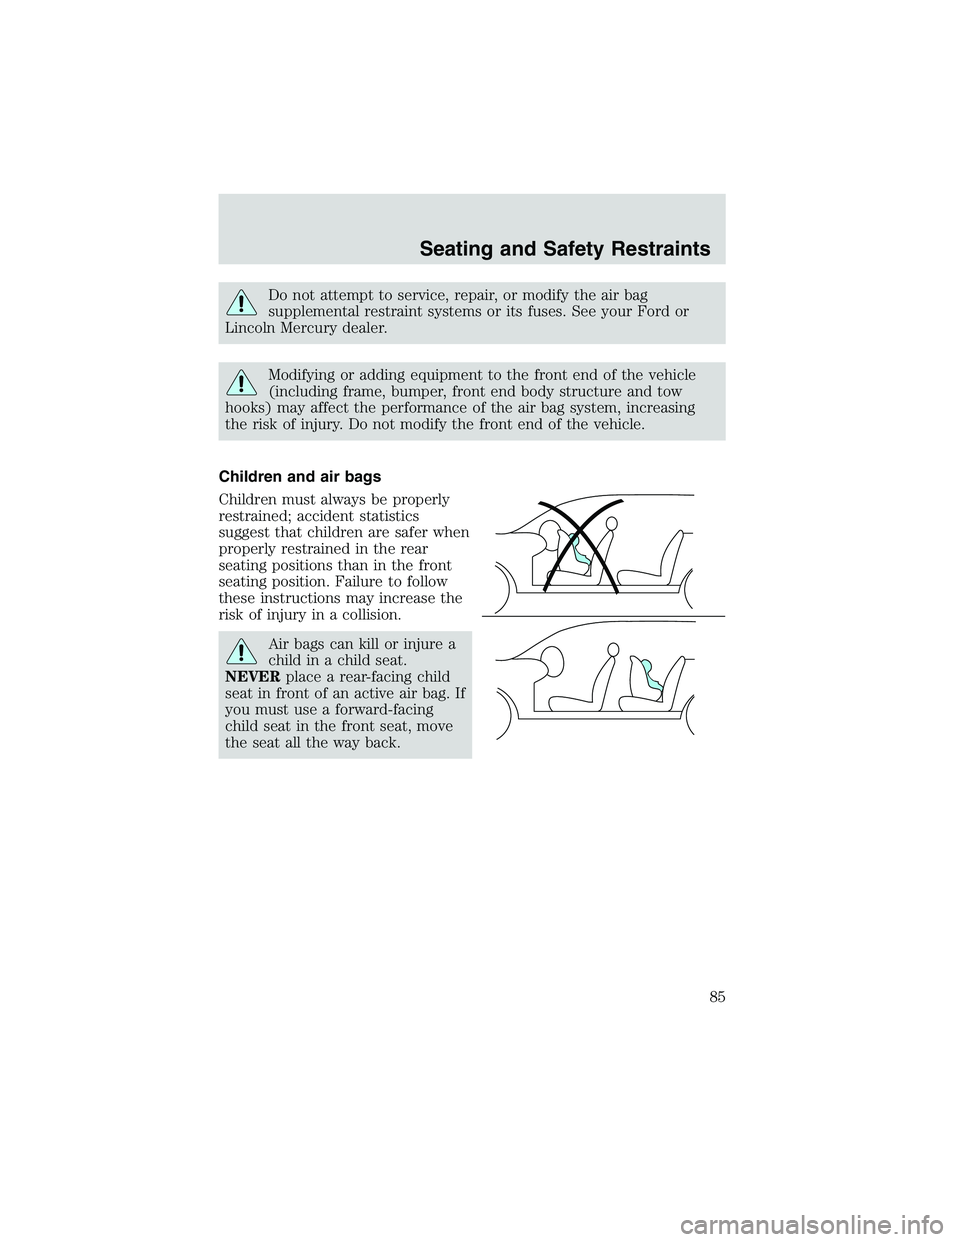
Children and air bags
Children must always be properly
restrained; accident statistics
suggest that children are safer when
properly restrained in the rear
seating positions than in the front
seating position. Failure to follow
these instructions may increase the
risk of injury in a collision.
Air bags can kill or injure a
child in a child seat.
NEVERplace a rear-facing child
seat in front of an active air bag. If
you must use a forward-facing
child seat in the front seat, move
the seat all the way back.
Seating and Safety Restraints
85
Page 87 of 200

•a readiness light and tone
•a diagnostic module
•and the electrical wiring which connects the components
Several air bag system components get hot after inflation. Do not
touch them after inflation.
If the air bag has deployed,the air bag will not function
again and must be replaced immediately.If the air bag is not
replaced, the unrepaired area will increase the risk of injury in a
collision.
Determining if the system is operational
The SRS uses a readiness light in the instrument cluster or a tone to
indicate the status of the system. Refer toAir bag readinesssection in
theInstrument clusterchapter. Routine maintenance of the air bag is
not required.
A difficulty with the system is indicated by one or more of the following:
•The readiness light will either
flash or stay lit.
•The readiness light will not
illuminate immediately after
ignition is turned on.
•A series of five beeps will be heard. The tone pattern will repeat
periodically until the problem and/or light are repaired.
If any of these things happen, even intermittently, have the SRS serviced
at your dealership or by a qualified technician immediately. Unless
serviced, the system may not function properly in the event of a
collision.
Disposal of air bags and air bag equipped vehicles (including
pretensioners)
See your local dealership or qualified technician. Air bags MUST BE
disposed of by qualified personnel.
SAFETY RESTRAINTS FOR CHILDREN
Read the following sections for directions on how to properly use safety
restraints for children. Also seeAir bag supplemental restraint system
(SRS)in this chapter for special instructions about air bags.
Seating and Safety Restraints
87
Page 101 of 200

•Make sure the gearshift is in P
(Park).
If starting a vehicle with a manual
transmission:
1. Make sure the parking brake is
set.
2. Push the clutch pedal to the floor.
•Turn the key to 4 (ON) without
turning the key to 5 (START).
Make sure the corresponding lights illuminate or illuminate briefly. If a
light fails to illuminate, have the vehicle serviced.
•If the driver’s safety belt is fastened, the
light may not illuminate.
1
2
34
5
C12345
6
RPMx1000
ABS
CHECK
ENGINE
EFH
H
H
PRN D 2 1THEFT
SPEED
CONT
4WD
HIGH
4WD
LOW
O/D
OFFL
L
MPH 2060
4080
km/h
00
1
20
160100
140
180
20
DOOR
AJAR
CHECK
GAGE
!
BRAKE
CHECK
FUEL
CAP
Driving
101
Page 103 of 200

Using the engine block heater (if equipped)
An engine block heater warms the engine coolant which aids in starting
and heater/defroster performance. Use of an engine block heater is
strongly recommended if you live in a region where temperatures reach
-23°C (-10°F) or below. For best results, plug the heater in at least
three hours before starting the vehicle. The heater can be plugged in the
night before starting the vehicle.
To prevent electrical shock, do not use your heater with
ungrounded electrical systems or two-pronged (cheater)
adapters.
Guarding against exhaust fumes
Carbon monoxide is present in exhaust fumes. Take precautions to avoid
its dangerous effects.
If you smell exhaust fumes inside your vehicle, have your dealer
inspect your vehicle immediately. Do not drive if you smell
exhaust fumes.
Important ventilating information
If the engine is idling while the vehicle is stopped for a long period of
time, open the windows at least 2.5 cm (one inch) or adjust the heating
or air conditioning to bring in fresh air.
BRAKES
Occasional brake noise is normal. If a metal-to-metal, continuous grinding
or continuous squeal sound is present, the brake linings may be worn-out
and should be inspected by a qualified service technician. If the vehicle
has continuous vibration or shudder in the steering wheel while braking,
the vehicle should be inspected by a qualified service technician.
Four-wheel anti-lock brake system (ABS)
Your vehicle is equipped with an Anti-lock Braking System (ABS). This
system helps you maintain steering control during emergency stops by
keeping the brakes from locking. Noise from the ABS pump motor and
brake pedal pulsation may be observed during ABS braking; any
pulsations or mechanical noise you may feel or hear is normal.
ABS warning lamp
ABS
TheABSlamp in the instrument cluster momentarily illuminates when
the ignition is turned to ON. If the light does not illuminate during start
up, remains on or flashes, the ABS may be disabled and the ABS may
need to be serviced
Driving
103
Page 104 of 200

Even when the ABS is disabled,
normal braking is still effective. (If
your BRAKE warning lamp
illuminates with the parking brake
released, have your brake system
serviced immediately.)
Using ABS
When hard braking is required, apply continuous force on the brake
pedal; do not pump the brake pedal since this will reduce the
effectiveness of the ABS and will increase your vehicle’s stopping
distance. The ABS will be activated immediately, allowing you to retain
full steering control during hard braking and on slippery surfaces.
However, the ABS does not decrease stopping distance.
Parking brake
To set the parking brake (1), press
the parking brake pedal down until
the pedal stops. The BRAKE
warning lamp will illuminate and will
remain illuminated until the parking
brake is released.
To release, pull the lever (2).
Always set the parking
brake fully and make sure
that the gearshift is securely
latched in P (Park) (automatic
transmission) or in 1 (First)
(manual transmission).
STEERING
To prevent damage to the power steering system:
•Never hold the steering wheel at it’s furthest turning points (until it
stops) for more than a few seconds when the engine is running.
•Do not operate the vehicle with a low power steering pump fluid level
(below the MIN mark on the reservoir).
!
BRAKE
Driving
104