Page 130 of 200
Fuse/Relay
LocationFuse Amp
RatingPassenger Compartment Fuse
Panel Description
9 7.5A Speed control, Anti-lock Brake
System (ABS), 4x4, Powertrain
Control Module (PCM), Park
interlock, Keyless entry
10 15A Ignition, IPATS
11 15A Subwoofer
12 15A Air bags, Climate control, Rear
climate control
13 15A Stop lamps, Speed control,
Auxiliary Center High-Mounted
Stop Lamp (CHMSL)
14—Not used
15 15A 4x4 module
16 7.5A Turn signals, Park interlock,
Overhead console, Climate
control, 4x4, Speed control
17 20A Cigar lighter, On-Board
Diagnostics (OBD) II
18 20A Power locks, Keyless entry
19 15A Trailer tow park lamps
20 15A Daytime Running Lamps (DRL),
Reverse lamps, PCM
21 15A Flashers
22 20A I/P power point
23 10A Front washers
24 30A Front wiper
25 7.5A Cluster, GEM
26 10A Interior illumination, Battery saver
27 7.5A Audio, Windows, GEM, Moonroof,
Rear window
28 15A Rear wiper (on glass)
29 20A Audio, Rear audio
Roadside Emergencies
130
Page 135 of 200

Fuse/Relay
LocationFuse Amp
RatingPower Distribution Box Description
50A–Not used
50B–Fuel pump relay
51–Not used
52–Not used
53–PCM diode
54–PCM relay
55–Blower relay
56A–A/C clutch solenoid
56B–Horn relay
CHANGING A FLAT TIRE
If you get a flat tire while driving:
•do not brake heavily.
•gradually decrease the vehicle’s speed.
•hold the steering wheel firmly.
•slowly move to a safe place on the side of the road.
The use of tire sealants is not recommended and may compromise the
integrity of your tires. The use of tire sealants may also affect your tire
pressure monitoring system (if equipped).
Spare tire information
The spare tire can be used as a spare or a regular tire.
Location of the spare tire and tools
The spare tire and tools for your vehicle are stowed in the following
locations:
Tool Location
Spare tire Under the vehicle, just in front of
the rear bumper
Jack, Jack handle, jack handle
extension, wheel lug nut wrenchIn the passenger side rear cab
compartment behind the access
door in trim panel
Roadside Emergencies
135
Page 136 of 200
Removing the jack
To remove the jack, turn the
thumbwheel (1) counterclockwise,
then remove the jack (2), lug
wrench (3) and jack handles (4)
from the bracket.
Installing the jack
To install the jack, place the jack handles (4) in the clips, then replace
the lug wrench (3).Note:The square hole fits over the peg (5) on the
jack stowage bracket. Fully lower the jack (2) by turning the
thumbwheel (1) clockwise, then install the jack (2) by placing the base
of the jack onto the stands (6). Turn the thumbwheel (1) clockwise to
raise the jack between the stands (6) and the top of the lug wrench (3).
Removing the spare tire
1. Assemble the jack handle with the spade end to the lug wrench as
shown in the illustration.
•To assemble, depress button and
slide together.
Roadside Emergencies
136
Page 137 of 200

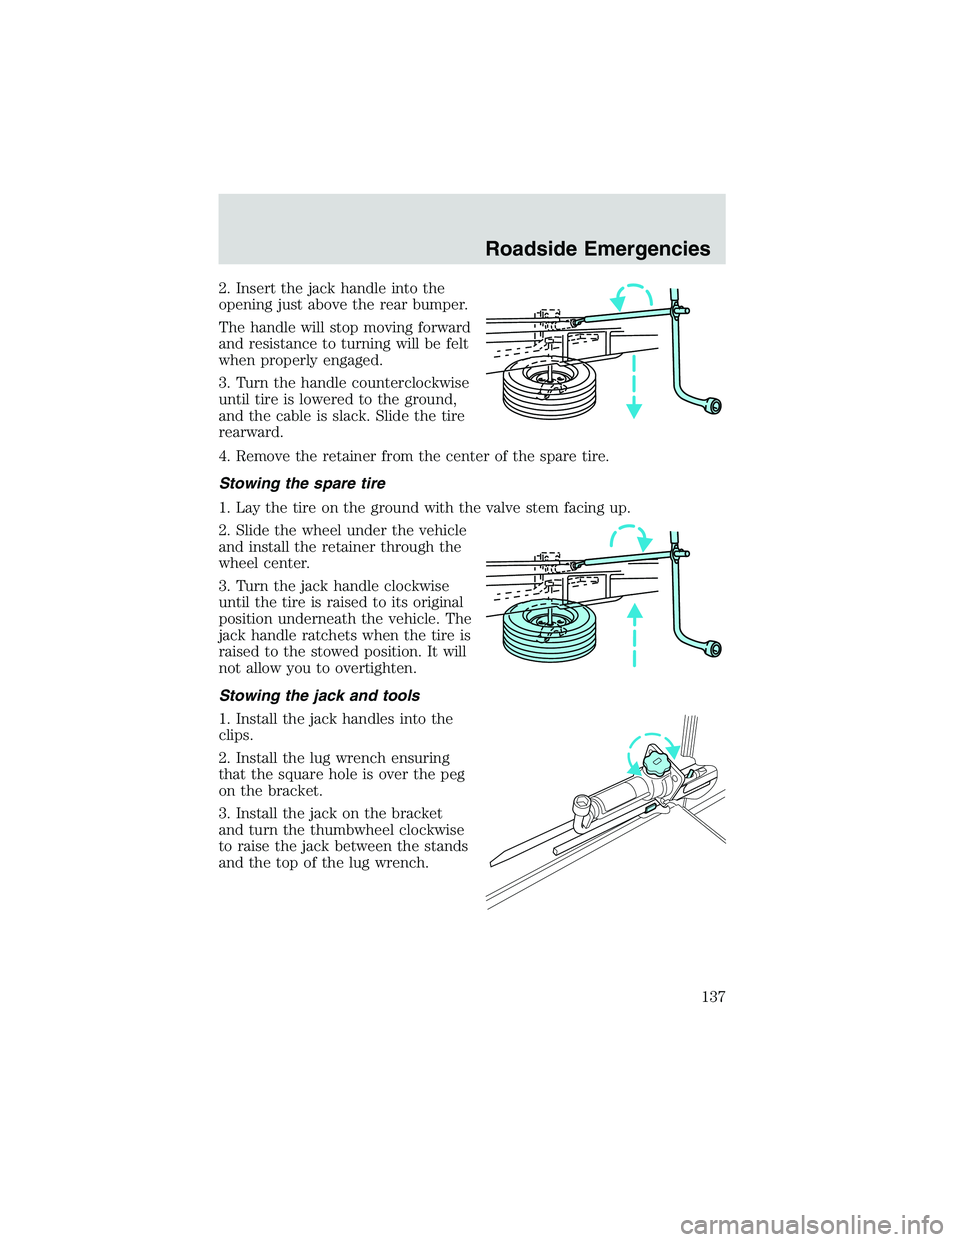
2. Insert the jack handle into the
opening just above the rear bumper.
The handle will stop moving forward
and resistance to turning will be felt
when properly engaged.
3. Turn the handle counterclockwise
until tire is lowered to the ground,
and the cable is slack. Slide the tire
rearward.
4. Remove the retainer from the center of the spare tire.
Stowing the spare tire
1. Lay the tire on the ground with the valve stem facing up.
2. Slide the wheel under the vehicle
and install the retainer through the
wheel center.
3. Turn the jack handle clockwise
until the tire is raised to its original
position underneath the vehicle. The
jack handle ratchets when the tire is
raised to the stowed position. It will
not allow you to overtighten.
Stowing the jack and tools
1. Install the jack handles into the
clips.
2. Install the lug wrench ensuring
that the square hole is over the peg
on the bracket.
3. Install the jack on the bracket
and turn the thumbwheel clockwise
to raise the jack between the stands
and the top of the lug wrench.
Roadside Emergencies
137
Page 141 of 200
8. Remove the jack and fully tighten
the lug nuts in the order shown.
9. Stow the flat tire. Refer to
Stowing the spare tire.
10. Stow the jack and lug nut
wrench. Make sure the jack is
fastened so it does not rattle when
you drive.
11. Unblock the wheels.
JUMP STARTING
The gases around the battery can explode if exposed to flames,
sparks, or lit cigarettes. An explosion could result in injury or
vehicle damage.
Note:Do not push start your vehicle. You could damage the catalytic
converter.
Batteries contain sulfuric acid which, if you come in contact
with, burns skin, eyes and clothing.
Only connect batteries with the
same nominal voltage (12 volts).
Use jump leads with insulated
clamps and sufficient cross section.
Do not disconnect the battery from
the vehicle’s electrical system.
Suitable jump leads for this purpose
can be obtained from your dealer.
Note:(+) terminal is larger than
the (-) terminal.
1
4 3
2 5
Roadside Emergencies
141
Page 143 of 200
WRECKER TOWING
For towing, contact a professional towing service or your roadside
assistance center.
Ford recommends your vehicle be towed with a wheel lift or flatbed. Do
not tow with a slingbelt. Ford Motor Company has not approved a
slingbelt towing procedure.
Roadside Emergencies
143
Page 146 of 200

In some states (in the U.S.) you must directly notify Ford in writing
before pursuing remedies under your state’s warranty laws. Ford is also
allowed a final repair attempt in some states.
In the United States, a warranty dispute must be submitted to the
Dispute Settlement Board before taking action under the Magnuson-Moss
Warranty Act, or to the extent allowed by state law, before pursuing
replacement or repurchase remedies provided by certain state laws. This
dispute handling procedure is not required prior to enforcing state
created rights or other rights which are independent of the
Magnuson-Moss Warranty Act or state replacement or repurchase laws.
FORD EXTENDED SERVICE PLAN
You can get more protection for your new car or light truck by
purchasing Ford Extended Service Plan (Ford ESP) coverage. Ford ESP
is an optional service contract which is backed by Ford Motor Company
or Ford Motor Service Company (in the U.S.) and Ford of Canada (in
Canada). It provides the following:
•Benefits during the warranty period depending on the plan you
purchase (such as: reimbursement for rentals; coverage for certain
maintenance and wear items).
•Protection against covered repair costs after your Bumper-to-Bumper
Warranty expires.
You may purchase Ford ESP from any participating Ford and Lincoln
Mercury and Ford of Canada dealer. There are several plans available in
various time, distance and deductible combinations which can be tailored
to fit your own driving needs. Ford ESP also offers reimbursement
benefits for towing and rental coverage.
When you buy Ford ESP, you receive Peace-of-Mind protection
throughout the United States and Canada, provided by a network of
more than 5,000 participating Ford or Lincoln Mercury and Ford of
Canada dealers.
If you did not take advantage of the Ford Extended Service Plan at the
time of purchasing your vehicle, you may still be eligible. Please contact
your dealer for further information. Since this information is subject to
change, please ask your dealer for complete details about Ford Extended
Service Plan coverage options, or visit the Ford ESP website at
www.ford-esp.com.
Customer Assistance
146
Page 153 of 200

WASHING THE EXTERIOR
Wash your vehicle regularly with cool or lukewarm water and a neutral
Ph shampoo, such as Detail Wash (ZC-3–A), which is available from your
dealer.
•Never use strong household detergents or soap, such as dish washing
or laundry liquid. These products can discolor and spot painted
surfaces.
•Never wash a vehicle that is“hot to the touch”or during exposure to
strong, direct sunlight.
•Always use a clean sponge or carwash mitt with plenty of water for
best results.
•Dry the vehicle with a chamois or soft terry cloth towel in order to
eliminate water spotting.
•It is especially important to wash the vehicle regularly during the
winter months, as dirt and road salt are difficult to remove and cause
damage to the vehicle.
•Immediately remove items such as gasoline, diesel fuel, bird droppings
and insect deposits because they can cause damage to the vehicle’s
paintwork and trim over time.
•Remove any exterior accessories, such as antennas, before entering a
car wash.
•Suntan lotions and insect repellents can damage any painted
surface; if these substances come in contact with your vehicle,
wash off as soon as possible.
WAXING
Applying a polymer paint sealant to your vehicle every six months will
assist in reducing minor scratches and paint damage.
•Wash the vehicle first.
•Do not use waxes that contain abrasives.
•Do not allow paint sealant to come in contact with any non-body
(low-gloss black) colored trim, such as grained door handles, roof
racks, bumpers, side moldings, mirror housings or the windshield cowl
area. The paint sealant will“gray”or stain the parts over time.
Cleaning
153