Page 56 of 200

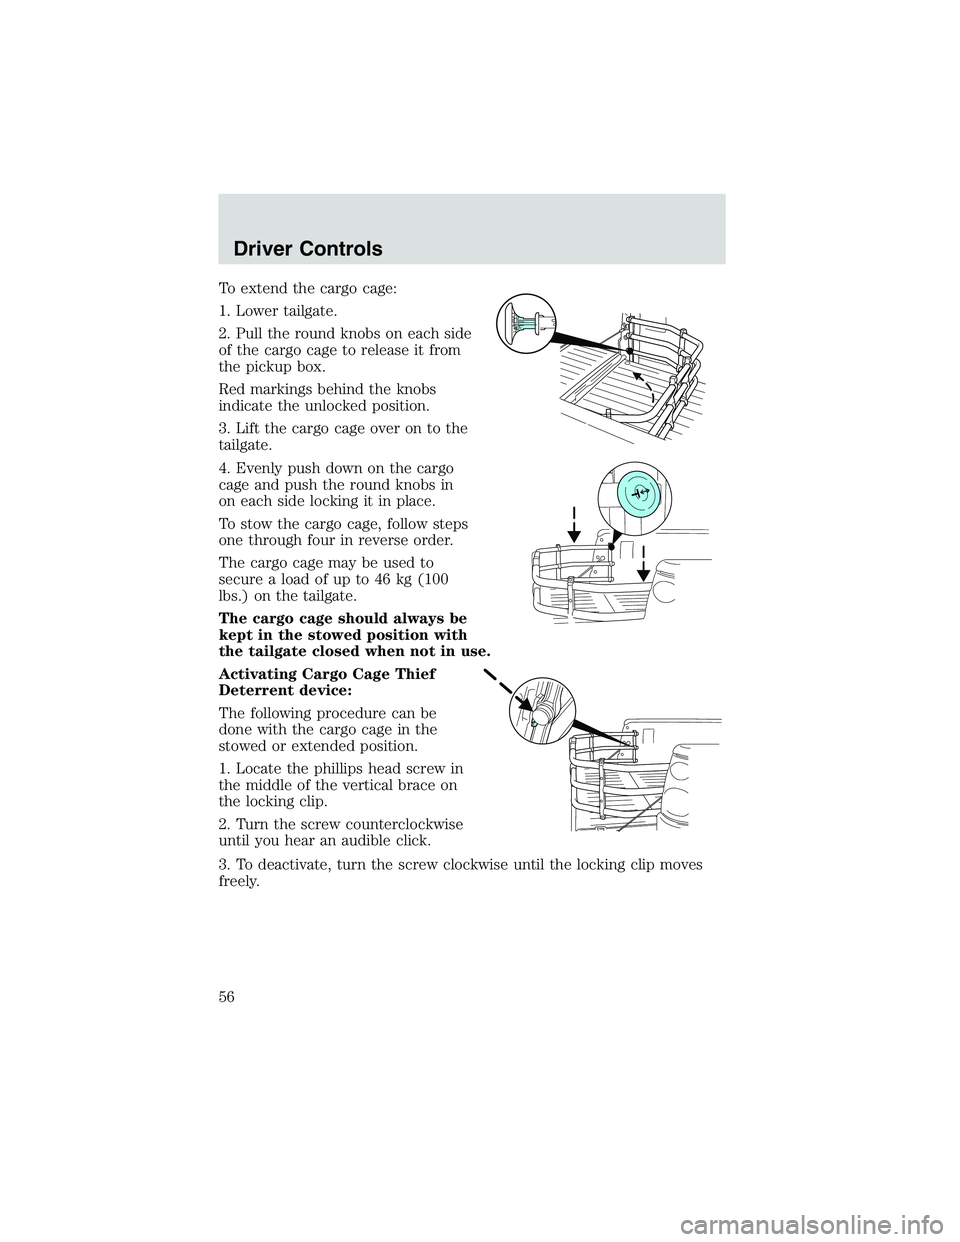
To extend the cargo cage:
1. Lower tailgate.
2. Pull the round knobs on each side
of the cargo cage to release it from
the pickup box.
Red markings behind the knobs
indicate the unlocked position.
3. Lift the cargo cage over on to the
tailgate.
4. Evenly push down on the cargo
cage and push the round knobs in
on each side locking it in place.
To stow the cargo cage, follow steps
one through four in reverse order.
The cargo cage may be used to
secure a load of up to 46 kg (100
lbs.) on the tailgate.
The cargo cage should always be
kept in the stowed position with
the tailgate closed when not in use.
Activating Cargo Cage Thief
Deterrent device:
The following procedure can be
done with the cargo cage in the
stowed or extended position.
1. Locate the phillips head screw in
the middle of the vertical brace on
the locking clip.
2. Turn the screw counterclockwise
until you hear an audible click.
3. To deactivate, turn the screw clockwise until the locking clip moves
freely.
Driver Controls
56
Page 57 of 200

To remove the cargo cage:
1. Extend the cargo cage.
2. Pull the round knobs on each side
of the cage to unlock it.
Make sure the locking clip screws
are loose before removing the cargo
cage.
3. Press the locking clips below the
middle bar and lift the cargo cage
out of the channels on the“D”pillar.
To install the cargo cage, follow the removal procedure in reverse order.
TONNEAU COVER (IF EQUIPPED)
The tonneau cover has been designed to maximize fuel economy and
should be fully installed whenever possible.
The rear panel can be folded in half and secured behind the cab, or the
whole cover can be removed completely from the vehicle.
To avoid damage to the cover, do not operate the vehicle unless
the cover is fully installed, or securely stowed.
To avoid damage to the cover, do not stand, sit or load anything
on top of the cover.
To open the front panel:
•Open the lock cover and unlock
the front panel.
•Lift the panel to access items in
the pickup box near the cab.
•To close, lower the panel down
on the pickup box.
The panel will automatically
lock when lowered onto the
pickup box.
Do not drive with front panel unlocked or folded on top of the
rear panel.
Driver Controls
57
Page 58 of 200

To open the rear panel:
•Open the lock cover and unlock
the rear panel.
•Lift the rear panel to access items
in the pickup box.
•To close, lower the rear panel on
the pickup box.
The panel will automatically
lock when lowered onto the
pickup box.
To stow the rear panel:
•Before driving with the rear panel
open, unlock the rear panel.
•Lift the rear panel up, lay it on
top of the front panel and secure
it with the two straps to the
exterior tiedowns on the pickup
box.
Failure to secure the rear panel
could damage the tonneau cover
or vehicle.
To remove the tonneau cover:
The tonneau cover weighs 29 kg (70
lbs.) and needs to be supported
during removal since the panels will
automatically lock when set down
on the pickup box. This is a two
person operation.
•Unlock and support the front and
rear panels.
•Fold the rear panel on top of the
front panel.
•Pull the release levers on the underside of the tonnneau cover from
the pickup box and remove the cover.
For installation of the tonneau cover, reverse the removal procedure.
Driver Controls
58
Page 62 of 200

2. Pressand release again within three seconds to confirm that all the
doors are closed and locked.Note:the doors will lock again, the horn
will chirp once and the headlamps will flash.
If any of the doors are not properly closed the horn will make two quick
chirps.
Sounding a panic alarm
Press
to activate the alarm. The horn will sound for a maximum of
30 seconds and the parklamps will flash for a maximum of 3 minutes.
Press again or turn the ignition to ON to deactivate, or wait for the alarm
to timeout in 3 minutes.
Note:The panic alarm will only operate when the ignition is in the OFF
or ACC position.
Replacing the battery
The remote entry transmitter uses one coin type three-volt lithium
battery CR2032 or equivalent. The typical operating range for your
remote entry transmitter is approximately 10 meters (33 feet). A
decrease in the operating range could be caused by:
•weather conditions,
•nearby radio towers,
•structures around the vehicle and
•other vehicles parked next to the vehicle.
To replace the battery:
1. Twist a thin coin between the two
halves of the remote entry
transmitter near the key ring. DO
NOT TAKE THE FRONT PART OF
THE REMOTE ENTRY
TRANSMITTER APART.
2. Remove the old battery.
3. Insert the new battery. Refer to
the diagram inside the remote entry
transmitter for the correct orientation of the battery.
4. Snap the two halves back together.
Note:Replacement of the battery willnotcause the remote transmitter
to become deprogrammed from your vehicle. The remote transmitter
should operate normally after battery replacement.
Locks and Security
62
Page 66 of 200

The horn will chirp twice (one short and one long chirp) when the
system has been successfully reactivated.
SECURILOCK�PASSIVE ANTI-THEFT SYSTEM
SecuriLock�passive anti-theft system is an engine immobilization
system. This system is designed to prevent the engine from being started
unless acoded key programmed to your vehicleis used. The use of
the wrong type of coded key may lead to a“no-start”condition.
The SecuriLock�passive anti-theft system is not compatible with
non-Ford aftermarket remote start systems. Use of these systems may
result in vehicle starting problems and a loss of security protection.
Your vehicle comes with two coded keys; additional coded keys may be
purchased from your dealer. The dealer can program your spare keys to
your vehicle or you can program the keys yourself. Refer to
Programming spare keysfor instructions on how to program the coded
key.
Note:Coded keys are not compatible with non-Ford aftermarket remote
starting systems. Use of these systems may result in vehicle starting
problems and loss of security protection.
Note:Large metallic objects, electronic devices that are used to
purchase gasoline or similar items, or a second coded key on the same
key chain may cause vehicle starting issues. You need to prevent these
objects from touching the coded key while starting the engine. These
objects will not cause damage to the coded key, but may cause a
momentary issue if they are too close to the key when starting the
engine. If a problem occurs, turn the ignition off, remove all objects on
the key chain away from the coded key and restart the engine.
Replacement keys
If your keys are lost or stolen and you don’t have an extra coded key,
you will need to have your vehicle towed to a dealership. The key codes
need to be erased from your vehicle and new coded keys and key codes
will need to be programmed.
Replacing coded keys can be very costly. Store an extra programmed key
away from the vehicle in a safe place to help prevent any
inconveniences. Please visit an authorized dealer to purchase additional
spare or replacement keys.
Programming spare keys
You can program your own coded keys to your vehicle. Please read and
understand the entire procedure before you begin.
Locks and Security
66
Page 70 of 200
Reclining the seats
Pull the lever located on the outside
of the seat to recline the seatback.
Release the lever to lock the
seatback in place.
Reclining the seatback can cause an occupant to slide under the
seat’s safety belt, resulting in severe personal injuries in the
event of a collision.
Never adjust the driver’s seat or seatback when the vehicle is
moving.
Using the manual lumbar support (if equipped)
For more lumbar support, turn the
lumbar support control toward the
front of vehicle.
For less lumbar support, turn the
lumbar support control toward the
rear of vehicle.
Seating and Safety Restraints
70
Page 71 of 200
Folding down rear 60/40 seats
1. Raise the rear seat head restraint.
2. Flip the bottom of the head
restraint up, toward the front seat.
3. While holding the head restraint
in a“flat”position, lower the head
restraint to the seat back.
4. Flip the seat release control
toward the front seat.
Seating and Safety Restraints
71
Page 72 of 200
5. Push the seatback toward the
front seat and completely down
until it locks into place. For Pioneer
Edition vehicles, the 40 percent rear
seat (behind the driver) does not
fold due to the subwoofer location.
SeeAttaching child safety seats
with tether strapsin this chapter
for tether access behind this seat.
A carpeted panel will flip down from
the back panel to complete the load
floor.
Returning the rear 60/40 seats to upright position
1. Push down seatback release
control and pull seatback up and
into upright position making sure
seatback locks into place.
2. Pull head restraint up and return to upright position.
Seating and Safety Restraints
72