2002 FIAT DUCATO 244 key
[x] Cancel search: keyPage 203 of 246

CONNECT Nav+
202
Moreover, navigation in these con-
ditions involves limitations and there-
fore some functions and commands
will not be available. Also information
shown on the map will be limited.
When the navigation system is no
longer able to continue destination
guidance or the vehicle is now out of
the loaded map section, the system
prompts for inserting the navigation
CD-ROM. If the user does not insert
the CD-ROM, the system returns to
the operating conditions previously
described for the first case, i.e.: dis-
playing only GPS information (vehicle
position and number of available satel-
lites) and not map information.IMPORTANT NOTES
– When entering the new CD-ROM,
the system software is automatically
up-dated to the new map material or
the new functions. During this opera-
tion, a wait message is displayed and
at the end the destination memory is
empty.
– The driver is always responsible for
compliance with the enforced traffic
regulations: any indication based on
wrong map data leading to unautho-
rised driving manoeuvres MUST NOT
be followed.
NAVIGATION SYSTEM
MENU
The system features three menu
pages that are shown on the display af-
ter selecting the navigation function
page with the “NAV” key 20-fig. 1,
pressing knob 22-fig. 1and selecting
the “Other menus” option on each
menu page.
The following pages describe the
functions that may be selected from
the various menu pages.First menu page fig. 49
The functions available from the first
menu page are:
– Other menus
– Address
– Points of interest
– Last destinations
– Directory
– RDS TMC.
To obtain the following page, select
and confirm “Other menus” using
knob 22-fig. 1.
fig. 49
F0D1033g
Page 205 of 246

CONNECT Nav+
204
“Place name”
The (destination) city name is en-
tered by selecting and confirming
“Place name” option in the “Address”
function submenu with the knob 22-
fig. 1, thus displaying the name entry
field fig. 53.
The display has available all characters
and the “Delete” (to delete the com-
plete line), “Delete character” (to
delete the last entered letter), “List”
(list of stored items compatible with the
entered characters) and “Space” (to en-
ter blank space between the charac-
ters) options. Moreover, a zoom is
available in the display lower part to
highlight the selected character.Enter the characters by selecting and
confirming them using the knob 22-
fig. 1.
For city name entry, it is advisable to
select “List”, after entering a few char-
acters and then select the destination
directly using the knob 22-fig. 1.
In fact, when “List” is selected, the
computer starts a quick search for a
city name matching the entered char-
acters in the stored list. The city field
is automatically filled as soon as a
matching city is found on the list.
In order to quicken character entry,
the system automatically moves to the
beginning or the end of the list when
the cursor is taken in front of the first
character and after the last one, re-
spectively.
If a combination between two char-
acters is possible (a letter of the alpha-
bet and a symbol), it will automatically
be replaced by the corresponding sin-
gle character: for example, entering “E”
first and them “ ¨ ” the two characters
will be replaced by the only character
“Ë”. The blank space and symbols . , -
_ ‘ ( ) are used to separate the words.After selecting the place name, press
knob 22-fig. 1to confirm it and con-
tinue with next page to enter the
street; press the “ESC” key 23-fig. 1
to return to the previous display with-
out entering new cities.
“Street”
The destination street name is en-
tered, after selecting the city, by se-
lecting and confirming with the knob
the “Street” option in the “Address”
function submenu 22-fig. 1, thus dis-
playing the name entry page.
Entering the destination street name
is obtained with the same procedure
used for “Place name”.
Entering the character “C” instead
of the street, the chosen city “centre”
is selected as the destination, there-
fore the “Street number” and “2
nd
street” fields are not to be filled in.
The navigation system always takes
you to the centre in case of very small
towns.
fig. 53
F0D1037g
Page 206 of 246

CONNECT Nav+
205
After setting the street name, press
knob 22-fig. 1to confirm and contin-
ue with the following page for street
number entry; press the “ESC” key
23-fig. 1to return to the previous
screen without setting the street.
“Street number”
Entering the destination street num-
ber is obtained, after entering the
street, by selecting and confirming the
“Street number” option from the “Ad-
dress” function submenu using knob
22-fig. 1, thus displaying the entry
page fig. 54.The display contains all the available
characters and numbers, as well as
“Delete” (to delete the complete line),
“Delete character” (to delete the last
entered character), “OK” (to confirm
entry) and “Space” (to enter a blank
space between the characters) op-
tions. Moreover, a zoom is available in
the display lower part to highlight the
selected number.
To enter the numbers select and con-
firm them using knob 22-fig. 1.
“2
ndstreet”
This option is used to enter the name
of a second street that intersects the
first entered street, so that the se-
lected destination is the intersection
between the two streets.
The second street name may be en-
tered, after the city and the first street
entry, by selecting and confirming with
the knob 22-fig. 1the “2
ndstreet” op-
tion from the “Address” function sub-
menu, thus displaying the associated
entry page.
The second street name may be en-
tered using the same procedure
adopted for “Place name”. “OK”
After entering the place name, street
and street number, select and confirm
“OK” with the knob 22-fig. 1; press
the “ESC” key 23-fig. 1to return to
the previous display without storing
the new settings.
Confirming “OK” accesses a new
screen with the “Destination” and
“Directory” functions, which makes it
possible to decide what to do with the
new destination entered.
“Destination”
Select “Destination” to choose among
the “Enter”, “Replace” and “Delete”
options fig. 55.
fig. 54
F0D1038g
fig. 55
F0D1039g
Page 218 of 246

CONNECT Nav+
217
“Draw RDS TMC”
This option is used to activate or de-
activate icon representation on the
map of RDS TMC categories of events
(“NO”, “Traffic”, “Weather”, “Info”).
In order to deactivate the icon rep-
resentation, select and confirm “NO”,
to activate it, select and confirm one
of the categories from the list. Only
one category may be represented on
the map at a time.
“Draw areas”
When this function is selected, the
following map representation options
are obtained:
– NO (representation with street,
rivers, etc.)
– 2D (representation with coloured
segments and polygons)
– 3D (three-dimensional represen-
tation).“OK”
In order to activate the new setting,
select and confirm “OK” with the
knob22-fig. 1conversely, press the
“ESC” key 23-fig. 1to return to the
previous display and keep the previous
settings.
ROUTE OPTIONS
When selecting this function on the
navigation menu third page, a new
page is obtained to enter the route cal-
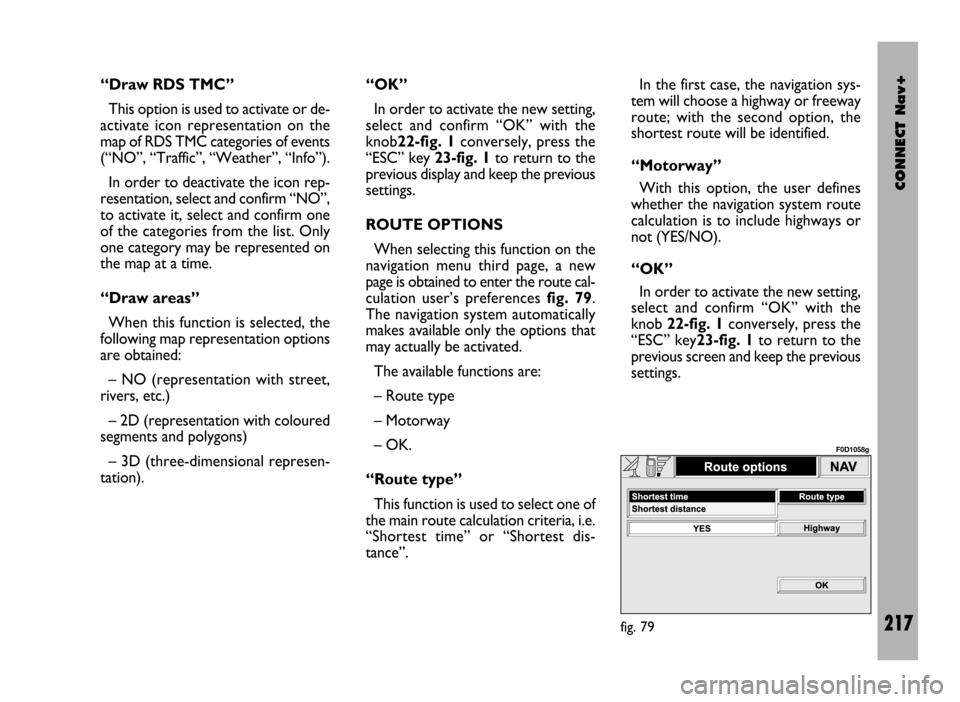
culation user’s preferences fig. 79.
The navigation system automatically
makes available only the options that
may actually be activated.
The available functions are:
– Route type
– Motorway
– OK.
“Route type”
This function is used to select one of
the main route calculation criteria, i.e.
“Shortest time” or “Shortest dis-
tance”. In the first case, the navigation sys-
tem will choose a highway or freeway
route; with the second option, the
shortest route will be identified.
“Motorway”
With this option, the user defines
whether the navigation system route
calculation is to include highways or
not (YES/NO).
“OK”
In order to activate the new setting,
select and confirm “OK” with the
knob 22-fig. 1conversely, press the
“ESC” key23-fig. 1to return to the
previous screen and keep the previous
settings.
fig. 79
F0D1058g
Page 219 of 246

CONNECT Nav+
218
GENERAL
INFORMATION
To access the on-board computer
screen, press the “TRIP” key 21-fig. 1;
to go back to the MAIN screen press
key 23-fig. 1.
The on-board computer provides a
series of helpful data relevant to the
last path selected through the NAV
function (see “Navigator” section).
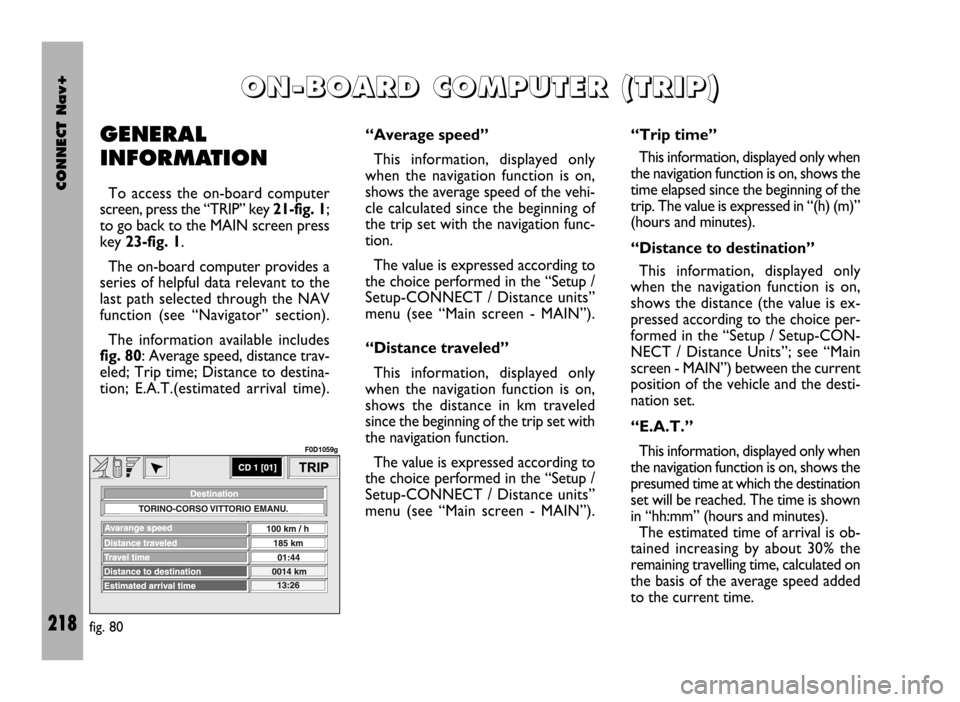
The information available includes
fig. 80: Average speed, distance trav-
eled; Trip time; Distance to destina-
tion; E.A.T.(estimated arrival time).
O O
N N
- -
B B
O O
A A
R R
D D
C C
O O
M M
P P
U U
T T
E E
R R
( (
T T
R R
I I
P P
) )
“Average speed”
This information, displayed only
when the navigation function is on,
shows the average speed of the vehi-
cle calculated since the beginning of
the trip set with the navigation func-
tion.
The value is expressed according to
the choice performed in the “Setup /
Setup-CONNECT / Distance units”
menu (see “Main screen - MAIN”).
“Distance traveled”
This information, displayed only
when the navigation function is on,
shows the distance in km traveled
since the beginning of the trip set with
the navigation function.
The value is expressed according to
the choice performed in the “Setup /
Setup-CONNECT / Distance units”
menu (see “Main screen - MAIN”).“Trip time”
This information, displayed only when
the navigation function is on, shows the
time elapsed since the beginning of the
trip. The value is expressed in “(h) (m)”
(hours and minutes).
“Distance to destination”
This information, displayed only
when the navigation function is on,
shows the distance (the value is ex-
pressed according to the choice per-
formed in the “Setup / Setup-CON-
NECT / Distance Units”; see “Main
screen - MAIN”) between the current
position of the vehicle and the desti-
nation set.
“E.A.T.”
This information, displayed only when
the navigation function is on, shows the
presumed time at which the destination
set will be reached. The time is shown
in “hh:mm” (hours and minutes).
The estimated time of arrival is ob-
tained increasing by about 30% the
remaining travelling time, calculated on
the basis of the average speed added
to the current time.
fig. 80
F0D1059g
Page 221 of 246

CONNECT Nav+
220
VOICE COMMANDS
Voice commands, identified as “key-
words”, that the system is able to rec-
ognize are organized according to
three increasing levels: 1
stlevel, 2nd lev-
el, 3rdlevel. 1stlevel keywords activate
the following main system functions:
Memo; Radio; CD player; Navigator,
Telephone.
When a 1
stlevel keyword is pro-
nounced, the system will activate 2nd
level keywords; when a 2ndlevel key-word is pronounced, the system will
activate 3
rdlevel keywords.
If the user pronounces a 1
stlevel key-
word, then the submenu relevant to
that command will remain active un-
til another 1
stlevel keyword is given;
the same rule applies for the other
lower levels (2
ndand 3rd).
If too much time passes between a
command and another of lower level
the system will invite the user to con-
tinue by voice message “Can I help
you?”.1st level keywords are the following:
– Memo
– Radio
– CD player
– Navigator
– Call
– Dial
– Redial
– PIN code
– Directory
– Abort.
KEYWORDS - Summary
The following tables show the list /divided according to function) of voice commands (“keywords”) that the system can re-
ceive.
“Memo” function
VOICE COMMANDS - KEYWORDS
1
stLEVEL
KEYWORDS
Memo
REQUIRED FUNCTION
Memo (“Voice memo” function)
Read a message
Delete all messages
Record memo 2ndLEVEL
KEYWORDS
Read
Delete
Record3rdLEVEL
KEYWORDS
Page 222 of 246

CONNECT Nav+
221
“Radio” function
VOICE COMMANDS - KEYWORDS
1
stLEVEL
KEYWORDS
Radio
Once a command has been pronounced and executed, second level “keywords” and all first level keywords will remain available for further
commands. (*) After this command the system will ask: “The frequency, please”.
2ndLEVEL
KEYWORDS
Next
Previous
FM
MW
LW
Memory
Autostore
Tune
Frequency (*)
3rdLEVEL
KEYWORDS
(1 …. 3)
(1 …. 6)
(0 …. 9)
“Point”
Cancel
Delete
Abort
Repeat
Send
REQUIRED FUNCTION
Tuner
Tune next radio station
Tune previous radio station
Select FM band
Select MW band
Select LW band
Select one station in the band
If FM station is tuned: FMAST band
is selected. If LW or MW station
is tuned: AMAST band is selected.
Valid only if selected band is FMAST
or AMAST: autostore function activation.
Tuning on special frequency
Page 223 of 246

CONNECT Nav+
222
“Integrated CD player” function
VOICE COMMANDS - KEYWORDS
1
stLEVEL
KEYWORDS
CD Player
Once a command has been pronounced and executed, second level “keywords” and all first level keywords will remain available for fur-
ther commands.
(*) Direct track selection for MP3 CDs is not available .2
ndLEVEL
KEYWORDS
Stop
Play
Pause
Previous
Next
Track
Random3rdLEVEL
KEYWORDS
(1 …. 20)REQUIRED FUNCTION
Integrated CD Player
Stop
Play
Pause
Previous track
Next track
Select track by number (*)
Random play