2002 DODGE RAM cooling
[x] Cancel search: coolingPage 316 of 2255

(3) Remove windshield washer reservoir tank from
radiator fan shroud.
(4) Disconnect the coolant reserve/overflow tank-
to-radiator hose at the tank.
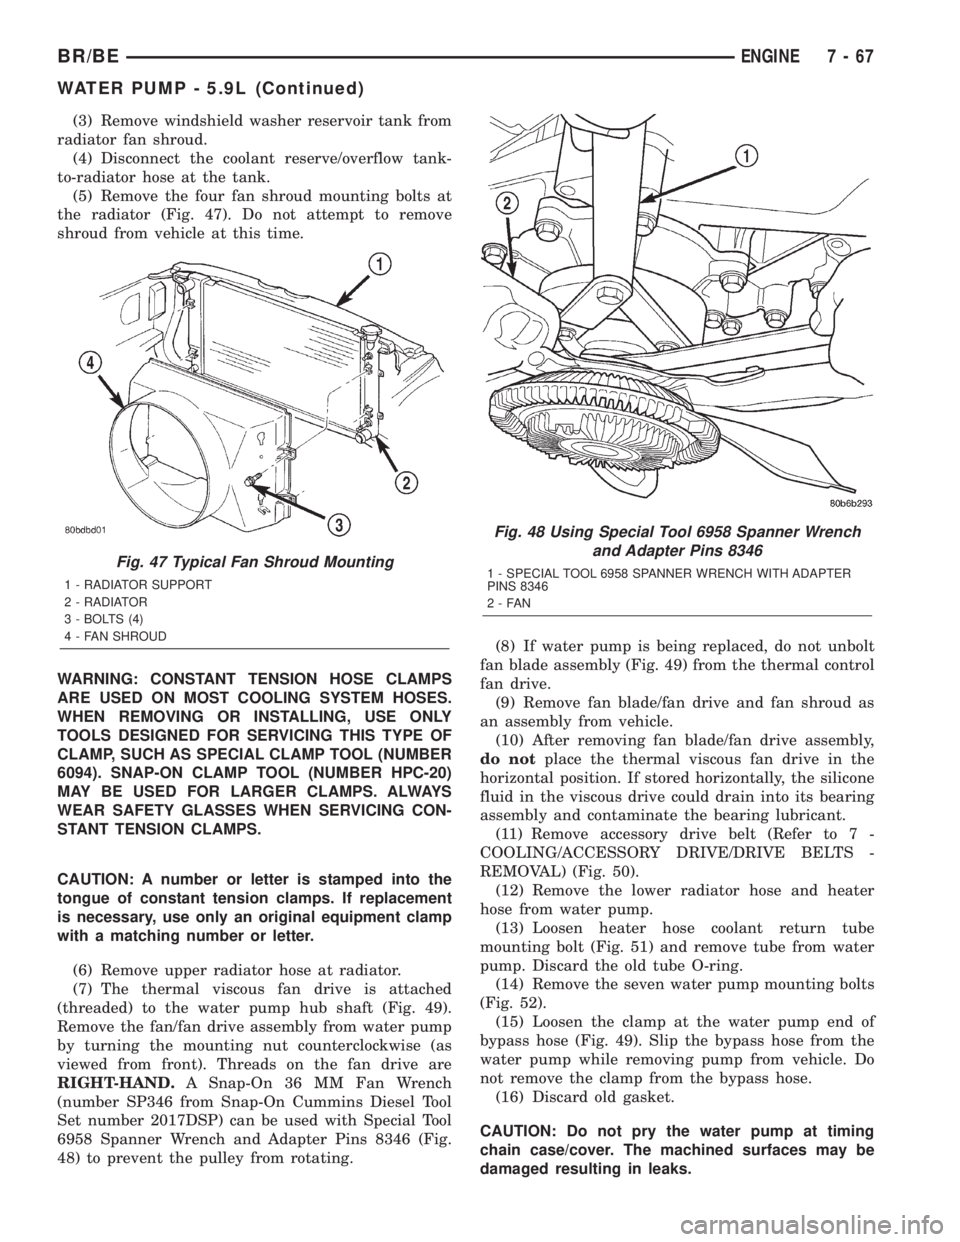
(5) Remove the four fan shroud mounting bolts at
the radiator (Fig. 47). Do not attempt to remove
shroud from vehicle at this time.
WARNING: CONSTANT TENSION HOSE CLAMPS
ARE USED ON MOST COOLING SYSTEM HOSES.
WHEN REMOVING OR INSTALLING, USE ONLY
TOOLS DESIGNED FOR SERVICING THIS TYPE OF
CLAMP, SUCH AS SPECIAL CLAMP TOOL (NUMBER
6094). SNAP-ON CLAMP TOOL (NUMBER HPC-20)
MAY BE USED FOR LARGER CLAMPS. ALWAYS
WEAR SAFETY GLASSES WHEN SERVICING CON-
STANT TENSION CLAMPS.
CAUTION: A number or letter is stamped into the
tongue of constant tension clamps. If replacement
is necessary, use only an original equipment clamp
with a matching number or letter.
(6) Remove upper radiator hose at radiator.
(7) The thermal viscous fan drive is attached
(threaded) to the water pump hub shaft (Fig. 49).
Remove the fan/fan drive assembly from water pump
by turning the mounting nut counterclockwise (as
viewed from front). Threads on the fan drive are
RIGHT-HAND.A Snap-On 36 MM Fan Wrench
(number SP346 from Snap-On Cummins Diesel Tool
Set number 2017DSP) can be used with Special Tool
6958 Spanner Wrench and Adapter Pins 8346 (Fig.
48) to prevent the pulley from rotating.(8) If water pump is being replaced, do not unbolt
fan blade assembly (Fig. 49) from the thermal control
fan drive.
(9) Remove fan blade/fan drive and fan shroud as
an assembly from vehicle.
(10) After removing fan blade/fan drive assembly,
do notplace the thermal viscous fan drive in the
horizontal position. If stored horizontally, the silicone
fluid in the viscous drive could drain into its bearing
assembly and contaminate the bearing lubricant.
(11) Remove accessory drive belt (Refer to 7 -
COOLING/ACCESSORY DRIVE/DRIVE BELTS -
REMOVAL) (Fig. 50).
(12) Remove the lower radiator hose and heater
hose from water pump.
(13) Loosen heater hose coolant return tube
mounting bolt (Fig. 51) and remove tube from water
pump. Discard the old tube O-ring.
(14) Remove the seven water pump mounting bolts
(Fig. 52).
(15) Loosen the clamp at the water pump end of
bypass hose (Fig. 49). Slip the bypass hose from the
water pump while removing pump from vehicle. Do
not remove the clamp from the bypass hose.
(16) Discard old gasket.
CAUTION: Do not pry the water pump at timing
chain case/cover. The machined surfaces may be
damaged resulting in leaks.
Fig. 47 Typical Fan Shroud Mounting
1 - RADIATOR SUPPORT
2 - RADIATOR
3 - BOLTS (4)
4 - FAN SHROUD
Fig. 48 Using Special Tool 6958 Spanner Wrench
and Adapter Pins 8346
1 - SPECIAL TOOL 6958 SPANNER WRENCH WITH ADAPTER
PINS 8346
2-FAN
BR/BEENGINE 7 - 67
WATER PUMP - 5.9L (Continued)
Page 318 of 2255

(2) Using a new gasket, install water pump to
engine as follows: Guide water pump nipple into
bypass hose as pump is being installed. Install water
pump bolts (Fig. 52). Tighten water pump mounting
bolts to 40 N´m (30 ft. lbs.) torque.
(3) Position bypass hose clamp to bypass hose.
(4) Spin water pump to be sure that pump impel-
ler does not rub against timing chain case/cover.
(5) Install a new o-ring to the heater hose coolant
return tube (Fig. 51). Coat the new o-ring with anti-
freeze before installation.
(6) Install coolant return tube and its mounting
bolt to engine (Fig. 51). Be sure the slot in tube
bracket is bottomed to mounting bolt. This will prop-
erly position return tube.
(7) Connect radiator lower hose to water pump.
(8) Connect heater hose and hose clamp to coolant
return tube.
(9) Install drive belt (Refer to 7 - COOLING/AC-
CESSORY DRIVE/DRIVE BELTS - INSTALLATION)
(Fig. 50).
(10) Position fan shroud and fan blade/viscous fan
drive assembly to vehicle as a complete unit.
(11) Install fan shroud.
(12) Install fan blade/viscous fan drive assembly to
water pump shaft.
(13) Fill cooling system (Refer to 7 - COOLING -
STANDARD PROCEDURE).
(14) Connect negative battery cable.
(15) Start and warm the engine. Check for leaks.
WATER PUMP - 8.0L
DIAGNOSIS AND TESTINGÐWATER PUMP
A quick test to determine if pump is working is to
check if heater warms properly. A defective water
pump will not be able to circulate heated coolant
through the long heater hose to the heater core.
REMOVAL
NOTE:
The water pump on all models can be removed
without discharging the air conditioning system (if
equipped).
The water pump on all gas powered engines is
bolted directly to the engine timing chain case/
cover.
On the 8.0L V-10 engine, a rubber o-ring (instead of
a gasket) is used as a seal between the water pump
and timing chain case/cover.
If water pump is replaced because of bearing/shaft
damage or leaking shaft seal, the mechanical cooling
fan assembly should also be inspected. Inspect for
fatigue cracks, loose blades or loose rivets that couldhave resulted from excessive vibration. Replace fan if
any of these conditions are found. Also check condi-
tion of the thermal viscous fan drive (Refer to 7 -
COOLING/ENGINE/FAN DRIVE VISCOUS
CLUTCH - DIAGNOSIS AND TESTING).
(1) Disconnect negative battery cable from battery.
(2) Drain cooling system (Refer to 7 - COOLING -
STANDARD PROCEDURE).
Do not waste reusable coolant. If solution is clean,
drain coolant into a clean container for reuse.
(3) Remove windshield washer reservoir tank from
radiator fan shroud.
(4) Remove the four fan shroud mounting bolts at
the radiator (Fig. 53). Do not attempt to remove
shroud from vehicle at this time.
WARNING: CONSTANT TENSION HOSE CLAMPS
ARE USED ON MOST COOLING SYSTEM HOSES.
WHEN REMOVING OR INSTALLING, USE ONLY
TOOLS DESIGNED FOR SERVICING THIS TYPE OF
CLAMP, SUCH AS SPECIAL CLAMP TOOL (NUMBER
6094). SNAP-ON CLAMP TOOL (NUMBER HPC-20)
MAY BE USED FOR LARGER CLAMPS. ALWAYS
WEAR SAFETY GLASSES WHEN SERVICING CON-
STANT TENSION CLAMPS.
CAUTION: A number or letter is stamped into the
tongue of constant tension clamps. If replacement
is necessary, use only an original equipment clamp
with a matching number or letter.
(5) Remove radiator upper hose at radiator.
(6) The thermal viscous fan drive is attached
(threaded) to the water pump hub shaft (Fig. 55).
Fig. 53 Typical Fan Shroud Mounting
1 - RADIATOR SUPPORT
2 - RADIATOR
3 - BOLTS (4)
4 - FAN SHROUD
BR/BEENGINE 7 - 69
WATER PUMP - 5.9L (Continued)
Page 319 of 2255

Remove the fan/fan drive assembly from water pump
by turning the mounting nut counterclockwise (as
viewed from front). Threads on the fan drive are
RIGHT-HAND.A Snap-On 36 MM Fan Wrench
(number SP346 from Snap-On Cummins Diesel Tool
Set number 2017DSP) can be used with Special Tool
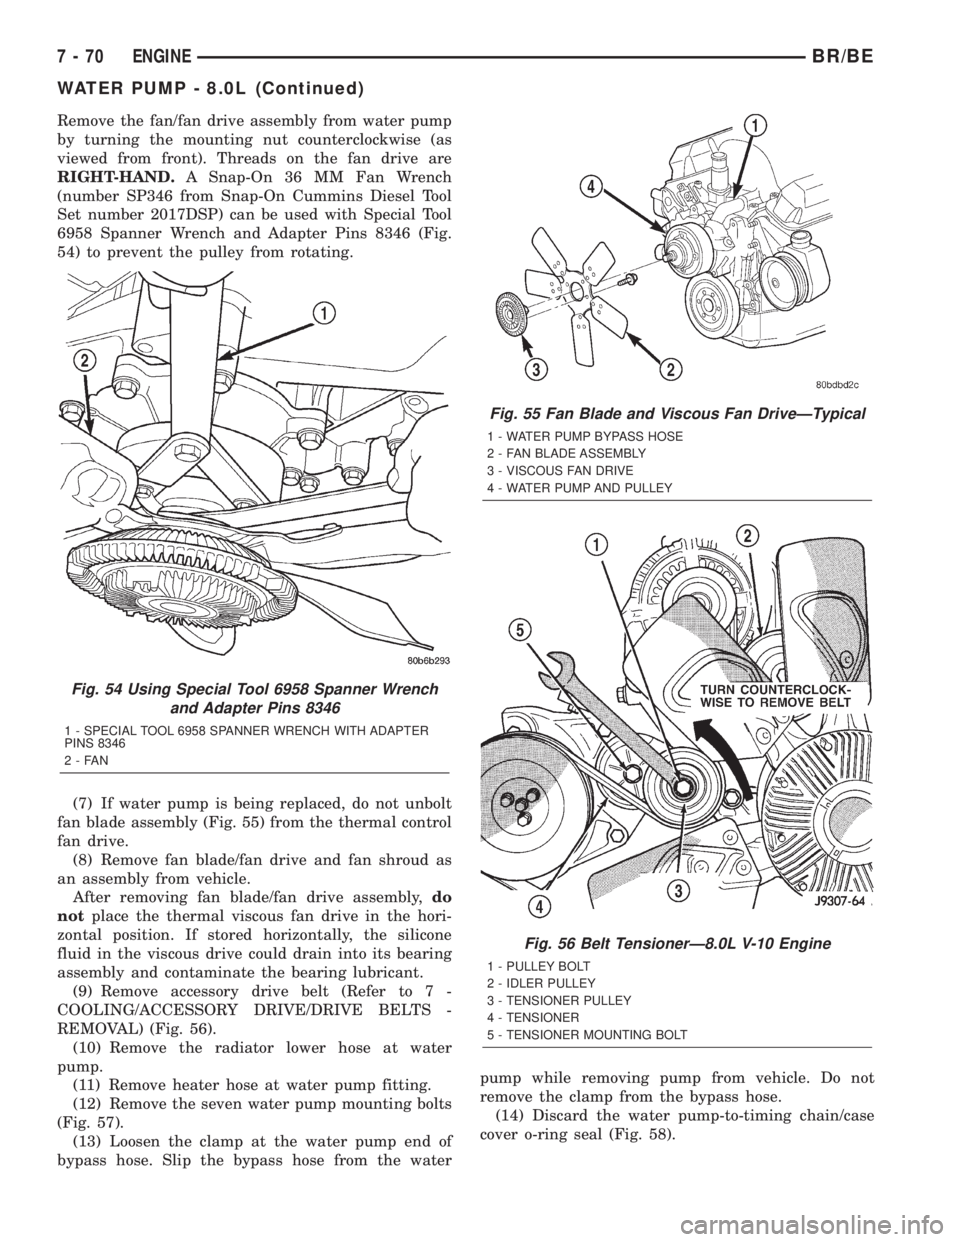
6958 Spanner Wrench and Adapter Pins 8346 (Fig.
54) to prevent the pulley from rotating.
(7) If water pump is being replaced, do not unbolt
fan blade assembly (Fig. 55) from the thermal control
fan drive.
(8) Remove fan blade/fan drive and fan shroud as
an assembly from vehicle.
After removing fan blade/fan drive assembly,do
notplace the thermal viscous fan drive in the hori-
zontal position. If stored horizontally, the silicone
fluid in the viscous drive could drain into its bearing
assembly and contaminate the bearing lubricant.
(9) Remove accessory drive belt (Refer to 7 -
COOLING/ACCESSORY DRIVE/DRIVE BELTS -
REMOVAL) (Fig. 56).
(10) Remove the radiator lower hose at water
pump.
(11) Remove heater hose at water pump fitting.
(12) Remove the seven water pump mounting bolts
(Fig. 57).
(13) Loosen the clamp at the water pump end of
bypass hose. Slip the bypass hose from the waterpump while removing pump from vehicle. Do not
remove the clamp from the bypass hose.
(14) Discard the water pump-to-timing chain/case
cover o-ring seal (Fig. 58).
Fig. 54 Using Special Tool 6958 Spanner Wrench
and Adapter Pins 8346
1 - SPECIAL TOOL 6958 SPANNER WRENCH WITH ADAPTER
PINS 8346
2-FAN
Fig. 55 Fan Blade and Viscous Fan DriveÐTypical
1 - WATER PUMP BYPASS HOSE
2 - FAN BLADE ASSEMBLY
3 - VISCOUS FAN DRIVE
4 - WATER PUMP AND PULLEY
Fig. 56 Belt TensionerÐ8.0L V-10 Engine
1 - PULLEY BOLT
2 - IDLER PULLEY
3 - TENSIONER PULLEY
4 - TENSIONER
5 - TENSIONER MOUNTING BOLT
7 - 70 ENGINEBR/BE
WATER PUMP - 8.0L (Continued)
Page 321 of 2255

(4) Install water pump to engine as follows: Guide
water pump fitting into bypass hose as pump is being
installed. Install water pump bolts (Fig. 57). Tighten
water pump mounting bolts to 40 N´m (30 ft. lbs.)
torque.
(5) Position bypass hose clamp to bypass hose.
(6) Spin water pump to be sure that pump impel-
ler does not rub against timing chain case/cover.
(7) Connect radiator lower hose to water pump.
(8) Connect heater hose and hose clamp to heater
hose fitting.
(9) Install drive belt (Refer to 7 - COOLING/AC-
CESSORY DRIVE/DRIVE BELTS - INSTALLATION)
(Fig. 56).
(10) Position fan shroud and fan blade/viscous fan
drive assembly to vehicle as a complete unit.
(11) Install fan shroud to radiator. Tighten bolts to
6 N´m (50 in. lbs.) torque.
(12) Install fan blade/viscous fan drive assembly to
water pump shaft.
(13) Fill cooling system (Refer to 7 - COOLING -
STANDARD PROCEDURE).
(14) Connect negative battery cable.
(15) Start and warm the engine. Check for leaks.
WATER PUMP - 5.9L DIESEL
DESCRIPTION
The water pump is mounted to the engine front
cover between the automatic belt tensioner and the
fan drive pulley (Fig. 60).
The water pump impeller is pressed onto the rear
of a shaft that rotates in a bearing pressed into the
water pump body. The body has a small hole for ven-
tilation. The water pump seals are lubricated by
antifreeze in the coolant mixture. Additional lubrica-
tion is not necessary.
OPERATION
The diesel engine water pump draws coolant from
radiator outlet and circulates it through engine,
heater core and back to radiator inlet. The crank-
shaft pulley drives the water pump with a serpentine
drive belt (Fig. 60).
DIAGNOSIS AND TESTINGÐWATER PUMP
A quick test to determine if pump is working is to
check if heater warms properly. A defective water
pump will not be able to circulate heated coolant
through the long heater hose to the heater core.
REMOVAL
(1) Disconnect battery negative cables.
(2) Drain cooling system (Refer to 7 - COOLING -
STANDARD PROCEDURE).(3) Remove the bolt retaining the wiring harness
near the top of water pump. Position wire harness to
the side.
(4) Remove the accessory drive belt (Refer to 7 -
COOLING/ACCESSORY DRIVE/DRIVE BELTS -
REMOVAL).
(5) Remove water pump mounting bolts (Fig. 61).
(6) Clean water pump sealing surface on cylinder
block.
CLEANING
Clean gasket mating surfaces as necessary.
INSPECTION
Visually inspect the water pump and replace if it
has any of the following conditions:
²The body is cracked or damaged
²Water leaks from the shaft seal. This is evident
by traces of coolant below the vent hole
²Loose or rough turning bearing. Also inspect
thermal fan drive
²Impeller rubbing the pump body
INSTALLATION
(1) Install new O-ring seal in groove on water
pump (Fig. 62).
(2) Install water pump. Tighten mounting bolts to
24 N´m (18 ft. lbs.) torque.
(3) Install accessory drive belt. Refer to procedure
in this group.
Fig. 60 Water PumpÐ5.9L DieselÐTypical (non-A/C
shown)
1 - WATER PUMP
2 - ACCESSORY DRIVE BELT
3 - AUTOMATIC BELT TENSIONER
4 - MOUNT BOLT
5 - 3/89SQUARE HOLE
7 - 72 ENGINEBR/BE
WATER PUMP - 8.0L (Continued)
Page 322 of 2255

(4) Install the bolt retaining the wiring harness
near top of water pump.
(5) Fill cooling system. Refer to Refilling Cooling
System in this section.
(6) Connect both battery cables.
(7) Start and warm the engine. Check for leaks.
WATER PUMP INLET TUBE -
5.9L
REMOVAL
REMOVAL - WATER PUMP BYPASS HOSE
WITH AIR CONDITIONING
If equipped with A/C, the generator and A/C com-
pressor along with their common mounting bracket
(Fig. 63) must be partially removed. Removing the
generator or A/C compressor from their mounting
bracket is not necessary. Also, discharging the A/C
system is not necessary.Do notremove any refriger-
ant lines from A/C compressor.
WARNING: THE A/C SYSTEM IS UNDER PRESSURE
EVEN WITH THE ENGINE OFF. REFER TO REFRIG-
ERANT WARNINGS IN 24 - HEATING AND AIR CON-
DITIONING.
Fig. 61 Water Pump Removal/Installation
1 - O-RING SEAL (SQUARE)
2 - WATER PUMP
3 - BOLT (2)
Fig. 62 Pump O-ring Seal
1 - O-RING SEAL
2 - GROOVE
3 - WATER PUMP
Fig. 63 Generator - A/C Compressor Mounting
Bracket - Typical
BR/BEENGINE 7 - 73
WATER PUMP - 5.9L DIESEL (Continued)
Page 323 of 2255

(1) Disconnect negative battery cable from battery.
(2) Partially drain cooling system (Refer to 7 -
COOLING - STANDARD PROCEDURE).Do not
waste reusable coolant. If the solution is clean, drain
the coolant into a clean container for reuse.
(3) Remove upper radiator hose clamp at radiator.
A special clamp tool must be used to remove the con-
stant tension clamps. Remove hose at radiator.
(4) Disconnect throttle cable from clip at radiator
fan shroud.
(5) Unplug wiring harness from A/C compressor.
(6) Remove the air cleaner assembly.
(7) Remove accessory drive belt (Refer to 7 -
COOLING/ACCESSORY DRIVE/DRIVE BELTS -
REMOVAL).
(8)5.9L V-8 LDC-Gas:The drive belt idler pulley
must be removed to gain access to one of the A/C
compressor/generator bracket mounting bolts.
Remove the idler pulley bolt and remove idler pulley
(Fig. 64).(9)5.9L HDC-Gas:The automatic belt tensioner/
pulley assembly must be removed to gain access to
one of the A/C compressor/generator bracket mount-
ing bolts. Remove the tensioner mounting bolt (Fig.
65) and remove tensioner.
(10) Remove the engine oil dipstick tube mounting
bolt at the side of the A/C-generator mounting
bracket.
(11) Disconnect throttle body control cables.
(12) Remove heater hose coolant return tube
mounting bolt (Fig. 66) (Fig. 67) and remove tube
from engine. Discard the old tube O-ring.
(13) Remove bracket-to-intake manifold bolts
(number 1 and 2 (Fig. 63).
(14) Remove remaining bracket-to-engine bolts
(Fig. 68) (Fig. 69).
Fig. 64 Idler Pulley - 5.9L V-8 LDC-Gas Engine
Fig. 65 Belt Tensioner - 5.9L HDC-Gas Engine
1 - PULLEY BOLT
2 - IDLER PULLEY
3 - TENSIONER PULLEY
4 - TENSIONER
5 - TENSIONER MOUNTING BOLT
7 - 74 ENGINEBR/BE
WATER PUMP INLET TUBE - 5.9L (Continued)
Page 325 of 2255

(15) Lift and position generator and A/C compres-
sor (along with their common mounting bracket) to
gain access to bypass hose. A block of wood may be
used to hold assembly in position.
(16) Loosen and position both hose clamps to the
center of bypass hose. A special clamp tool must be
used to remove the constant tension clamps. Remove
hose from vehicle.
REMOVAL - WATER PUMP BYPASS HOSE
WITHOUT AIR CONDITIONING
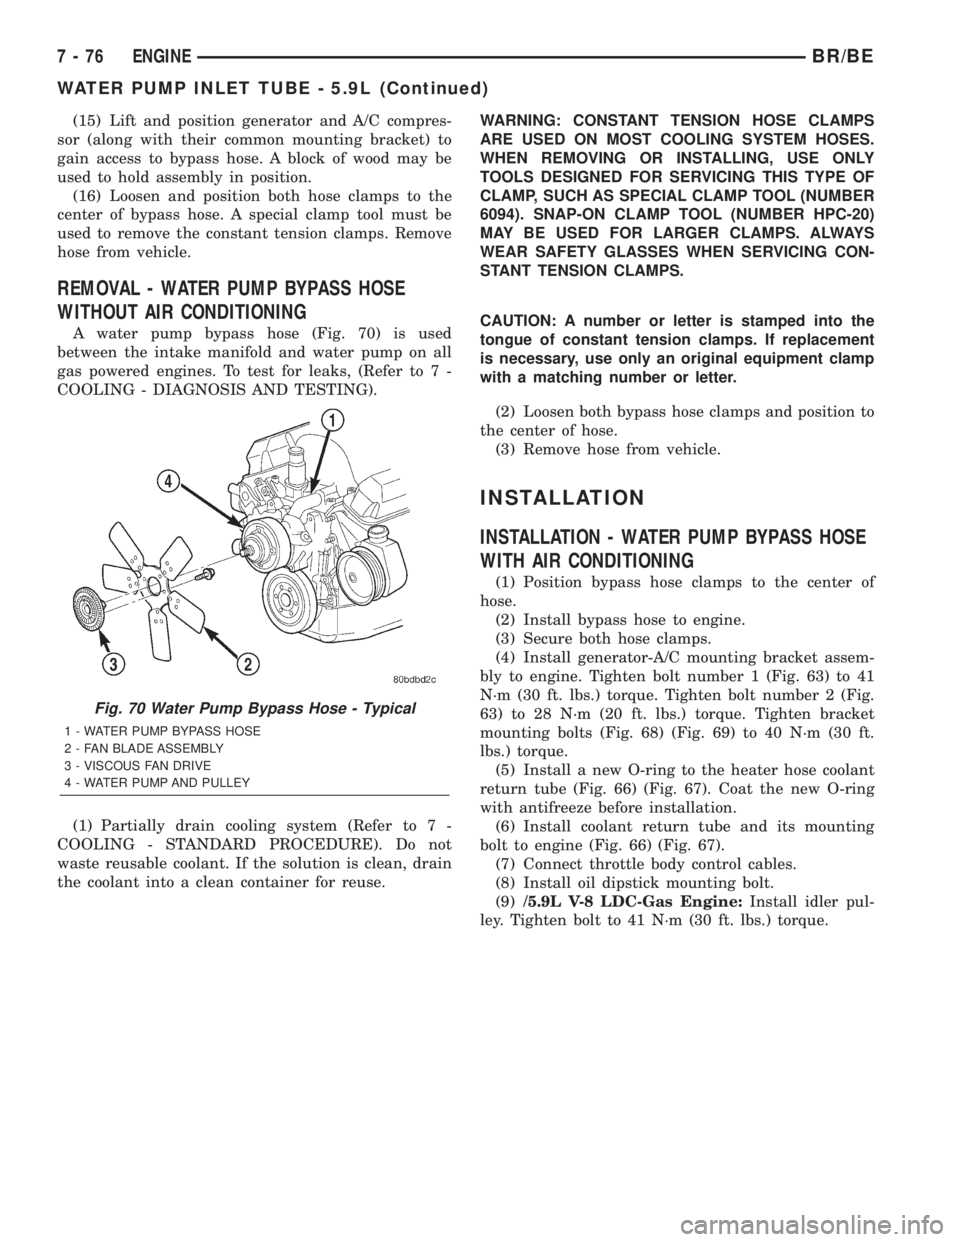
A water pump bypass hose (Fig. 70) is used
between the intake manifold and water pump on all
gas powered engines. To test for leaks, (Refer to 7 -
COOLING - DIAGNOSIS AND TESTING).
(1) Partially drain cooling system (Refer to 7 -
COOLING - STANDARD PROCEDURE). Do not
waste reusable coolant. If the solution is clean, drain
the coolant into a clean container for reuse.WARNING: CONSTANT TENSION HOSE CLAMPS
ARE USED ON MOST COOLING SYSTEM HOSES.
WHEN REMOVING OR INSTALLING, USE ONLY
TOOLS DESIGNED FOR SERVICING THIS TYPE OF
CLAMP, SUCH AS SPECIAL CLAMP TOOL (NUMBER
6094). SNAP-ON CLAMP TOOL (NUMBER HPC-20)
MAY BE USED FOR LARGER CLAMPS. ALWAYS
WEAR SAFETY GLASSES WHEN SERVICING CON-
STANT TENSION CLAMPS.
CAUTION: A number or letter is stamped into the
tongue of constant tension clamps. If replacement
is necessary, use only an original equipment clamp
with a matching number or letter.
(2) Loosen both bypass hose clamps and position to
the center of hose.
(3) Remove hose from vehicle.
INSTALLATION
INSTALLATION - WATER PUMP BYPASS HOSE
WITH AIR CONDITIONING
(1) Position bypass hose clamps to the center of
hose.
(2) Install bypass hose to engine.
(3) Secure both hose clamps.
(4) Install generator-A/C mounting bracket assem-
bly to engine. Tighten bolt number 1 (Fig. 63) to 41
N´m (30 ft. lbs.) torque. Tighten bolt number 2 (Fig.
63) to 28 N´m (20 ft. lbs.) torque. Tighten bracket
mounting bolts (Fig. 68) (Fig. 69) to 40 N´m (30 ft.
lbs.) torque.
(5) Install a new O-ring to the heater hose coolant
return tube (Fig. 66) (Fig. 67). Coat the new O-ring
with antifreeze before installation.
(6) Install coolant return tube and its mounting
bolt to engine (Fig. 66) (Fig. 67).
(7) Connect throttle body control cables.
(8) Install oil dipstick mounting bolt.
(9)/5.9L V-8 LDC-Gas Engine:Install idler pul-
ley. Tighten bolt to 41 N´m (30 ft. lbs.) torque.
Fig. 70 Water Pump Bypass Hose - Typical
1 - WATER PUMP BYPASS HOSE
2 - FAN BLADE ASSEMBLY
3 - VISCOUS FAN DRIVE
4 - WATER PUMP AND PULLEY
7 - 76 ENGINEBR/BE
WATER PUMP INLET TUBE - 5.9L (Continued)
Page 326 of 2255

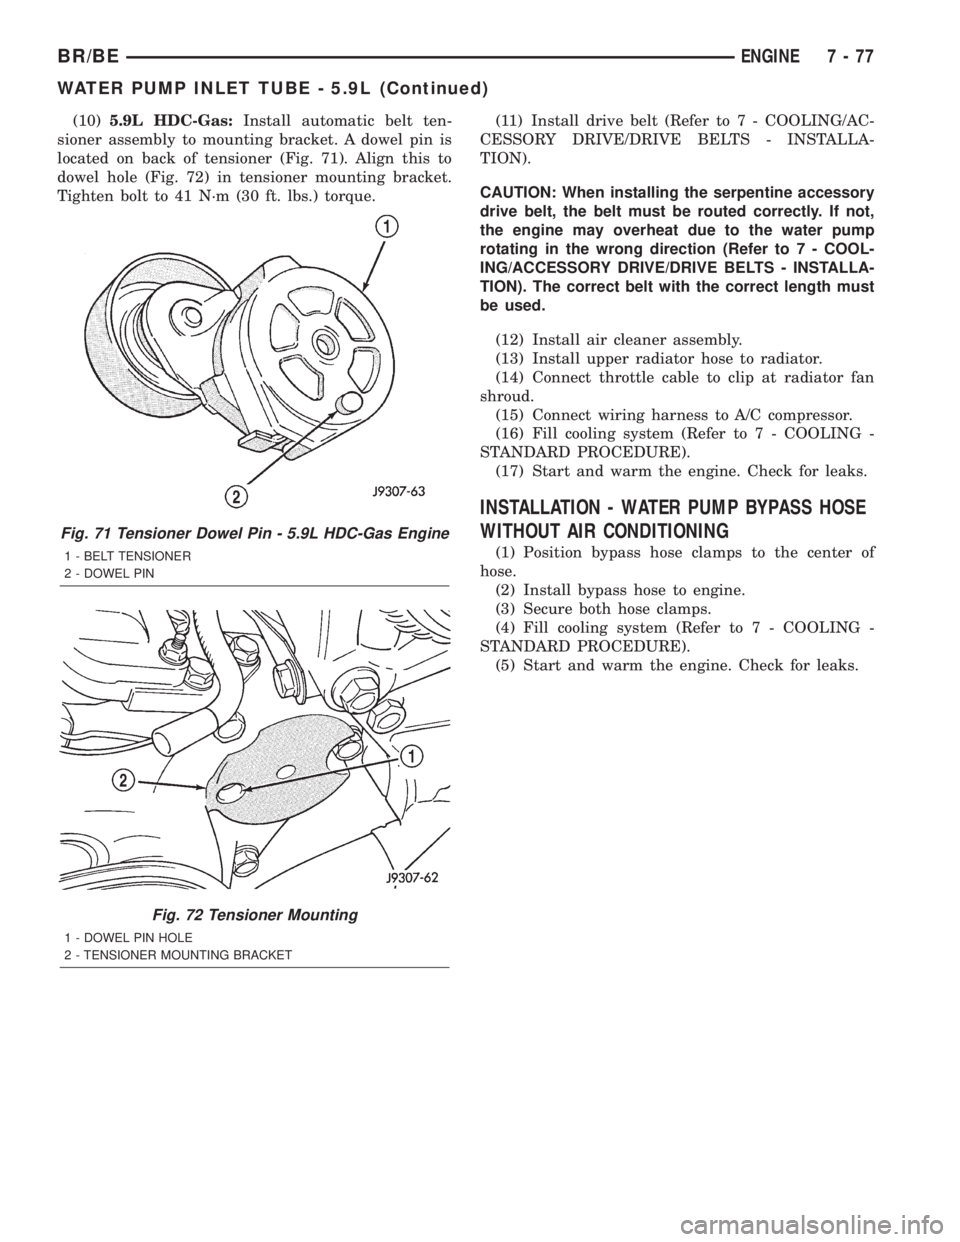
(10)5.9L HDC-Gas:Install automatic belt ten-
sioner assembly to mounting bracket. A dowel pin is
located on back of tensioner (Fig. 71). Align this to
dowel hole (Fig. 72) in tensioner mounting bracket.
Tighten bolt to 41 N´m (30 ft. lbs.) torque.(11) Install drive belt (Refer to 7 - COOLING/AC-
CESSORY DRIVE/DRIVE BELTS - INSTALLA-
TION).
CAUTION: When installing the serpentine accessory
drive belt, the belt must be routed correctly. If not,
the engine may overheat due to the water pump
rotating in the wrong direction (Refer to 7 - COOL-
ING/ACCESSORY DRIVE/DRIVE BELTS - INSTALLA-
TION). The correct belt with the correct length must
be used.
(12) Install air cleaner assembly.
(13) Install upper radiator hose to radiator.
(14) Connect throttle cable to clip at radiator fan
shroud.
(15) Connect wiring harness to A/C compressor.
(16) Fill cooling system (Refer to 7 - COOLING -
STANDARD PROCEDURE).
(17) Start and warm the engine. Check for leaks.
INSTALLATION - WATER PUMP BYPASS HOSE
WITHOUT AIR CONDITIONING
(1) Position bypass hose clamps to the center of
hose.
(2) Install bypass hose to engine.
(3) Secure both hose clamps.
(4) Fill cooling system (Refer to 7 - COOLING -
STANDARD PROCEDURE).
(5) Start and warm the engine. Check for leaks.
Fig. 71 Tensioner Dowel Pin - 5.9L HDC-Gas Engine
1 - BELT TENSIONER
2 - DOWEL PIN
Fig. 72 Tensioner Mounting
1 - DOWEL PIN HOLE
2 - TENSIONER MOUNTING BRACKET
BR/BEENGINE 7 - 77
WATER PUMP INLET TUBE - 5.9L (Continued)