2002 CHRYSLER CARAVAN lock
[x] Cancel search: lockPage 1589 of 2399
CLUTCHES BANDS
LEVER START PARK
FRONT REAR LOCKUPOVER-
RUNNING(KICKDOWN) LOW/REV
POSITION SAFETY SPRAG FRONT REAR
P - PARK X X
R-
REVERSEXX
N-
NEUTRALX
D - DRIVE
First X X
Second X X
Third X X X
2-
SECOND
First X X
Second X X
1 - Low X X
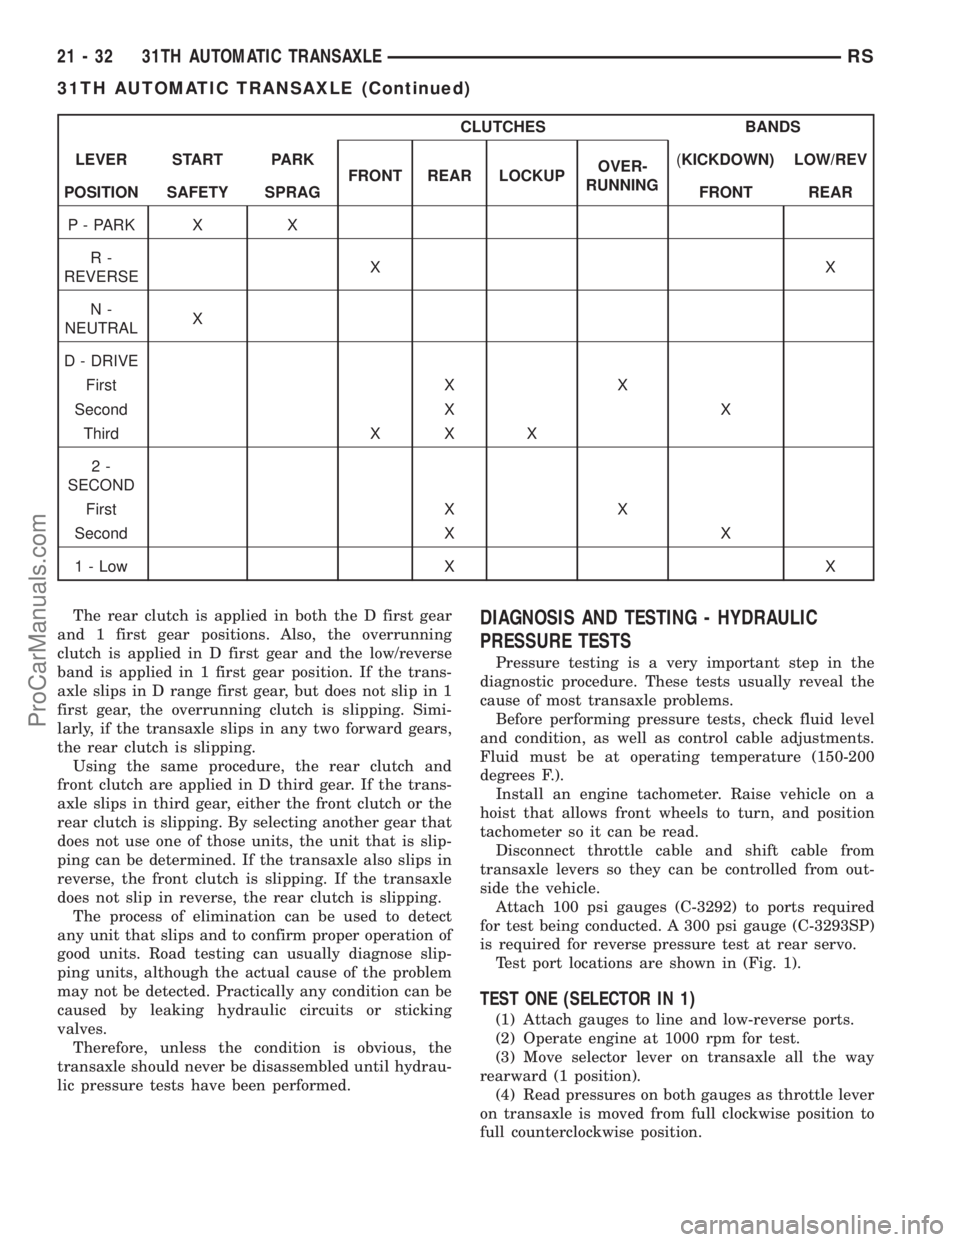
The rear clutch is applied in both the D first gear
and 1 first gear positions. Also, the overrunning
clutch is applied in D first gear and the low/reverse
band is applied in 1 first gear position. If the trans-
axle slips in D range first gear, but does not slip in 1
first gear, the overrunning clutch is slipping. Simi-
larly, if the transaxle slips in any two forward gears,
the rear clutch is slipping.
Using the same procedure, the rear clutch and
front clutch are applied in D third gear. If the trans-
axle slips in third gear, either the front clutch or the
rear clutch is slipping. By selecting another gear that
does not use one of those units, the unit that is slip-
ping can be determined. If the transaxle also slips in
reverse, the front clutch is slipping. If the transaxle
does not slip in reverse, the rear clutch is slipping.
The process of elimination can be used to detect
any unit that slips and to confirm proper operation of
good units. Road testing can usually diagnose slip-
ping units, although the actual cause of the problem
may not be detected. Practically any condition can be
caused by leaking hydraulic circuits or sticking
valves.
Therefore, unless the condition is obvious, the
transaxle should never be disassembled until hydrau-
lic pressure tests have been performed.
DIAGNOSIS AND TESTING - HYDRAULIC
PRESSURE TESTS
Pressure testing is a very important step in the
diagnostic procedure. These tests usually reveal the
cause of most transaxle problems.
Before performing pressure tests, check fluid level
and condition, as well as control cable adjustments.
Fluid must be at operating temperature (150-200
degrees F.).
Install an engine tachometer. Raise vehicle on a
hoist that allows front wheels to turn, and position
tachometer so it can be read.
Disconnect throttle cable and shift cable from
transaxle levers so they can be controlled from out-
side the vehicle.
Attach 100 psi gauges (C-3292) to ports required
for test being conducted. A 300 psi gauge (C-3293SP)
is required for reverse pressure test at rear servo.
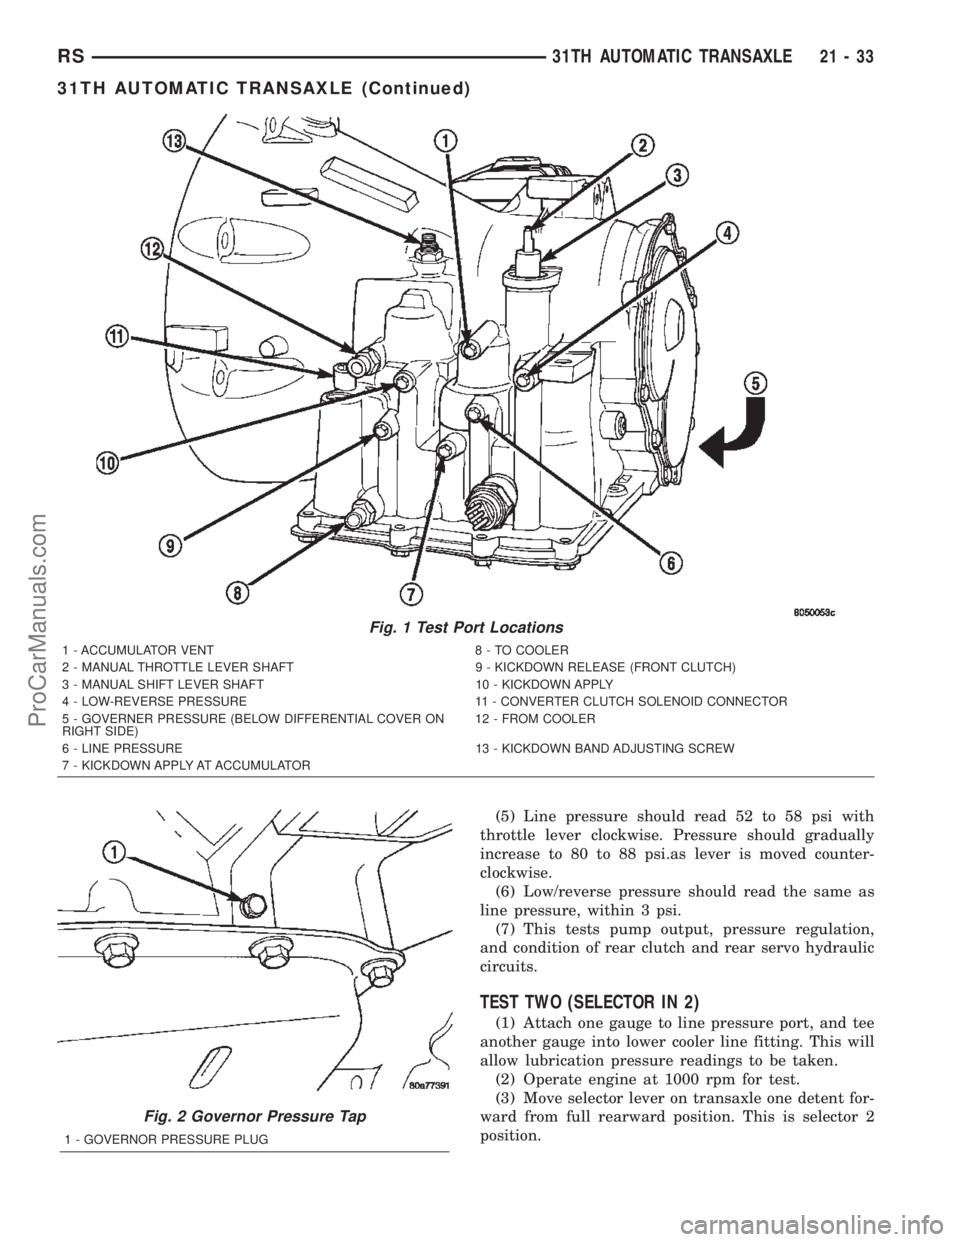
Test port locations are shown in (Fig. 1).
TEST ONE (SELECTOR IN 1)
(1) Attach gauges to line and low-reverse ports.
(2) Operate engine at 1000 rpm for test.
(3) Move selector lever on transaxle all the way
rearward (1 position).
(4) Read pressures on both gauges as throttle lever
on transaxle is moved from full clockwise position to
full counterclockwise position.
21 - 32 31TH AUTOMATIC TRANSAXLERS
31TH AUTOMATIC TRANSAXLE (Continued)
ProCarManuals.com
Page 1590 of 2399
(5) Line pressure should read 52 to 58 psi with
throttle lever clockwise. Pressure should gradually
increase to 80 to 88 psi.as lever is moved counter-
clockwise.
(6) Low/reverse pressure should read the same as
line pressure, within 3 psi.
(7) This tests pump output, pressure regulation,
and condition of rear clutch and rear servo hydraulic
circuits.
TEST TWO (SELECTOR IN 2)
(1) Attach one gauge to line pressure port, and tee
another gauge into lower cooler line fitting. This will
allow lubrication pressure readings to be taken.
(2) Operate engine at 1000 rpm for test.
(3) Move selector lever on transaxle one detent for-
ward from full rearward position. This is selector 2
position.
Fig. 1 Test Port Locations
1 - ACCUMULATOR VENT 8 - TO COOLER
2 - MANUAL THROTTLE LEVER SHAFT 9 - KICKDOWN RELEASE (FRONT CLUTCH)
3 - MANUAL SHIFT LEVER SHAFT 10 - KICKDOWN APPLY
4 - LOW-REVERSE PRESSURE 11 - CONVERTER CLUTCH SOLENOID CONNECTOR
5 - GOVERNER PRESSURE (BELOW DIFFERENTIAL COVER ON
RIGHT SIDE)12 - FROM COOLER
6 - LINE PRESSURE 13 - KICKDOWN BAND ADJUSTING SCREW
7 - KICKDOWN APPLY AT ACCUMULATOR
Fig. 2 Governor Pressure Tap
1 - GOVERNOR PRESSURE PLUG
RS31TH AUTOMATIC TRANSAXLE21-33
31TH AUTOMATIC TRANSAXLE (Continued)
ProCarManuals.com
Page 1591 of 2399
(4) Read pressures on both gauges as throttle lever
on transaxle is moved from full clockwise position to
full counterclockwise position.
(5) Line pressure should read 52 to 58 psi with
throttle lever clockwise. Pressure should gradually
increase to 80 to 88 psi. as lever is moved counter-
clockwise.
(6) Lubrication pressure should be 10 to 25 psi
with lever clockwise and 10 to 35 psi with lever at
full counterclockwise.
(7) This tests pump output, pressure regulation,
and condition of rear clutch and lubrication hydraulic
circuits.
TEST THREE (SELECTOR IN D)
(1) Attach gauges to line and kickdown release
ports.
(2) Operate engine at 1600 rpm for test.
(3) Move selector lever on transaxle two detents
forward from full rearward position. This is selector
D position.
(4) Read pressures on both gauges as throttle lever
on transaxle is moved from full clockwise to the full
counterclockwise position.
(5) Line pressure should read 52 to 58 psi with
throttle lever clockwise. Pressure should gradually
increase to 80 to 88 psi. as lever is moved counter-
clockwise.
(6) Kickdown release is pressurized only in direct
drive and should be same as line pressure within 3
psi, up to kickdown point.
(7) This tests pump output, pressure regulation,
and condition of rear clutch, front clutch, and
hydraulic circuits.
TEST FOUR (SELECTOR IN REVERSE)
(1) Attach 300 psi gauge (C-3292SP) to low-reverse
port.
(2) Operate engine at 1600 rpm for test.
(3) Move selector lever on transaxle four detents
forward from full rearward position. This is selector
R position.
(4) Low/reverse pressure should read 180 to 220
psi with throttle lever clockwise. Pressure should
gradually increase to 260 to 300 psi. as lever is
moved counterclockwise.(5) This tests pump output, pressure regulation,
and condition of front clutch and rear servo hydraulic
circuits.
(6) Move selector lever on transaxle to D position
to check that low/reverse pressure drops to zero.
(7) This tests for leakage into rear servo, due to
case porosity, which can cause reverse band burn out.
TEST RESULT INDICATIONS
(1) If proper line pressure, minimum to maximum,
is found in any one test, the pump and pressure reg-
ulator are working properly.
(2) Low pressure in D, 1, and 2 but correct pres-
sure in R, indicates rear clutch circuit leakage.
(3) Low pressure in D and R, but correct pressure
in 1 indicates front clutch circuit leakage.
(4) Low pressure in R and 1, but correct pressure
in 2 indicates rear servo circuit leakage.
(5) Low line pressure in all positions indicates a
defective pump, a clogged filter, or a stuck pressure
regulator valve.
GOVERNOR PRESSURE
Test only if transaxle shifts at wrong vehicle
speeds when throttle cable is correctly adjusted.
(1) Connect a 100 psi gauge to governor pressure
port. It is located at lower right side of case, below
differential cover (Fig. 2).
(2) Operate transaxle in third gear to read pres-
sures. The governor pressure should respond
smoothly to changes in mph and should return to 0
to 3 psi when vehicle is stopped. High pressure
(above 3 psi) at standstill will prevent the transaxle
from downshifting.
THROTTLE PRESSURE
No gauge port is provided for throttle pressure.
Incorrect throttle pressure should be suspected if
part throttle upshift speeds are either delayed or
occur too early in relation to vehicle speed. Engine
runaway on shifts can also be an indicator of low
throttle pressure setting, or misadjusted throttle
cable.
In no case should throttle pressure be adjusted
until the transaxle throttle cable adjustment has
been verified to be correct.
21 - 34 31TH AUTOMATIC TRANSAXLERS
31TH AUTOMATIC TRANSAXLE (Continued)
ProCarManuals.com
Page 1596 of 2399
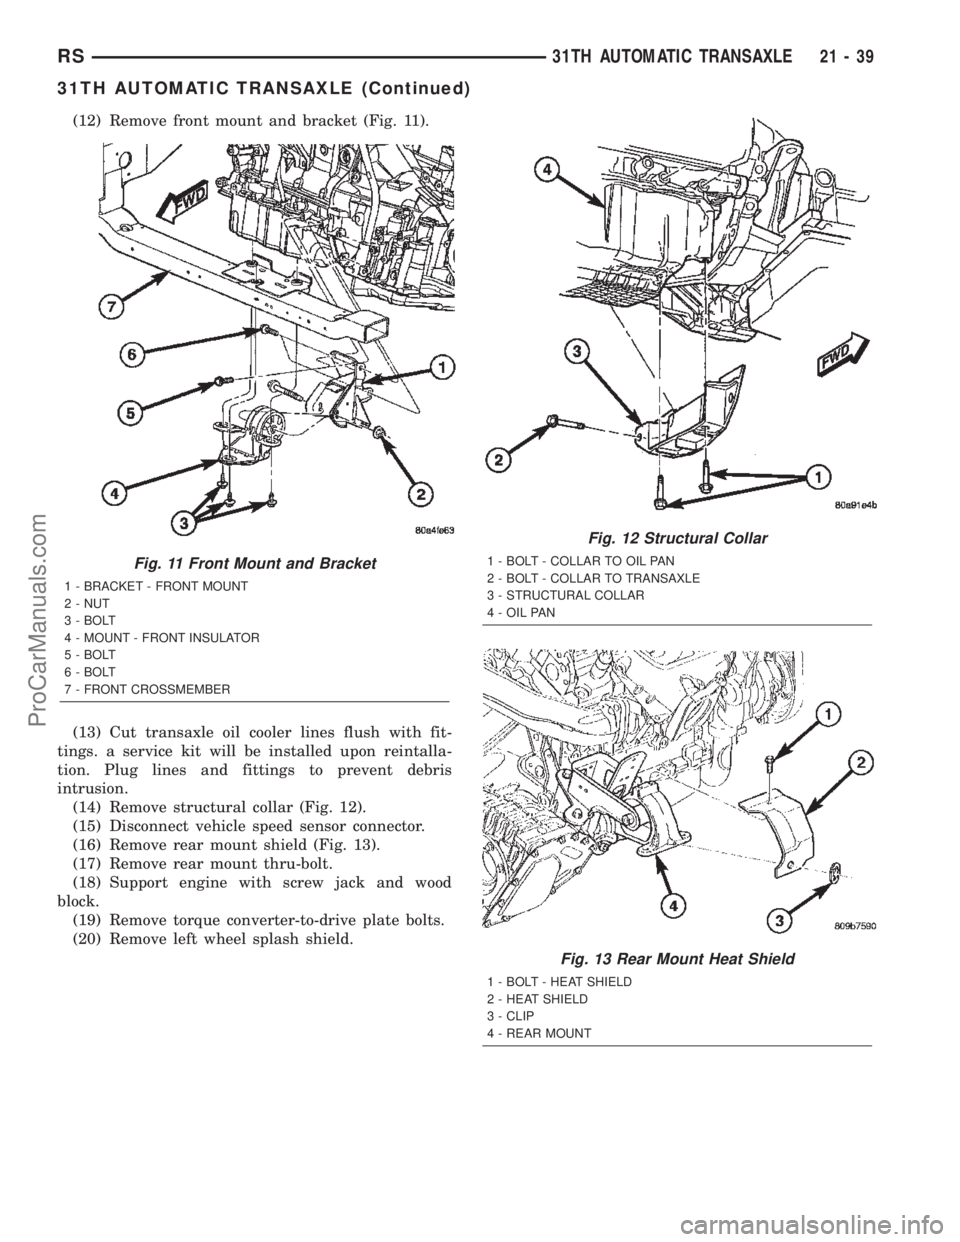
(12) Remove front mount and bracket (Fig. 11).
(13) Cut transaxle oil cooler lines flush with fit-
tings. a service kit will be installed upon reintalla-
tion. Plug lines and fittings to prevent debris
intrusion.
(14) Remove structural collar (Fig. 12).
(15) Disconnect vehicle speed sensor connector.
(16) Remove rear mount shield (Fig. 13).
(17) Remove rear mount thru-bolt.
(18) Support engine with screw jack and wood
block.
(19) Remove torque converter-to-drive plate bolts.
(20) Remove left wheel splash shield.
Fig. 11 Front Mount and Bracket
1 - BRACKET - FRONT MOUNT
2 - NUT
3 - BOLT
4 - MOUNT - FRONT INSULATOR
5 - BOLT
6 - BOLT
7 - FRONT CROSSMEMBER
Fig. 12 Structural Collar
1 - BOLT - COLLAR TO OIL PAN
2 - BOLT - COLLAR TO TRANSAXLE
3 - STRUCTURAL COLLAR
4 - OIL PAN
Fig. 13 Rear Mount Heat Shield
1 - BOLT - HEAT SHIELD
2 - HEAT SHIELD
3 - CLIP
4 - REAR MOUNT
RS31TH AUTOMATIC TRANSAXLE21-39
31TH AUTOMATIC TRANSAXLE (Continued)
ProCarManuals.com
Page 1600 of 2399
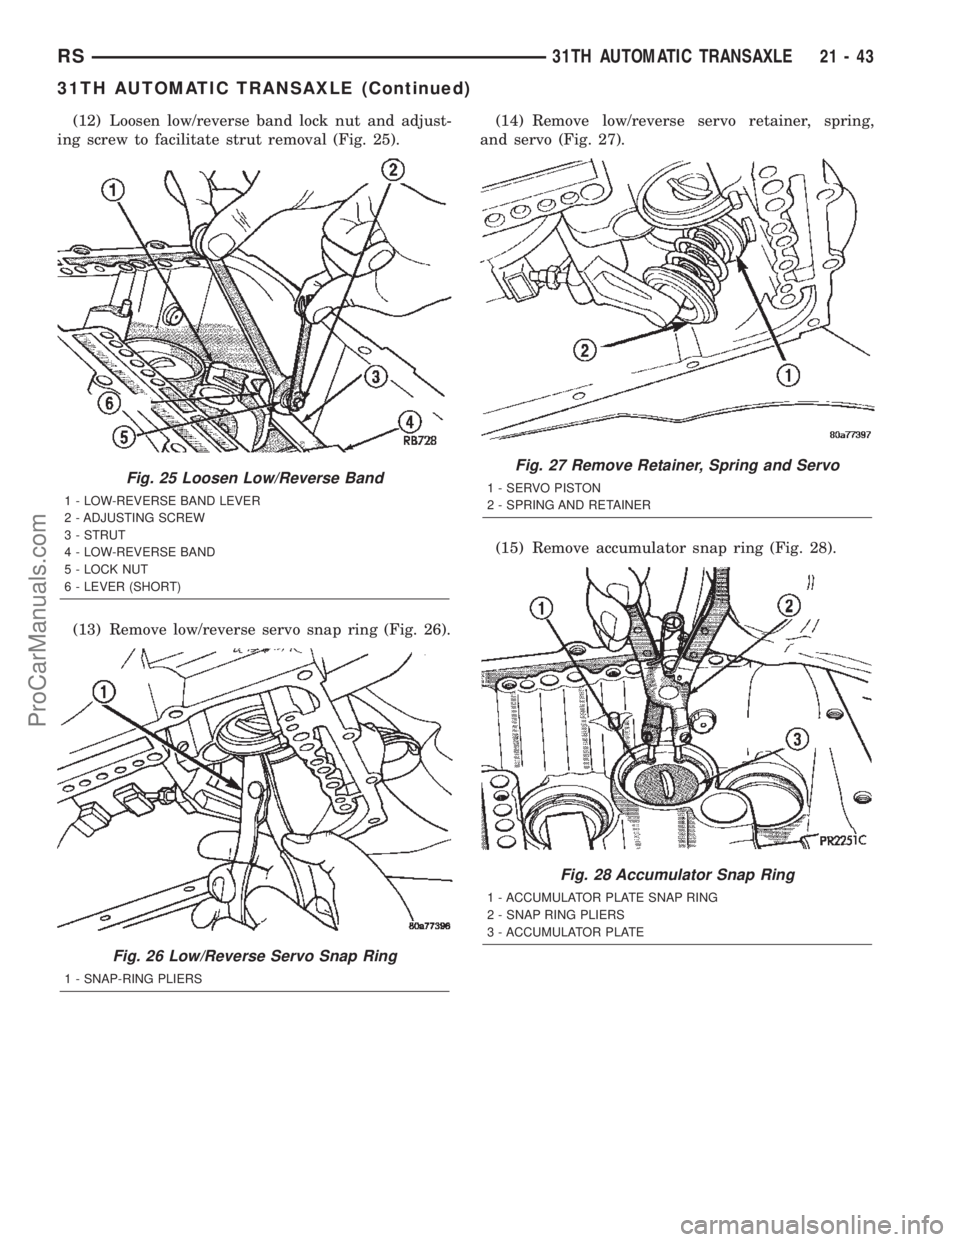
(12) Loosen low/reverse band lock nut and adjust-
ing screw to facilitate strut removal (Fig. 25).
(13) Remove low/reverse servo snap ring (Fig. 26).(14) Remove low/reverse servo retainer, spring,
and servo (Fig. 27).
(15) Remove accumulator snap ring (Fig. 28).
Fig. 25 Loosen Low/Reverse Band
1 - LOW-REVERSE BAND LEVER
2 - ADJUSTING SCREW
3 - STRUT
4 - LOW-REVERSE BAND
5 - LOCK NUT
6 - LEVER (SHORT)
Fig. 26 Low/Reverse Servo Snap Ring
1 - SNAP-RING PLIERS
Fig. 27 Remove Retainer, Spring and Servo
1 - SERVO PISTON
2 - SPRING AND RETAINER
Fig. 28 Accumulator Snap Ring
1 - ACCUMULATOR PLATE SNAP RING
2 - SNAP RING PLIERS
3 - ACCUMULATOR PLATE
RS31TH AUTOMATIC TRANSAXLE21-43
31TH AUTOMATIC TRANSAXLE (Continued)
ProCarManuals.com
Page 1601 of 2399
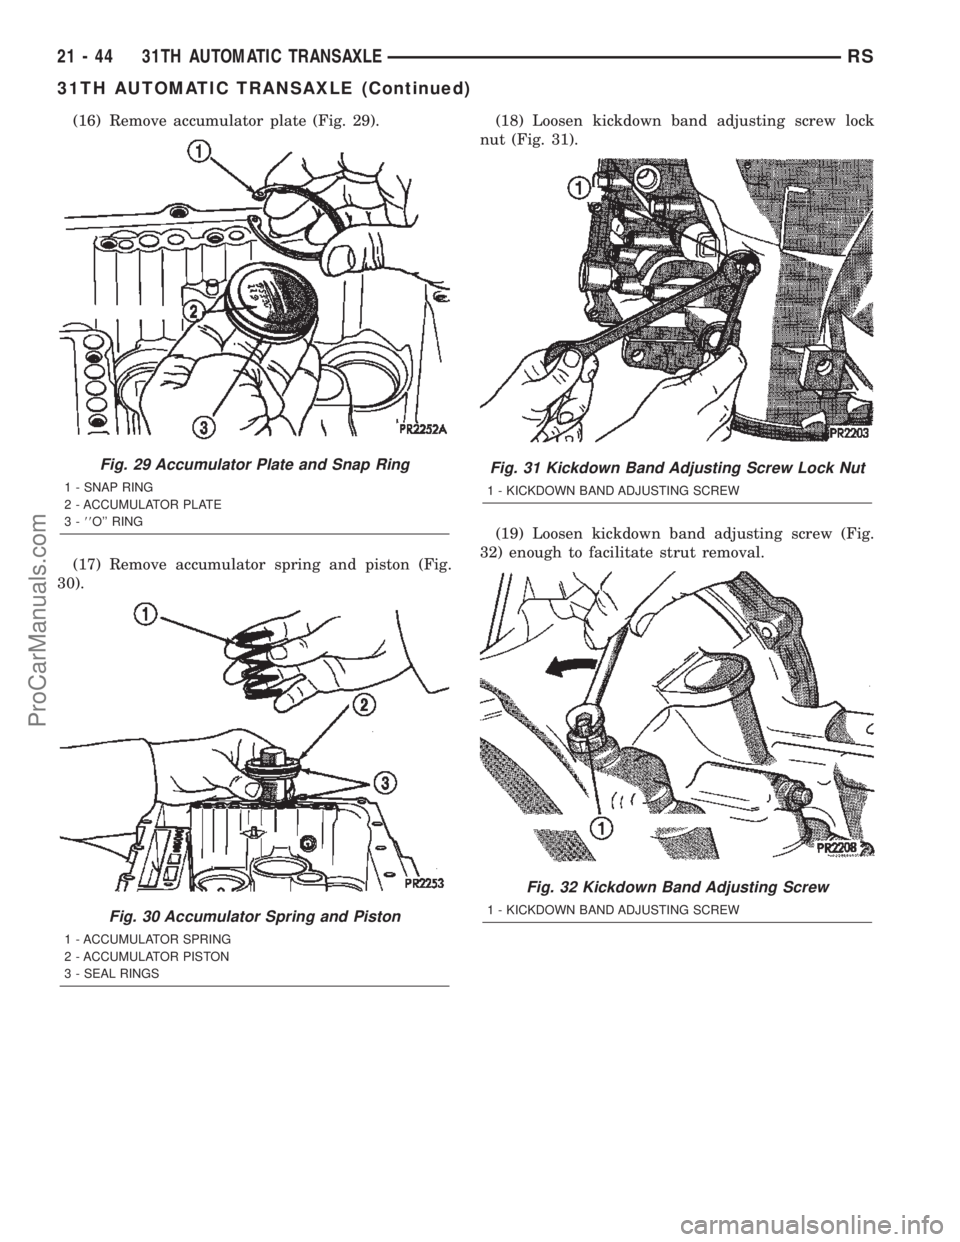
(16) Remove accumulator plate (Fig. 29).
(17) Remove accumulator spring and piston (Fig.
30).(18) Loosen kickdown band adjusting screw lock
nut (Fig. 31).
(19) Loosen kickdown band adjusting screw (Fig.
32) enough to facilitate strut removal.
Fig. 29 Accumulator Plate and Snap Ring
1 - SNAP RING
2 - ACCUMULATOR PLATE
3-88O'' RING
Fig. 30 Accumulator Spring and Piston
1 - ACCUMULATOR SPRING
2 - ACCUMULATOR PISTON
3 - SEAL RINGS
Fig. 31 Kickdown Band Adjusting Screw Lock Nut
1 - KICKDOWN BAND ADJUSTING SCREW
Fig. 32 Kickdown Band Adjusting Screw
1 - KICKDOWN BAND ADJUSTING SCREW
21 - 44 31TH AUTOMATIC TRANSAXLERS
31TH AUTOMATIC TRANSAXLE (Continued)
ProCarManuals.com
Page 1614 of 2399
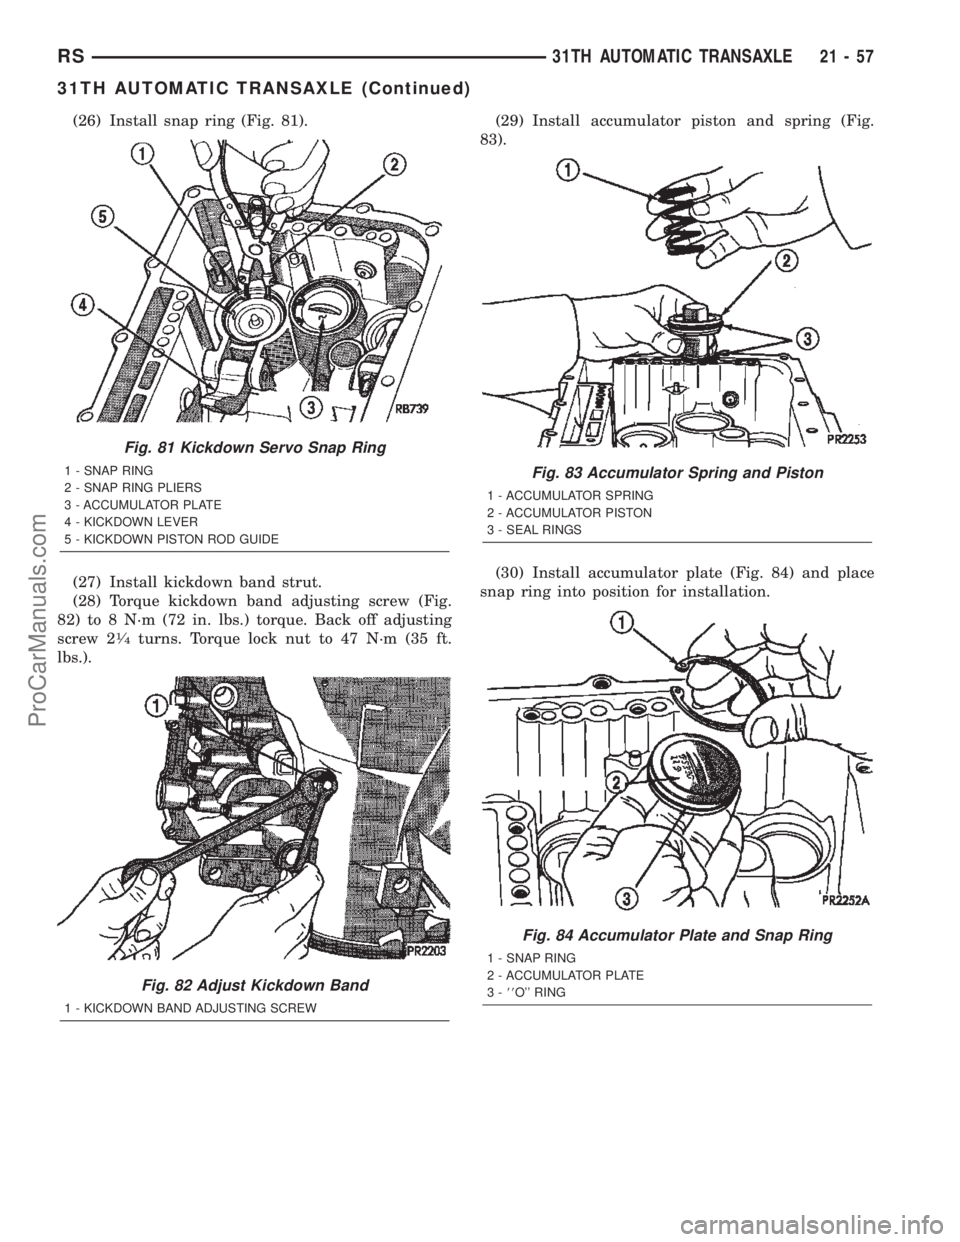
(26) Install snap ring (Fig. 81).
(27) Install kickdown band strut.
(28) Torque kickdown band adjusting screw (Fig.
82) to 8 N´m (72 in. lbs.) torque. Back off adjusting
screw 2
1¤4turns. Torque lock nut to 47 N´m (35 ft.
lbs.).(29) Install accumulator piston and spring (Fig.
83).
(30) Install accumulator plate (Fig. 84) and place
snap ring into position for installation.
Fig. 81 Kickdown Servo Snap Ring
1 - SNAP RING
2 - SNAP RING PLIERS
3 - ACCUMULATOR PLATE
4 - KICKDOWN LEVER
5 - KICKDOWN PISTON ROD GUIDE
Fig. 82 Adjust Kickdown Band
1 - KICKDOWN BAND ADJUSTING SCREW
Fig. 83 Accumulator Spring and Piston
1 - ACCUMULATOR SPRING
2 - ACCUMULATOR PISTON
3 - SEAL RINGS
Fig. 84 Accumulator Plate and Snap Ring
1 - SNAP RING
2 - ACCUMULATOR PLATE
3-88O'' RING
RS31TH AUTOMATIC TRANSAXLE21-57
31TH AUTOMATIC TRANSAXLE (Continued)
ProCarManuals.com
Page 1615 of 2399
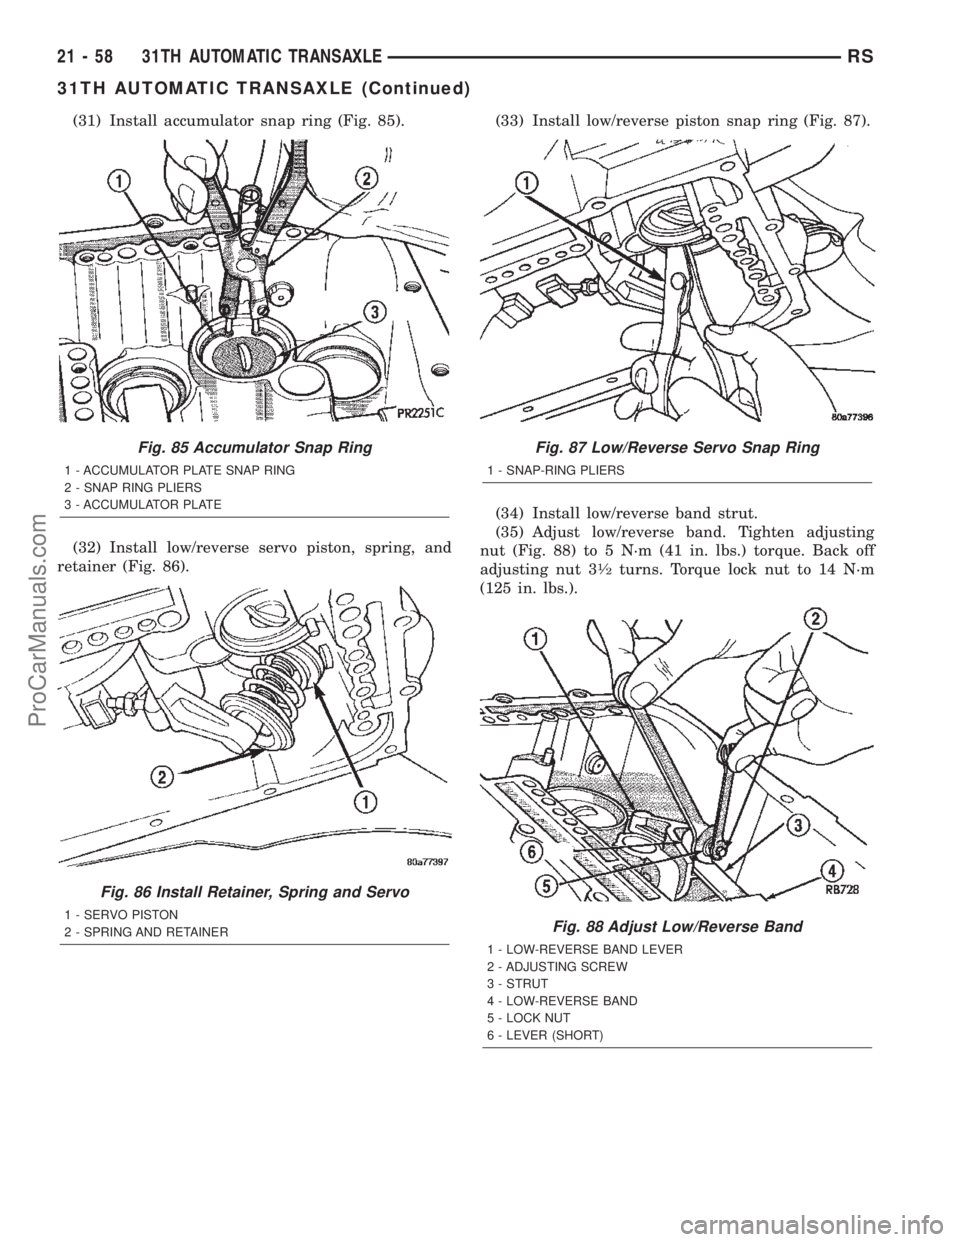
(31) Install accumulator snap ring (Fig. 85).
(32) Install low/reverse servo piston, spring, and
retainer (Fig. 86).(33) Install low/reverse piston snap ring (Fig. 87).
(34) Install low/reverse band strut.
(35) Adjust low/reverse band. Tighten adjusting
nut (Fig. 88) to 5 N´m (41 in. lbs.) torque. Back off
adjusting nut 3
1¤2turns. Torque lock nut to 14 N´m
(125 in. lbs.).
Fig. 85 Accumulator Snap Ring
1 - ACCUMULATOR PLATE SNAP RING
2 - SNAP RING PLIERS
3 - ACCUMULATOR PLATE
Fig. 86 Install Retainer, Spring and Servo
1 - SERVO PISTON
2 - SPRING AND RETAINER
Fig. 87 Low/Reverse Servo Snap Ring
1 - SNAP-RING PLIERS
Fig. 88 Adjust Low/Reverse Band
1 - LOW-REVERSE BAND LEVER
2 - ADJUSTING SCREW
3 - STRUT
4 - LOW-REVERSE BAND
5 - LOCK NUT
6 - LEVER (SHORT)
21 - 58 31TH AUTOMATIC TRANSAXLERS
31TH AUTOMATIC TRANSAXLE (Continued)
ProCarManuals.com