Page 369 of 486
5-36
A. Cable
B. Liftgate Hinges
C. Door Striker
4. Pull the cable through the door striker and the center
of the wheel.
5. Hook the cable onto the
outside portion of the
liftgate hinges.
6. Pull on the cable to make sure it is secure.
7. Make sure the metal
tube is centered at the
striker. Push the tube
towards the front of
the vehicle.
8. Close the liftgate and make sure that it is latched.
Page 372 of 486

5-39
NOTICE:
Spinning your wheels can destroy parts of your
vehicle as well as the tires. If you spin the wheels
too fast while shifting your transaxle back and
forth, you can destroy your transaxle.
For information about using tire chains on your vehicle,
see ªTire Chainsº in the Index.
Rocking Your Vehicle To Get It Out
First, turn your steering wheel left and right. That will
clear the area around your front wheels. If your vehicle
has traction control, you should turn your traction
control system off. See ªTraction Control Systemº in the
Index. Then shift back and forth between REVERSE (R)
and a forward gear, spinning the wheels as little as
possible. Release the accelerator pedal while you shift,
and press lightly on the accelerator pedal when the
transaxle is in gear. By slowly spinning your wheels in
the forward and reverse directions, you will cause a
rocking motion that may free your vehicle. If that
doesn't get you out after a few tries, you may need to be
towed out. If you do need to be towed out, see ªTowing
Your Vehicleº in the Index.
Page 384 of 486

6-12
Engine Oil
United States Canada
If the low engine oil level message appears on the
instrument cluster, it means you need to check your
engine oil level right away. For more information, see
ªLow Engine Oil Level Messageº in the Index.
You should check your engine oil level regularly; this is
an added reminder.
Checking Engine Oil
It's a good idea to check your engine oil every time you
get fuel. In order to get an accurate reading, the oil must
be warm and the vehicle must be on level ground.
The engine oil dipstick is
located at the front of the
engine compartment, near
the center. The dipstick
handle has a bright, yellow
loop design for easy
identification. See ªEngine
Compartment Overviewº in
the Index for more
information on location.
Turn off the engine and give the oil several minutes to
drain back into the oil pan. If you don't, the oil dipstick
might not show the actual level.
Pull out the dipstick and clean it with a paper towel or
cloth, then push it back in all the way. Remove it again,
keeping the tip down, and check the level.
Page 392 of 486
6-20
2. Then push the tab, located on the left of the inner
access panel, to the right.
3. The first air filter will pull straight out. To remove
the second, reach in and slide it toward the opening.
Pull the second filter out.
4. Replace the filters by reversing Step 3. Make sure
the filters are inserted so that the sealing foam is
angled in the same direction on both filters. For the
type of filter to use, see ªNormal Maintenance
Replacement Partsº in the Index.
5. Close the inner access door, while squeezing the tab.
Be sure it is tightly closed.
6. Snap the outer access panel into the back of the
glove box.
Page 393 of 486

6-21
Automatic Transaxle Fluid
When to Check and Change
A good time to check your automatic transaxle fluid
level is when the engine oil is changed.
Change both the fluid and filter every 50,000 miles
(83 000 km) if the vehicle is mainly driven under one or
more of these conditions:
�In heavy city traffic where the outside temperature
regularly reaches 90�F (32�C) or higher.
�In hilly or mountainous terrain.
�When doing frequent trailer towing.
�Uses such as found in taxi, police or delivery service.
If you do not use your vehicle under any of
these conditions, change the fluid and filter
at 100,000 miles (166 000 km).
See ªScheduled Maintenance Servicesº in the Index.
How to Check
Because this operation can be a little difficult, you may
choose to have this done at the dealership service department.
If you do it yourself, be sure to follow all the instructions
here, or you could get a false reading on the dipstick.
NOTICE:
Too much or too little fluid can damage your
transaxle. Too much can mean that some of the
fluid could come out and fall on hot engine parts
or exhaust system parts, starting a fire. Too little
fluid could cause the transaxle to overheat. Be
sure to get an accurate reading if you check your
transaxle fluid.
Wait at least 30 minutes before checking the transaxle
fluid level if you have been driving:
�When outside temperatures are above 90�F (32�C).
�At high speed for quite a while.
�In heavy traffic
-- especially in hot weather.
�While pulling a trailer.
To get the right reading, the fluid should be at normal
operating temperature, which is 180�F to 200�F
(82�C to 93�C).
Get the vehicle warmed up by driving about 15 miles
(24 km) when outside temperatures are above 50�F
(10�C). If it's colder than 50�F (10�C), you may have
to drive longer.
Page 394 of 486
6-22
Checking the Fluid Level
Prepare your vehicle as follows:
�Park your vehicle on a level place. Keep the
engine running.
�With the parking brake applied, place the shift lever
in PARK (P).
�With your foot on the brake pedal, move the shift
lever through each gear range, pausing for about
three seconds in each range. Then, position the shift
lever in PARK (P).
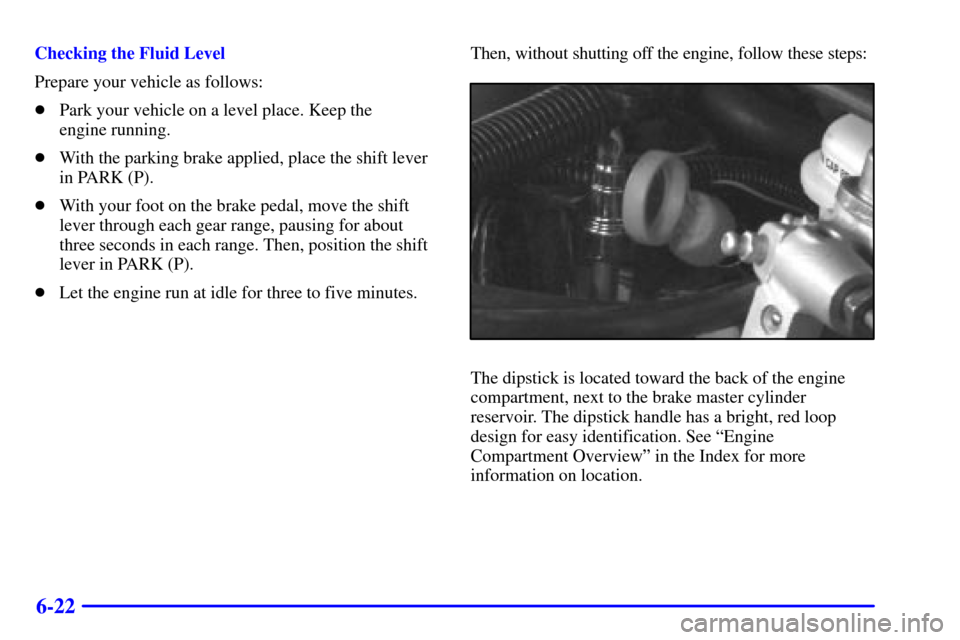
�Let the engine run at idle for three to five minutes.Then, without shutting off the engine, follow these steps:
The dipstick is located toward the back of the engine
compartment, next to the brake master cylinder
reservoir. The dipstick handle has a bright, red loop
design for easy identification. See ªEngine
Compartment Overviewº in the Index for more
information on location.
Page 395 of 486

6-23
1. Pull out the dipstick and wipe it with a clean rag or
paper towel.
2. Push it back in all the way, wait three seconds and
then pull it back out again.
3. Check both sides of the dipstick, and read the
lower level. The fluid level must be in the
cross
-hatched area.
4. If the fluid level is in the acceptable range, push the
dipstick back in all the way.
How to Add Fluid
Refer to the Maintenance Schedule to determine what
kind of transaxle fluid to use. See ªRecommended
Fluids and Lubricantsº in the Index.If the fluid level is low, add only enough of the
proper fluid to bring the level into the cross
-hatched
area on the dipstick.
1. Pull out the dipstick.
2. Using a long
-neck funnel, add enough fluid at the
dipstick hole to bring it to the proper level.
It doesn't take much fluid, generally less than
one pint (0.5 L). Don't overfill.
NOTICE:
We recommend you use only fluid labeled
DEXRON�-III, because fluid with that label is
made especially for your automatic transaxle.
Damage caused by fluid other than
DEXRON
�-III is not covered by your new
vehicle warranty.
3. After adding fluid, recheck the fluid level as
described under ªHow to Check.º
4. When the correct fluid level is obtained, push the
dipstick back in all the way.
Page 416 of 486
6-44
4. While holding the
wiper arm away from
the glass, push the
release clip from
under the blade.
5. Push the release clip at the connecting point of
the blade and the arm up. Then pull the blade
assembly down toward the glass to remove it
from the wiper arm.
6. Push the new wiper blade securely on the wiper arm
until you hear the release clip ªclickº into place.
7. Push the release clip, from Step 4, down to secure
the wiper blade into place.