Page 319 of 432
5-27
4. Place the jack in the appropriate position nearest the
flat tire.
CAUTION:
Getting under a vehicle when it is jacked up is
dangerous. If the vehicle slips off the jack, you
could be badly injured or killed. Never get under
a vehicle when it is supported only by a jack.
CAUTION:
Raising your vehicle with the jack improperly
positioned can damage the vehicle and even make
the vehicle fall. To help avoid personal injury and
vehicle damage, be sure to fit the jack lift head into
the proper location before raising the vehicle.
5. Raise the vehicle by turning the jack handle clockwise.
Raise the vehicle far enough off the ground so there is
enough room for the spare tire to fit.
6. Remove all the wheel nuts and take off the flat tire.
Page 321 of 432
5-29
11. Lower the vehicle by turning the jack handle
counterclockwise. Lower the jack completely.
12. Use the wrench to
tighten the wheel nuts
firmly in a crisscross
sequence as shown.
CAUTION:
Incorrect wheel nuts or improperly tightened
wheel nuts can cause the wheel to become loose
and even come off. This could lead to an accident.
Be sure to use the correct wheel nuts. If you have
to replace them, be sure to get new GM original
equipment wheel nuts.
Stop somewhere as soon as you can and have
the nuts tightened with a torque wrench to
100 lb
-ft (140 N´m).
NOTICE:
Improperly tightened wheel nuts can lead to
brake pulsation and rotor damage. To avoid
expensive brake repairs, evenly tighten the
wheel nuts in the proper sequence and to the
proper torque specification.
Page 324 of 432
5-32
Return the jack, wheel wrench and wheel blocks to the
proper location under the rear seat of the vehicle. Secure
the items and return the rear seat to its proper position.
A. Handle
B. Wheel WrenchC. Extension
D. Wheel Blocks
and Jack
If You're Stuck: In Sand, Mud,
Ice or Snow
In order to free your vehicle when it is stuck, you will
need to spin the wheels, but you don't want to spin
your wheels too fast. The method known as ªrockingº
can help you get out when you're stuck, but you must
use caution.
CAUTION:
If you let your tires spin at high speed, they can
explode, and you or others could be injured.
And, the transmission or other parts of the
vehicle can overheat. That could cause an engine
compartment fire or other damage. When you're
stuck, spin the wheels as little as possible. Don't
spin the wheels above 35 mph (55 km/h) as shown
on the speedometer.
Page 332 of 432
6-6
Filling Your Tank
CAUTION:
Gasoline vapor is highly flammable. It burns
violently, and that can cause very bad injuries.
Don't smoke if you're near gasoline or refueling
your vehicle. Keep sparks, flames and smoking
materials away from gasoline.
The fuel cap is located behind a hinged door on the
driver's side of your vehicle.
While refueling, hang the fuel cap by the tether using
the hook located on the inside of the filler door.
To remove the fuel cap, turn it slowly to the left
(counterclockwise). The fuel cap has a spring in it;
if you let go of the cap too soon, it will spring back
to the right.
Page 333 of 432

6-7
CAUTION:
If you get gasoline on yourself and then something
ignites it, you could be badly burned. Gasoline can
spray out on you if you open the fuel cap too
quickly. This spray can happen if your tank is
nearly full, and is more likely in hot weather.
Open the fuel cap slowly and wait for any ªhissº
noise to stop. Then unscrew the cap all the way.
Be careful not to spill gasoline. Clean gasoline from
painted surfaces as soon as possible. See ªCleaning the
Outside of Your Vehicleº in the Index.When you put the fuel cap back on, turn it to the right
(clockwise) until you hear a clicking sound. Make sure
you fully install the cap. The diagnostic system can
determine if the fuel cap has been left off or improperly
installed. This would allow fuel to evaporate into the
atmosphere. See ªMalfunction Indicator Lampº in
the Index.
NOTICE:
If you need a new fuel cap, be sure to get the
right type. Your dealer can get one for you. If
you get the wrong type, it may not fit properly.
This may cause your malfunction indicator lamp
to light and may damage your fuel tank and
emissions system. See ªMalfunction Indicator
Lampº in the Index.
Page 337 of 432

6-11
A. Coolant Recovery Tank
B. Engine Air Cleaner/Filter
C. Windshield Washer Fluid Reservoir
D. Engine Air Cleaner/Filter Indicator
E. Power Steering Fluid Reservoir
F. Automatic Transmission Dipstick
G. Engine Oil Dipstick
H. Radiator Pressure Cap
I. Engine Oil Fill Cap
J. Front Engine Lift Bracket Marked ªGNDº
K. Brake Master Cylinder
L. Battery
M. Engine Compartment Fuse Block
Before closing the hood, be sure all filler caps are on
properly. Then lift the hood to relieve pressure on the
hood prop. Remove the hood prop from its slot in the
hood and return the prop to its retainer. Then pull the
hood down firmly to close. It will latch when dropped
from 6 to 8 inches (15 to 20 cm) without pressing on
the hood.Engine Oil
If the CHECK OIL LEVEL message appears on the
instrument cluster, it means you need to check your
engine oil level right away. For more information,
see ªCheck Oil Level Messageº in the Index.
You should check your engine oil level regularly;
this is an added reminder.
Checking Engine Oil
It's a good idea to check your engine oil every time you
get fuel. In order to get an accurate reading, the oil must
be warm and the vehicle must be on level ground.
The engine oil dipstick
handle is a yellow ring
located in the engine
compartment toward the
passenger's side of the
vehicle. See ªEngine
Compartment Overviewº
in the Index for more
information on location.
Page 346 of 432

6-20
Then, without shutting off the engine, follow
these steps:
Locate the handle with the
transmission and lock
symbols for the automatic
transmission dipstick in
the engine compartment
on the passenger's side of
the vehicle.
See ªEngine Compartment Overviewº
in the Index for more information on location.
1. Flip the handle up and then pull out the dipstick and
wipe it with a clean rag or paper towel.
2. Push it back in all the way, wait three seconds and
then pull it back out again.
3. If the fluid level is in the acceptable range, push
the dipstick back in all the way; then flip the handle
down to lock the dipstick in place.
How to Add Fluid
Refer to the Maintenance Schedule to determine what
kind of transmission fluid to use. See ªRecommended
Fluids and Lubricantsº in the Index.
Add fluid only after checking the transmission fluid
while it is hot. (A cold check is used only as a reference.)
If the fluid level is low, add only enough of the proper
fluid to bring the level up to the HOT area for a hot
check. It doesn't take much fluid, generally less than
one pint (0.5 L). Don't overfill.
Page 347 of 432
6-21
NOTICE:
We recommend you use only fluid labeled
DEXRON�-III, because fluid with that label is
made especially for your automatic transmission.
Damage caused by fluid other than DEXRON
�-III
is not covered by your new vehicle warranty.
�After adding fluid, recheck the fluid level as
described under ªHow to Check.º
�When the correct fluid level is obtained, push the
dipstick back in all the way; then flip the handle
down to lock the dipstick in place.
Rear Axle
When to Check Lubricant
Refer to the Maintenance Schedule to determine
how often to check the lubricant. See ªScheduled
Maintenance Servicesº in the Index.
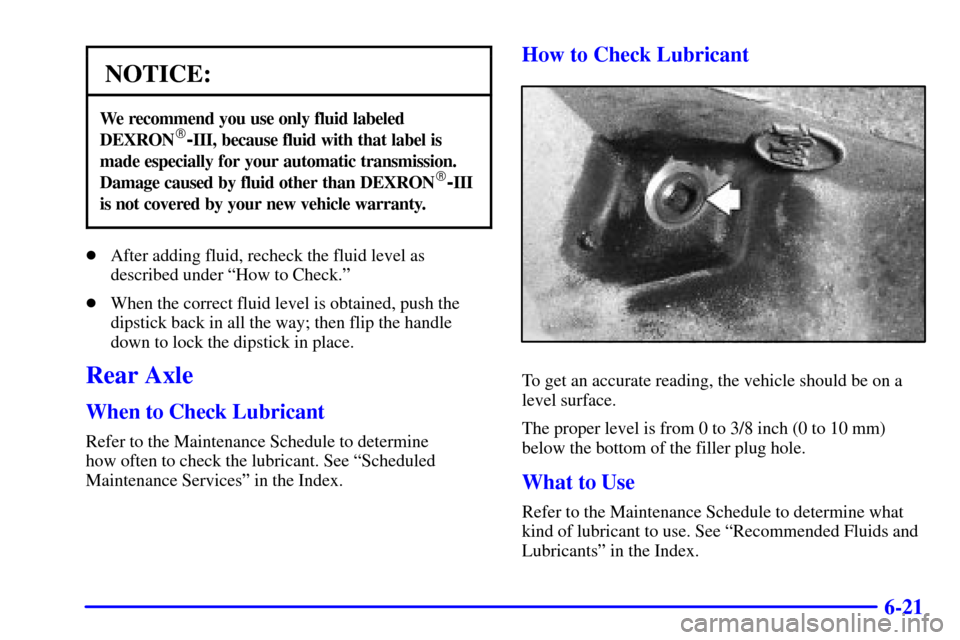
How to Check Lubricant
To get an accurate reading, the vehicle should be on a
level surface.
The proper level is from 0 to 3/8 inch (0 to 10 mm)
below the bottom of the filler plug hole.
What to Use
Refer to the Maintenance Schedule to determine what
kind of lubricant to use. See ªRecommended Fluids and
Lubricantsº in the Index.