2002 CHEVROLET AVEO battery
[x] Cancel search: batteryPage 2076 of 5127
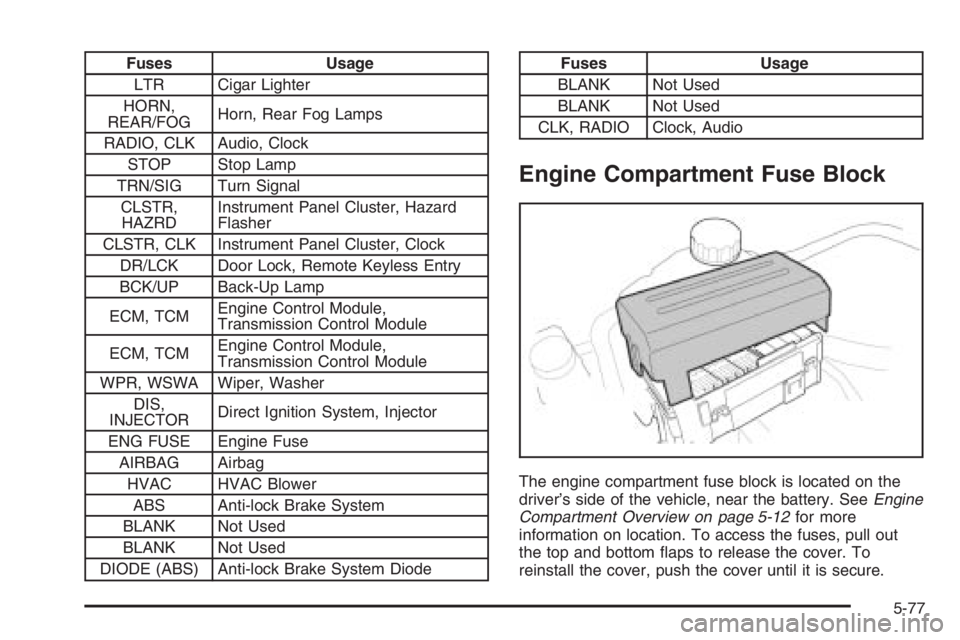
Fuses Usage
LTR Cigar Lighter
HORN,
REAR/FOGHorn, Rear Fog Lamps
RADIO, CLK Audio, Clock
STOP Stop Lamp
TRN/SIG Turn Signal
CLSTR,
HAZRDInstrument Panel Cluster, Hazard
Flasher
CLSTR, CLK Instrument Panel Cluster, Clock
DR/LCK Door Lock, Remote Keyless Entry
BCK/UP Back-Up Lamp
ECM, TCMEngine Control Module,
Transmission Control Module
ECM, TCMEngine Control Module,
Transmission Control Module
WPR, WSWA Wiper, Washer
DIS,
INJECTORDirect Ignition System, Injector
ENG FUSE Engine Fuse
AIRBAG Airbag
HVAC HVAC Blower
ABS Anti-lock Brake System
BLANK Not Used
BLANK Not Used
DIODE (ABS) Anti-lock Brake System DiodeFuses Usage
BLANK Not Used
BLANK Not Used
CLK, RADIO Clock, Audio
Engine Compartment Fuse Block
The engine compartment fuse block is located on the
driver’s side of the vehicle, near the battery. SeeEngine
Compartment Overview on page 5-12for more
information on location. To access the fuses, pull out
the top and bottom flaps to release the cover. To
reinstall the cover, push the cover until it is secure.
5-77
Page 2118 of 5127
•Flat Tire Change:Installation of a spare tire will be
covered at no charge. The customer is responsible
for the repair or replacement of the tire if not
covered by a warrantable failure.
•Jump Start:No-start occurrences which require a
battery jump start will be covered at no charge.
•Dealer Locator Service
In many instances, mechanical failures are covered
under Chevrolet’s Bumper-to-Bumper warranty.
However, when other services are utilized, our Roadside
Assistance Representatives will explain any payment
obligations you might incur.
For prompt and efficient assistance when calling, please
provide the following to the Roadside Assistance
Representative:
•Your name, home address, and home telephone
number.
•Telephone number of your location.
•Location of the vehicle.
•Model, year, color, and license plate number.
•Mileage, Vehicle Identification Number (VIN), and
delivery date of the vehicle.
•Description of the problem.While we hope you never have the occasion to use our
service, it is added security while traveling for you
and your family. Remember, we are only a phone call
away. Chevrolet Roadside Assistance:
1-800-CHEV-USA (1-800-243-8872), text telephone
(TTY) users, call1-888-889-2438.
Chevrolet reserves the right to limit services or
reimbursement to an owner or driver when, in
Chevrolet’s judgement, the claims become excessive in
frequency or type of occurrence.
Roadside Assistance is not part of or included in the
coverage provided by the New Vehicle Limited Warranty.
Chevrolet reserves the right to make any changes or
discontinue the Roadside Assistance program at
any time without notification.
Canadian Roadside Assistance
Vehicles purchased in Canada have an extensive
roadside assistance program accessible from anywhere
in Canada or the United States. Please refer to the
Warranty and Owner Assistance Information book.
7-7
Page 2129 of 5127
Automatic Transaxle
Fluid..........................................................5-19
Operation...................................................2-21
B
Battery..........................................................5-35
Before Leaving on a Long Trip.........................4-19
Brake
Anti-Lock Brake System (ABS)........................ 4-7
Emergencies................................................ 4-8
Parking......................................................2-26
System Inspection.......................................6-24
System Warning Light..................................3-27
Brakes..........................................................5-32
Braking........................................................... 4-6
Braking in Emergencies..................................... 4-8
Break-In, New Vehicle.....................................2-17
Bulb Replacement...........................................5-40
Front Turn Signal and Parking Lamps.............5-42
Halogen Bulbs............................................5-40
Headlamp Aiming........................................5-39
Headlamps.................................................5-40
Replacement Bulbs......................................5-44
Taillamps, Turn Signal, Stoplamps and
Back-up Lamps........................................5-43
Turn Signal Lamps......................................5-42
Buying New Tires...........................................5-54
C
California Fuel.................................................. 5-5
California Proposition 65 Warning....................... 5-3
Canadian Owners................................................ ii
Capacities and Specifications............................5-80
Carbon Monoxide.............2-9, 2-11, 2-30, 4-22, 4-35
Care of
Safety Belts................................................5-69
Your CD Player...........................................3-71
Your CDs ...................................................3-71
Center Rear Passenger Position, Safety Belts.....1-28
Chains, Tire...................................................5-57
Charging System Light....................................3-33
Check
Engine Light...............................................3-34
Checking Things Under the Hood......................5-10
Chemical Paint Spotting...................................5-72
Child Restraints
Child Restraint Systems...............................1-36
Infants and Young Children...........................1-32
Lower Anchors and Tethers for Children..........1-42
Older Children.............................................1-30
Securing a Child Restraint in a
Rear Seat Position...................................1-49
Securing a Child Restraint in the
Right Front Seat Position..........................1-51
Where to Put the Restraint...........................1-40
Cigarette Lighter.............................................3-17
2
Page 2131 of 5127
Driver
Position, Safety Belt.....................................1-18
Seat Height Adjuster...................................... 1-3
Driving
At Night.....................................................4-14
City ...........................................................4-17
Defensive..................................................... 4-2
Drunken....................................................... 4-3
Freeway.....................................................4-18
Hill and Mountain Roads..............................4-20
In Rain and on Wet Roads...........................4-15
Rocking Your Vehicle to Get it Out.................4-26
Winter........................................................4-22
E
Electrical System
Add-On Equipment......................................5-74
Engine Compartment Fuse Block...................5-77
Fuses and Circuit Breakers...........................5-75
Headlamp Wiring.........................................5-75
Instrument Panel Fuse Block.........................5-76
Power Windows and Other Power Options......5-75
Windshield Wiper Fuses...............................5-75
Engine
Air Cleaner/Filter.........................................5-17
Battery.......................................................5-35
Check and Service Engine Soon Light............3-34
Coolant......................................................5-22
Coolant Heater............................................2-20Engine (cont.)
Coolant Temperature Gage...........................3-28
Cooling System Inspection............................6-24
Engine Compartment Overview......................5-12
Exhaust.....................................................2-30
Oil .............................................................5-13
Overheating................................................5-24
Starting......................................................2-19
Event Data Recorders (EDR)............................7-10
Extender, Safety Belt.......................................1-29
Exterior Lamps...............................................3-13
F
Filter
Engine Air Cleaner......................................5-17
Finish Damage...............................................5-72
Fixed Mast Antenna........................................3-71
Flashers, Hazard Warning.................................. 3-6
Flash-to-Pass................................................... 3-8
Flat Tire........................................................5-58
Flat Tire, Changing.........................................5-58
Flat Tire, Storing.............................................5-65
Fluid
Automatic Transaxle.....................................5-19
Manual Transaxle........................................5-21
Power Steering...........................................5-30
Windshield Washer......................................5-31
Fog Lamp Light..............................................3-38
Fog Lamps ....................................................3-15
4
Page 2582 of 5127
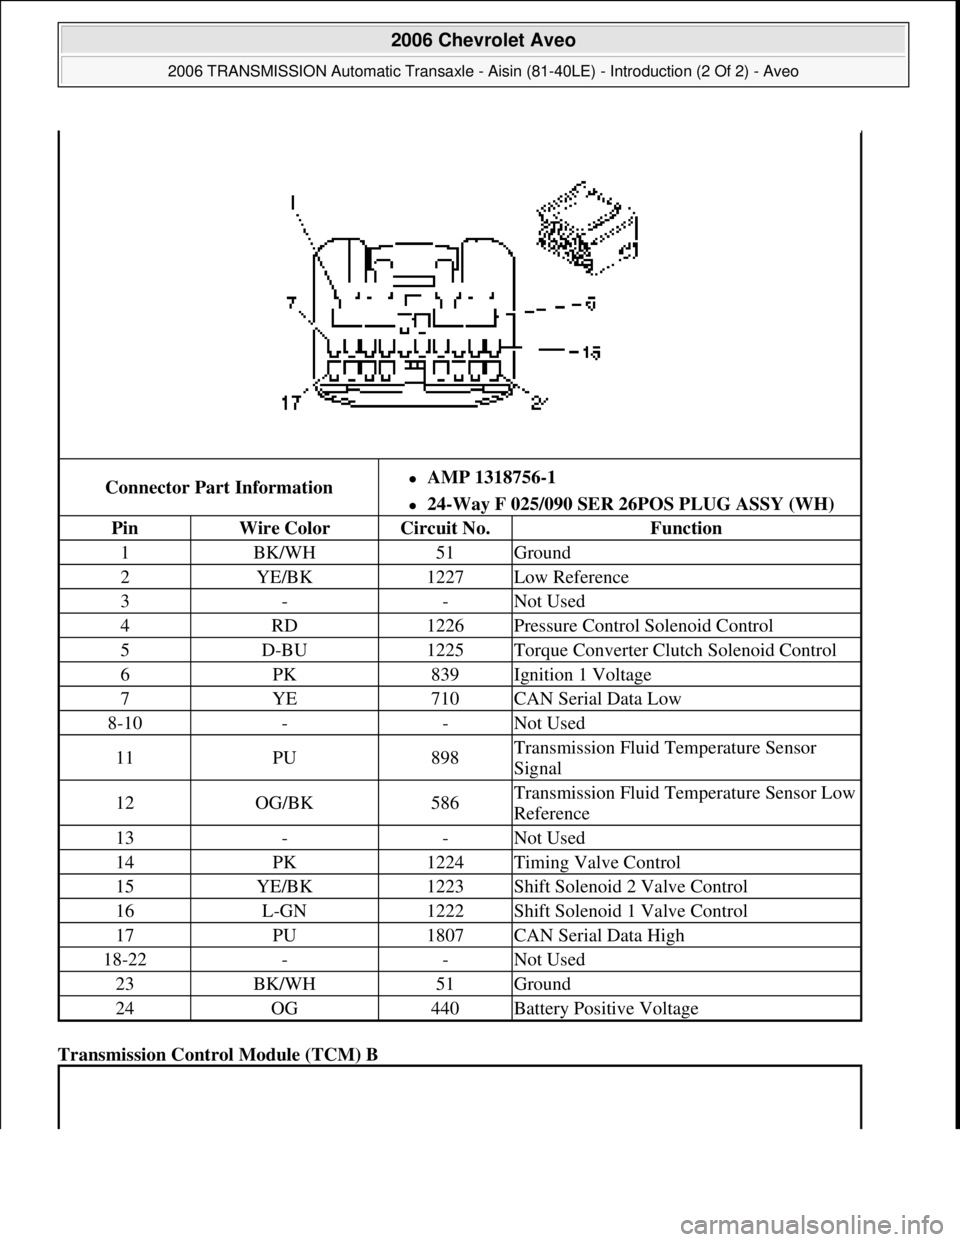
Transmission Control Module (TCM) B
Connector Part InformationAMP 1318756-1
24-Way F 025/090 SER 26POS PLUG ASSY (WH)
PinWire ColorCircuit No.Function
1BK/WH51Ground
2YE/BK1227Low Reference
3--Not Used
4RD1226Pressure Control Solenoid Control
5D-BU1225Torque Converter Clutch Solenoid Control
6PK839Ignition 1 Voltage
7YE710CAN Serial Data Low
8-10--Not Used
11PU898Transmission Fluid Temperature Sensor
Signal
12OG/BK586Transmission Fluid Temperature Sensor Low
Reference
13--Not Used
14PK1224Timing Valve Control
15YE/BK1223Shift Solenoid 2 Valve Control
16L-GN1222Shift Solenoid 1 Valve Control
17PU1807CAN Serial Data High
18-22--Not Used
23BK/WH51Ground
24OG440Battery Positive Voltage
2006 Chevrolet Aveo
2006 TRANSMISSION Automatic Transaxle - Aisin (81-40LE) - Introduction (2 Of 2) - Aveo
Microsoft
Thursday, July 16, 2009 1:17:17 PMPage 33 © 2005 Mitchell Repair Information Company, LLC.
Page 2599 of 5127
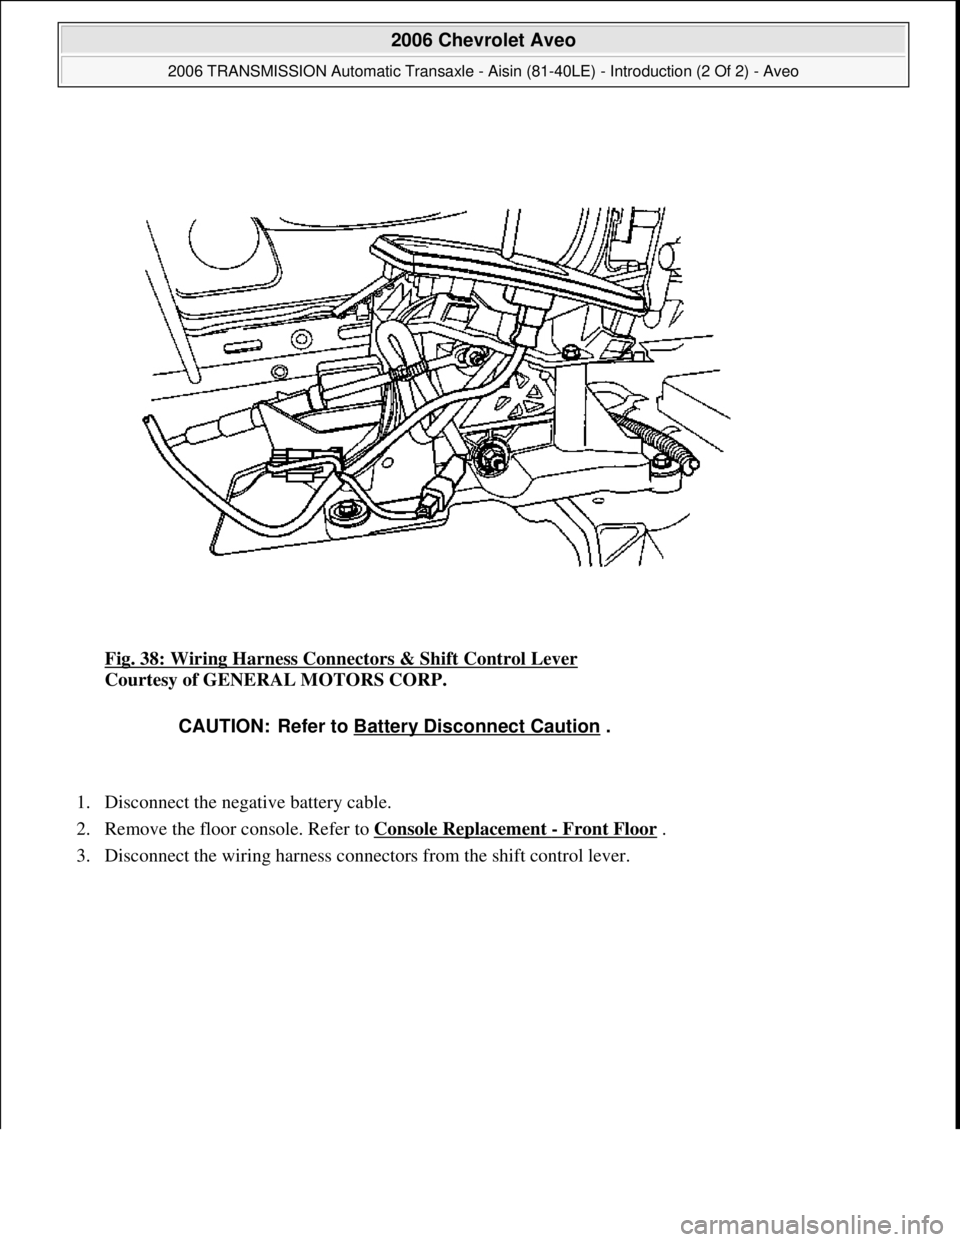
Fig. 38: Wiring Harness Connectors & Shift Control Lever
Courtesy of GENERAL MOTORS CORP.
1. Disconnect the negative battery cable.
2. Remove the floor console. Refer to Console Replacement
- Front Floor .
3. Disconnect the wirin
g harness connectors from the shift control lever.
CAUTION: Refer to Battery Disconnect Caution .
2006 Chevrolet Aveo
2006 TRANSMISSION Automatic Transaxle - Aisin (81-40LE) - Introduction (2 Of 2) - Aveo
Microsoft
Thursday, July 16, 2009 1:17:18 PMPage 50 © 2005 Mitchell Repair Information Company, LLC.
Page 2604 of 5127
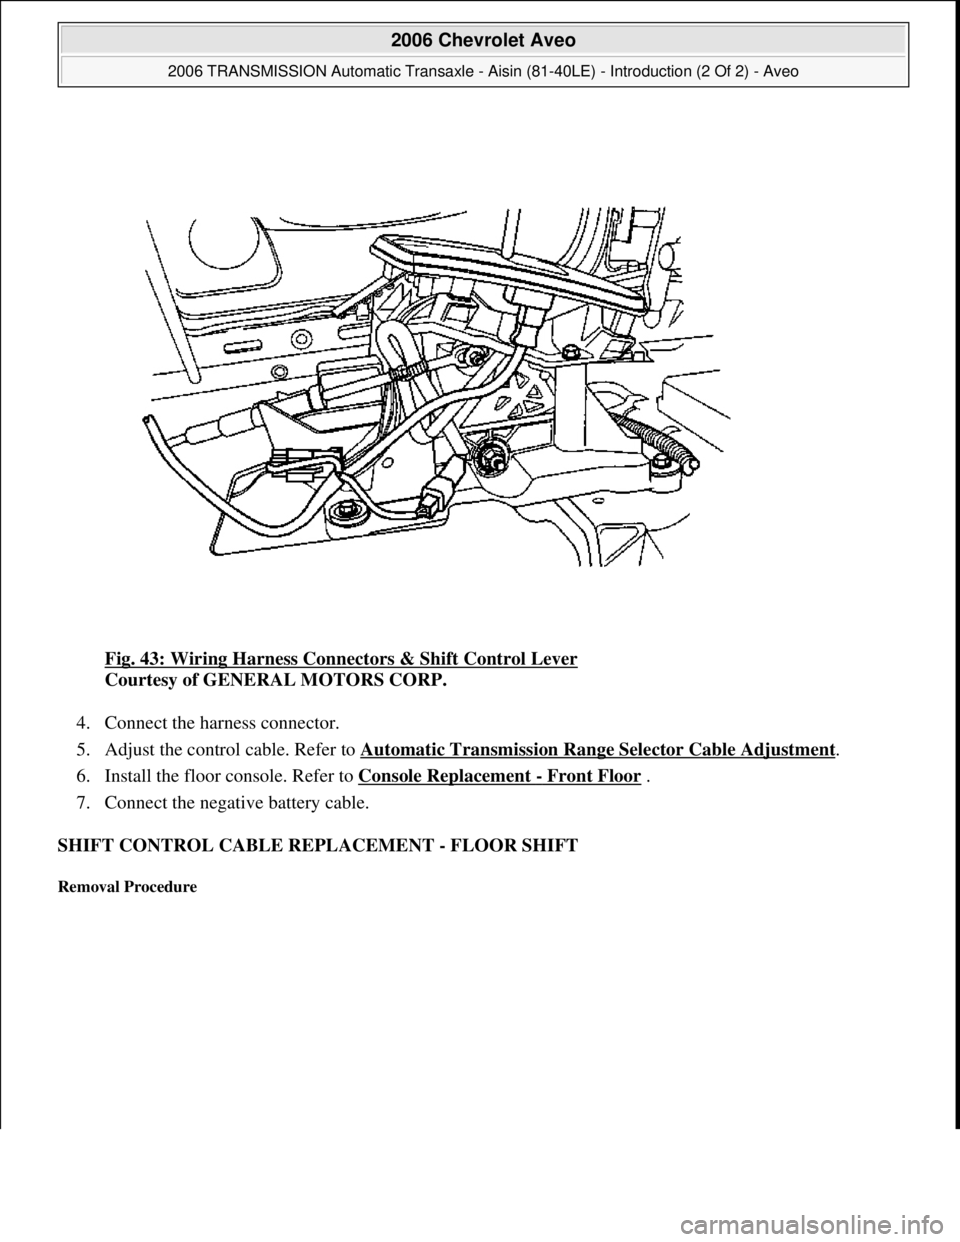
Fig. 43: Wiring Harness Connectors & Shift Control Lever
Courtesy of GENERAL MOTORS CORP.
4. Connect the harness connector.
5. Adjust the control cable. Refer to Automatic Transmission Range Selector Cable Adjustment
.
6. Install the floor console. Refer to Console Replacement
- Front Floor .
7. Connect the negative battery cable.
SHIFT CONTROL CABLE REPLACEMENT - FLOOR SHIFT
Removal Procedure
2006 Chevrolet Aveo
2006 TRANSMISSION Automatic Transaxle - Aisin (81-40LE) - Introduction (2 Of 2) - Aveo
Microsoft
Thursday, July 16, 2009 1:17:18 PMPage 55 © 2005 Mitchell Repair Information Company, LLC.
Page 2605 of 5127
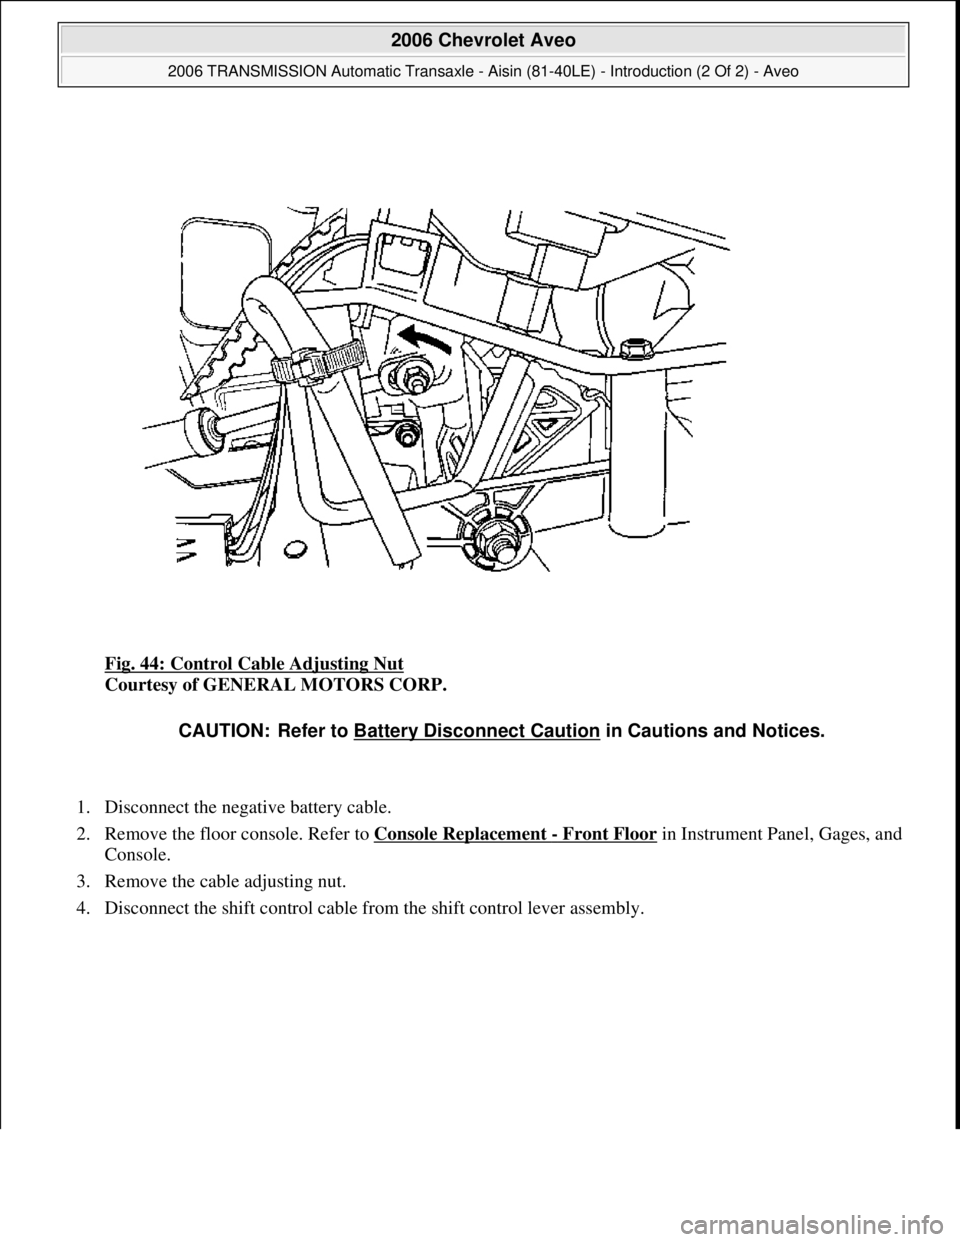
Fig. 44: Control Cable Adjusting Nut
Courtesy of GENERAL MOTORS CORP.
1. Disconnect the negative battery cable.
2. Remove the floor console. Refer to Console Replacement
- Front Floorin Instrument Panel, Gages, and
Console.
3. Remove the cable adjusting nut.
4. Disconnect the shift control cable from the shift control lever assembly.
CAUTION: Refer to Battery Disconnect Caution in Cautions and Notices.
2006 Chevrolet Aveo
2006 TRANSMISSION Automatic Transaxle - Aisin (81-40LE) - Introduction (2 Of 2) - Aveo
Microsoft
Thursday, July 16, 2009 1:17:18 PMPage 56 © 2005 Mitchell Repair Information Company, LLC.