Page 129 of 426
2-61
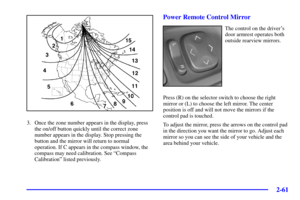
3. Once the zone number appears in the display, press
the on/off button quickly until the correct zone
number appears in the display. Stop pressing the
button and the mirror will return to normal
operation. If C appears in the compass window, the
compass may need calibration. See ªCompass
Calibrationº listed previously.
Power Remote Control Mirror
The control on the driver's
door armrest operates both
outside rearview mirrors.
Press (R) on the selector switch to choose the right
mirror or (L) to choose the left mirror. The center
position is off and will not move the mirrors if the
control pad is touched.
To adjust the mirror, press the arrows on the control pad
in the direction you want the mirror to go. Adjust each
mirror so you can see the side of your vehicle and the
area behind your vehicle.
Page 130 of 426

2-62
The mirrors can be manually folded inward to prevent
damage when going through an automatic car wash. To
fold, push the mirror toward the vehicle. To return the
mirror to its original position, push outward. Be sure to
return both mirrors to their original unfolded position
before driving.
The mirrors can also be programmed for personalization
and parallel parking feature if you have the optional
memory package. For more information, see ªMemory
Seat, Mirrors and Steering Wheelº and ªVehicle
Programming and Personalization Featuresº in
the Index.
Driver's Outside Auto-Dimming
Rearview Mirror
The driver's side outside mirror will adjust for the glare
of headlamps behind you. This feature is controlled by
the on and off settings on the electrochromic mirror.
See ªElectrochromic Day/Night Rearview Mirror with
Compassº in the Index.
Curb View Assist Mirror (If Equipped)
If your vehicle is equipped with memory mirrors, it
will also be capable of performing the curb view assist
mirror feature. This feature will cause the passenger's
mirror to tilt to a preselected position when the vehicle
is in REVERSE (R). This feature may be useful
in allowing you to view the curb when you are
parallel parking.
When the vehicle is shifted out of REVERSE (R) and a
five
-second delay has occurred, the passenger's mirror
will return to its original position.
If further adjustment is needed after the mirror is tilted,
the mirror switch may be used.
This feature can be enabled/disabled through the
Driver Information Center. See ªVehicle Programming
and Personalization Featuresº in the Index for
more information.
Page 131 of 426

2-63
Convex Outside Mirror
Your passenger's side mirror is convex. A convex
mirror's surface is curved so you can see more from the
driver's seat.
CAUTION:
A convex mirror can make things (like other
vehicles) look farther away than they really are.
If you cut too sharply into the right lane, you
could hit a vehicle on your right. Check your
inside mirror or glance over your shoulder before
changing lanes.
Heated Outside Mirrors
When you operate the rear window defogger, it also
warms both outside mirrors to help clear them of fog
or ice. See ªRear Window Defoggerº in the Index for
more information.
Storage Compartments
Glove Box
The glove box is located in front of the passenger's seat.
To lock the glove box door, insert the master key into
the lock cylinder and turn it clockwise. Turn the key
counterclockwise to unlock the door.
Front Storage Area (If Equipped)
The front storage area comes with a coinholder, a
storage compartment for CDs or tapes, an optional
cellular telephone and a dual cupholder.
Map Pocket
The map/storage pockets are located on each front door
and on the rear door trim as well as on the back of both
front seatbacks.
Page 132 of 426

2-64
Center Instrument Panel Compartment
(If Equipped)
This storage compartment is located in the center of the
instrument panel below the radio. Pull the door out to
reveal the accessory power outlet and storage
compartment. To clean the storage compartment, lift out
while pulling on the sides.
Center Console Storage (If Equipped)
The center console comes with a storage tray, a storage
compartment for CDs or tapes, a dual cupholder that
unfolds, a coinholder, an optional phone and an armrest.
The cupholder can be opened by pressing on the surface
panel located in front of the armrest and unfolding it.
Close the lid to secure it.
Full Floor Console Storage (If Equipped)
The full floor console has an upper and lower storage
area. The upper storage area is available for the optional
cellular telephone. The lower storage area has
two removable bins that can hold tapes and/or CDs.To open the console, pull up on either lever to open the
upper or lower storage area.
There is also a removable coinholder that attaches to
the side of one of the bins. A dual cupholder is located
in front of the console. Open and close by pressing on
the cupholder.
Rear Storage Center Armrest
Your vehicle is equipped with a rear seat armrest which
includes an open storage compartment and a dual
cupholder. To open, release the latch at the front edge.
Rear Storage Door Trim Armrest
(If Equipped)
Your vehicle may be equipped with a rear storage door
trim armrest. The storage area is located in the rear door
trim under the switch plate lid and includes an accessory
power outlet.
Page 133 of 426

2-65
Center Flex Storage Unit (If Equipped)
Your vehicle may be equipped with a center flex storage
unit that includes a front center seat with a lap belt and
an underseat storage compartment. The center seatback
can also be used as a fold down armrest with extra space
for CDs or tapes. An optional cellular telephone is
located in the underseat storage compartment.
Cupholders are also located at the front edge of the
storage unit and can be accessed by pulling the strap
and folding the compartment forward.
When not being used, the center seat lap belt can be
stored in the underseat storage compartment as shown.
Convenience Net
The convenience net attaches to the floor of the trunk.
Put small loads, like grocery bags, behind the net. It can
help keep them from falling over during sharp turns or
quick starts and stops.
The net is not for larger, heavier loads. Store them in the
trunk as far forward as you can. When not using the net,
hook the net to the tabs securing it to the sill plate.
Page 134 of 426

2-66
Ashtrays and Cigarette Lighter
NOTICE:
Don't put papers or other flammable items
into your ashtrays. Hot cigarettes or other
smoking materials could ignite them, causing a
damaging fire.
Front Ashtray
With the full floor console, the ashtray is located
below the climate control system. To open, push down
on the cover. To clean the ashtray, lift it out by gripping
the sides.
For vehicles without the floor console, pull the tray
located below the radio to reveal the ashtray. The
ashtray can be removed for cleaning.
Rear Ashtray
The ashtrays are located on the door armrests. To use an
ashtray, lift the lid.
Cigarette Lighter
NOTICE:
Don't hold a cigarette lighter in with your hand
while it is heating. If you do, it won't be able to
back away from the heating element when it's
ready. That can make it overheat, damaging the
lighter and the heating element.
The front cigarette lighter is located near the ashtray.
The rear cigarette lighters are located in the door
armrests next to the ashtrays.
Press the lighter all the way in and release it. It will pop
back out by itself once the element has heated for use.
Cigarette lighters can be used to provide electrical
power to accessories. See ªAccessory Power Outletsº in
the Index for more information.
Page 135 of 426
2-67
Sun Visors
Swing down the primary visor to block out glare. It can
also be detached from the center mount and moved to
the side while the auxiliary sunshade remains to block
the glare from the front. The visors also have
side
-to-side slide capability.
The driver's sunshade is also equipped with a
storage flap.
Lighted Visor Vanity Mirror
Pull the visor down and lift the cover. Move the slide
switch up or down to brighten or dim the lamp.
Lighted Rear Vanity Mirror (If Equipped)
Pull the vanity cover down to see the mirror. Move the
slide switch up or down to brighten or dim the lamps.
Rear Power Sunshade (If Equipped)
The rear power sunshade helps to reduce the amount of
heat and light entering the rear window.
The rear power sunshade is located in the rear shelf.
Page 136 of 426

2-68
The rear power sunshade switch only works when the
ignition is on or when the Retained Accessory Power is
active. See ªRetained Accessory Powerº in the Index.
To raise the power sunshade, press and release the
REAR SHADE switch located on the front overhead
console. To close the power sunshade, press and release
the REAR SHADE switch again.
Never store objects on the rear shelf because they
may get caught in the sunshade or be tossed about
in your vehicle.
Manual Rear Side Door Sunshade
(If Equipped)
To use the manual rear side door sunshades, lower the
side windows and hook the top edge of the retractable
sunshades over the edge of the windows and raise the
windows. To remove the shades, lower the windows and
the hooks will disengage automatically.
Accessory Power Outlets
Your vehicle is equipped with accessory power outlets.
The outlets can be used to plug in electrical equipment
such as a cellular telephone, CB radio, etc.
If you have a vehicle with a center storage compartment
located on the instrument panel, you may have an
accessory power outlet in the storage drawer. There is
also an outlet on the front passenger's seat near the
umbrella tray.
There are two accessory power outlets in the rear seat
area located on the door armrests next to the ashtrays.
Remove the cigarette lighters to access the outlets.
Your vehicle may have a small cap that must be
removed to access the accessory power outlet. If it does,
when not using the outlet be sure to cover it with the
protective cap.