Page 57 of 159
57n
OverviewControlsMaintenanceRepairsDataIndex
Transporting children safelyChild seat securityAll of the rear belt retractors and the
front passenger's safety belt can be
locked for mounting and securing child-
restraint systems.
A label with the appropriate instructions
for this is located in the immediate
vicinity of the buckle latch of each
safety belt.
Lock the safety beltExtract the entire length of the belt from
the inertia reel mechanism. Allow the
reel to retract the belt somewhat and
engage the buckle, then tighten the belt
against the child-restraint system. The
retraction mechanism is now locked.
The belt cannot be extracted further.
Always observe the installation instruc-
tions provided by the manufacturer of
the child-restraint system.Unlock the safety beltRelease the safety belt, remove the
child's seat and retract the safety belt
to its end position on the belt retractor.
Page 58 of 159
,
the r")
58n
Rollover protection system In the event of an accident or some
other critical driving situation (extreme
tilting in the longitudinal or transverse
axis, loss of contact with the ground),
the rollover protection system will be
automatically activated. The protective
bars located in the rear head restraints
extend within fractions of a second.
In addition to the integrated rollover bar
in the windshield frame, the rollover
protection system affords all the vehicle
occupants necessary headroom.
Always keep the travel path for the
rollover protection system free
and clear. Under no circumstances
should you cover the head restraints.
In the event of less serious accidents,
the safety belt will protect you and,
depending on the severity of the acci-
dent, so will the safety belt tensioner
and the multi-stage airbag restraint
system as well.<
If, after being automatically triggered,
the protective function is not needed,
then the rollover protection system can
be lowered back into place. No special
tool is needed for this.
1. Using a screwdriver from the on-
board tool kit, remove the cover
panel; to do this, position the screw-
driver under the notch (arrow)
2. Pull up on the lever (arrow) toward
the front of the vehicle and keep it in
this position
Page 59 of 159

59n
OverviewControlsMaintenanceRepairsDataIndex
Rollover protection system3. Keep pressing down on the protec-
tive bar 1 from on top until you hear it
click into place
4. Put the cover panel back in place
and press down firmly
5. Press the rear part of the head
restraint 2 closed.
Do the same for the second protective
bar. If you are not familiar with any of
the procedures, consult your BMW
center.
Have the rollover protection system
checked out by your BMW center after
it has been inadvertently triggered.Do not move the convertible top
under any circumstances if the
rollover protection system has
extended.
Do not use the rear head restraints as
storage shelves.
Absolutely no modifications are to be
made to any of the rollover protection
system's individual components or any
of its wiring.
Only your BMW center is to carry out
any work on the rollover protection
system.
Work done on the system that is carried
out improperly could lead to failure in
an emergency or accidental airbag acti-
vation.
Regarding having the system checked
to ensure long-term operation: be scru-
pulous in adhering to the Service
Interval Display for maintenance inter-
vals. Every 2 years at the latest, the roll-
over protection system must be
inspected by a BMW center.<
Page 60 of 159

60n
Vehicle Memory, Key Memory How the system functionsYou have probably frequently wished
that you could configure individual
functions of your vehicles to reflect your
own personal requirements. In engi-
neering your vehicle, BMW has
included several user-defined func-
tions in the vehicle's design. Your BMW
center can make these settings for you
in accordance with your wishes.
There are settings related to the vehicle
("Vehicle Memory") and settings related
to individuals ("Key Memory"). You can
have up to four different basic settings
adjusted for four different persons. The
only requirement is that each person
uses his or her own remote control key.
When your vehicle is unlocked with the
remote control, the vehicle recognizes
the individual user by means of a data
exchange with the key, and makes
adjustments accordingly.
In order for you to distinguish between
different keys, colored decals are
supplied together with the keys.What the system can doYour BMW center can provide you with
details on the possibilities that the
Vehicle and Key Memory systems offer.
Examples for Vehicle Memory:
>Various signals that can serve as
acknowledgment for locking and
unlocking the vehicle, refer to
pages 29, 30
>Activating/deactivating operation of
"Follow me home," refer to page 85.Examples for Key Memory:
>Locking the vehicle after driving off,
refer to page 33
>Automatically moving the seat and
outside mirror into position for that
particular person when unlocking the
vehicle, refer to page 49
>Calling up customized settings for the
automatic climate control when
unlocking using the remote control,
refer to page 92
>After the engine is started, calling up
of the last selected driving program
for each shifting mode, refer to
page 68.
You will see this symbol
throughout the Owner's Manual. It
is to remind you at appropriate places
of the settings that are available to
you.<
Page 61 of 159

61n
OverviewControlsMaintenanceRepairsDataIndex
Ignition key positions0 Steering locked
1 Steering unlocked
2 Ignition switched on
3 Starting engineSteering locked The key can be inserted or removed in
this position only.
After removing the key, turn the
steering wheel slightly to the left or right
until the lock engages.
If the key is not removed, an acoustic
signal is sounded after the driver's door
has been opened.
Once the ignition has been switched off
(ignition key in position 0 or removed),
the radio functions are still available for
approx. 20 minutes. Turn the radio back
on to use it.Steering unlocked You will find that it is often easier to turn
the ignition key from position 0 to posi-
tion 1 when you move the steering
wheel slightly to help disengage the
lock.
Individual electrical accessories are
ready for operation. 1. Engage the parking brake
2. Gearshift lever in idling position
3. Depress the clutch pedal
4. Turn the key to position 3 to start the
engine. Do not actuate the starter for
too short a time. Do not turn it for
more than approx. 20 seconds.
Release the ignition key immediately
when the engine starts.
Do not allow the engine to warm up by
leaving it running while the vehicle
remains stationary. Instead, drive off
immediately at a moderate engine
speed.
Vehicle with sequential M gearbox
*
SMG II: refer to the instructions on
page 64.
Do not allow the engine to run in
enclosed spaces. The exhaust
gases contain carbon monoxide, an
odorless and colorless, but highly toxic
gas. Breathing the exhaust gases poses
an extreme health risk, and can lead to
unconsciousness and death.
Do not leave the vehicle unattended
with the engine running. An unat-
tended vehicle with a running engine
represents a potential safety hazard.<
Steering/Ignition lock Starting the engine
Page 62 of 159
:
>Press the accelerator pedal halfway
down while e")
62n
Starting the engine Switching off the engine If the engine does not start on the first
attempt (the engine is very hot or cold,
for instance):
>Press the accelerator pedal halfway
down while engaging the starter.
Cold starts at very low temperatures,
starting at about 5 7 (Ð15 6) and at
high altitudes above 3,300 feet
(1,000 m):
>For the initial start attempt, allow the
starter to remain engaged somewhat
longer (approx. 10 seconds).
Extended starting attempts, char-
acterized by excessively frequent
or long periods with the starter
engaged, can lead to damage to the
catalytic converter.<
When driving, standing at idle or
when parking, take precautions to
avoid contact between the hot exhaust
system and easily flammable materials
(grass, hay or leaves, for example).
Such contact could lead to a fire,
resulting in serious personal injury and
property damage.<
Engine idle speed is controlled by the
engine computer system. Increased
speeds at start-up are normal and
should decrease as the engine warms
up. If engine speed does not decrease,
service is required.
To prevent the battery from
discharging, always deactivate elec-
trical devices that are not in use. Switch
the ignition off when the vehicle is not
being driven.Turn the ignition key to position 1 or 0.
Do not remove the ignition key
while the vehicle is still moving. If
you do so, the steering will lock, making
it impossible to steer the vehicle.
When you leave the vehicle, always
remove the ignition key and engage the
steering lock.
While parking on a downhill road, set
the parking brake, as engaging even
the first or reverse gear may not be
sufficient to prevent the vehicle from
rolling away.<
Vehicle with sequential M gearbox
*
SMG II: refer to the instructions on
page 64.
Page 63 of 159

63n
OverviewControlsMaintenanceRepairsDataIndex
Parking brake Manual transmission The parking brake is designed primarily
to prevent the vehicle from rolling when
it is parked. It operates against the rear
wheels. To engageThe lever engages automatically, the
indicator lamp in the instrument cluster
comes on when the ignition key is in
position 2, refer to page 18.To releasePull up slightly on the lever, press the
button (arrow) and lower the lever.
If, in exceptional circumstances,
it should be necessary to engage
the parking brake while the vehicle is
in motion, do not pull the lever with
excessive pressure. Keep your thumb
pressed against the release button
while carefully pulling the lever up to
apply moderate pressure.
Excessive pressure can lead to over-
braking and loss of traction (fishtailing)
at the rear axle.
The brake lamps do not come on when
the parking brake is engaged.
While parking on a downhill road, set
the parking brake, as engaging even
the first or reverse gear may not be
sufficient to prevent the vehicle from
rolling away.<
To avoid corrosion and one-sided
braking, apply the parking brake lightly
from time to time when coasting to a
standstill (at a traffic signal, for
instance), provided that it is safe to do
so.
Every time you shift gears, always
depress the clutch pedal all the way
down, pushing the gearshift lever into
the desired position.
When shifting gears in the 5th/6th-
gear plane, be sure to press the
gearshift lever to the right in order to
prevent inadvertent selection of a gear
in the 3rd/4th-gear plane.<
Page 64 of 159

64n
Manual transmission Sequential M gearbox
* SMG II
Reverse Select only when the vehicle is
stationary. Press the shift lever to the
left to overcome the resistance.
As you do this, the backup lamps will
turn on automatically when the ignition
key is in position 2.
Do not hold the vehicle in place on
slopes by slipping or "riding" the
clutch. Use the parking brake instead.
Riding the clutch causes the clutch
assembly to wear out sooner.<
The conceptThe sequential M gearbox SMG II is an
automated manual gearbox with which
clutching and shifting is assumed by an
electro-hydraulic system.
The SMG II is operated via two shift
paddles on the steering wheel and the
selector lever in the center console.
It offers the following functions:
>Sequential and automated shifting
mode
>Ability to choose between different
driving programs (Drivelogic)
>Gradient assistance
>Upshift display (shift lights)
>Throttle blip
>Driving dependent functions:
The respective driving situation (e.g.
cornering, mountain driving, braking)
is detected by sensors and taken into
account accordingly for shifting, e.g.
to achieve optimum gear selection
during deceleration and subsequent
acceleration>Slip recognition at the rear axle for
increasing driving stability, e.g.
during downshifting on slippery road
surfaces
>Operating safety through protection
against misshifting.
 1
1 2
2 3
3 4
4 5
5 6
6 7
7 8
8 9
9 10
10 11
11 12
12 13
13 14
14 15
15 16
16 17
17 18
18 19
19 20
20 21
21 22
22 23
23 24
24 25
25 26
26 27
27 28
28 29
29 30
30 31
31 32
32 33
33 34
34 35
35 36
36 37
37 38
38 39
39 40
40 41
41 42
42 43
43 44
44 45
45 46
46 47
47 48
48 49
49 50
50 51
51 52
52 53
53 54
54 55
55 56
56 57
57 58
58 59
59 60
60 61
61 62
62 63
63 64
64 65
65 66
66 67
67 68
68 69
69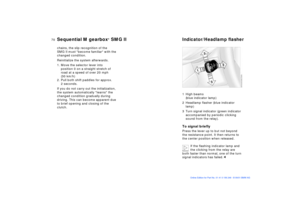 70
70 71
71 72
72 73
73 74
74 75
75 76
76 77
77 78
78 79
79 80
80 81
81 82
82 83
83 84
84 85
85 86
86 87
87 88
88 89
89 90
90 91
91 92
92 93
93 94
94 95
95 96
96 97
97 98
98 99
99 100
100 101
101 102
102 103
103 104
104 105
105 106
106 107
107 108
108 109
109 110
110 111
111 112
112 113
113 114
114 115
115 116
116 117
117 118
118 119
119 120
120 121
121 122
122 123
123 124
124 125
125 126
126 127
127 128
128 129
129 130
130 131
131 132
132 133
133 134
134 135
135 136
136 137
137 138
138 139
139 140
140 141
141 142
142 143
143 144
144 145
145 146
146 147
147 148
148 149
149 150
150 151
151 152
152 153
153 154
154 155
155 156
156 157
157 158
158