Page 129 of 159
129n
OverviewControlsMaintenanceRepairsDataIndex
Lamps and bulbsFront fog lamps HB4 bulb, 51 watt
The bulb is pressurized. There-
fore, wear safety glasses and
protective gloves. Failure to comply
with this precaution could lead to injury
if the bulb is damaged during replace-
ment.<
1. Pull out the cover around the head-
lamp toward the front
2. Loosen the screw (arrow) and swing
the lamp assembly out
3. Release the spring on the back of the
lamp and turn the cover to the left
4. Release the clamp, remove the
contact base and replace the bulb.
Tail lamp assembly Tail lamp 4: bulbs 21/4 watt
Remaining bulbs: 21 watt
1 Turn signal indicator yellow
2 Backup lamp yellow
3 Tail lamp red
4 Tail lamp/brake lamp red
The illustration shows the right-hand
luggage compartment opening.Bulbs in the fenderAll of the bulbs are integrated in a
central bulb holder.
1. Release the bulb holder (arrow)
Page 130 of 159
130n
Lamps and bulbs2. Take out the bulb holder
3. Unplug the power supply receptacle.
Set the bulb holder aside (on the
luggage compartment floor, for
example)
4. Applying light pressure, turn the bulb
to the left. Remove and exchange the
bulb
5. Plug in the power supply receptacle
6. Reattach the bulb holder until you
hear it snap into place (Illustration).
Bulbs in the luggage
compartment lid1. Using a screwdriver, loosen the clip
2. Fold the trim panel down (arrow 1).
Disengage the bulb holder (arrow 2)
and remove it
3. Applying light pressure, turn the bulb
to the left. Remove and exchange the
bulb
4. Press the bulb holder into position
until you hear it engage
5. Reinstall the trim with the clip.
Page 131 of 159
131n
OverviewControlsMaintenanceRepairsDataIndex
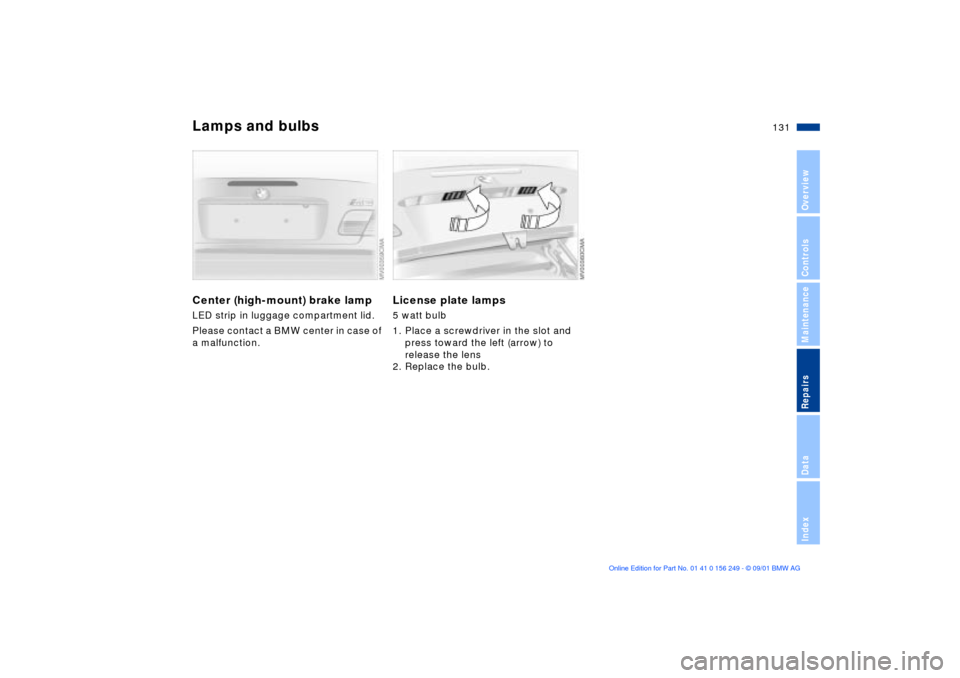
Lamps and bulbsCenter (high-mount) brake lamp
LED strip in luggage compartment lid.
Please contact a BMW center in case of
a malfunction.
License plate lamps 5 watt bulb
1. Place a screwdriver in the slot and
press toward the left (arrow) to
release the lens
2. Replace the bulb.
Page 132 of 159

132n
Repairing a flat tire
Precautions in case of a flat tire:
Stop the vehicle as far as possible
from passing traffic; switch on the
hazard warning flashers.
Turn the steering wheel to the straight-
ahead position and engage the steering
lock. Shift into 1st or reverse and
engage the parking brake.
All passengers should be outside the
vehicle and well away from your imme-
diate working area (behind a guardrail,
for instance).
If necessary, set up your warning
triangle or portable hazard warning
lamp on the roadside at an appropriate
distance from the rear of the vehicle.
Comply with all safety guidelines and
regulations.<
M Mobility systemYou will find an M Mobility system in
your BMW M3 convertible for repairing
flat tires. With this system you can
apply a sealing liquid to the inside of
the tire that seals off the damaged point
and then continue driving.
The M Mobility system makes trans-
porting a spare wheel superfluous,
thereby reducing the amount of weight
you have to carry around. Using the M Mobility systemTo repair a flat tire using the M Mobility
system, proceed as follows:
>Prepare the M Mobility system for
use, refer to the next column
>This is part of the M Mobility system,
refer to page 133
>Filling with sealant, refer to page 133
>Distributing sealant, refer to
page 134
>Inflating tire to correct pressure, refer
to page 135.
Preparing the M Mobility system
for useThe M Mobility system is located in the
luggage compartment under the floor
panel:
1. Lift the floor panel (refer to page 35)
2. Loosen the M Mobility system from
its storage location.
Before you use the M Mobility
system, read the warnings and
danger notices on the device care-
fully.<
If possible, leave the foreign object in
the tire.
Pull off the sticker 5 (refer to the second
column on the right) for the speed limit
and apply it to the steering wheel.
Page 133 of 159
133n
OverviewControlsMaintenanceRepairsDataIndex
Repairing a flat tire
Please note that the system's
sealant container must be
replaced every three years by your
BMW center if the device is not used.<
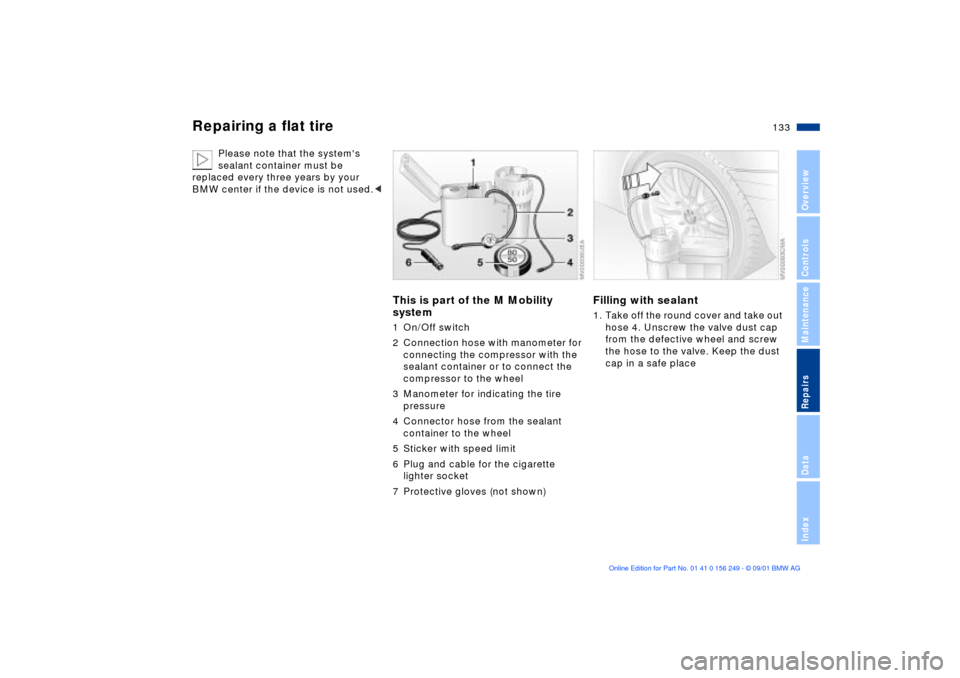
This is part of the M Mobility
system1 On/Off switch
2 Connection hose with manometer for
connecting the compressor with the
sealant container or to connect the
compressor to the wheel
3 Manometer for indicating the tire
pressure
4 Connector hose from the sealant
container to the wheel
5 Sticker with speed limit
6 Plug and cable for the cigarette
lighter socket
7 Protective gloves (not shown)
Filling with sealant1. Take off the round cover and take out
hose 4. Unscrew the valve dust cap
from the defective wheel and screw
the hose to the valve. Keep the dust
cap in a safe place
Page 134 of 159

134n
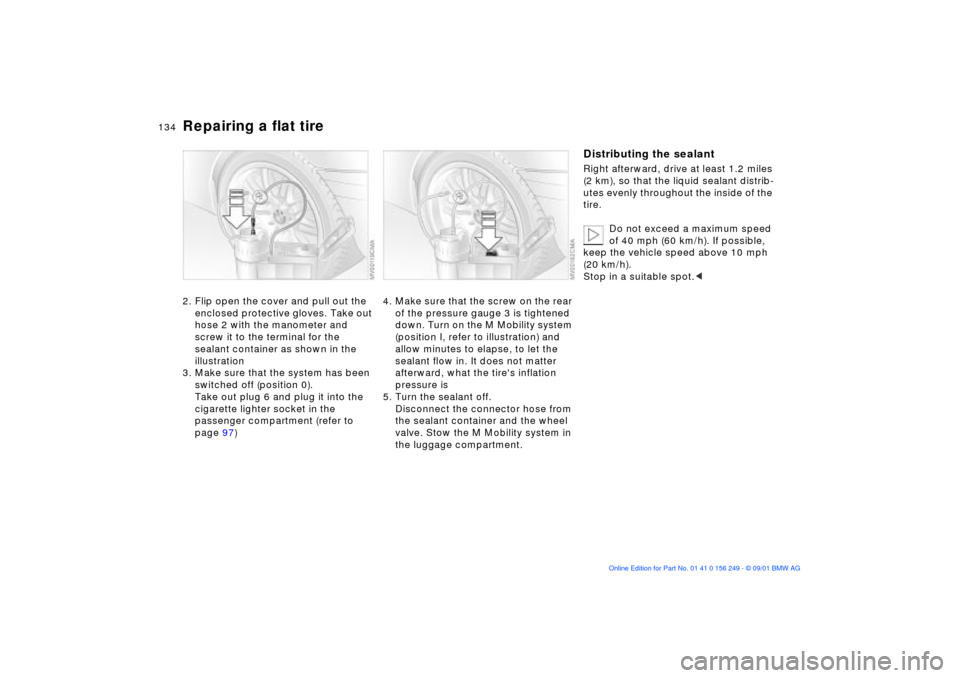
Repairing a flat tire2. Flip open the cover and pull out the
enclosed protective gloves. Take out
hose 2 with the manometer and
screw it to the terminal for the
sealant container as shown in the
illustration
3. Make sure that the system has been
switched off (position 0).
Take out plug 6 and plug it into the
cigarette lighter socket in the
passenger compartment (refer to
page 97)
4. Make sure that the screw on the rear
of the pressure gauge 3 is tightened
down. Turn on the M Mobility system
(position I, refer to illustration) and
allow minutes to elapse, to let the
sealant flow in. It does not matter
afterward, what the tire's inflation
pressure is
5. Turn the sealant off.
Disconnect the connector hose from
the sealant container and the wheel
valve. Stow the M Mobility system in
the luggage compartment.
Distributing the sealantRight afterward, drive at least 1.2 miles
(2 km), so that the liquid sealant distrib-
utes evenly throughout the inside of the
tire.
Do not exceed a maximum speed
of 40 mph (60 km/h). If possible,
keep the vehicle speed above 10 mph
(20 km/h).
Stop in a suitable spot.<
Page 135 of 159

135n
OverviewControlsMaintenanceRepairsDataIndex
Repairing a flat tire Inflating tire to correct pressure1. Take out the hose with the pressure
gauge and screw it onto the valve.
Take the plug out and plug it into the
cigarette lighter socket in the
passenger compartment
2. Reset the air pressure to 29 psi
(200 kilopascal), and:
>Increase tire pressure: turn on the
M Mobility system (position I). Turn
the unit off while you check the
current setting for the tire inflation
pressure
>Decrease tire pressure: turn the
screw on the back of the mano-
meter, a valve located there will
open
Even if the tire fails to hold the
pressure, you should still carry out
Step 3 before proceeding to drive the
vehicle again, refer to "Distributing
sealant" for more information. Then
repeat Steps 1 through 3.
The use of the M Mobility system may
be ineffective if the damaged area in
the tire is larger than approx. 0.16 in
(4 mm). Please consult the nearest
BMW center if the tire cannot be
temporarily repaired with the M Mobility
system.<
3. Unscrew the hose from the valve and
stow the M Mobility system in the
luggage compartment. Screw the
dust cap onto the valve again.
Do not exceed the maximum
speed limit described below,
otherwise it could lead to accidents.<
When you start driving again, do not
exceed the permissible maximum
speed of 50 mph (80 km/h).
You will find corresponding
instructions for using the
M Mobility system on the device.
Replace the defective tire as soon as
possible and have the new wheel
balanced. Reinitialize the Flat Tire
Monitor, and refer to page 83 for further
information. Have the M Mobility
system refilled. Contact your BMW
center for this.<
Protect valve stems against dirt using
screw-on dust caps. Dirty valve stems
frequently lead to slow pressure loss.
Page 136 of 159

136n
Battery Fuses
Battery posts, terminals, and
related accessories contain lead
and lead compounds. Wash hands after
handling.<
Maintenance The battery is completely maintenance-
free. That means that the original
battery acid will normally last for the
service life of the battery under
moderate climate conditions.
For all questions that regard the
battery, please consult your BMW
center. Since the battery is absolutely
maintenance-free, the following state-
ments are for your information only.<
Do not disconnect the battery
when the engine is running. If you
do so, the ensuing voltage surge will
damage the vehicle's onboard elec-
tronics.<
Charging the battery Charge the battery in the vehicle only
when the engine is not running. Use the
connections provided in the engine
compartment (for correct connections,
refer to "Jump-starting" on page 138.
Return used batteries to a recy-
cling point or your BMW center.
Maintain the battery in an upright posi-
tion for transport and storage. Secure
the battery against tilting in transit.<
Open the glove compartment and turn
the two white quick-release connec-
tions outward.
Do not attempt to repair a burned
fuse or replace it with a fuse
having a different color or amperage
rating. To do this could cause a fire in
the vehicle resulting from a circuit over-
load.<