2002 BMW 745LI SEDAN tyre pressure
[x] Cancel search: tyre pressurePage 76 of 208
At a glanceControlsDriving tipsCommunicationsNavigationEntertainmentMobilityReference
75
3 Interrupt cruise control Briefly press the lever up or down while the
cruise control is active. The status
message 5 in the Info Display is no longer
highlighted. You can use the cruise control
again as required.
In addition, cruise control is interrupted
automatically
>When you apply pressure to the brake
pedal
>when you select the automatic transmis-
sion's neutral range N
>when the DSC (Dynamic Stability
Control) system is in active operation. 4 To recall stored speed Briefly press button 4: The vehicle acceler-
ates to and maintains the last speed stored. To deactivate the cruise control The stored speed is deleted from the
system memory when you switch off the
ignition. To activate multilevel preset mode Push 1 or pull 2 the lever beyond the
detent.
The system maintains and stores the
current speed, which is also displayed as a
preset speed 5 and as the desired speed 6.
If no levels are programmed, with the
graduated function in operation you
can push or pull the lever past the detent to
increase or decrease the vehicle's speed in
increments of 6.2 mph (10 km/h).<1 Change preset level Press 1 or pull 2 the lever beyond the
detent: The preset speed progresses to the
next desired speed. The lowest desired
speed that it is possible to select is roughly
18 mph (30 km/h).3 Interrupt cruise control With the cruise control active, briefly tap
the lever up or down.
To deactivate the multilevel preset
modeThe multilevel preset mode is deactivated
when you switch off the ignition. Multilevel preset mode Ð Storing
speeds
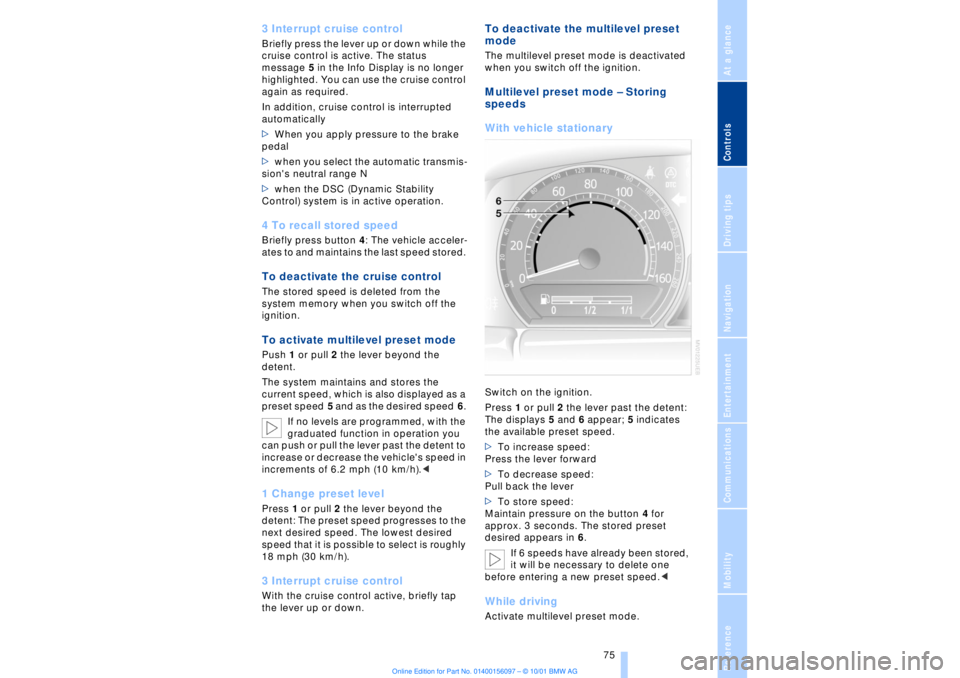
With vehicle stationary Switch on the ignition.
Press 1 or pull 2 the lever past the detent:
The displays 5 and 6 appear; 5 indicates
the available preset speed.
>To increase speed:
Press the lever forward
>To decrease speed:
Pull back the lever
>To store speed:
Maintain pressure on the button 4 for
approx. 3 seconds. The stored preset
desired appears in 6.
If 6 speeds have already been stored,
it will be necessary to delete one
before entering a new preset speed.
Page 90 of 208

At a glanceControlsDriving tipsCommunicationsNavigationEntertainmentMobilityReference
89
You also enjoy the option of having the
system show distances to objects in the
Control Display. The Control Display will
also indicate the presence of objects in
green before they are close enough to
generate a signal tone.
Select "PDC pic." from the "Settings" menu
and confirm your selection. This activates
the PDC display.
The display then appears in the Control
Display whenever PDC is automatically or
manually activated.
The previous display automatically reap-
pears after the system is deactivated.
Confirm in the menu to return to
the previous display.<
Even with PDC, final responsibility for
estimating the distance between the
vehicle and any obstructions always
remains with the driver. Even when sensors
are involved, there is a blind spot in which
objects cannot be detected. The system is
also subject to the physical limits that apply
to all forms of ultrasonic measurement,
such as those encountered with tow bars
and trailer couplings, as well as thin and
wedge-shaped objects, etc. After initial
detection, low objects such as curbs, etc.,
may disappear again before the system
starts to generate a continuous warning
tone. Loud noises from outside and inside
the vehicle may prevent you from hearing
PDC's signal tone.<
Keep the sensors clean and free of ice
or snow in order to ensure that they
will continue to operate effectively.
Do not apply high pressure spray to the
sensors for a prolonged period of time. Keep the spray at least 4 in (10 cm) away
from the sensors.<
Driving stability control/
DSC Dynamic Stability
Control Your BMW is equipped with an extended
array of systems designed to enhance and
maintain vehicle stability under extreme
conditions. The following section describes
these functions based on DSC and ABS. The concept DSC maintains vehicle stability, even in
critical driving situations.
The system optimizes vehicle stability
during acceleration and when starting from
a full stop, as well as optimizing traction.
The system recognizes any tendency for
the vehicle to assume an unstable attitude
such as oversteer or understeer; it then
counteracts this tendency with a combina-
tion of graduated reductions in engine
torque and selective braking intervention at
individual wheels. DSC provides optimal
stability within the limits defined by the
laws of physics.
The DSC is operational every time you start
the engine. DSC includes the functionality
of the DTC Dynamic Traction Control and
DBC Dynamic Brake Control.
With its selective braking intervention at the
individual drive wheels, DTC fulfills the
same function as a conventional limited-
slip differential to enhance traction under
difficult driving conditions, such as on
snow, etc. Indicator lamps
The indicator lamp in the Info
Display goes out soon after you
start the engine.
If the indicator lamp flashes:
DSC controls the drive and braking forces.
The indicator lamp stays lit:
DSC has been switched off via the Control
Display.
Page 92 of 208
At a glanceControlsDriving tipsCommunicationsNavigationEntertainmentMobilityReference
91
limited system response up to a speed of
approx. 45 mph (70 km/h). Intervention for
stability-enhancement is reduced. Do not
make any modiÞcations to the DSC system.
Never allow anyone other than authorized
professional technicians to carry out
service or repairs on the DSC system.< Dynamic Brake Control DBC
When you apply the brakes rapidly, this
system automatically produces the
maximum braking force boost and thus
helps to achieve the shortest possible
braking distance during "panic stops." This
system exploits all of the benefits provided
by ABS.
Do not reduce the pressure on the brake
pedal for the duration of the brake applica-
tion. When the brake pedal is released, the
DBC is deactivated.
In the event of a malfunction, the
warning lamp comes on with a
yellow lamp. Have the system
checked and repaired at your BMW center
as soon as possible.
Check Control messages, refer to page 80.
Please note the supplementary information
provided in the Control Display.
Warning lamp on Canadian models.Driving stability control/
ABS Antilock Brake System The concept ABS enhances active safety by preventing
the wheels from locking under braking.
ABS incorporates CBC and EBV. In case of malfunction
If the indicator lamp lights up in
yellow, this indicates that ABS has
been deactivated in response to a
system malfunction. Conventional braking
efficiency remains available without limita-
tions. Please have the system inspected at
your BMW center.
Cornering Brake Control CBC CBC is a technical advance based on ABS.
It provides further enhancements in vehicle
stability and steering response during lane
changes and cornering at high rates of
lateral acceleration. EBV Electronic brake-force
distribution EBV controls the brake system's applica-
tion pressure at the rear wheels to ensure
stable deceleration. In case of malfunction
If the brake system warning lamp
lights up in red, appearing together
with the yellow lamps for ABS and
DSC: the stability control is no
longer operational.
If all three lamps light up in yellow:
malfunction in the stability control
systems.
While you may continue, you should
remember to proceed cautiously and drive
defensively while avoiding full brake appli-
cations.
Please have the system checked at the
nearest BMW center.
Check Control status messages, refer to
page 80. Please note the supplementary
information provided in the Control Display.
Indicator and warning lamps on
Canadian models.
Dynamic Drive The concept Dynamic Drive minimizes body roll and
optimizes vehicle stability during cornering
and evasive maneuvers.
Page 94 of 208
At a glanceControlsDriving tipsCommunicationsNavigationEntertainmentMobilityReference
93
This symbol will appear in the
Check Control panel to inform you
when the inflation pressure varies
from that stored in the system. A text
message appears at the same time. Please
take note of the additional information in
the Control Display panel.
You can find more information on the
Check Control starting on page 80.
The RDC cannot alert you to severe
and sudden tire damage caused by
external factors.<
To initialize the system 1.With the vehicle parked, switch on the
ignition
2.Select "RDC" from the "Settings" menu
and confirm your selection. The initializa-
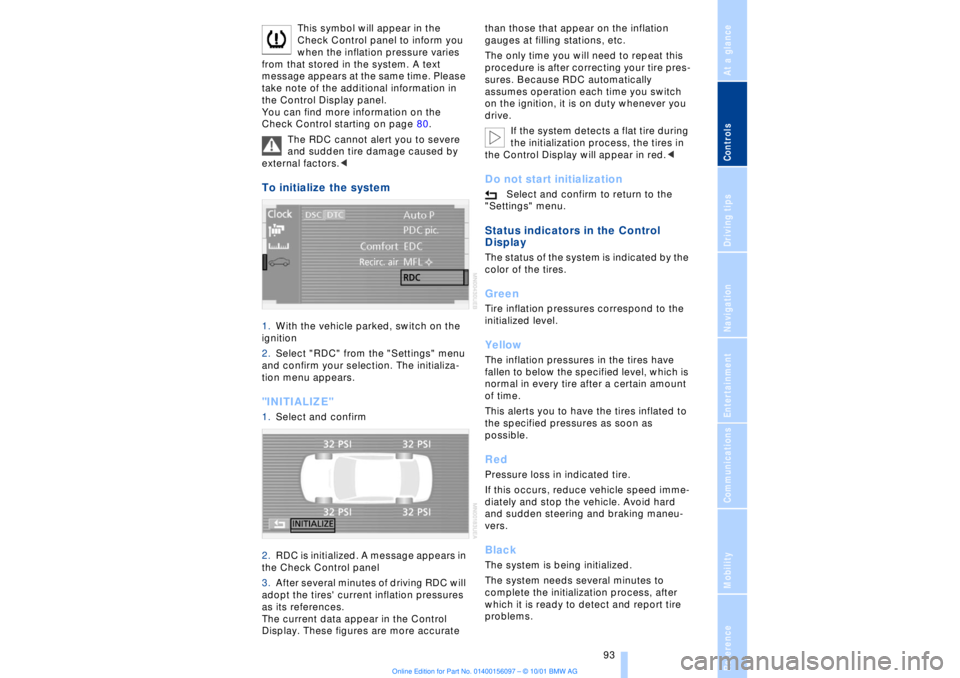
tion menu appears. "INITIALIZE" 1.Select and confirm
2.RDC is initialized. A message appears in
the Check Control panel
3.After several minutes of driving RDC will
adopt the tires' current inflation pressures
as its references.
The current data appear in the Control
Display. These figures are more accurate than those that appear on the inflation
gauges at filling stations, etc.
The only time you will need to repeat this
procedure is after correcting your tire pres-
sures. Because RDC automatically
assumes operation each time you switch
on the ignition, it is on duty whenever you
drive.
If the system detects a flat tire during
the initialization process, the tires in
the Control Display will appear in red.<
Do not start initialization
Select and confirm to return to the
"Settings" menu.
Status indicators in the Control
Display The status of the system is indicated by the
color of the tires. GreenTire inflation pressures correspond to the
initialized level.YellowThe inflation pressures in the tires have
fallen to below the specified level, which is
normal in every tire after a certain amount
of time.
This alerts you to have the tires inflated to
the specified pressures as soon as
possible. RedPressure loss in indicated tire.
If this occurs, reduce vehicle speed imme-
diately and stop the vehicle. Avoid hard
and sudden steering and braking maneu-
vers. BlackThe system is being initialized.
The system needs several minutes to
complete the initialization process, after
which it is ready to detect and report tire
problems.
Page 98 of 208
At a glanceControlsDriving tipsCommunicationsNavigationEntertainmentMobilityReference
97
Instrument lighting Turn the rotary dial to adjust the illumina-
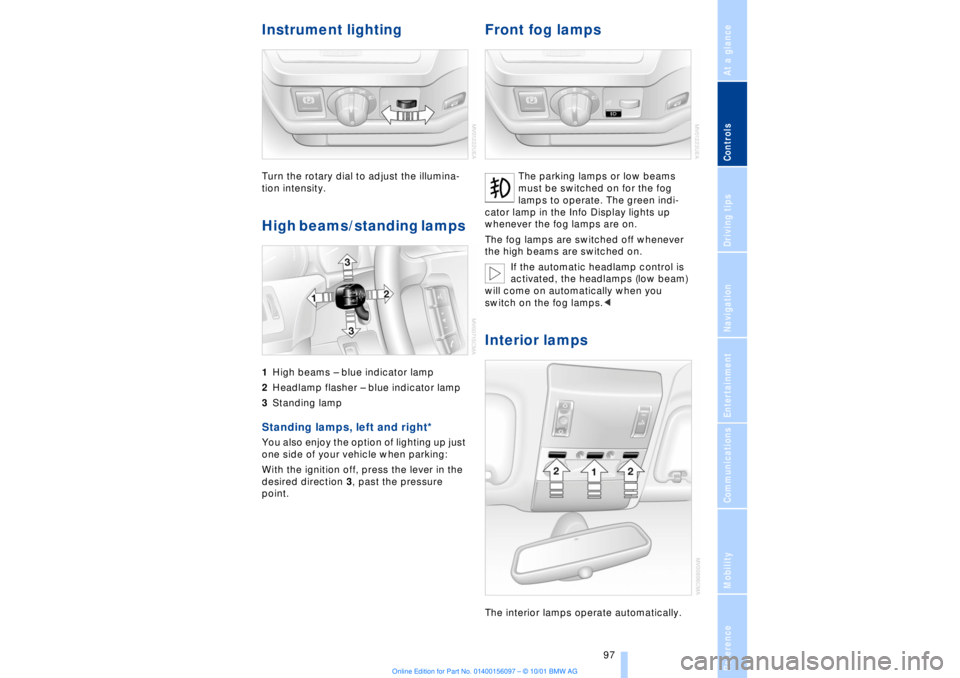
tion intensity. High beams/standing lamps 1High beams Ð blue indicator lamp
2Headlamp flasher Ð blue indicator lamp
3Standing lamp Standing lamps, left and right*
You also enjoy the option of lighting up just
one side of your vehicle when parking:
With the ignition off, press the lever in the
desired direction 3, past the pressure
point.
Front fog lamps
The parking lamps or low beams
must be switched on for the fog
lamps to operate. The green indi-
cator lamp in the Info Display lights up
whenever the fog lamps are on.
The fog lamps are switched off whenever
the high beams are switched on.
If the automatic headlamp control is
activated, the headlamps (low beam)
will come on automatically when you
switch on the fog lamps.<
Interior lamps The interior lamps operate automatically.
Page 110 of 208
At a glanceControlsDriving tipsCommunicationsNavigationEntertainmentMobilityReference
109
4.Simultaneously press the transmit key
on the original hand-held transmitter,
arrow 3 and the selected channel key 1
on the Universal Garage Door Opener.
Release both keys as soon as the indicator
lamp flashes rapidly
5.To program other original hand-held
transmitters, repeat steps 3 and 4.
The corresponding channel key is now
programmed with the signal of the original
hand-held transmitter. Programming alternating-code
transmitters
Observe all of the safety precautions
described on the previous page.<
Consult the unit's operating instructions
when programming the Universal Garage
Door Opener.
When programming hand-held transmitters
that employ an alternating code, please
observe the following supplementary
instructions:
Programming will be easier with the
aid of a second person.<
1.Program the Universal Garage Door
Opener by following the instructions given
above under Programming.
2.Maintain pressure on the alternating-
code transmitter for roughly two seconds,
continuing until the program lamp lights up.
3.Press the selected channel key on the
Universal Garage Door Opener three times.
If you have any additional questions,
please contact your BMW center.<
To clear channel keys
Observe all of the safety precautions
described on the previous page.<
The memory of individual channel keys
cannot be deleted. However, the three
channel keys can be cleared together as
follows:
>Press both outside keys on the Universal
Garage Door Opener; maintain pressure
until the indicator lamp starts to flash, then
release the key.
Sun blinds*
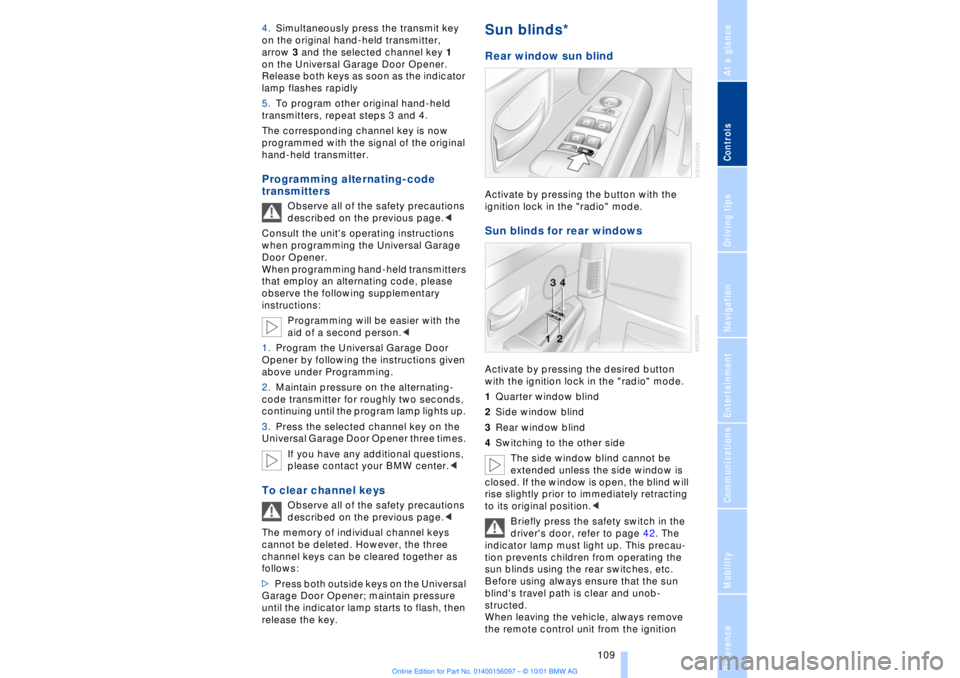
Rear window sun blind Activate by pressing the button with the
ignition lock in the "radio" mode. Sun blinds for rear windows Activate by pressing the desired button
with the ignition lock in the "radio" mode.
1Quarter window blind
2Side window blind
3Rear window blind
4Switching to the other side
The side window blind cannot be
extended unless the side window is
closed. If the window is open, the blind will
rise slightly prior to immediately retracting
to its original position.<
Briefly press the safety switch in the
driver's door, refer to page 42. The
indicator lamp must light up. This precau-
tion prevents children from operating the
sun blinds using the rear switches, etc.
Before using always ensure that the sun
blind's travel path is clear and unob-
structed.
When leaving the vehicle, always remove
the remote control unit from the ignition
Page 120 of 208
At a glanceControlsDriving tipsCommunicationsNavigationEntertainmentMobilityReference
119
Brake system Braking with ABS The best way to achieve optimal response
from the ABS is to apply maximum pres-
sure to the brake pedal during emergencyÐ
panic stops. Since the vehicle maintains
steering responsiveness, you can never-
theless avoid possible obstacles with a
minimum of steering effort.
Pulsation at the brake pedal combines with
sounds from the hydraulic circuits to indi-
cate to the driver that ABS is in its active
mode.
Do not drive with your foot resting on
the brake pedal. Even light but
consistent pedal pressure can lead to high
temperatures, brake wear and possibly
even brake failure.< Disc brakes
Driving in wet conditions While driving in wet conditions and in
heavy rain, it is a good idea to apply light
pressure to the brake pedal every few
miles. Monitor traffic conditions to ensure
that this maneuver does not endanger
other road users. The heat generated in this
process helps dry the pads and rotors to
ensure that full braking efficiency will then
be available when you need it. Hills You can retain full and unimpaired braking
efficiency by downshifting to a gear in
which only minimal brake applications are
needed when descending long or steep
downhill stretches.
You can further enhance the engine's
braking effect by selecting a lower gear in
the automatic transmission's manual
mode, downshifting as far as first gear on
extremely steep stretches, refer to
page 68. This strategy helps you avoid
placing excessive loads on the brake
system.
Corrosion When the vehicle is driven only occasion-
ally, during extended periods when the
vehicle is not used at all, and in operating
conditions where brake applications are
less frequent, there is an increased
tendency for corrosion to form on rotors,
while contaminants accumulate on the
brake pads. This occurs because the
minimal pressure which must be exerted by
the pads during brake applications to clean
the rotors is not reached.
Should corrosion form on the brake rotors,
the brakes will tend to respond with a
pulsating effect that even extended appli-
cation will fail to cure.
Never allow the vehicle to coast with
the transmission in neutral Ð or with
the engine switched off; there is no engine
braking when the transmission is in neutral,
and no power-assist for brakes and
steering when the engine is not running.
Never allow floor mats, carpets or any other
objects to protrude into the area around the
accelerator and brake pedals and obstruct
their movement.< Brake pads
If the brake pad wear indicator lamp
appears in the Check Control,
accompanied by a text: please take
careful note of the additional information in
the Control Display panel.
Warning lamp for Canadian models.
The brake pads have reached their
minimum pad thickness. Have them
replaced at your BMW center as soon as
possible.
For your own safety: use only brake
pads that BMW has released for your
particular vehicle model. Because BMW
cannot assess the suitability of other brake
pads for use on your vehicle, we are unable
to assume continued responsibility for the
vehicle's operating safety if non-approved
pads are installed.<
Page 144 of 208
At a glanceControlsDriving tipsCommunicationsNavigationEntertainmentMobilityReference
143
RadioSelect the frequency bandYour radio provides reception of FM and
AM wavebands.
AM provides good long-range reception,
as its broadcast signals are not only propa-
gated at ground level as surface waves, but
also reflected from the ionosphere as
atmospheric waves.
FM furnishes substantially better acoustic
quality than AM broadcasts. However,
transmission range is limited, as FM relies
on line-of-sight broadcast signals.
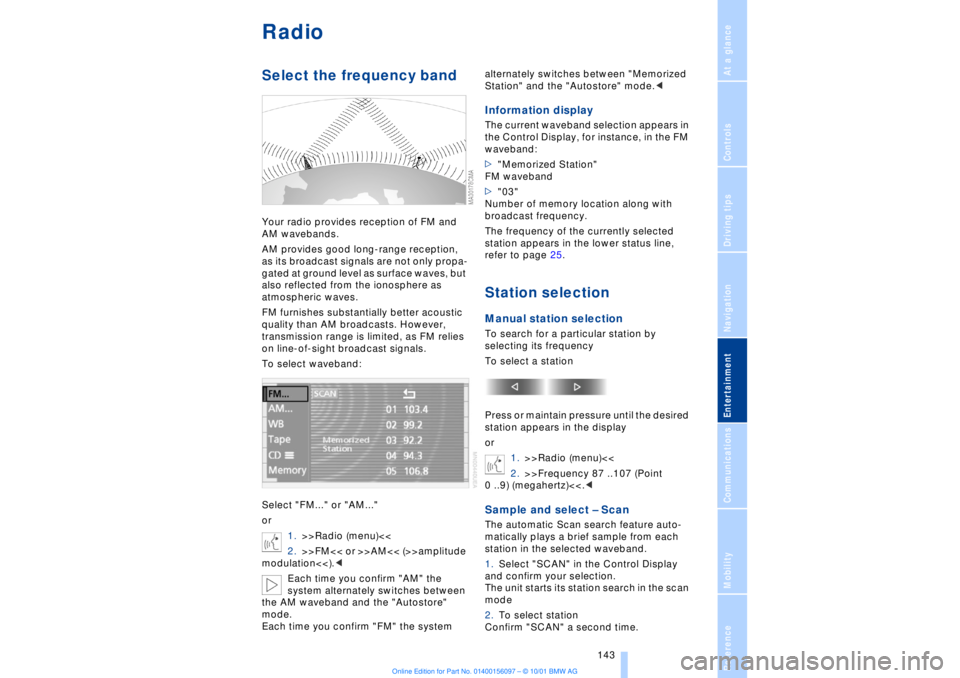
To select waveband:
Select "FM..." or "AM..."
or
1.>>Radio (menu)<<
2.>>FM<< or >>AM<< (>>amplitude
modulation<<).<
Each time you confirm "AM" the
system alternately switches between
the AM waveband and the "Autostore"
mode.
Each time you confirm "FM" the system alternately switches between "Memorized
Station" and the "Autostore" mode.<
Information displayThe current waveband selection appears in
the Control Display, for instance, in the FM
waveband:
>"Memorized Station"
FM waveband
>"03"
Number of memory location along with
broadcast frequency.
The frequency of the currently selected
station appears in the lower status line,
refer to page 25.Station selectionManual station selectionTo search for a particular station by
selecting its frequency
To select a station
Press or maintain pressure until the desired
station appears in the display
or
1.>>Radio (menu)<<
2.>>Frequency 87 ..107 (Point
0 ..9) (megahertz)<<.
station in the selected waveband.
1.Select "SCAN" in the Control Display
and confirm your selection.
The unit starts its station search in the scan
mode
2.To select station
Confirm "SCAN" a second time.