Page 14 of 106
DESCRIPTION
12
3
4
5
6
7
8
9
2-2
9.Passenger seat
10.Rider seat(page 3-11)
11.Air flow louver(page 6-22)
12.Headlight (page 6-34)
13.Radiator14.Battery(page 6-31)
15.Fuse box(page 6-33)
16.Coolant reservoir cap (page 6-19)
17.Coolant level check window (page 6-19)
18.Engine oil filler cap(page 6-15)
10
11
12
13 16 17
1815, 14
9
Right view
5GM-9-E1(No ABS) 9/27/00 2:18 PM Page 13
Page 18 of 106

3-2
134
2
EAU00056
Indicator lights
EAU03734
Oil change indicator light Ò
7
Ó
This indicator light comes on at the
initial 1,000 km and every 3,000 km
thereafter to indicate that the engine
oil should be changed.
After changing the engine oil, reset
the oil change indicator light.(See
page 6-17 for the resetting proce-
dure.)The electrical circuit of the indicator
light can be checked according to the
following procedure.
1.Set the engine stop switch to Ò#Ó
and turn the key to ÒONÓ.
2.Check that the indicator comes
on for a few seconds and then
goes off.
If the indicator light does not
come on, have a Yamaha dealer
check the electrical circuit.
NOTE:
The oil change indicator light may
flash when the engine is revved with
the scooter on the centerstand, but
this does not indicate a malfunction.
1.Oil change indicator light Ò
7
Ó
2.High beam indicator light Ò&Ó
3.Left turn signal indicator light Ò4Ó
4.Right turn signal indicator light Ò6Ó
INSTRUMENT AND CONTROL FUNCTIONS
1
23
4
5
6
7
8
9
EAU00063
High beam indicator light Ò&Ó
This indicator light comes on when
the high beam of the headlight is
switched on.
EAU03299
Turn signal indicator lights
Ò4Ó/Ò6Ó
The corresponding indicator light
flashes when the turn signal switch is
pushed to the left or right.
5GM-9-E1(No ABS) 9/27/00 2:18 PM Page 17
Page 19 of 106

EAU03740
Self-diagnosis deviceThis model is equipped with a self-
diagnosis device for the throttle posi-
tion sensor, oil change indicator light,
speedometer unit circuits. If any of
those circuits are defective, the oil
change indicator light will flash.
If the indicator light flashes or comes
on, have a Yamaha dealer check the
motorcycle as soon as possible.NOTE:
The oil change indicator light may
flash when the engine is revved with
the scooter on the centerstand, but
this does not indicate a malfunction.
3-3
EAU01586
Speedometer unit The speedometer unit is equipped
with a speedometer, an odometer
and a tripmeter. The speedometer
shows riding speed. The odometer
shows the total distance traveled.
The tripmeter shows the distance
traveled since it was last set to zero.
Pushing the ÒTRIPÓ button switches
the display between the odometer
mode ÒODOÓ and the tripmeter mode
ÒTRIPÓ. To reset the tripmeter, enter
the ÒTRIPÓ mode, and then hold downthe ÒTRIPÓ button for at least one
second. The tripmeter can be used
together with the fuel gauge to esti-
mate the distance that can be trav-
eled with a full tank of fuel. This infor-
mation will enable you to plan future
fuel stops.INSTRUMENT AND CONTROL FUNCTIONS
1
23
4
5
6
7
8
9
123
1.Speedometer
2.Odometer/tripmeter
3.ÒTRIPÓ button
5GM-9-E1(No ABS) 9/27/00 2:18 PM Page 18
Page 31 of 106

3-15
INSTRUMENT AND CONTROL FUNCTIONS
1
23
4
5
6
7
8
9
EAU00330
SidestandThe sidestand is located on the left
side of the frame. Raise the side-
stand or lower it with your foot while
holding the scooter upright.NOTE:
The built-in sidestand switch is part of
the ignition circuit cut-off system,
which cuts the ignition in certain situ-
ations. (See further down for an
explanation of the ignition circuit cut-
off system.)
EAU00337
Ignition circuit cut-off
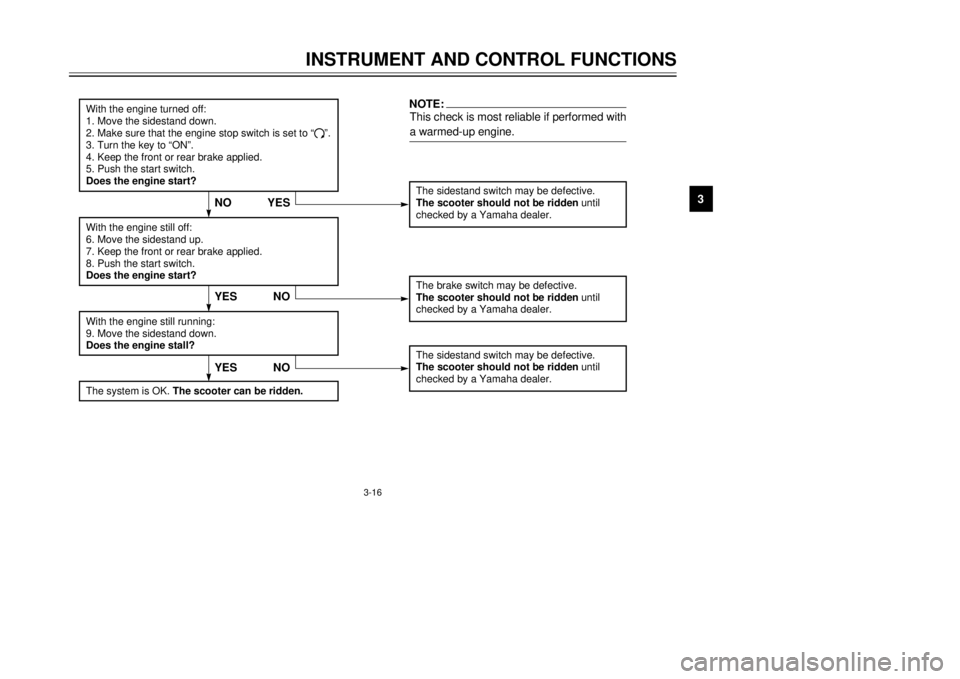
systemThe ignition circuit cut-off system
(comprising the sidestand switch and
brake light switches) has the follow-
ing functions.
8It prevents starting when the
sidestand is up, but neither brake
is applied.
8It prevents starting when either
brake is applied, but the side-
stand is still down.
8It cuts the running engine when
the sidestand is moved down.
Periodically check the operation of
the ignition circuit cut-off system
according to the following procedure.
EW000045
wIf a malfunction is noted, have a
Yamaha dealer check the system
before riding.
EW000044
wThe scooter must not be ridden
with the sidestand down, or if the
sidestand cannot be properly
moved up (or does not stay up),
otherwise the sidestand could con-
tact the ground and distract the
operator, resulting in a possible
loss of control. YamahaÕs ignition
circuit cut-off system has been
designed to assist the operator in
fulfilling the responsibility of rais-
ing the sidestand before starting
off. Therefore, check this system
regularly as described below and
have a Yamaha dealer repair it if it
does not function properly.
1
1.Sidestand switch
5GM-9-E1(No ABS) 9/27/00 2:18 PM Page 30
Page 32 of 106

3-16
INSTRUMENT AND CONTROL FUNCTIONS
1
23
4
5
6
7
8
9
The sidestand switch may be defective.The scooter should not be ridden until
checked by a Yamaha dealer.
YES NO
With the engine turned off:
1. Move the sidestand down.
2. Make sure that the engine stop switch is set to Ò#Ó.
3. Turn the key to ÒONÓ.
4. Keep the front or rear brake applied.
5. Push the start switch.
Does the engine start?
The brake switch may be defective.
The scooter should not be ridden until
checked by a Yamaha dealer.
With the engine still off:
6. Move the sidestand up.
7. Keep the front or rear brake applied.
8. Push the start switch.
Does the engine start?With the engine still running:
9. Move the sidestand down.
Does the engine stall?
The sidestand switch may be defective.
The scooter should not be ridden until
checked by a Yamaha dealer.NOTE:This check is most reliable if performed with
a warmed-up engine.
YESNO
The system is OK.
The scooter can be ridden.
YESNO
5GM-9-E1(No ABS) 9/27/00 2:18 PM Page 31
Page 35 of 106

4-1
EAU01114
PRE-OPERATION CHECKS
1
2
34
5
6
7
8
9The condition of a vehicle is the ownerÕs responsibility. Vital components can start to deteriorate quickly and unexpect-
edly, even if the vehicle remains unused (for example, as a result of exposure to the elements). Any damage, fluid leak-
age or loss of tire air pressure could have serious consequences. Therefore, it is very important, in addition to a thor-
ough visual inspection, to check the following points before each ride.
EAU03439
Pre-operation check list
ITEMCHECKSPAGE
Fuel¥Check fuel level in fuel tank.
¥Refuel if necessary.
¥Check fuel line for leakage.3-4, 3-9Ð3-10
Engine oil¥Check oil level in engine.
¥If necessary, add recommended oil to specified level.
¥Check vehicle for oil leakage.6-14Ð6-17
Final gear oil¥Check vehicle for oil leakage.6-17Ð6-18
Coolant¥Check coolant level in reservoir.
¥If necessary, add recommended coolant to specified level.
¥Check cooling system for leakage.3-4, 6-18Ð6-20
Front brake¥Check operation.
¥If soft or spongy, have Yamaha dealer bleed hydraulic system.
¥Check lever free play.
¥Adjust if necessary.
¥Check fluid level in reservoir.
¥If necessary, add recommended brake fluid to specified level.
¥Check hydraulic system for leakage.3-8, 6-25Ð6-28
5GM-9-E1(No ABS) 9/27/00 2:18 PM Page 34
Page 39 of 106

5-1
EAU01118
w8Become thoroughly familiar
with all operating controls and
their functions before riding.
Consult a Yamaha dealer
regarding any control or func-
tion that you do not thorough-
ly understand.
8Never start the engine or oper-
ate it in a closed area for any
length of time. Exhaust fumes
are poisonous, and inhaling
them can cause loss of con-
sciousness and death within a
short time. Always make sure
that there is adequate ventila-
tion.
8For safety, always start the
engine with the centerstand
down.
EAU03616
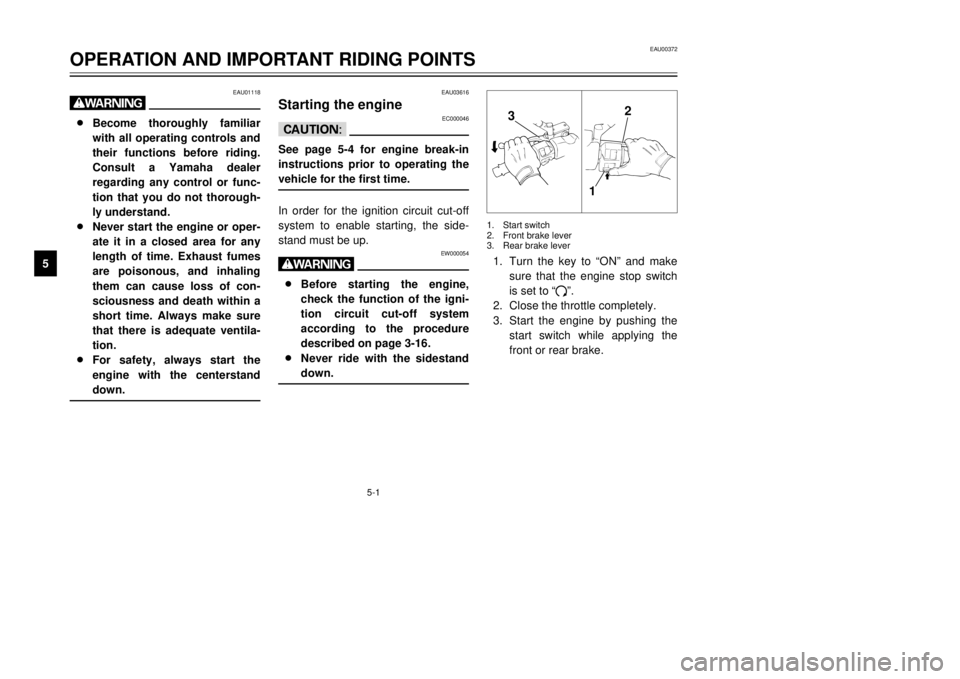
Starting the engine
EC000046
cCSee page 5-4 for engine break-in
instructions prior to operating the
vehicle for the first time.In order for the ignition circuit cut-off
system to enable starting, the side-
stand must be up.
EW000054
w8Before starting the engine,
check the function of the igni-
tion circuit cut-off system
according to the procedure
described on page 3-16.
8Never ride with the sidestand
down.
1.Turn the key to ÒONÓ and make
sure that the engine stop switch
is set to Ò#Ó.
2.Close the throttle completely.
3.Start the engine by pushing the
start switch while applying the
front or rear brake.
EAU00372
OPERATION AND IMPORTANT RIDING POINTS
1
2
3
45
6
7
8
9
32
1
1.Start switch
2.Front brake lever
3.Rear brake lever
5GM-9-E1(No ABS) 9/27/00 2:18 PM Page 38
Page 40 of 106
5-2
OPERATION AND IMPORTANT RIDING POINTS
1
2
3
45
6
7
8
9
EAU00433
Starting offNOTE:
Before starting off, allow the engine
to warm up.1.While pulling the rear brake lever
with your left hand and holding
the grab bar with your right hand,
push the scooter off the center-
stand.
2.Sit astride the seat, and then
adjust the rear view mirrors.
3.Switch the turn signal on.4.Check for oncoming traffic, and
then slowly turn the throttle grip
(on the right) in order to take off.
5.Switch the turn signal off.
1
1.Grab bar
NOTE:
If the engine does not start, release
the start switch, wait a few seconds,
and then try again. Each starting
attempt should be as short as possi-
ble to preserve the battery. Do not
crank the engine more than 10 sec-
onds on any one attempt. If the
engine does not start, try with the
throttle open 1/8 turn.
ECA00045
cCFor maximum engine life, never
accelerate hard when the engine is
cold!
5GM-9-E1(No ABS) 9/27/00 2:18 PM Page 39