Page 57 of 122
![VOLVO V70 2001 Owners Manual 2001 VOLVO V70
http://new.volvocars.com/ownersdocs/2001/2001_V70/01v70_06a.htm[4/4/2013 10:38:53 PM]
transmission will automatically switch to neutral.
The transmission will automatically return to](/manual-img/45/58545/w960_58545-56.png "VOLVO V70 2001 Owners Manual 2001 VOLVO V70
http://new.volvocars.com/ownersdocs/2001/2001_V70/01v70_06a.htm[4/4/2013 10:38:53 PM]
transmission will automatically switch to neutral.
The transmission will automatically return to")
2001 VOLVO V70
http://new.volvocars.com/ownersdocs/2001/2001_V70/01v70_06a.htm[4/4/2013 10:38:53 PM]
transmission will automatically switch to neutral.
The transmission will automatically return to Drive when the brake pedal is released.
This function has been added to help reduce emissions.
4 (Intermediate gear)
The transmission will shift automatically between gears 4, 3, 2 or 1 from this position. The transmission cannot shift up
to (D)rive from fourth gear.
3 (Intermediate gear)
The transmission will shift automatically between gears 3, 2 and 1 from this position. The transmission cannot shift up
to fourth gear or (D)rive from third gear.
L (Low gears)
The transmission is locked in gears 1 and 2 when the selector is in this position.
NOTE:
Gears 4, 3, or L can be used if you are driving in a mountainous area, towing a trailer or to increase engine braking
effect.
The transmission has a built-in limiter designed to help prevent excessive engine speeds (high rpm) when gears 4, 3
or L are selected.
Automatic transmission -adaptive system
The automatic transmission is controlled by an adaptive control system that constantly monitors the way in which the
transmission functions. It senses and adapts each gear shift for optimal performance. The system also monitors your
particular driving style and adapts gear shifting accordingly.
pg. 83 Automatic transmission AW5
Automatic transmission -shift gate positions
The gear selector can be moved freely between N and D.
ProCarManuals.com
Page 58 of 122
![VOLVO V70 2001 Owners Manual 2001 VOLVO V70
http://new.volvocars.com/ownersdocs/2001/2001_V70/01v70_06a.htm[4/4/2013 10:38:53 PM]
Depressing the button on the front of the gear selector knob enables you to move the gear selector](/manual-img/45/58545/w960_58545-57.png "VOLVO V70 2001 Owners Manual 2001 VOLVO V70
http://new.volvocars.com/ownersdocs/2001/2001_V70/01v70_06a.htm[4/4/2013 10:38:53 PM]
Depressing the button on the front of the gear selector knob enables you to move the gear selector")
2001 VOLVO V70
http://new.volvocars.com/ownersdocs/2001/2001_V70/01v70_06a.htm[4/4/2013 10:38:53 PM]
Depressing the button on the front of the gear selector knob enables you to move the gear selector to positions P, R, N,
D, 4, 3 and L.
W Winter/Wet driving mode -enhanced vehicle traction
Mode W will only function if the gear selector is in the (D)rive position.
Press the button at the base of the gear selector to engage/disengage this driving mode (see illustration).
An LED in the button will light up to indicate that W is engaged and this will also be displayed in the instrument
panel (see page 25
).
This mode may be selected for starting/ moving off on slippery roads.
Kickdown
Automatic shift to a lower gear (kickdown) is achieved by depressing the accelerator pedal fully and briskly. An
upshift will occur when approaching the top speed for a particular gear or by releasing the accelerator pedal slightly.
Kickdown can be used for maximum acceleration or when passing at highway speeds.
pg. 84 Automatic transmission (Geartronic)
P (Park)
Use this position when starting the engine or parking the car.
Never use P while the car is in motion. The parking brake should be set whenever the car is parked.
The gear selector is mechanically locked in the P position (SHIFTLOCK). To release the gear selector from this
position, the engine must be running (or the ignition key must be in position II) and the brake pedal must be
depressed.
ProCarManuals.com
Page 59 of 122
![VOLVO V70 2001 Owners Manual 2001 VOLVO V70
http://new.volvocars.com/ownersdocs/2001/2001_V70/01v70_06a.htm[4/4/2013 10:38:53 PM]
WARNING!
Never leave the car unattended when the engine is running. If, by mistake, the gear selec](/manual-img/45/58545/w960_58545-58.png "VOLVO V70 2001 Owners Manual 2001 VOLVO V70
http://new.volvocars.com/ownersdocs/2001/2001_V70/01v70_06a.htm[4/4/2013 10:38:53 PM]
WARNING!
Never leave the car unattended when the engine is running. If, by mistake, the gear selec")
2001 VOLVO V70
http://new.volvocars.com/ownersdocs/2001/2001_V70/01v70_06a.htm[4/4/2013 10:38:53 PM]
WARNING!
Never leave the car unattended when the engine is running. If, by mistake, the gear selector is moved from P, the car
may start moving.
R (Reverse)
Never engage R while the car is moving forward.
N (Neutral)
Neutral - no gear engaged. Use the parking brake.
D (Drive)
D is the normal driving position and should be used as often as possible to help improve fuel economy. The car should
not be moving when shifting from R to the D position.
Kickdown
Automatic shift to a lower gear (kickdown) is achieved by depressing the accelerator pedal fully and briskly. An
upshift will occur when approaching the top speed for a particular gear or by releasing the accelerator pedal slightly.
Kickdown can be used for maximum acceleration or when passing at highway speeds. Kickdown does not function
when the transmission is in the manual shift (geartronic) mode (see next page).
Automatic transmission -adaptive system
The automatic transmission is controlled by an adaptive control system that constantly monitors the way in which the
transmission functions. It senses and adapts each gear shift for optimal performance. The system also monitors your
particular driving style and adapts gear shifting accordingly.
Automatic transmission -shift gate positions
You can move the gear selector freely between the (MAN)ual and (D)rive positions while driving.
Depress the button on the front of the gear selector knob to move between the R, N, D, and P positions.
Please see the following page for information on using the Geartronic manual shift mode.
ProCarManuals.com
Page 60 of 122
![VOLVO V70 2001 Owners Manual 2001 VOLVO V70
http://new.volvocars.com/ownersdocs/2001/2001_V70/01v70_06a.htm[4/4/2013 10:38:53 PM]
pg. 85 Automatic transmission (Geartronic)
Manual shifting - Geartronic
You can move the gear sele](/manual-img/45/58545/w960_58545-59.png "VOLVO V70 2001 Owners Manual 2001 VOLVO V70
http://new.volvocars.com/ownersdocs/2001/2001_V70/01v70_06a.htm[4/4/2013 10:38:53 PM]
pg. 85 Automatic transmission (Geartronic)
Manual shifting - Geartronic
You can move the gear sele")
2001 VOLVO V70
http://new.volvocars.com/ownersdocs/2001/2001_V70/01v70_06a.htm[4/4/2013 10:38:53 PM]
pg. 85 Automatic transmission (Geartronic)
Manual shifting - Geartronic
You can move the gear selector freely between the (MAN)ual and (D)rive positions while driving. Gears 2, 3, and 4
have a "lock -up" function which reduces engine speed and helps save fuel. The currently selected gear will be
displayed in the instrument panel (see page 25
).
To access the (MAN)ual shifting position from (D)rive, pull the gear selector back slightly from D and move it to
the left to MAN.
To return to the (D)rive position from MAN, move the gear selector to the right and push it forward to the (D)rive
position.
While driving If you select the (MAN)ual position while driving, the gear that was being used in the (D)rive position
will also initially be selected in (MAN)ual position.
Move the gear selector forward (toward "+") to shift to a higher gear or rearward (toward "-") to shift to a lower
gear.
If you hold the gear selector toward "-", the transmission will downshift, one gear at a time, and will utilize the
braking power of the engine. If the current speed is too high for using a lower gear, the downshift will not occur until
the speed has decreased enough to allow the lower gear to be used.
If you slow down to a very low speed, the transmission will automatically shift down.
When starting in the (MAN)ual position, 3rd gear is the highest gear that may be selected.
NOTE: Kickdown (see previous page) does not function when the transmission is in the manual shift (geartronic)
mode.
W Winter/Wet driving mode -enhanced vehicle traction
Mode W will function only if the gear selector is in the (D)rive position.
Press the button at the base of the gear selector to engage/disengage this driving mode (see illustration).
An LED in the button will light up to indicate that W is engaged and this will also be displayed in the instrument
panel (see page 25
).
This mode may be selected for starting/ moving off on slippery roads.
pg. 86 Driving economy
Economical driving conserves natural resources
Better driving economy may be obtained by thinking ahead, avoiding rapid starts and stops and adjusting the speed of
ProCarManuals.com
Page 61 of 122
![VOLVO V70 2001 Owners Manual 2001 VOLVO V70
http://new.volvocars.com/ownersdocs/2001/2001_V70/01v70_06a.htm[4/4/2013 10:38:53 PM]
your vehicle to immediate traffic conditions. Observe the following rules:
Bring the engine to nor](/manual-img/45/58545/w960_58545-60.png "VOLVO V70 2001 Owners Manual 2001 VOLVO V70
http://new.volvocars.com/ownersdocs/2001/2001_V70/01v70_06a.htm[4/4/2013 10:38:53 PM]
your vehicle to immediate traffic conditions. Observe the following rules:
Bring the engine to nor")
2001 VOLVO V70
http://new.volvocars.com/ownersdocs/2001/2001_V70/01v70_06a.htm[4/4/2013 10:38:53 PM]
your vehicle to immediate traffic conditions. Observe the following rules:
Bring the engine to normal operating temperature as soon as possible by driving with a light foot on the accelerator
pedal for the first few minutes of operation. A cold engine uses more fuel and is subject to increased wear.
Whenever possible, avoid using the car for driving short distances. This does not allow the engine to reach normal
operating temperature.
Drive carefully and avoid rapid acceleration and hard braking.
Do not exceed posted speed limits.
Avoid carrying unnecessary items (extra load) in the car.
Maintain correct tire pressure. Check tire pressure regularly (when tires are cold).
Remove snow tires when threat of snow or ice has ended.
Note that roof racks, ski racks, etc., increase air resistance and also fuel consumption.
Avoid using automatic transmission kickdown feature unless necessary.
Avoid using the air conditioning when it is not required. When engaged, the conditioner's compressor places an
additional load on the engine. However, at higher driving speeds, fuel consumption will be lower with the air
conditioning on and the windows closed than with the air conditioning off and the windows open.
Using the onboard trip computer's fuel consumption modes can help you learn how to drive more economically.
Other factors that decrease gas mileage are:
Worn or dirty spark plugs
Incorrect spark plug gap
Dirty air cleaner
Dirty engine oil and clogged oil filter
Dragging brakes
Incorrect front end alignment Some of the above mentioned items and others are checked at the standard
Maintenance Service intervals.
NOTE: Vehicles equipped with automatic transmissions should use (D)rive as often as possible and avoid using
"kick -down" to help improve fuel economy. Vehicles equipped with manual transmissions should use fifth gear at
highway speeds. At other times, choose the highest gear that still allows smooth acceleration.
Weight distribution affects handling
At the specified curb weight your car has a tendency to understeer, which means that the steering wheel has to be
turned more than might seem appropriate for the curvature of a bend. This ensures good stability and reduces the risk
of rear wheel skid. Remember that these properties can alter with the vehicle load. The heavier the load on the rear of
the vehicle (e.g., heavily loaded (max. 220 lbs, 100 kg) cargo area or when towing a trailer, the less the tendency to
understeer.
Handling, roadholding
Vehicle load, tire design and inflation pressure all affect vehicle handling. Therefore, check that the tires are inflated to
the recommended pressure according to the vehicle load. See "Tire pressure" section. Loads should be distributed so
that capacity weight or maximum permissible axle loads are not exceeded.
pg. 87 Points to remember
Cooling system
The risk for engine overheating is greatest, especially in hot weather, when:
Towing a trailer up steep inclines for prolonged periods at wide open throttle and low engine rpm.
ProCarManuals.com
Page 62 of 122
![VOLVO V70 2001 Owners Manual 2001 VOLVO V70
http://new.volvocars.com/ownersdocs/2001/2001_V70/01v70_06a.htm[4/4/2013 10:38:53 PM]
Stopping the engine suddenly after high speed driving (so-called "after-boiling" can occur).
To avo](/manual-img/45/58545/w960_58545-61.png "VOLVO V70 2001 Owners Manual 2001 VOLVO V70
http://new.volvocars.com/ownersdocs/2001/2001_V70/01v70_06a.htm[4/4/2013 10:38:53 PM]
Stopping the engine suddenly after high speed driving (so-called \"after-boiling\" can occur).
To avo")
2001 VOLVO V70
http://new.volvocars.com/ownersdocs/2001/2001_V70/01v70_06a.htm[4/4/2013 10:38:53 PM]
Stopping the engine suddenly after high speed driving (so-called "after-boiling" can occur).
To avoid overheating, the following rules should be followed: Do not drive for prolonged periods at engine speeds
above 4500 rpm if you are towing a trailer in hilly terrain. Reduce speed when towing a trailer up long, steep inclines.
The risk of overheating can be reduced by switching off the air conditioning system for a short time. Do not let the
engine idle unnecessarily for prolonged periods. Do not mount auxiliary lamps in front of the grill.
When the risk of overheating is imminent, or in the event of overheating (the temperature gauge goes repeatedly into,
or stays continually in, the red section), the following precautions should be taken:
Switch off the air conditioning system.
Pull off the road, away from traffic, stop the car and put the gear selector into neutral.
Switch the heater to full (maximum) position. Increase the engine speed to approx. 2000 rpm (twice idling speed)
until the temperature begins to drop.
WARNING!
Do not remove coolant expansion tank cap. The coolant will be extremely hot.
If necessary, see page 125 and 128
for information on checking and topping-up the coolant level.
CAUTION: Drive slowly and carefully if going through standing water (i.e. flooded roadways, etc.). Damage to the
engine could result if excess water is drawn in through the air intake system. Never drive the vehicle in water deeper
than 1 foot (300 mm). See the flood warning on page 7
.
WARNING!
Driving with the tailgate open: Driving with the tailgate open could mean that poisonous exhaust gases enter the
passenger compartment. If the tailgate must be kept open for any reason, proceed as follows:
- Close the windows.
- Set the ventilation system control to air flow to floor, windshield and side windows and blower control to its
highest setting.
Floor mats: An extra mat on the driver's floor can cause the accelerator pedal to catch. Check that the movement of
the accelerator pedal is not impeded. Not more than one protective floor covering may be used at one time.
Electrical system
When replacing the battery or when carrying out work involving the electrical system, the following should be
observed:
A battery connection to the wrong terminal will damage the electrical system. Be sure to connect the positive battery
cable to the positive battery terminal and the negative battery cable to the negative battery terminal.
If booster batteries are used for starting, they must be properly connected to minimize the risk of the electrical
system being damaged. For correct connection, see "Jump starting" section.
Never disconnect the battery circuit (for example, to replace the battery) while the engine is running, as this may
damage the generator. Always make sure that all the battery connections are properly cleaned and tightened.
If any electrical welding work is performed on the vehicle, the battery's ground lead (negative cable) and all the
connecting cables of the generator must be disconnected and the welder cables placed as near the welding points as
possible.
The radio must be turned off before the battery is disconnected.
Switch off the ignition for at least 10 minutes before disconnecting the battery.
ProCarManuals.com
Page 63 of 122
![VOLVO V70 2001 Owners Manual 2001 VOLVO V70
http://new.volvocars.com/ownersdocs/2001/2001_V70/01v70_06a.htm[4/4/2013 10:38:53 PM]
pg. 88 Roof racks/Load carriers
Load carriers (accessory)
Load carriers are available as Volvo acce](/manual-img/45/58545/w960_58545-62.png "VOLVO V70 2001 Owners Manual 2001 VOLVO V70
http://new.volvocars.com/ownersdocs/2001/2001_V70/01v70_06a.htm[4/4/2013 10:38:53 PM]
pg. 88 Roof racks/Load carriers
Load carriers (accessory)
Load carriers are available as Volvo acce")
2001 VOLVO V70
http://new.volvocars.com/ownersdocs/2001/2001_V70/01v70_06a.htm[4/4/2013 10:38:53 PM]
pg. 88 Roof racks/Load carriers
Load carriers (accessory)
Load carriers are available as Volvo accessories. Observe the following points when in use:
To avoid damaging your car and to achieve maximum safety when driving, we recommend using the load carriers
that Volvo has developed especially for your car.
The maximum weight that may be loaded on the roof is 220 lbs (100 kg), including load carriers.
Avoid single-point loads. Distribute loads evenly.
Place heavier cargo at the bottom of the load.
Anchor the cargo correctly with appropriate tie-down equipment.
Check periodically that the load carriers and load are properly secured.
Remember that the car's center of gravity and handling change when you carry a load on the roof.
The car's wind resistance (and correspondingly, fuel consumption) will increase with the size of the load.
Drive smoothly. Avoid rapid starts, fast cornering and hard braking.
Attaching load carriers (models without rails)
The attachment brackets for the load carriers are located under the roof molding.
1 Make sure that the load carriers are placed in the right direction. See the mark on the decal under the cover.
2 Press the guide lugs into the holes (1).
3 Carefully lower the opposite side of the load carrier to the roof.
4 Loosen the tightening wheel slightly. Slide the hook on the load carrier attachment into the attachment bracket under
the roof molding.
5 Turn the tightening wheel to secure the load carrier in the attachment bracket.
6 Repeat this procedure for the other load carrier attachments.
7 Check that the hooks on all four load carrier attachments are securely tightened in the respective attachment brackets
on the roof of the car.
8 Press down the covers.
Check periodically that the load carriers and load are properly secured.
pg. 89 Load carriers (models with rails)
ProCarManuals.com
Page 64 of 122
2001 VOLVO V70
http://new.volvocars.com/ownersdocs/2001/2001_V70/01v70_06a.htm[4/4/2013 10:38:53 PM]
Position of load carriers
Make sure that the wing-shaped load carriers are installed on the roof rails with the rounded edge forward (see the
inset illustration above). The load carriers are identical and can be placed anywhere along the roof rails.
Fitting the load carriers (accessory)
Make sure that the load carrier is pressed firmly out against the roof rail. Screw the load carrier in place. Use the
supplied torque wrench and tighten to the mark on the wrench (corresponding to 6 Nm). See illustration.
Load carrier cover
The car's ignition key or the stud on the edge of the supplied torque wrench can be used to undo or tighten the cover.
Turn a quarter turn (90 degrees). See illustration.
ProCarManuals.com
 1
1 2
2 3
3 4
4 5
5 6
6 7
7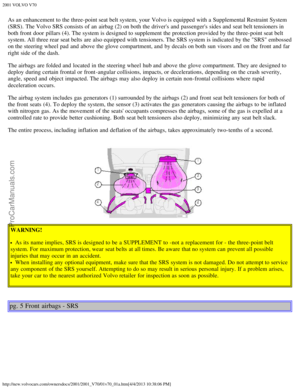 8
8 9
9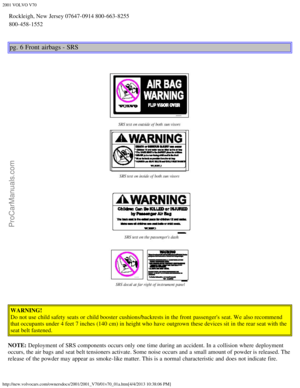 10
10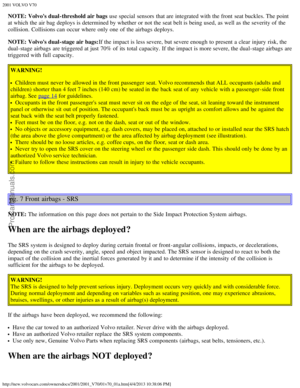 11
11 12
12 13
13 14
14 15
15 16
16 17
17 18
18 19
19 20
20 21
21 22
22 23
23 24
24 25
25 26
26 27
27 28
28 29
29 30
30 31
31 32
32 33
33 34
34 35
35 36
36 37
37 38
38 39
39 40
40 41
41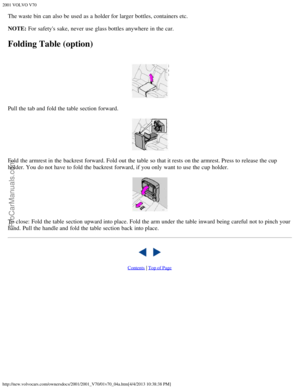 42
42 43
43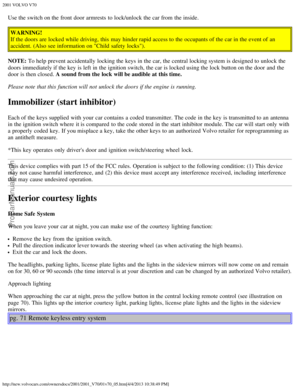 44
44 45
45 46
46 47
47 48
48 49
49 50
50 51
51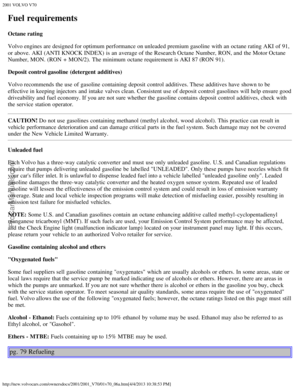 52
52 53
53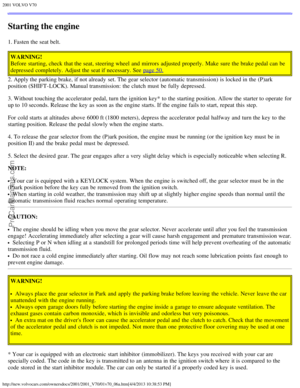 54
54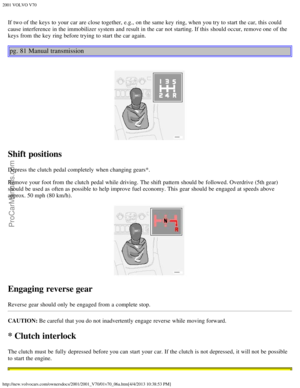 55
55 56
56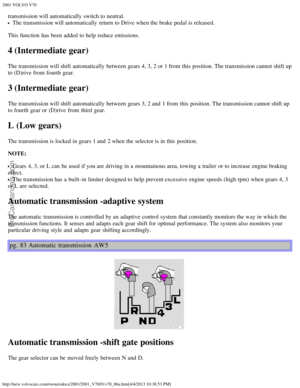 57
57 58
58 59
59 60
60 61
61 62
62 63
63 64
64 65
65 66
66 67
67 68
68 69
69 70
70 71
71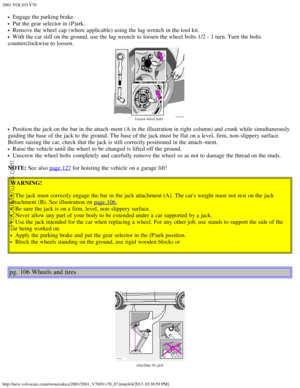 72
72 73
73 74
74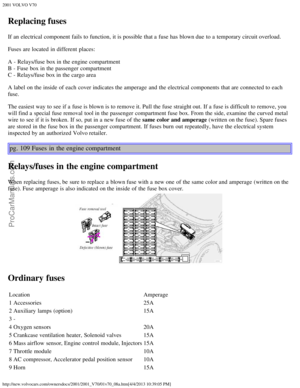 75
75 76
76 77
77 78
78 79
79 80
80 81
81 82
82 83
83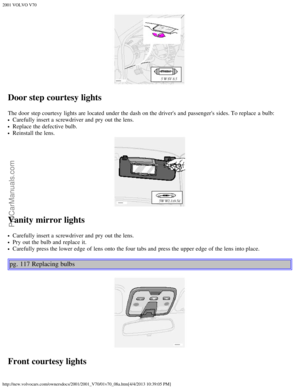 84
84 85
85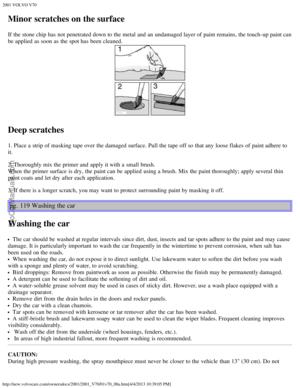 86
86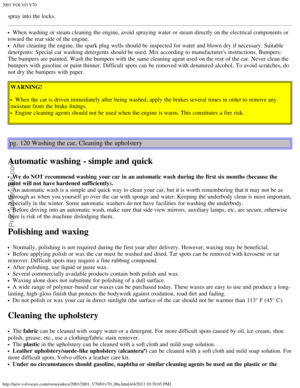 87
87 88
88 89
89 90
90 91
91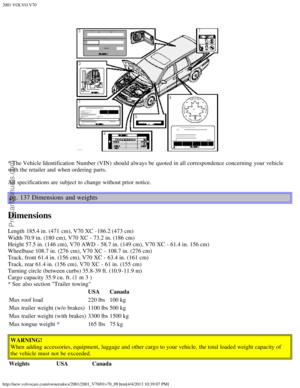 92
92 93
93 94
94 95
95 96
96 97
97 98
98 99
99 100
100 101
101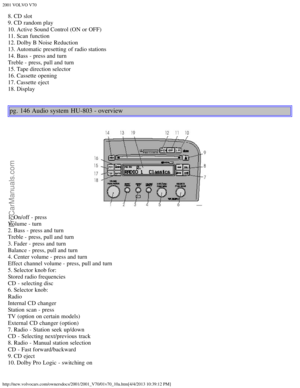 102
102 103
103 104
104 105
105 106
106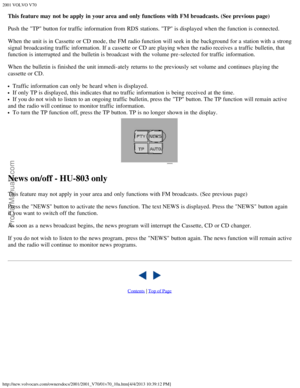 107
107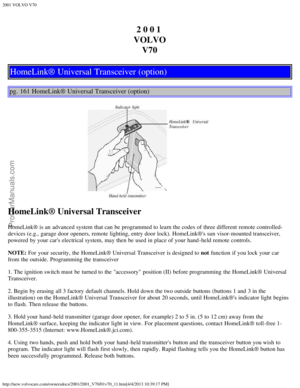 108
108 109
109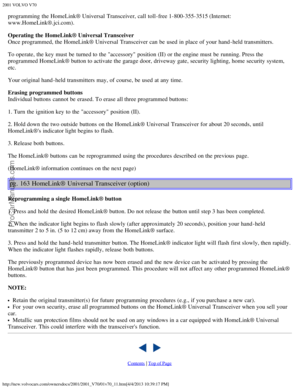 110
110 111
111 112
112 113
113 114
114 115
115 116
116 117
117 118
118 119
119 120
120 121
121![VOLVO V70 2001 Owners Manual 2001 VOLVO V70
http://new.volvocars.com/ownersdocs/2001/2001_V70/01v70_06a.htm[4/4/2013 10:38:53 PM]
Position of load carriers
Make sure that the wing-shaped load carriers are installed on the roof ra](/manual-img/45/58545/w960_58545-63.png "VOLVO V70 2001 Owners Manual 2001 VOLVO V70
http://new.volvocars.com/ownersdocs/2001/2001_V70/01v70_06a.htm[4/4/2013 10:38:53 PM]
Position of load carriers
Make sure that the wing-shaped load carriers are installed on the roof ra")