Page 48 of 4323

MA001±42
± MAINTENANCEOUTSIDE VEHICLE
MA±1
48 Author�: Date�:
2005 SEQUOIA (RM1146U)
OUTSIDE VEHICLE
GENERAL MAINTENANCE
The owners are responsible for these maintenance and inspection items.
They can be done by the owner or they can have them done at a service shop.
These items include those which should be checked on a daily basis, those which, in most cases, do not
require (special) tools and those which are considered to be reasonable for the owner to do.
Items and procedures for general maintenance are as follows.
1. GENERAL NOTES
�Maintenance items may vary from country to country. Check the owner's manual supplement in which
the maintenance schedule is shown.
�Every service item in the periodic maintenance schedule must be performed.
�Periodic maintenance service must be performed according to whichever interval in the periodic main-
tenance schedule occurs first, the odometer reading (miles) or the time interval (months).
�Maintenance service after the last period should be performed at the same interval as before unless
otherwise noted.
�Failure to do even one item can cause the engine to run poorly and increase exhaust emissions.
2. TIRES
(a) Check the pressure with a gauge.
If necessary, adjust.
(b) Check for cuts, damage or excessive wear.
3. WHEEL NUTS
When checking the tires, check the nuts for looseness or for missing.
If necessary, tighten them.
4. TIRE ROTATION (See page SA±3)
Check the owner's manual supplement in which the maintenance schedule is shown.
5. WINDSHIELD WIPER BLADES
Check for wear or cracks whenever they do not wipe clean.
If necessary, replace.
6. FLUID LEAKS
(a) Check underneath for leaking fuel, oil, water or other fluid.
(b) If you smell gasoline fumes or notice any leak, find the cause and correct.
7. DOORS AND ENGINE HOOD
(a) Check that all doors and the tailgate operate smoothly, and that all latches lock securely.
(b) Check that the engine hood secondary latch secures the hood from opening when the primary latch
is released.
Page 3419 of 4323

± BODY ELECTRICALTROUBLESHOOTING
BE±7
3411 Author�: Date�:
2005 SEQUOIA (RM1146U)
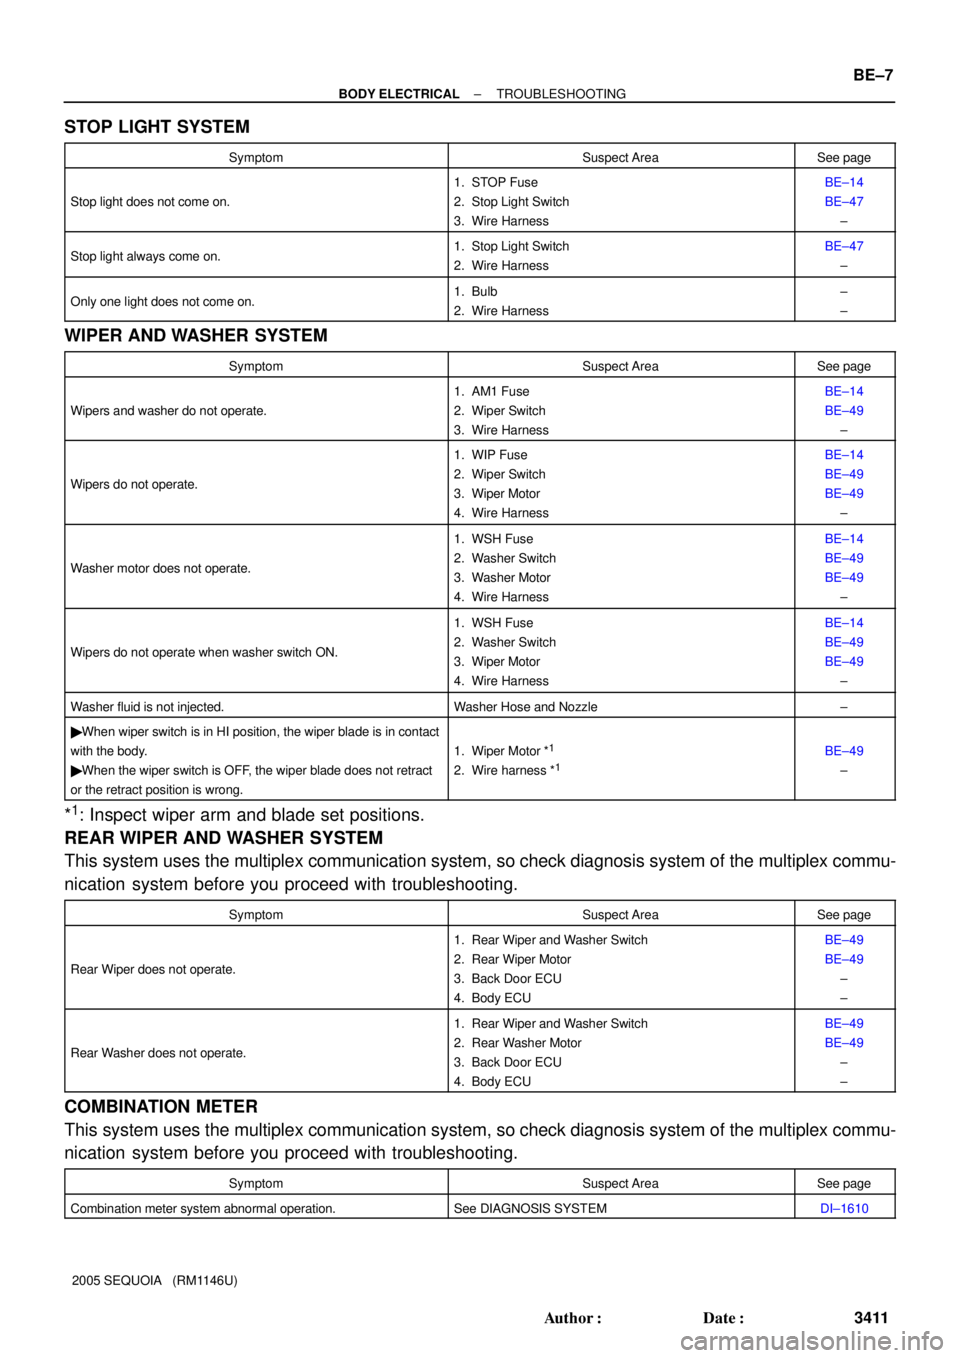
STOP LIGHT SYSTEM
SymptomSuspect AreaSee page
Stop light does not come on.
1. STOP Fuse
2. Stop Light Switch
3. Wire HarnessBE±14
BE±47
±
Stop light always come on.1. Stop Light Switch
2. Wire HarnessBE±47
±
Only one light does not come on.1. Bulb
2. Wire Harness±
±
WIPER AND WASHER SYSTEM
SymptomSuspect AreaSee page
Wipers and washer do not operate.
1. AM1 Fuse
2. Wiper Switch
3. Wire HarnessBE±14
BE±49
±
Wipers do not operate.
1. WIP Fuse
2. Wiper Switch
3. Wiper Motor
4. Wire HarnessBE±14
BE±49
BE±49
±
Washer motor does not operate.
1. WSH Fuse
2. Washer Switch
3. Washer Motor
4. Wire HarnessBE±14
BE±49
BE±49
±
Wipers do not operate when washer switch ON.
1. WSH Fuse
2. Washer Switch
3. Wiper Motor
4. Wire HarnessBE±14
BE±49
BE±49
±
Washer fluid is not injected.Washer Hose and Nozzle±
� When wiper switch is in HI position, the wiper blade is in contact
with the body.
� When the wiper switch is OFF, the wiper blade does not retract
or the retract position is wrong.
1. Wiper Motor *1
2. Wire harness *1BE±49
±
*1: Inspect wiper arm and blade set positions.
REAR WIPER AND WASHER SYSTEM
This system uses the multiplex communication system, so check diagnosis system of the multiplex commu-
nication system before you proceed with troubleshooting.
SymptomSuspect AreaSee page
Rear Wiper does not operate.
1. Rear Wiper and Washer Switch
2. Rear Wiper Motor
3. Back Door ECU
4. Body ECUBE±49
BE±49
±
±
Rear Washer does not operate.
1. Rear Wiper and Washer Switch
2. Rear Washer Motor
3. Back Door ECU
4. Body ECUBE±49
BE±49
±
±
COMBINATION METER
This system uses the multiplex communication system, so check diagnosis system of the multiplex commu-
nication system before you proceed with troubleshooting.
SymptomSuspect AreaSee page
Combination meter system abnormal operation.See DIAGNOSIS SYSTEMDI±1610
Page 3597 of 4323
H16692
H16693H17630
2 jet type:
3 jet type:AHI
J
BAC
DE DF
FDEEDF
JJ
HI
B G
G
G
BO460±01
BO±36
± BODYFRONT WIPER AND WASHER
3589 Author�: Date�:
2005 SEQUOIA (RM1146U)
INSPECTION
INSPECT WASHER NOZZLE
While operating the washer, check whether the point where the
washer fluid hits the windshield and the surge area are within
the range indicated by hatched line.
A: Approx. 50 mm (1.97 in)
B: Approx. 40 mm (1.57 in)
C: Approx. 10 mm (0.39 in)
D: Approx. 150 mm (5.91 in)
E: Approx. 110 mm (4.33 in)
F: Approx. 180 mm (7.09 in)
G: Approx. 60 mm (2.36 in)
H: Approx. 310 mm (12.20 in)
I: Approx. 298 mm (11.69 in)
J: Approx. 455 mm (17.91 in)
Page 3598 of 4323
BO461±01
BE3367
2.0 ± 2.5 mm
(0.079 ± 0.098 in.)
0.7 ± 0.75 mm
(0.028 ± 0.0295 in.)
± BODYFRONT WIPER AND WASHER
BO±37
3590 Author�: Date�:
2005 SEQUOIA (RM1146U)
ADJUSTMENT
ADJUST WASHER NOZZLE
Using a tool like the one shown in the illustration, change the
direction of the nozzle hole to adjust the point where washer
fluid hits the windshield.
Page 3604 of 4323
H16695
BA
C
D
BO465±01
± BODYREAR WIPER AND WASHER
BO±43
3596 Author�: Date�:
2005 SEQUOIA (RM1146U)
INSPECTION
INSPECT REAR WASHER NOZZLE
While operating the washer, check it the point where the washer
fluid hits the back door glass is within the range indicated by the
hatched line.
A: Approx. 156 mm (6.14 in)
B: Approx. 180 mm (7.09 in)
C: Approx. 33 mm (1.30 in)
D: Approx. 292 mm (11.50 in)
Page 3605 of 4323
BO466±01
BE3367
2.0 ± 2.5 mm
(0.079 ± 0.098 in.)
0.7 ± 0.75 mm
(0.028 ± 0.0295 in.) BO±44
± BODYREAR WIPER AND WASHER
3597 Author�: Date�:
2005 SEQUOIA (RM1146U)
ADJUSTMENT
ADJUST WASHER NOZZLE
Using a tool like the one shown in the illustration, change the
direction of the nozzle hole to adjust the point where washer
fluid hits the back door glass.
Page 4012 of 4323

05_SEQUOIA_U (L/O 0408)
153
2005 SEQUOIA from Aug. '04 Prod. (OM34424U)
When all the doors are unlocked using
either the key or the wireless remote con-
trol transmitter simultaneously, the ignition
switch light will come on and remain on
for about 15 seconds before fading out.
To prevent the battery being discharged,
the light will automatically turn off when
the key is removed and the door is left
opened for 20 minutes or more.
The following adjustments can be made in
this system. For details, contact your
Toyota dealer.
�Cancelling the door key or wireless re-
mote control transmitter linked opera-
tion
�Changing the timing for the light turn-
ing off
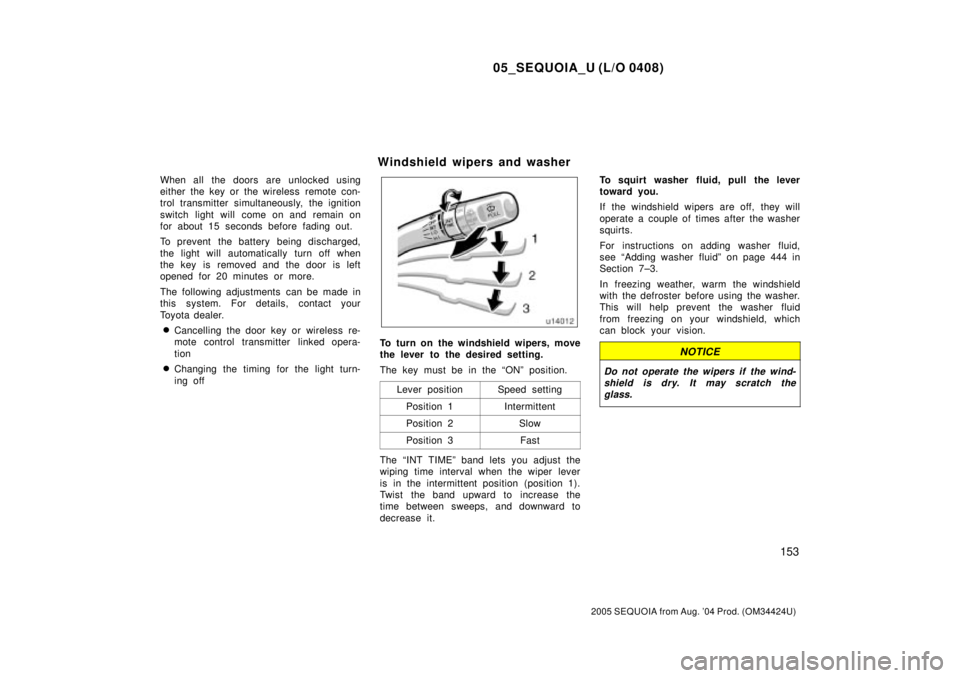
To turn on the windshield wipers, move
the lever to the desired setting.
The key must be in the ªONº position.
Lever position
Speed setting
Position 1Intermittent
Position 2Slow
Position 3Fast
The ªINT TIMEº band lets you adjust the
wiping time interval when the wiper lever
is in the intermittent position (position 1).
Twist the band upward to increase the
time between sweeps, and downward to
decrease it.To squirt washer fluid, pull the lever
toward you.
If the windshield wipers are off, they will
operate a couple of times after the washer
squirts.
For instructions on adding washer fluid,
see ªAdding washer fluidº on page 444 in
Section 7±3.
In freezing weather, warm the windshield
with the defroster before using the washer.
This will help prevent the washer fluid
from freezing on your windshield, which
can block your vision.
NOTICE
Do not operate the wipers if the wind-
shield is dry. It may scratch the
glass.
Windshield wipers and washer
Page 4013 of 4323

05_SEQUOIA_U (L/O 0408)
154
2005 SEQUOIA from Aug. '04 Prod. (OM34424U)
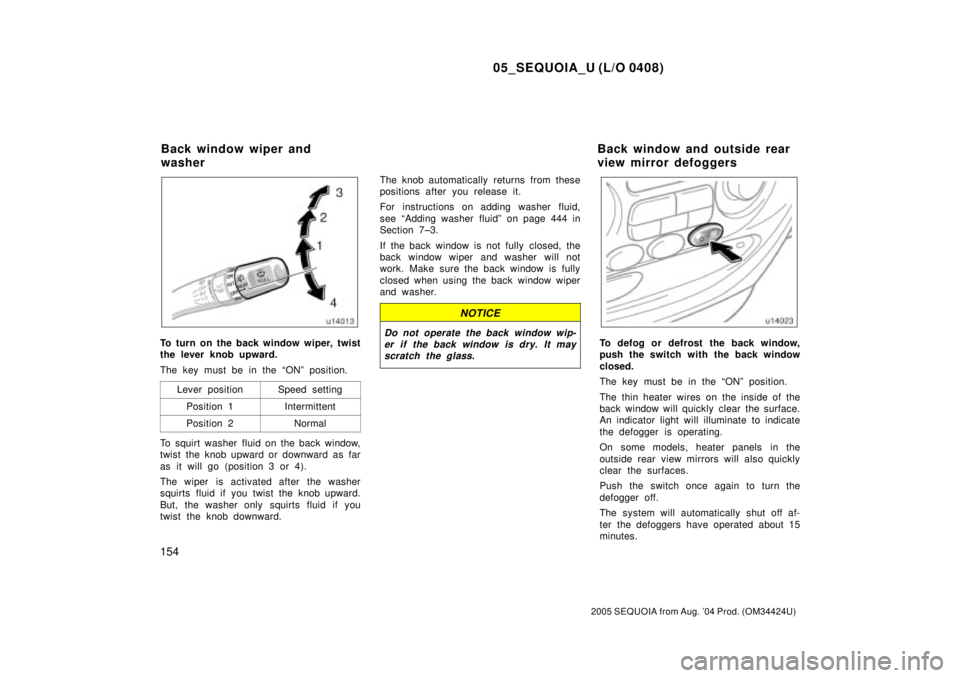
To turn on the back window wiper, twist
the lever knob upward.
The key must be in the ªONº position.
Lever position
Speed setting
Position 1Intermittent
Position 2Normal
To squirt washer fluid on the back window,
twist the knob upward or downward as far
as it will go (position 3 or 4).
The wiper is activated after the washer
squirts fluid if you twist the knob upward.
But, the washer only squirts fluid if you
twist the knob downward.The knob automatically returns from these
positions after you release it.
For instructions on adding washer fluid,
see ªAdding washer fluidº on page 444 in
Section 7±3.
If the back window is not fully closed, the
back window wiper and washer will not
work. Make sure the back window is fully
closed when using the back window wiper
and washer.
NOTICE
Do not operate the back window wip-
er if the back window is dry. It may
scratch the glass.To defog or defrost the back window,
push the switch with the back window
closed.
The key must be in the ªONº position.
The thin heater wires on the inside of the
back window will quickly clear the surface.
An indicator light will illuminate to indicate
the defogger is operating.
On some models, heater panels in the
outside rear view mirrors will also quickly
clear the surfaces.
Push the switch once again to turn the
defogger off.
The system will automatically shut off af-
ter the defoggers have operated about 15
minutes.
Back window wiper and
washerBack window and outside rear
view mirror defoggers