Page 1576 of 1943

REMOVAL
1. DISCHARGE REFRIGERANT FROM REFRIGERATION
SYSTEM
HINT:
At the time of installation, please refer")
CO145±01
I17955
I17954
± COOLINGRADIATOR AND CONDENSER MODULE
CO±17
2001 PRIUS (RM778U)
REMOVAL
1. DISCHARGE REFRIGERANT FROM REFRIGERATION
SYSTEM
HINT:
At the time of installation, please refer to the following item.
Evacuate air from refrigeration system.
Charge system with refrigerant and inspect for leakage of refrig-
erant.
Specified amount: 500 ± 50 g (17.64 ± 1.76 oz.)
2. DRAIN ENGINE COOLANT FROM RADIATOR
HINT:
It is not necessary to drain out all the coolant.
3. REMOVE ELECTRIC COOLING FAN ASSEMBLY
(See Page CO±22)
4. REMOVE FRONT BUMPER (See Page BO±4)
5. REMOVE RADIATOR RESERVOIR HOSE
6. DISCONNECT DISCHARGE AND LIQUID TUBE
(a) Remove the 2 bolts and disconnect discharge and liquid
tube.
Torque: 5.4 N´m (55 kgf´cm, 48 in.´lbf)
NOTICE:
Cap open the fittings immediately to keep moisture or dirt
out of the system.
HINT:
At the time of installation, please refer to the following item.
Lubricate 2 new O±rings with compressor oil and install them
to the tubes.
(b) Remove the bolt.
(c) Disconnect the liquid tube and remove the bracket.
7. REMOVE RADIATOR UPPER SUPPORT
Remove the 2 bolts and 2 radiator upper supports.
Page 1577 of 1943
I17968
CO±18
± COOLINGRADIATOR AND CONDENSER MODULE
2001 PRIUS (RM778U)
8. REMOVE RADIATOR & CONDENSER MODULE
(a) Push the radiator & condenser module toward engine.
(b) Pull up the radiator until the lower radiator support is re-
moved.
(c) Pull it downward to remove it.
Page 1578 of 1943

REMOVAL
1. DISCHARGE REFRIGERANT FROM REFRIGERATION
SYSTEM
HINT:
At the time of installation, please refer to the fo")
CO149±01
I17963
I17964
CO±22
± COOLINGELECTRIC COOLING FAN
2001 PRIUS (RM778U)
REMOVAL
1. DISCHARGE REFRIGERANT FROM REFRIGERATION
SYSTEM
HINT:
At the time of installation, please refer to the following item.
Evacuate air from refrigeration system.
Charge system with refrigerant and inspect for leakage of refrig-
erant.
Specified amount: 500 ± 50 g (17.64 ± 1.76 oz.)
2. DRAIN ENGINE COOLANT FROM RADIATOR
HINT:
It is not necessary to drain out all coolant.
3. REMOVE BRACKETS
(a) Remove the water hose from fan shroud.
(b) Remove the 5 bolts and 2 brackets.
4. REMOVE SUCTION AND DISCHARGE HOSES
(a) Remove the 2 bolts and disconnect the both hoses.
Torque: 10 N´m (100 kgf´cm, 7 ft´lbf)
HINT:
At the time of installation, please refer to the following item.
Lubricate 2 new O±rings with compressor oil and install them
to the tubes.
(b) Loosen the 2 nuts and remove the both hoses.
Torque:
Suction hose 32 N´m (330 kgf´cm, 24 ft´lbf)
Discharge hose 22 N´m (225 kgf´cm, 16 ft´lbf)
HINT:
At the time of installation, please refer to the following item.
Lubricate 2 new O±rings with compressor oil and install them
to the tubes.
Page 1579 of 1943
I17965
I17967
I17956
± COOLINGELECTRIC COOLING FAN
CO±23
2001 PRIUS (RM778U)
5. DISCONNECT RADIATOR HOSES FROM RADIATOR
AND CONDENSER MODULE
(a) Using pliers, grip the claw of the hose clip and slide the
clip along the hose.
(b) Disconnect the radiator hoses.
6. REMOVE ELECTRIC COOLING FAN ASSEMBLY
(a) Disconnect the 2 connectors.
(b) Remove the 2 bolts.
(c) Pull up the electric cooling fan assembly until the it is re-
moved from the radiator and condenser module.
(d) Pull it downward to remove it.
Page 1607 of 1943

INSTALLATION
1. INSTALL CONVERTER & INVERTER ASSEMBLY
(a)")
HV00D±01
B11978
B11980
B12004
B11979
A
A
AB
B
B
B12005
HV±22
± HYBRID VEHICLE CONTROLCONVERTER AND INVERTER ASSEMBLY
2001 PRIUS (RM778U)
INSTALLATION
1. INSTALL CONVERTER & INVERTER ASSEMBLY
(a) Install the converter & inverter assembly with the 4 bolts.
Torque: 21 N´m (214 kgf´cm, 15 ft´lbf)
(b) Connect the 3 water hoses to the converter & inverter as-
sembly.
(c) Connect the 4 connectors.
(d) Connect the 2 power cable connectors.
(e) Install the ground cable to the radiator upper support.
Torque: 8.0 N´m (82 kgf´cm, 71 in.´lbf)
(f) Install the power cable for MG1 with the 3 bolts.
Torque: 7.0 N´m (71 kgf´cm, 62 in.´lbf)
NOTICE:
Be careful to prevent foreign matter from entering the in-
side of connector cover.
(g) Install the connector cover and circuit breaker sensor with
the2 screws.
Torque: 20 N´m (204 kgf´cm, 15 ft´lbf)
(h) Connect the connector for circuit breaker sensor.
(i) Install the 3 power cables for MG2 with the 6 bolts.
Torque:
Bolt A: 19.5 N´m (199 kgf´cm, 14 ft´lbf)
Bolt B: 8.0 N´m (82 kgf´cm, 71 in.´lbf)
NOTICE:
Be careful to prevent foreign matter from entering the in-
side of connector cover.
(j) Install the gasket and inverter terminal cover with the 4
screws.
Torque: 8.0 N´m (82 kgf´cm, 71 in.´lbf)
2. INSTALL COWL TOP PANEL (See page BO±31)
3. INSTALL SERVICE PLUG (See page HV±1)
4. FILL WITH HV COOLANT (See page HT±6)
Page 1919 of 1943
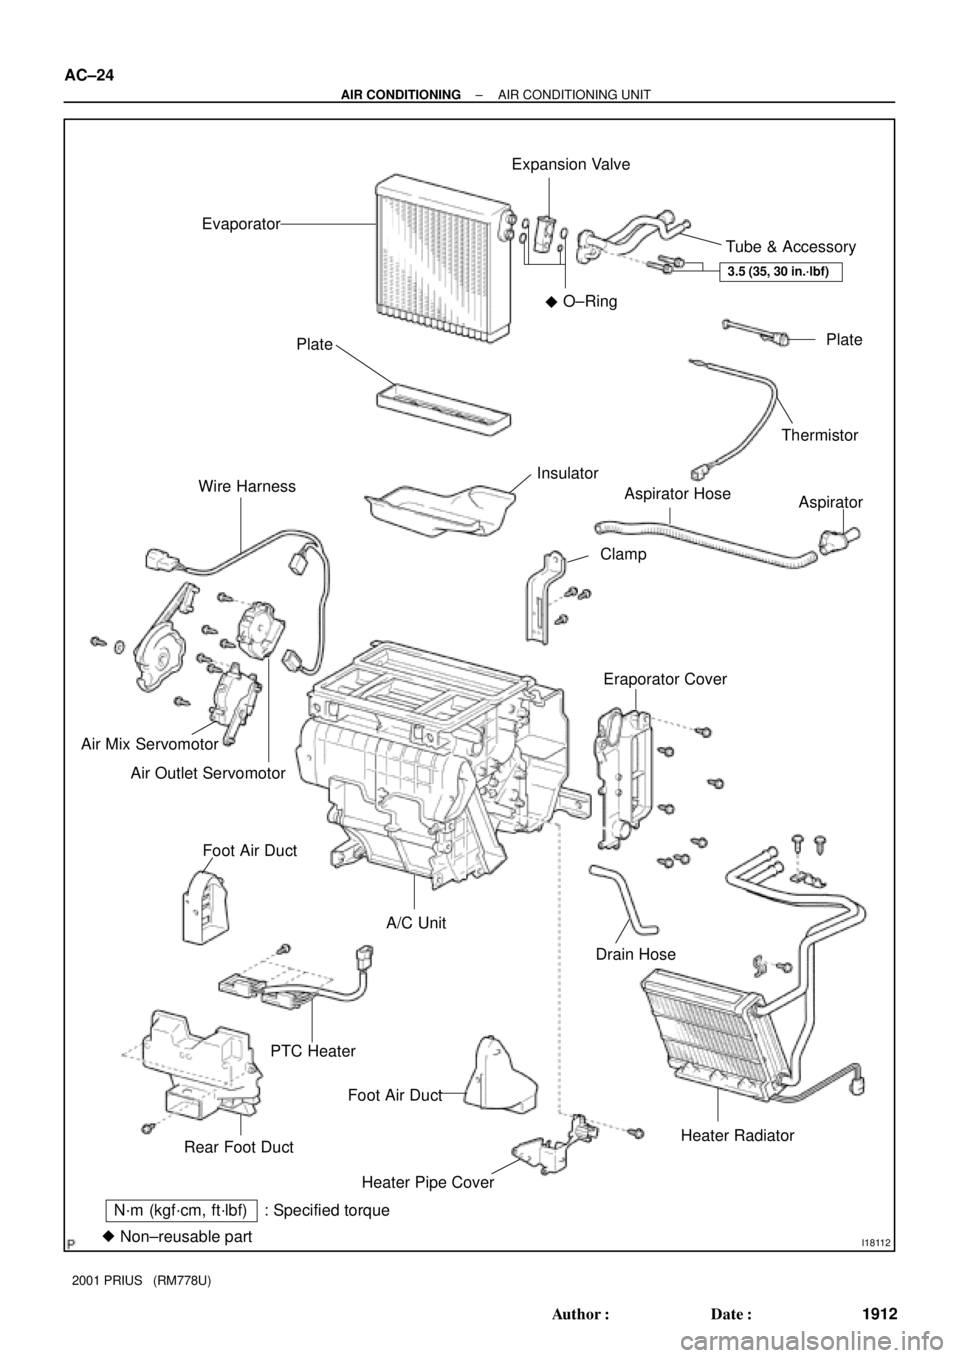
I18112
N´m (kgf´cm, ft´lbf) : Specified torque
�Non±reusable partEvaporatorExpansion Valve
Tube & Accessory
Plate
Thermistor
Aspirator
Eraporator CoverAspirator Hose
Clamp Insulator Plate
Wire Harness
Air Mix Servomotor
Air Outlet Servomotor
Foot Air Duct
PTC HeaterA/C Unit
Foot Air Duct
Heater Pipe CoverDrain Hose
Heater Radiator
Rear Foot DuctO±Ring
3.5 (35, 30 in.´lbf)
�
AC±24
± AIR CONDITIONINGAIR CONDITIONING UNIT
1912 Author�: Date�:
2001 PRIUS (RM778U)
Page 1920 of 1943

REMOVAL
1. REMOVE FRONT WIPER AND OUTER FRONT COWL
TOP PANEL (Se")
AC37K±01
I17981
I03838
SST
I03839
SST
Push
SSTPull
Release
Lever
± AIR CONDITIONINGAIR CONDITIONING UNIT
AC±25
2001 PRIUS (RM778U)
REMOVAL
1. REMOVE FRONT WIPER AND OUTER FRONT COWL
TOP PANEL (See page BO±32)
2. DISCHARGE REFRIGERANT FROM REFRIGERATION
SYSTEM
HINT:
At the time of installation, please refer to the following item.
Evacuate air from refrigeration system.
Charge system with refrigerant and inspect for leakage of refrig-
erant.
Specified amount: 500 ± 50 g (17.64 ± 1.76 oz.)
3. DRAIN ENGINE COOLANT FROM RADIATOR
HINT:
It is not necessary to drain out all coolant.
4. DISCONNECT LIQUID TUBE AND SUCTION HOSE
(a) Using SST, remove the 2 piping clamps.
SST 09870±00015 (Suction tube)
09870±00025 (Liquid tube)
(1) Insert SST to piping clamp.
HINT:
Confirm the direction of the piping clamp claw and SST using
the illustration showing on the caution label.
(2) Push down SST and release the clamp lock.
NOTICE:
Be careful not to deform the tubes, when pushing SST.
(3) Pull SST slightly and push the release lever, then re-
move the piping clamp with SST.
(4) Remove the piping clamp from SST.
(b) Disconnect the both tubes.
Page 1921 of 1943

I06919
Disconnect the tube
using hand
Screw
Driver
Tube
I17982
I18108
View
Upper
Lower RH LH
MarkingHose Clip
A
View
Second RidgeA
Upper
Lower
20°
20°
I17984
I17985
AC±26
± AIR CONDITIONINGAIR CONDITIONING UNIT
2001 PRIUS (RM778U)
NOTICE:
�Do not use tools like screwdriver to remove the tube.
�Cap the open fittings immediately to keep moisture or
dirt out of the system.
HINT:
At the time of reassembly, please refer to the following item.
Lubricate 4 new O±rings with compressor oil and install them
to the valve.
5. DISCONNECT WATER HOSES FROM HEATER RA-
DIATOR PIPES
(a) Using pliers, grip the claw of the hose clip and slide the
hose clip along the hose.
(b) Disconnect the heater hoses.
HINT:
At the time of installation, please refer to the following item.
Push the water hose onto the heater radiator pipe as far as se-
cond ridge on the pipe and install the hose clip.
6. REMOVE INSTRUMENT PANEL AND REINFORCE-
MENT (See page BO±62)
7. REMOVE BLOWER UNIT (See page AC±32)
8. REMOVE A/C UNIT
(a) Remove the 2 screws and defroster duct.
(b) Remove the foot air duct.
(c) Disconnect the connectors.
(d) Remove the 2 nuts and A/C unit.

8. REMOVE RADIATOR & CONDENSER MODULE
(a) Push the radiator & condenser module toward engine.
(b) Pull up the radiator until")

5. DISCONNECT RADIATOR HOSES FROM RADIATOR
AND CONDENSER MODULE
(a) Using pliers, grip the claw of the hose clip and sl")