Page 635 of 1943
BE6653
A00347
A00348
ON
ECM
Intake Air
Temp. Sensor
4
5
Connecting
BE6653
A13620A00360A13621
ON
Intake Air
Temp. Sensor
54
THAE2
ECM
5 V
E2THA
E1 3
9
DI±30
± DIAGNOSTICSENGINE
2001 PRIUS (RM778U)
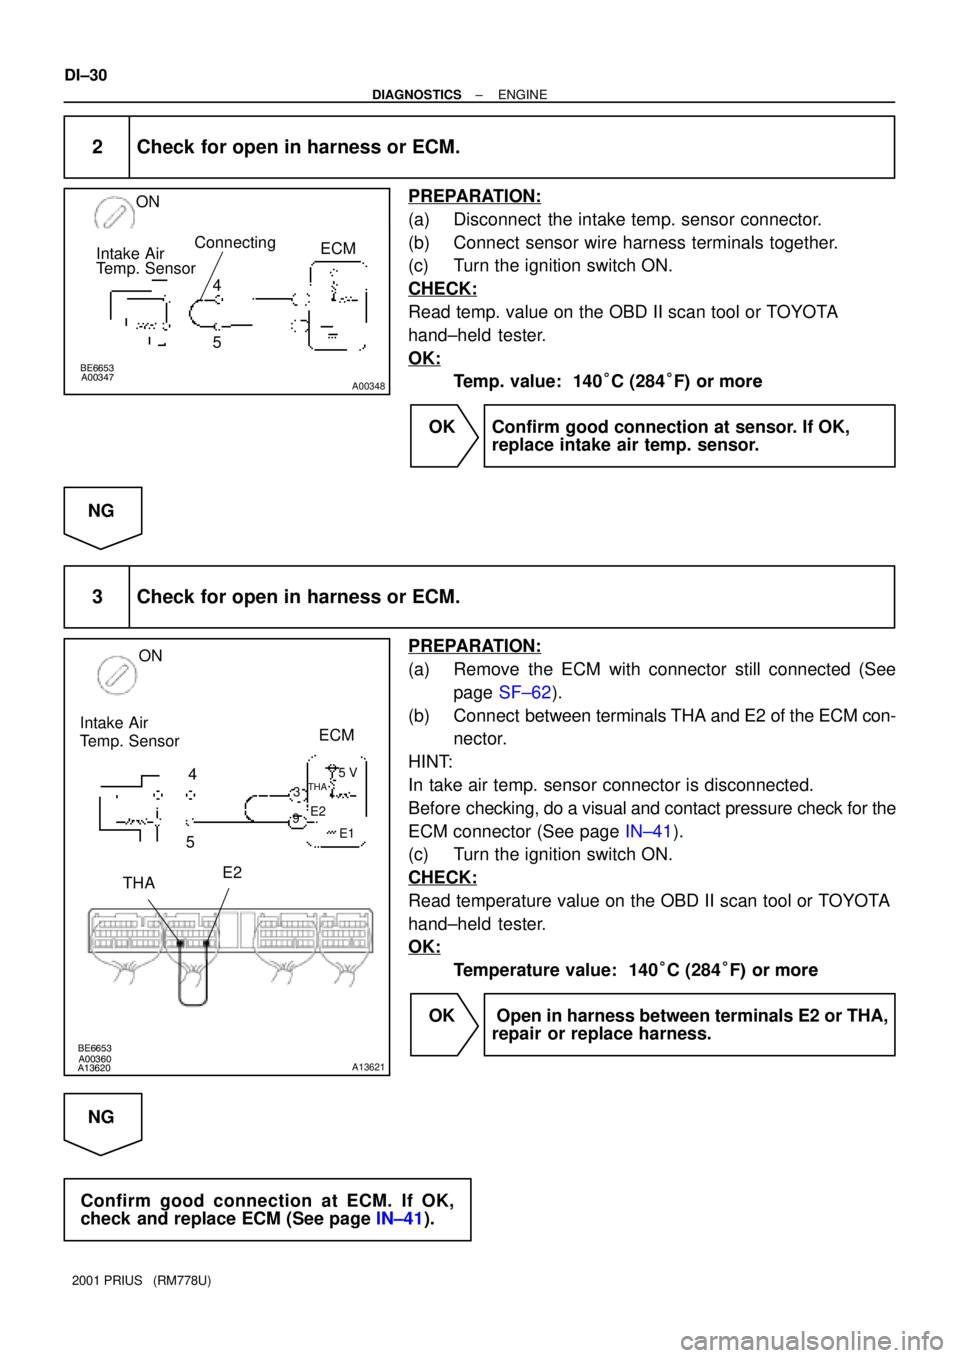
2 Check for open in harness or ECM.
PREPARATION:
(a) Disconnect the intake temp. sensor connector.
(b) Connect sensor wire harness terminals together.
(c) Turn the ignition switch ON.
CHECK:
Read temp. value on the OBD II scan tool or TOYOTA
hand±held tester.
OK:
Temp. value: 140°C (284°F) or more
OK Confirm good connection at sensor. If OK,
replace intake air temp. sensor.
NG
3 Check for open in harness or ECM.
PREPARATION:
(a) Remove the ECM with connector still connected (See
page SF±62).
(b) Connect between terminals THA and E2 of the ECM con-
nector.
HINT:
In take air temp. sensor connector is disconnected.
Before checking, do a visual and contact pressure check for the
ECM connector (See page IN±41).
(c) Turn the ignition switch ON.
CHECK:
Read temperature value on the OBD II scan tool or TOYOTA
hand±held tester.
OK:
Temperature value: 140°C (284°F) or more
OK Open in harness between terminals E2 or THA,
repair or replace harness.
NG
Confirm good connection at ECM. If OK,
check and replace ECM (See page IN±41).
Page 636 of 1943
BE6653
A00362A00363
ON
Intake Air
Temp. SensorECM
4
5
A09085A09091
ON
Intake Air Temp.
Sensor
E8 Connector
ECM
5 V
E2THA
E1
± DIAGNOSTICSENGINE
DI±31
2001 PRIUS (RM778U)
4 Check for short in harness and ECM.
PREPARATION:
(a) Disconnect the mass air flow meter connector.
(b) Turn the ignition switch ON.
CHECK:
Read temperature value on the OBD II scan tool or TOYOTA
hand±held tester.
OK:
Temperature value: ±40°C (±40°F)
OK Replace mass air flow meter.
NG
5 Check for short in harness or ECM.
PREPARATION:
(a) Remove the ECM with connector still connected (See
page SF±62).
(b) Disconnect the E8 connector of the ECM.
HINT:
Intake air temp. sensor connector is disconnected.
(c) Turn the ignition switch ON.
CHECK:
Read temperature value on the OBD II scan tool or TOYOTA
hand±held tester.
OK:
Temperature value: ±40°C (±40°F)
OK Repair or replace harness or connector.
NG
Check and replace ECM (See page IN±41).
Page 638 of 1943
BE6653
A00365
A00366
ON
ECM
2
1 Water Temp. Sensor
Connecting
± DIAGNOSTICSENGINE
DI±33
2001 PRIUS (RM778U)
1 Connect OBD II scan tool or TOYOTA hand±held tester, and read value of
engine coolant temperature.
PREPARATION:
(a) Connect the OBD II scan tool or TOYOTA hand±held tester to the DLC3.
(b) Turn the ignition switch ON and push the OBD II scan tool or TOYOTA hand±held tester main switch
ON.
CHECK:
Read temperature value on the OBD II scan tool or TOYOTA hand±held tester.
OK:
Same as actual engine coolant temperature
HINT:
�If there is open circuit, OBD II scan tool or TOYOTA hand±held tester indicates ±40°C (±40°F).
�If there is open circuit, OBD II scan tool or TOYOTA hand-held tester indicates 140°C (284°F) or more.
NG ±40°C (±40°F) ... Go to step 2.
140°C (284°F) or more ... Go to step 4.
OK
Check for intermittent problems
(See page DI±3).
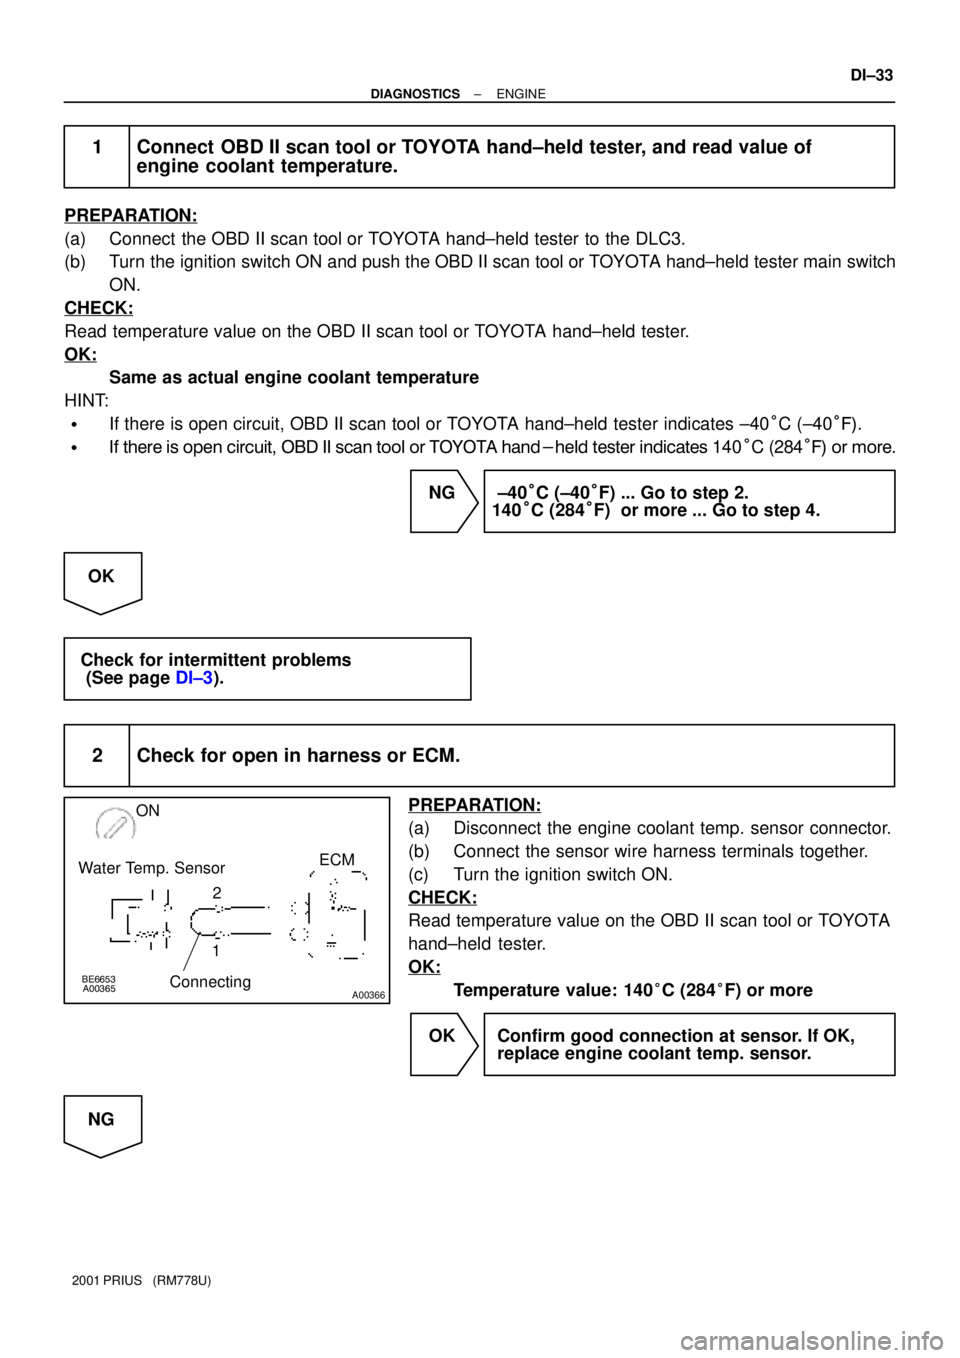
2 Check for open in harness or ECM.
PREPARATION:
(a) Disconnect the engine coolant temp. sensor connector.
(b) Connect the sensor wire harness terminals together.
(c) Turn the ignition switch ON.
CHECK:
Read temperature value on the OBD II scan tool or TOYOTA
hand±held tester.
OK:
Temperature value: 140°C (284°F) or more
OK Confirm good connection at sensor. If OK,
replace engine coolant temp. sensor.
NG
Page 639 of 1943
BE6653
A00370
A13622A13623
ON
Engine Coolant
Temp. Sensor
12
THWE2
ECM
5 V
E2THW
E1
BE6653
A00372A00373
ON
2
1ECM
Water Temp. Sensor
DI±34
± DIAGNOSTICSENGINE
2001 PRIUS (RM778U)
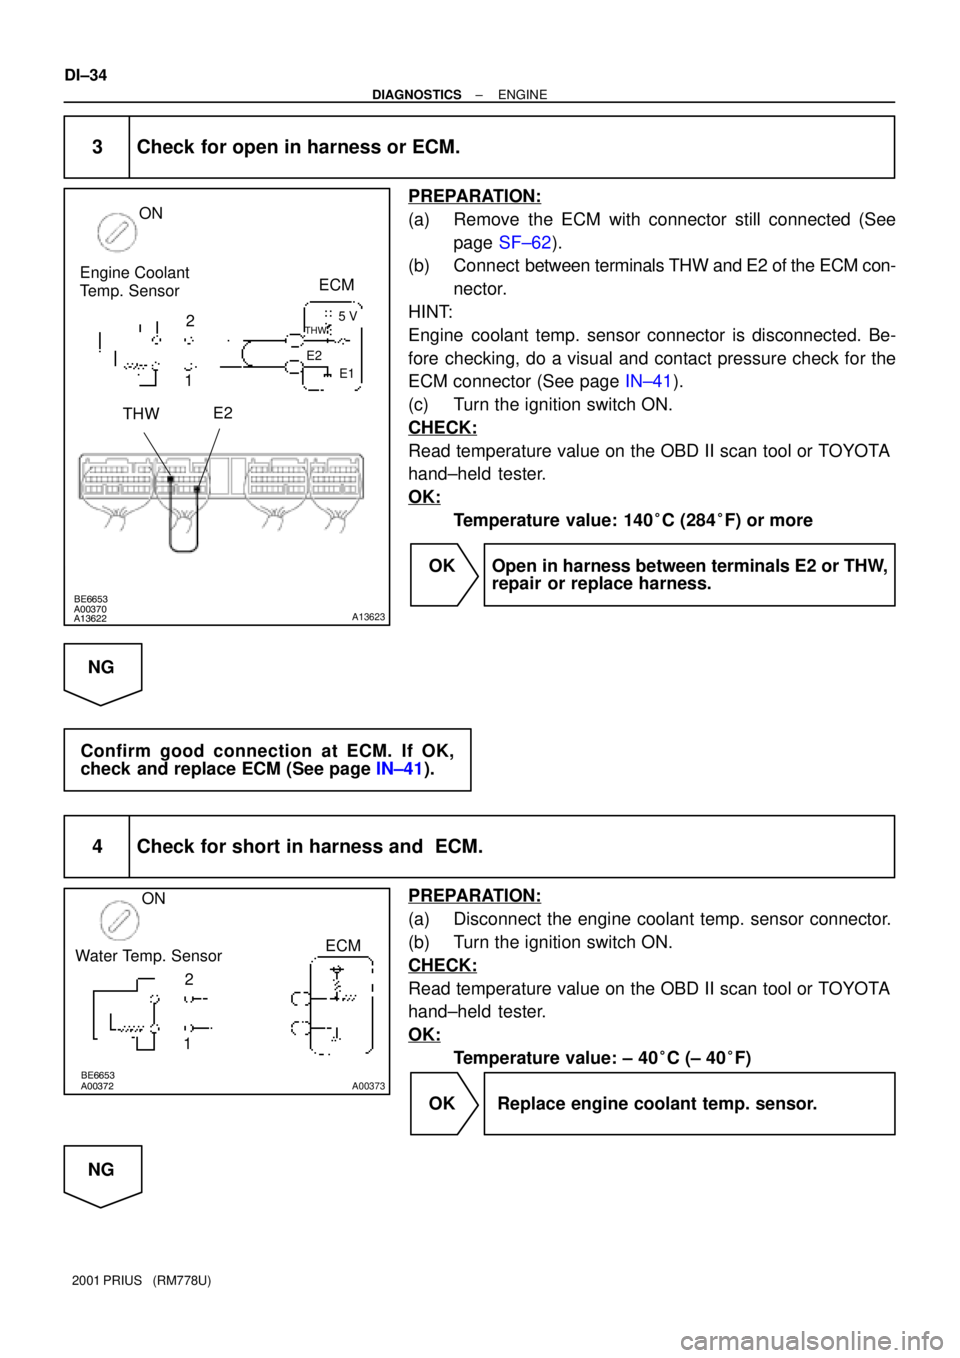
3 Check for open in harness or ECM.
PREPARATION:
(a) Remove the ECM with connector still connected (See
page SF±62).
(b) Connect between terminals THW and E2 of the ECM con-
nector.
HINT:
Engine coolant temp. sensor connector is disconnected. Be-
fore checking, do a visual and contact pressure check for the
ECM connector (See page IN±41).
(c) Turn the ignition switch ON.
CHECK:
Read temperature value on the OBD II scan tool or TOYOTA
hand±held tester.
OK:
Temperature value: 140°C (284°F) or more
OK Open in harness between terminals E2 or THW,
repair or replace harness.
NG
Confirm good connection at ECM. If OK,
check and replace ECM (See page IN±41).
4 Check for short in harness and ECM.
PREPARATION:
(a) Disconnect the engine coolant temp. sensor connector.
(b) Turn the ignition switch ON.
CHECK:
Read temperature value on the OBD II scan tool or TOYOTA
hand±held tester.
OK:
Temperature value: ± 40°C (± 40°F)
OK Replace engine coolant temp. sensor.
NG
Page 640 of 1943
A09085A09091
ON
Engine Coolant
Temp. Sensor
E8 Connector
ECM
5 V
E2THW
E1
± DIAGNOSTICSENGINE
DI±35
2001 PRIUS (RM778U)
5 Check for short in harness or ECM.
PREPARATION:
(a) Remove the ECM with connector still connected (See
page SF±62).
(b) Disconnect the E8 connector of the ECM.
HINT:
Engine coolant temp. sensor connector is disconnected.
(c) Turn the ignition switch ON.
CHECK:
Read temperature value on the OBD II scan tool or TOYOTA
hand±held tester.
OK:
Temperature value: ±40°C (±40°F)
OK Repair or replace harness or connector.
NG
Check and replace ECM (See page IN±41).
Page 642 of 1943
± DIAGNOSTICSENGINE
DI±37
2001 PRIUS (RM778U)
2 Check thermostat (See page CO±9).
NG Replace thermostat.
OK
Replace engine coolant temp. sensor.
Page 644 of 1943
A14051
T3
Throttle Position
SensorECM
2 3
PL E2
VC Y±R
BR232
21 18
VTA VC
VTA2 E2 E8
E8 E8
E8 (Shielded)
EB AJ9
J/C A J8
J/C
4 1 CC
BR
VTA2
VTA1 Y±R
FI7052
± DIAGNOSTICSENGINE
DI±39
2001 PRIUS (RM778U)
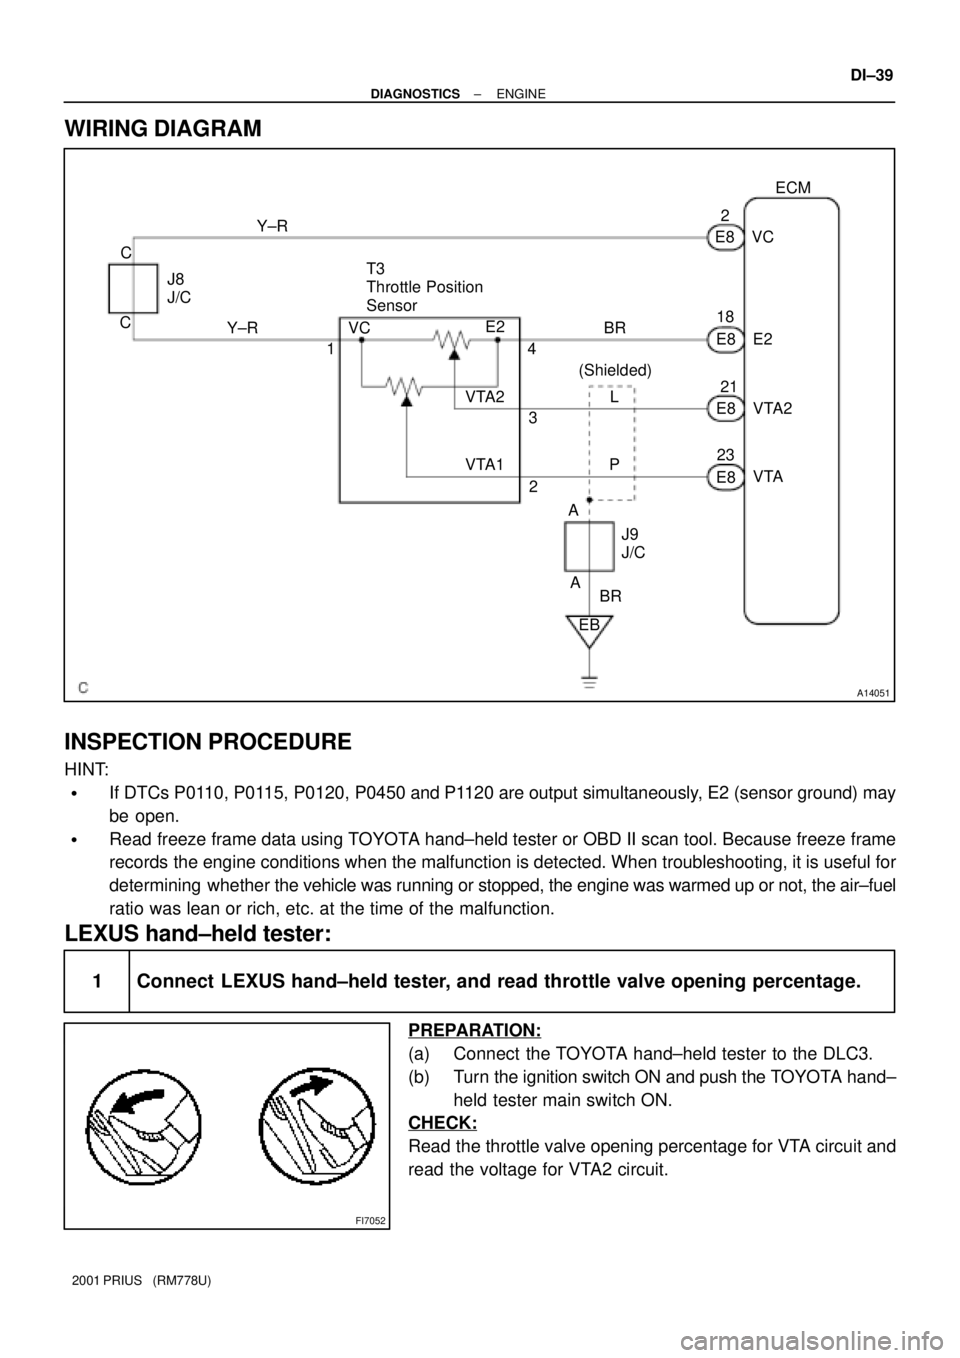
WIRING DIAGRAM
INSPECTION PROCEDURE
HINT:
�If DTCs P0110, P0115, P0120, P0450 and P1120 are output simultaneously, E2 (sensor ground) may
be open.
�Read freeze frame data using TOYOTA hand±held tester or OBD II scan tool. Because freeze frame
records the engine conditions when the malfunction is detected. When troubleshooting, it is useful for
determining whether the vehicle was running or stopped, the engine was warmed up or not, the air±fuel
ratio was lean or rich, etc. at the time of the malfunction.
LEXUS hand±held tester:
1 Connect LEXUS hand±held tester, and read throttle valve opening percentage.
PREPARATION:
(a) Connect the TOYOTA hand±held tester to the DLC3.
(b) Turn the ignition switch ON and push the TOYOTA hand±
held tester main switch ON.
CHECK:
Read the throttle valve opening percentage for VTA circuit and
read the voltage for VTA2 circuit.
Page 645 of 1943
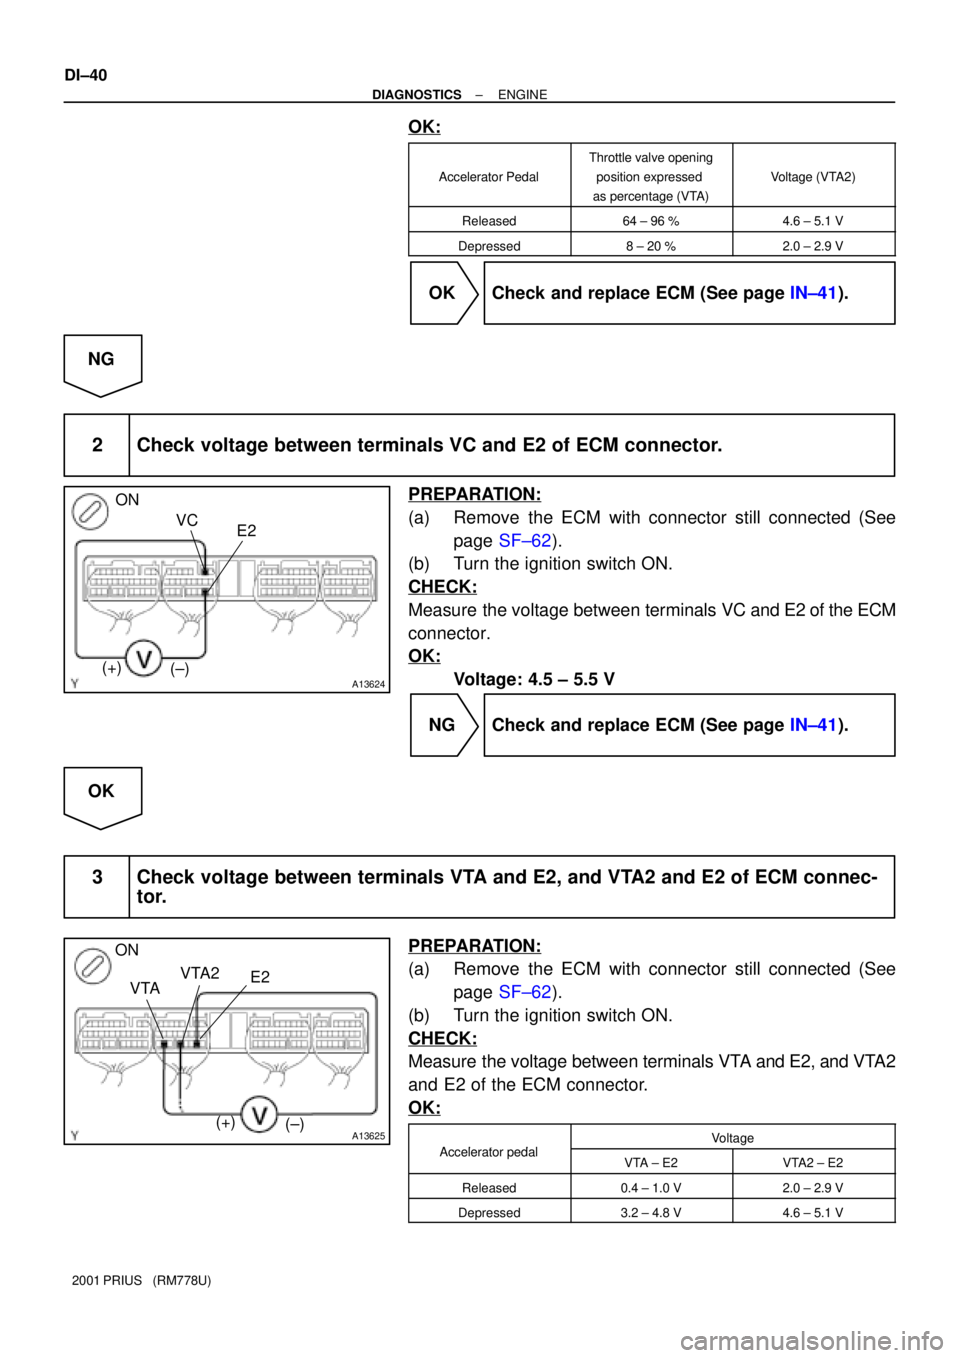
A13624
ON
E2 VC
(+)
(±)
A13625
ON
VTAVTA2
E2
(+)
(±)
DI±40
± DIAGNOSTICSENGINE
2001 PRIUS (RM778U)
OK:
Accelerator Pedal
Throttle valve opening
position expressed
as percentage (VTA)
Voltage (VTA2)
Released64 ± 96 %4.6 ± 5.1 V
Depressed8 ± 20 %2.0 ± 2.9 V
OK Check and replace ECM (See page IN±41).
NG
2 Check voltage between terminals VC and E2 of ECM connector.
PREPARATION:
(a) Remove the ECM with connector still connected (See
page SF±62).
(b) Turn the ignition switch ON.
CHECK:
Measure the voltage between terminals VC and E2 of the ECM
connector.
OK:
Voltage: 4.5 ± 5.5 V
NG Check and replace ECM (See page IN±41).
OK
3 Check voltage between terminals VTA and E2, and VTA2 and E2 of ECM connec-
tor.
PREPARATION:
(a) Remove the ECM with connector still connected (See
page SF±62).
(b) Turn the ignition switch ON.
CHECK:
Measure the voltage between terminals VTA and E2, and VTA2
and E2 of the ECM connector.
OK:
Alt dlVoltageAccelerator pedalVTA ± E2VTA2 ± E2
Released0.4 ± 1.0 V2.0 ± 2.9 V
Depressed3.2 ± 4.8 V4.6 ± 5.1 V