Page 1847 of 1943

INSPECTION
1. INSPECT HORN SWITCH
(a) Disconnect the negative (±) terminal from the battery.
(b) Remove the")
BE0FZ±14
I17863
I11734
BE3907
± BODY ELECTRICALHORN SYSTEM
BE±117
2001 PRIUS (RM778U)
INSPECTION
1. INSPECT HORN SWITCH
(a) Disconnect the negative (±) terminal from the battery.
(b) Remove the left and right covers from the steering wheel.
(c) Using a torx socket wrench, loosen the 2 bolts.
(d) Pull up the horn pad and place it on the steering column,
as shown.
HINT:
Do not disconnect the connector from the horn pad.
(e) Disconnect the connector from the slip ring.
(f) Check that no continuity exists between terminal 6 of the
connector and body ground.
(g) Check that continuity exists between terminal 6 of the
connector and body ground when the horn contact plate
is pressed against the steering spoke assembly.
If continuity is not as specified, repair or replace the steering
wheel or wire harness as necessary.
(h) Install the horn pad in place and using a torx socket
wrench, torque the 2 bolts.
Torque:
7.1 N´m (72 kgf´cm, 62 in.´lbf)
(i) Install the left and right covers.
(j) Connect the negative (±) terminal to the battery.
2. INSPECT HORN OPERATION
Connect the positive (+) lead from the battery to the terminal
and negative (±) lead to the horn body and check that the horn
blows.
If operation is not as specified, replace the horn.
Page 1854 of 1943

HINT:
At the time of reassembly, please refer to the following item.
Using an air r")
H15394
Air Riveter
H00475
Mandrel
H15395Protective Tape
H15408
H15407
± BODYFRONT DOOR
BO±13
2001 PRIUS (RM778U)
HINT:
At the time of reassembly, please refer to the following item.
Using an air riveter and nose piece No.1, strike rivets into the
door panel to install the speaker to the door panel.
NOTICE:
At the time of reassembly, please refer to the following
item.
If the rivet is not positioned perpendicularly it will bend the
mandrel. When the trigger is then pulled, it may damage the
air riveter.
8. REMOVE OUTSIDE VIEW MIRROR
(a) Disconnect the connecter.
(b) Remove the 3 nuts andout side view mirror.
Torque: 7.8 N´m (80 kgf´cm, 69 in.´lbf)
9. REMOVE DOOR BELT MOULDING
Using a scraper, remove the door belt moulding.
HINT:
Tape the scraper tip before use.
10. REMOVE DOOR LOCK SILENCER
11. REMOVE DOOR GLASS
(a) Remove the 3 bolts and reinforce inside extension.
(b) Open the door glass until the door belts appear in the ser-
vice hole.
(c) Remove the 2 bolts.
NOTICE:
Be careful not to drop the door glass.
(d) Pull the door glass upward to remove it.
12. REMOVE DOOR GLASS RUN
13. REMOVE LOWER FLAME
Remove the 2 nuts, plate and lower flame.
Page 1855 of 1943

14. REMOVE WINDOW REGULATOR
(a) Disconnect the connector.
(b) Remove the 2 bolts from the window regulator.
Torque: 4.9 N´m (50 kgf´cm, 4")
H15435
H15436
BO±14
± BODYFRONT DOOR
2001 PRIUS (RM778U)
14. REMOVE WINDOW REGULATOR
(a) Disconnect the connector.
(b) Remove the 2 bolts from the window regulator.
Torque: 4.9 N´m (50 kgf´cm, 43 in.´lbf)
(c) Remove the 4 bolts and window regulator.
Torque: 8.3 N´m (85 kgf´cm, 74 in.´lbf)
HINT:
At the time of reassembly, please refer to the following item.
Apply MP grease to the window regulator.
NOTICE:
At the time of reassembly, please refer to the following
item.
Do not apply grease to the spring of the window regulator.
15. REMOVE DOOR LOCK
(a) Disconnect the control cable from the clamp.
(b) Disconnect the 2 links from the outside handle and key
cylinder.
(c) Disconnect the connecter.
(d) Remove the bolt.
Torque: 4.9 N´m (50 kgf´cm, 43 in.´lbf)
(e) Remove the 3 screws and door lock.
Torque: 4.9 N´m (50 kgf´cm, 43 in.´lbf)
HINT:
At the time of reassembly, please refer to the following item.
�Apply adhesive to the 3 screws.
Part No. 08833±00070, THREE BOND 1324 or equiva-
lent
Page 1856 of 1943
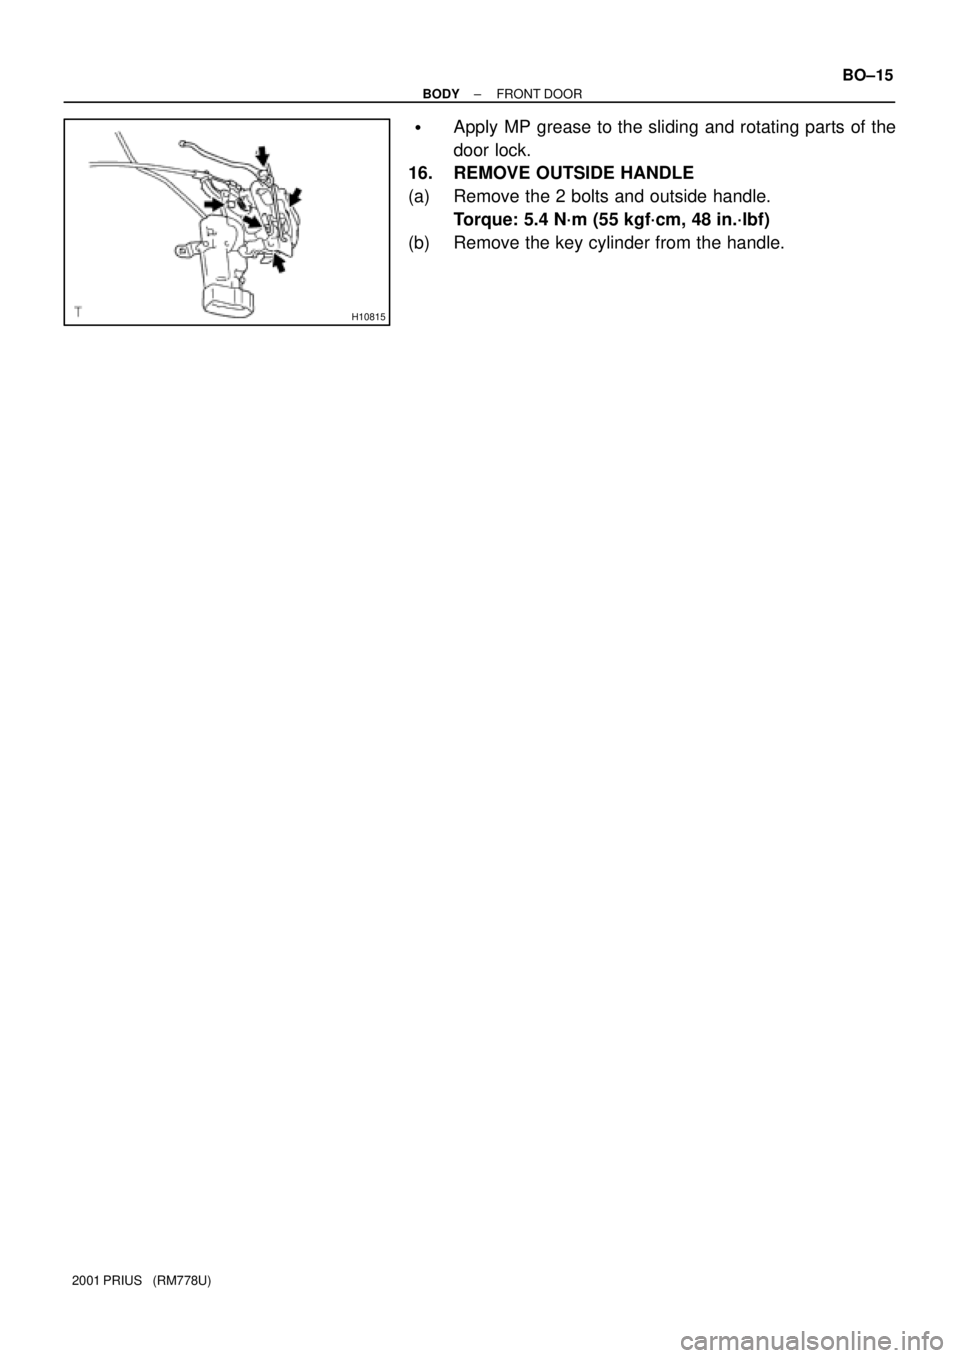
H10815
± BODYFRONT DOOR
BO±15
2001 PRIUS (RM778U)
�Apply MP grease to the sliding and rotating parts of the
door lock.
16. REMOVE OUTSIDE HANDLE
(a) Remove the 2 bolts and outside handle.
Torque: 5.4 N´m (55 kgf´cm, 48 in.´lbf)
(b) Remove the key cylinder from the handle.
Page 1859 of 1943

14. REMOVE INSIDE PANEL PLATE
Remove the 3 screws and inside panel plate.
15. REMOVE INSIDE PANEL REINFORCEMENT
Remove the 4 s")
H13687
H15431
H15432
H15433
± BODYREAR DOOR
BO±21
2001 PRIUS (RM778U)
14. REMOVE INSIDE PANEL PLATE
Remove the 3 screws and inside panel plate.
15. REMOVE INSIDE PANEL REINFORCEMENT
Remove the 4 screws and inside panel plate.
16. REMOVE DOOR GLASS
(a) Side out the door glass from the window regulator.
NOTICE:
Be careful not to drop the door glass.
(b) Pull the door glass upward to remove it.
17. REMOVE WINDOW REGULATOR
Disconnect the connector, then remove the 4 bolts and window
regulator.
Torque: 5.4 N´m (55 kgf´cm, 48 in.´lbf)
HINT:
Remove the regulator through the service hole.
HINT:
At the time of reassembly, please refer to the following item.
Apply MP grease to the window regulator.
18. REMOVE DOOR LOCK
(a) Remove the child protection cover.
(b) Disconnect the connector.
(c) Using a screwdriver, remove the door lock link guide and
clamp.
HINT:
Tape the screwdriver tip before use.
(d) Remove the 3 screws.
Torque: 4.9 N´m (50 kgf´cm, 43 in.´lbf)
HINT:
At the time of reassembly, please refer to the following item.
Apply adhesive to the 3 screws.
Part No. 08833±00070, THREE BOND 1324 or equiva-
lent
(e) Remove the bolts.
(f) Remove the door lock through the service hole.
Page 1860 of 1943
H15434
BO±22
± BODYREAR DOOR
2001 PRIUS (RM778U)
HINT:
At the time of reassembly, please refer to the following item.
Apply MP grease to the sliding and rotating parts of the door
lock.
19. REMOVE OUTSIDE HANDLE
(a) Remove the 2 bolts.
Torque: 5.4 N´m (55 kgf´cm, 48 in.´lbf)
(b) Remove the outside handle and key cylinder.
Page 1861 of 1943

REMOVAL
1. REMOVE LUGGAGE COMPARTMENT DOOR TRIM
Remove the 10 clips and luggage compartment")
BO3QS±01
H15480
H15418
H15419
H15420
BO±26
± BODYLUGGAGE COMPARTMENT DOOR AND HINGE
2001 PRIUS (RM778U)
REMOVAL
1. REMOVE LUGGAGE COMPARTMENT DOOR TRIM
Remove the 10 clips and luggage compartment door trim.
2. REMOVE LUGGAGE COMPARTMENT DOOR LOCK
(a) Remove the 2 bolts and luggage compartment door lock.
Torque: 5.4 N´m (55 kgf´cm, 48 in.´lbf)
(b) Disconnect the link and cable from the lock.
3. REMOVE LUGGAGE COMPARTMENT DOOR OUTER
GARNISH
(a) Remove the 4 nuts.
(b) Remove the luggage compartment door outer garnish
and key cylinder.
4. REMOVE LICENCE PLATE LIGHT
(a) Disconnect the connector.
(b) Remove the licence plate light as shown in the illustration.
(c) Employ the same manner described above to the other
side.
(d) Using a clip remover, remove the clamps.
5. REMOVE LUGGAGE COMPARTMENT DOOR
Remove the 4 bolts luggage compartment door.
Torque: 8.3 N´m (85 kgf´cm, 74 in.´lbf)
6. REMOVE LUGGAGE REAR FLOOR FINISH PLATE
(a) Using a clip remover, remove the 4 clips.
(b) Remove the rear floor finish plate.
7. REMOVE LUGGAGE COMPARTMENT DOOR WEATH-
ERSTRIP
Page 1862 of 1943

8. REMOVE LUGGAGE COMPARTMENT SIDE TRIM
COVER LH AND RH
(a) Remove the 3 clips and lower side lugga")
H13694
5 Clips
H15384
4 Clips
± BODYLUGGAGE COMPARTMENT DOOR AND HINGE
BO±27
2001 PRIUS (RM778U)
8. REMOVE LUGGAGE COMPARTMENT SIDE TRIM
COVER LH AND RH
(a) Remove the 3 clips and lower side luggage compartment
cover.
(b) Remove the clip and warning reflector holder.
(c) Remove the warning reflector box.
(d) Remove the 4 clips and luggage compartment side trim
cover LH and RH.
9. REMOVE REAR SEAT CUSHION (See page BO±83)
10. REMOVE REAR SEATBACK (See page BO±83)
11. REMOVE LUGGAGE TRIM NO. 2 COVER
12. REMOVE LUGGAGE COMPARTMENT TRIM COVER
13. REMOVE UPPER PART OF REAR DOOR OPENING
TRIMS
14. REMOVE ROOF SIDE INNER GARNISH
(a) Using a screwdriver, disengage the clips.
HINT:
Tape the screwdriver tip before use.
(b) Pull the garnish upward to remove it.
(c) Employ the same manner described above to the other
side.
15. REMOVE CRS TETHER ANCHOR
Remove the 3 CRS tether anchor covers and 3 CRS tether an-
chor brackets.
Torque: 20 N´m (200 kgf´cm, 14 ft´lbf)
16. REMOVE PACKAGE TRAY TRIM PANEL
(a) Pull the package tray trim panel upward to disengage the
clips.
(b) Remove the rear seat outer belts through the cut out on
the package tray trim.
(c) Pull the package tray trim panel forward to remove it.
17. REMOVE SILENCER PAD
18. REMOVE ROOM PARTITION PANEL
19. REMOVE TORSION BAR
(a) Remove the torsion bars from center bracket.

HINT:
At the time of reassembly, please refer to the following item.
Apply MP grease to the sliding and rotating parts of the door
lock.
19. REMOVE")