Page 608 of 1943
SS±34
± SERVICE SPECIFICATIONSBODY ELECTRICAL
156 Author�: Date�:
2001 PRIUS (RM778U) 1 ± Ground (Ignition switch LOCK)
No voltage
2 ± Ground (Constant)Battery voltage
TRANSPONDER KEY ECU (Wire harness side)
1 ± Ground (Constant)Battery voltage
2 ± Ground (Ignition switch ON)Battery voltage
Page 613 of 1943

N09214
FI2547
± DIAGNOSTICSENGINE
DI±5
2001 PRIUS (RM778U)
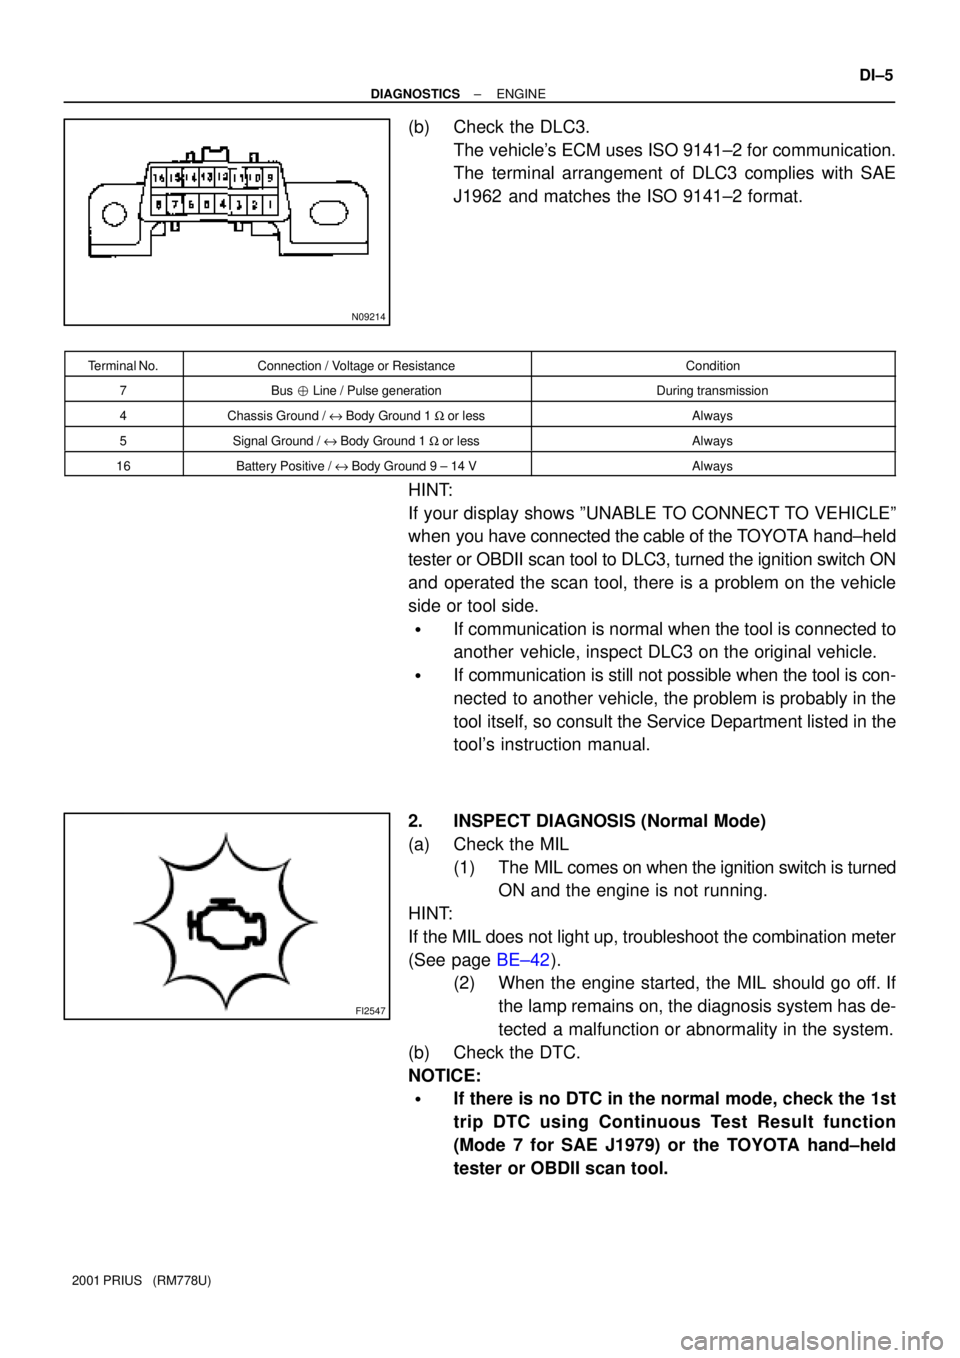
(b) Check the DLC3.
The vehicle's ECM uses ISO 9141±2 for communication.
The terminal arrangement of DLC3 complies with SAE
J1962 and matches the ISO 9141±2 format.
Terminal No.Connection / Voltage or ResistanceCondition
7Bus � Line / Pulse generationDuring transmission
4Chassis Ground / e Body Ground 1 W or lessAlways
5Signal Ground / e Body Ground 1 W or lessAlways
16Battery Positive / e Body Ground 9 ± 14 VAlways
HINT:
If your display shows ºUNABLE TO CONNECT TO VEHICLEº
when you have connected the cable of the TOYOTA hand±held
tester or OBDII scan tool to DLC3, turned the ignition switch ON
and operated the scan tool, there is a problem on the vehicle
side or tool side.
�If communication is normal when the tool is connected to
another vehicle, inspect DLC3 on the original vehicle.
�If communication is still not possible when the tool is con-
nected to another vehicle, the problem is probably in the
tool itself, so consult the Service Department listed in the
tool's instruction manual.
2. INSPECT DIAGNOSIS (Normal Mode)
(a) Check the MIL
(1) The MIL comes on when the ignition switch is turned
ON and the engine is not running.
HINT:
If the MIL does not light up, troubleshoot the combination meter
(See page BE±42).
(2) When the engine started, the MIL should go off. If
the lamp remains on, the diagnosis system has de-
tected a malfunction or abnormality in the system.
(b) Check the DTC.
NOTICE:
�If there is no DTC in the normal mode, check the 1st
trip DTC using Continuous Test Result function
(Mode 7 for SAE J1979) or the TOYOTA hand±held
tester or OBDII scan tool.
Page 614 of 1943

DI±6
± DIAGNOSTICSENGINE
2001 PRIUS (RM778U)
�TOYOTA hand±held tester only:
When the diagnosis system is switched from normal
mode to check mode, it erases all DTCs and freezed
frame data recorded in normal mode. So before
switching modes, always check the DTCs and
freezed frame data, and note them down.
(1) Prepare the TOYOTA hand±held tester or OBDII
scan tool (complying with SAE J1978).
(2) Connect the TOYOTA hand±held tester or OBDII
scan tool to DLC3 under the instrument panel lower
pad.
(3) Turn the ignition switch ON and turn the TOYOTA
hand±held tester or OBDII scan tool switch ON.
(4) Use the TOYOTA hand±held tester or OBDII scan
tool to check the DTCs and freezed frame data;
note them down. (For operating instructions, see
the OBDII scan tool's instruction book.)
(5) See step 4 to confirm the details of the DTCs.
NOTICE:
�When simulating symptoms with an OBDII scan tool
(excluding TOYOTA hand±held tester) to check the
DTCs, use normal mode. For code on the DTC chart
subject to º2 trip detection logicº, perform the follow-
ing either action.
�Turn the ignition switch OFF after the symptom is
simulated the first time. Then repeat the simulation
process again. When the problem has been simulated
twice, the MIL lights up and the DTCs are recorded in
the ECM.
�Check the 1st trip DTC using Mode 7 (Continuous Test
Results) for SAE J1979.
(c) Clear the DTC.
The DTCs and freezed frame data will be erased by either
action.
(1) Operating the TOYOTA hand±held tester or OBDII
scan tool (complying with SAE J1978) to erase the
codes. (See the OBDII scan tool's instruction book
for operating instructions.)
(2) Disconnecting the battery terminals or EFI fuse.
NOTICE:
If the TOYOTA hand±held tester switches the ECM from the
normal mode to the check mode or vice±versa, or if the
ignition switch is turned from ON to ACC or OFF during
check mode, the DTCs and freezed frame data will be
erased.
Page 615 of 1943

FI3605
ON
OFFFlashing
0.13 Second
± DIAGNOSTICSENGINE
DI±7
2001 PRIUS (RM778U)
3. INSPECT DIAGNOSIS (Check Mode)
TOYOTA hand±held tester only:
Compared to the normal mode, the check mode has an in-
creased sensitivity to detect malfunctions.
Furthermore, the same diagnostic items which are detected in
the normal mode can also be detected in the check mode.
(a) Check the DTC
(1) Initial conditions:
�Battery positive voltage 11 V or more.
�Throttle valve fully closed.
�Transmission in ºPº or ºNº position.
�A/C switched OFF.
(2) Turn the ignition switch OFF.
(3) Prepare the TOYOTA hand±held tester.
(4) Connect the TOYOTA hand±held tester to DLC3
under the instrument panel lower pad.
(5) Turn the ignition switch ON and switch the TOYOTA
hand±held tester ON.
(6) Switch the TOYOTA hand±held tester normal mode
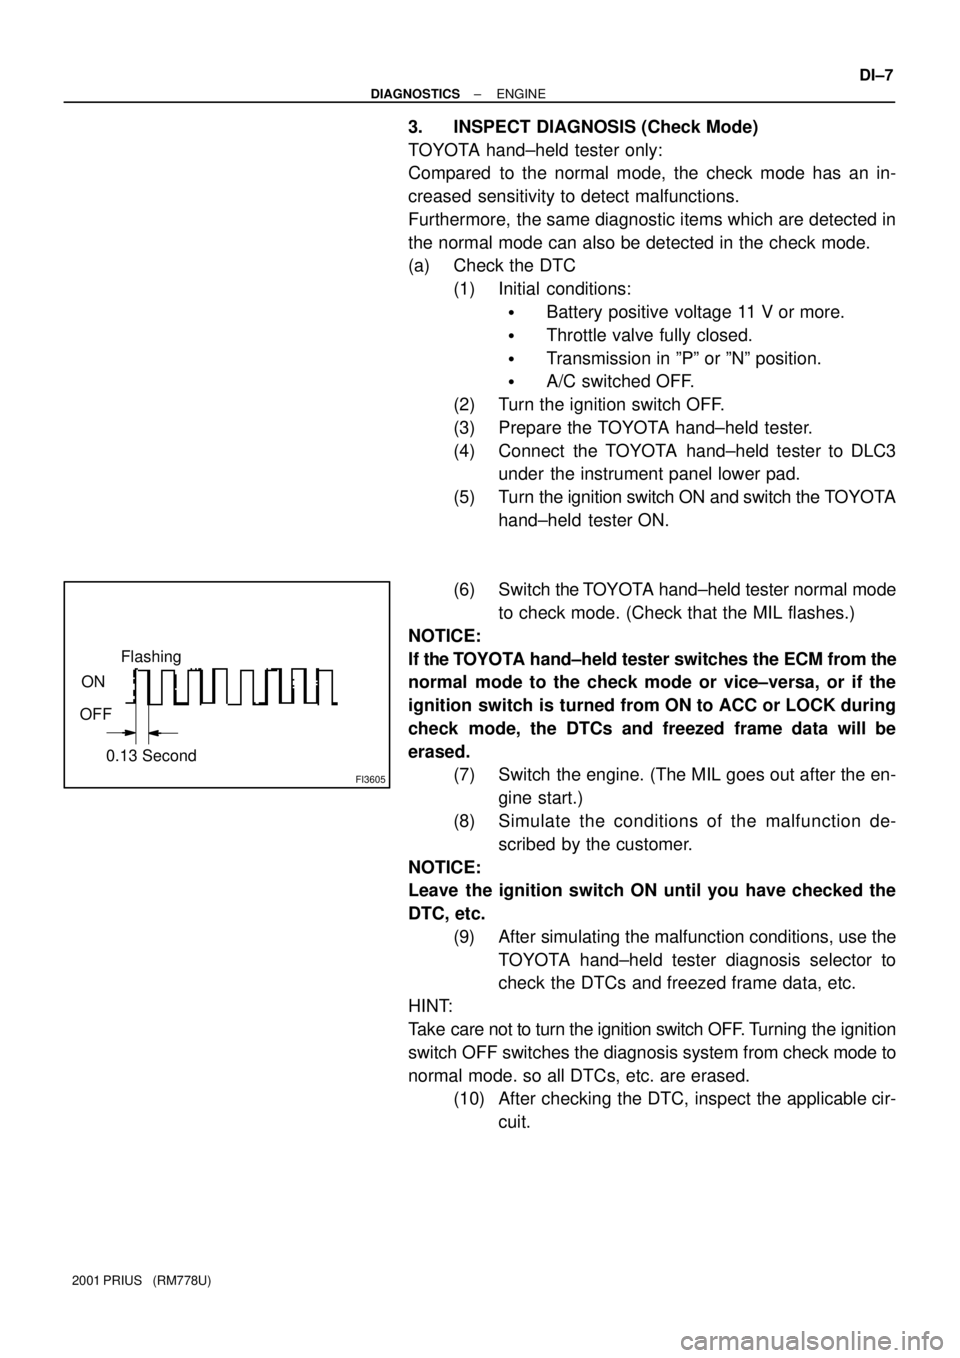
to check mode. (Check that the MIL flashes.)
NOTICE:
If the TOYOTA hand±held tester switches the ECM from the
normal mode to the check mode or vice±versa, or if the
ignition switch is turned from ON to ACC or LOCK during
check mode, the DTCs and freezed frame data will be
erased.
(7) Switch the engine. (The MIL goes out after the en-
gine start.)
(8) Simulate the conditions of the malfunction de-
scribed by the customer.
NOTICE:
Leave the ignition switch ON until you have checked the
DTC, etc.
(9) After simulating the malfunction conditions, use the
TOYOTA hand±held tester diagnosis selector to
check the DTCs and freezed frame data, etc.
HINT:
Take care not to turn the ignition switch OFF. Turning the ignition
switch OFF switches the diagnosis system from check mode to
normal mode. so all DTCs, etc. are erased.
(10) After checking the DTC, inspect the applicable cir-
cuit.
Page 616 of 1943

DI±8
± DIAGNOSTICSENGINE
2001 PRIUS (RM778U)
4. FAIL±SAFE CHART
If any of the following codes is recorded, the ECM enters fail±safe mode.
DTC No.Fail±Safe OperationFail±Safe Deactivation Conditions
P0100Ignition timing fixed at 5° BTDCReturned to normal condition
P0110Intake air temp. is fixed at 20°C (68°F)Returned to normal condition
P0115Engine coolant temp. is fixed at 80°C (176°F)Returned to normal condition
P0120VTA is fixed at 0°
The following condition must be repeated at least 2 times
consecutively
0.1 V � VTA � 0.95 V
P0135
P0141The heater circuit in which an abnormality is detected is
turned offIgnition switch OFF
P0325Max. timing retardationIgnition switch OFF
P1300
P1305
P1310
P1315
Fuel cutIGF signal is detected for 2 consecutive ignitions
5. CHECK FOR INTERMITTENT PROBLEMS
TOYOTA hand±held tester only:
By putting the vehicle's ECM in check mode, 1 trip detection logic is possible instead of 2 trip detection logic
and sensitivity to detect open circuits is increased. This makes it easier to detect intermittent problems.
(1) Clear the DTC (See step 3).
(2) Set the check mode (See step 3).
(3) Perform a simulation test (See page IN±30).
(4) Check the connector and terminal (See page IN±41).
(5) Handle the connector (See page IN±41).
6. BASIC INSPECTION
When the malfunction code is not confirmed in the DTC check, troubleshooting should be performed in the
order for all possible circuits to be considered as the causes of the problems. In many cases, by carrying
out the basic engine check shown in the following flow chart, the location causing the problem can be found
quickly and efficiently. Therefore, use of this check is essential in engine troubleshooting.
1 Is battery positive voltage 11 V or more when engine is stopped?
NO Charge or replace battery.
YES
2 Does engine start?
NO Go to step 6.
YES
Page 618 of 1943

A04438A13924A14466
TC
CG
A14060
DI±10
± DIAGNOSTICSENGINE
2001 PRIUS (RM778U)
5 Check ignition timing.
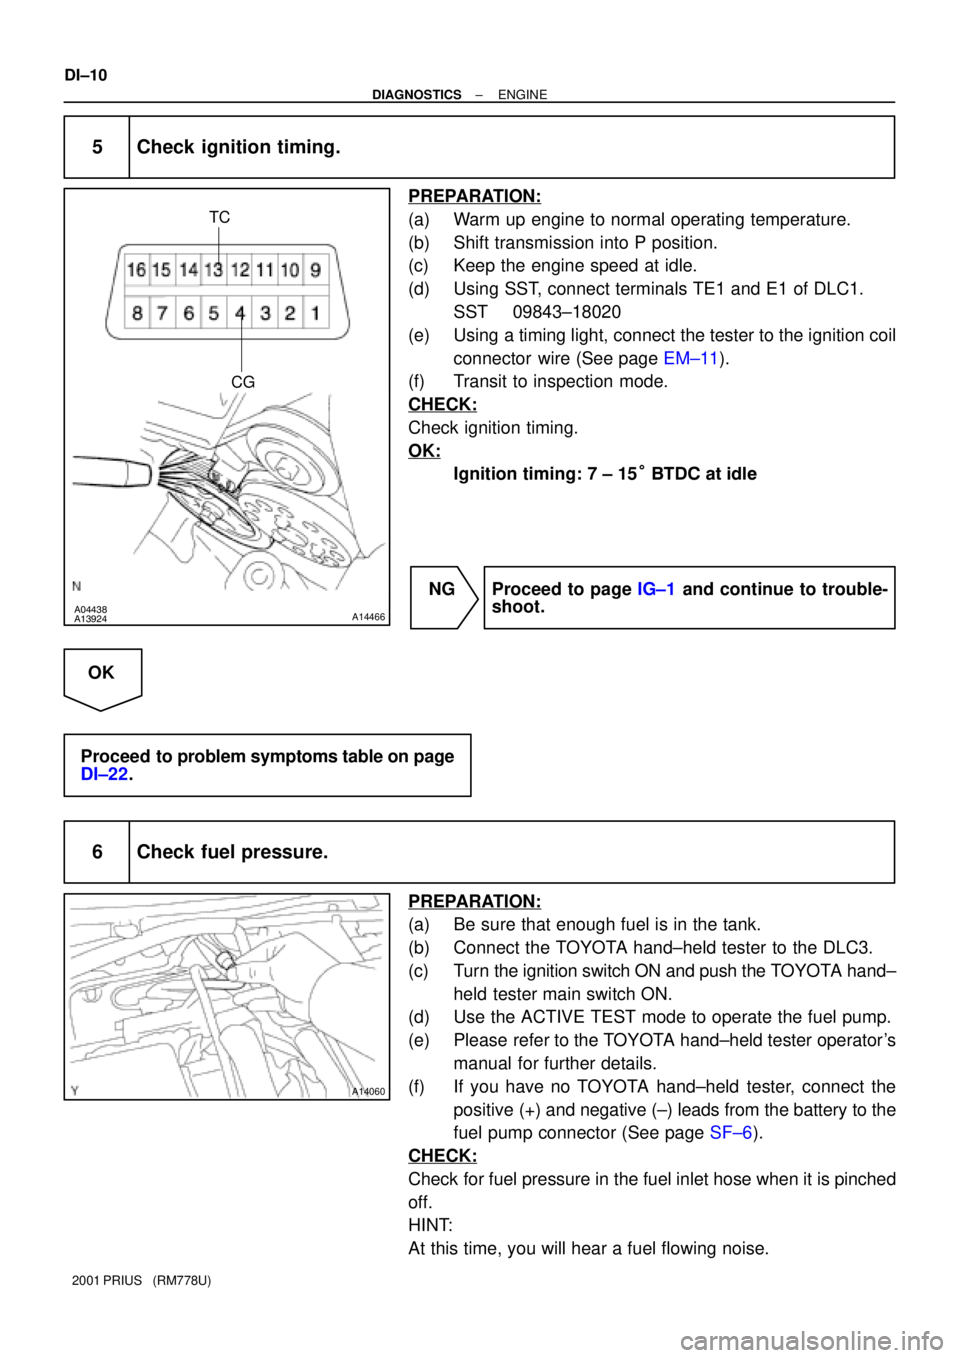
PREPARATION:
(a) Warm up engine to normal operating temperature.
(b) Shift transmission into P position.
(c) Keep the engine speed at idle.
(d) Using SST, connect terminals TE1 and E1 of DLC1.
SST 09843±18020
(e) Using a timing light, connect the tester to the ignition coil
connector wire (See page EM±11).
(f) Transit to inspection mode.
CHECK:
Check ignition timing.
OK:
Ignition timing: 7 ± 15° BTDC at idle
NG Proceed to page IG±1 and continue to trouble-
shoot.
OK
Proceed to problem symptoms table on page
DI±22.
6 Check fuel pressure.
PREPARATION:
(a) Be sure that enough fuel is in the tank.
(b) Connect the TOYOTA hand±held tester to the DLC3.
(c) Turn the ignition switch ON and push the TOYOTA hand±
held tester main switch ON.
(d) Use the ACTIVE TEST mode to operate the fuel pump.
(e) Please refer to the TOYOTA hand±held tester operator's
manual for further details.
(f) If you have no TOYOTA hand±held tester, connect the
positive (+) and negative (±) leads from the battery to the
fuel pump connector (See page SF±6).
CHECK:
Check for fuel pressure in the fuel inlet hose when it is pinched
off.
HINT:
At this time, you will hear a fuel flowing noise.
Page 630 of 1943

A14050
G±R
(Shielded)
512
IA2
1A
3
2
1
1EFI
3
B±G
F13B
MAIN
FL Block No. 1
BatteryEngine Room J/B
BR 1F
1K 1
2 3
11BW±B4
EB A
J7
J/C 1 2M1 Mass
Air Flow
Meter
A A 3
BE9
E810
VG
EVGECM
EFI
Relay
IEMREL
E8 G±R
19 G
R
F18 FL Block No. 2
F12W±B
J1
J/CJ9
J/C A
AW±B25
DI±24
± DIAGNOSTICSENGINE
2001 PRIUS (RM778U)
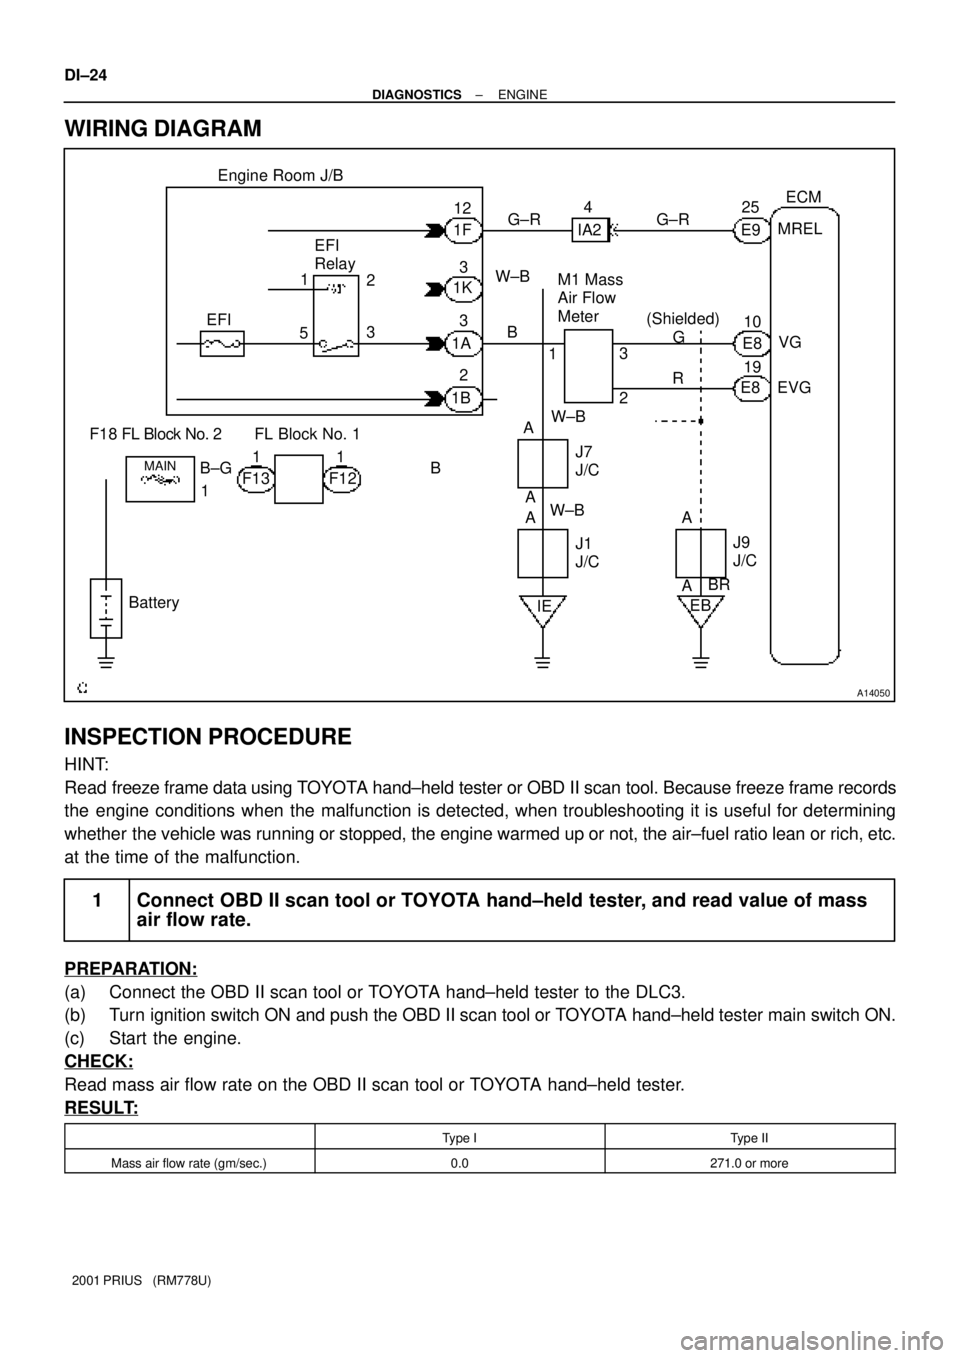
WIRING DIAGRAM
INSPECTION PROCEDURE
HINT:
Read freeze frame data using TOYOTA hand±held tester or OBD II scan tool. Because freeze frame records
the engine conditions when the malfunction is detected, when troubleshooting it is useful for determining
whether the vehicle was running or stopped, the engine warmed up or not, the air±fuel ratio lean or rich, etc.
at the time of the malfunction.
1 Connect OBD II scan tool or TOYOTA hand±held tester, and read value of mass
air flow rate.
PREPARATION:
(a) Connect the OBD II scan tool or TOYOTA hand±held tester to the DLC3.
(b) Turn ignition switch ON and push the OBD II scan tool or TOYOTA hand±held tester main switch ON.
(c) Start the engine.
CHECK:
Read mass air flow rate on the OBD II scan tool or TOYOTA hand±held tester.
RESULT:
Type IType II
Mass air flow rate (gm/sec.)0.0271.0 or more
Page 649 of 1943
A14052
ECM
G±R
7
236 1B1AIA2 12
BR
G±Y 1
1 EFI2
1 5
11
1 1
12
3 Engine Room J/B
B±GF12
MAINFL
Block
No. 2
BatteryJ1
J/C W±B4
B
P±L
Y12
2
4 3
A
IEB
IP1BR
J23 BR
H9
Bank 1
Sensor 22
1 4
3
18
E10
E10E2 MREL
E11
BR IE1
IE1
IE1 W
W
D
11 2225
16
7 (Shielded) (Shielded)(Shielded) 2
FL Block No. 1
F13
J7
J/CJ4
J/C
J/C
A
ACHT1A
OX1B E10E10 E10E8E9
OX1A
HT1B G±R
EFI
Relay
1K 1F
1F
C
B
J23 J22 J23E
E EBR BR IK1
IK1
IK1 W (Shielded)P±L
P±L H3
Bank 1
Sensor 1
B
B
W±B 3
13
12
± DIAGNOSTICSENGINE
DI±45
2001 PRIUS (RM778U)
HINT:
After confirming DTC P0125, use the OBD II scan tool or TOYOTA hand-held tester to confirm voltage output
of oxygen sensor (bank 1 sensor 1) from "CURRENT DATA".
If voltage output of oxygen sensor (bank 1 sensor 1) is less than 0.1 V, oxygen sensor (bank 1 sensor 1) circuit
may be open or short.
WIRING DIAGRAM