Page 6 of 1897

I12987
AC2GL-01
- AIR CONDITIONINGAIR CONDITIONING AMPLIFIER (Manual A/C)
AC-77
1999 Author�: Date�:
2001 AVALON (RM808U)
AIR CONDITIONING AMPLIFIER
(Manual A/C)
ON-VEHICLE INSPECTION
INSPECT A/C AMPLIFIER CIRCUIT
(a) Remove the multi display with connectors still connected.
(b) Inspect wire harness side connector from the back side,
as shown in the chart below.
Test conditions:
�Running engine at idle speed
�A/C switch ON
�Temperature control dial ºMAX COOLº position
�Blower speed control switch at ºHIº position
�Set on manifold gauge set
Tester connectionConditionSpecified condition
Refrigerant pressure at 196 - 3,140 kPaBelow 1.0 V
1 - GroundRefrigerant pressure less than 196 kPa or more
than 3,140 kPaBattery positive voltage
2 - GroundConstantPulse generation
5 - GroundA/C switch ONBattery positive voltage
7 - GroundEvaporator temperature at 25 °C (77 °F)Approx. 1.5 kW
8G dA/C switch ONBattery positive voltage8 - GroundA/C switch OFFBelow 1.0 V
9G dA/C switch ONBelow 2.0 V9 - GroundA/C switch OFFNo voltage
10 G dConstantBattery positive voltage10 - GroundEngine speed at idle-up speedBelow 1.0 V
11 G dA/C switch OFFBattery positive voltage11 - GroundA/C switch ONBelow 0.7 V
11 G dMagnetic clutch is engagedBelow 1.0 V11 - GroundMagnetic clutch is not engagedBattery positive voltage
If the circuit is not as specified, inspect the circuits connected
to other parts.
Page 11 of 1897
AC0YE-02
I12953I12946
I12964
Auto A/C:
Ambient Temperature
Sensor
Pressure Switch
Compressor
Relay Block No. 8
� No. 2 Cooling Fan Relay
� No. 3 Cooling Fan RelayJunction Block No. 8
� Heater Main Relay
� Magnetic Clutch Relay
Condenser Fan
Condenser
Auto A/C:
Solar Sensor
A/C Control Assembly
� Auto A/C:
A/C Amplifier
� Manual A/C:
A/C Switch� Manual A/C:
Blower Speed Control Switch
� Manual A/C:
Mode Control Switch
Auto A/C:
Room Temperature Sensor
A/C Unit
� Heater Radiator
� Evaporator
� Expansion Valve
� Evaporator Temp. Sensor
� Auto A/C
Air Mix Servomotor
� Air Outlet Servomotor
Blower Unit
� Blower Motor
� Manual A/C:
Blower Resistor
� Auto A/C:
Blower Motor Linear Controller
� Air inlet Servomotor
Manual A/C:
Multi Display (Built
into the A/C amplifier)
AC-14
- AIR CONDITIONINGAIR CONDITIONING SYSTEM
1936 Author�: Date�:
2001 AVALON (RM808U)
LOCATION
Page 19 of 1897
AC-10
- AIR CONDITIONINGAIR CONDITIONING SYSTEM
1932 Author�: Date�:
2001 AVALON (RM808U)
4. INSPECT IDLE-UP SPEED
(a) Warm up engine.
(b) Inspect idle-up speed when the these conditions are es-
tablished.
Test conditions:
�Idle speed set correctly.
�Steering wheel straight ahead
�Blower speed control switch at HI
�A/C switch ON
�Steering wheel straight ahead
Magnetic clutch conditionIdle speed
Magnetic clutch not engaged700 ±50 rpm
Magnetic clutch engaged700 ±50 rpm
If idle speed is not as specified, check the IAC valve and idle
control system (See page SF-43,DI-102 ).
Page 46 of 1897
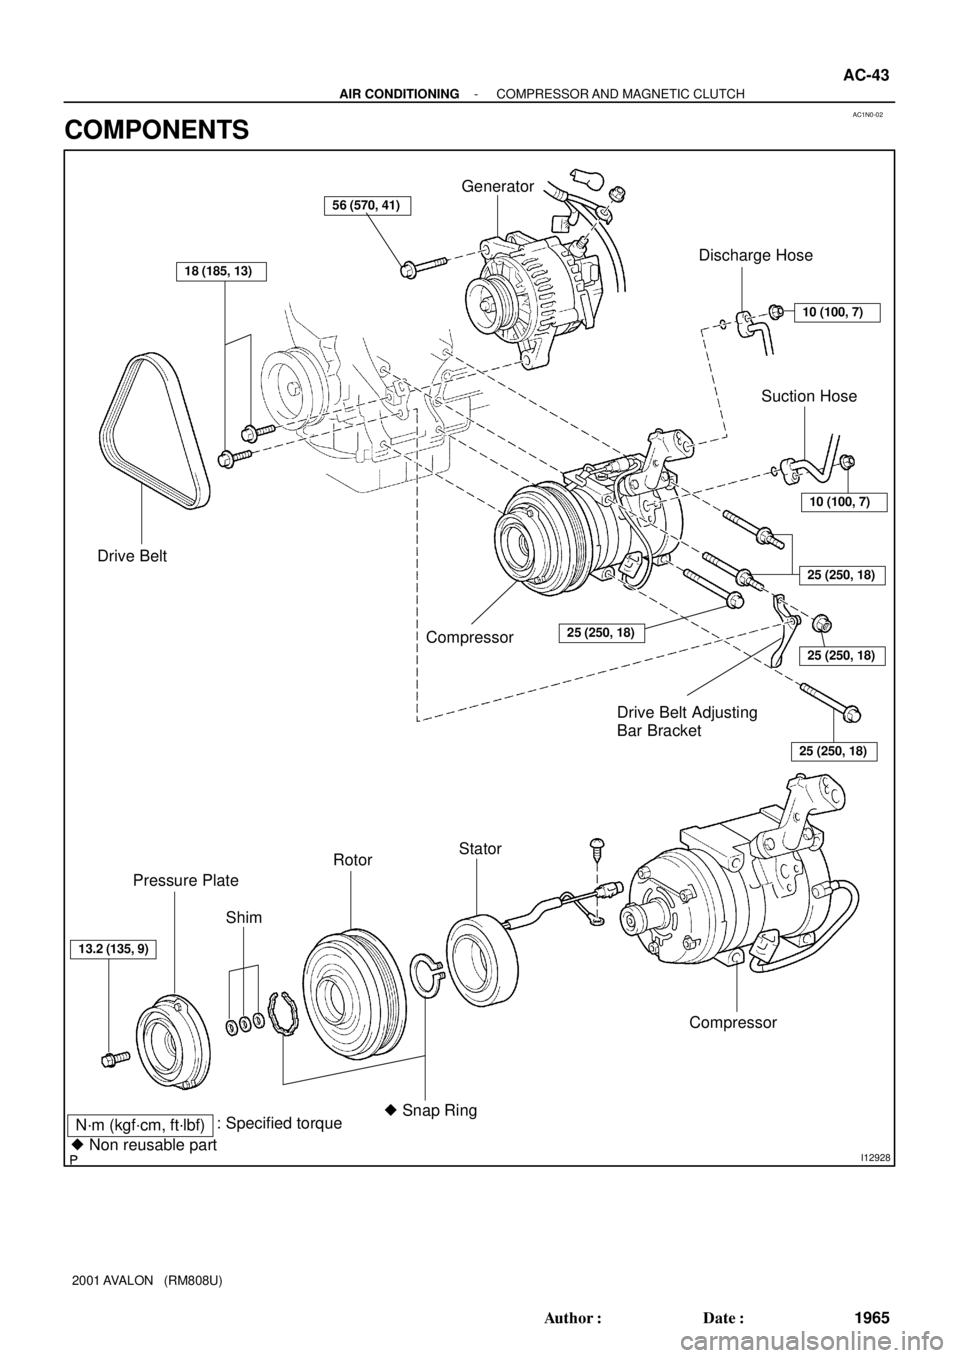
AC1N0-02
I12928
N´m (kgf´cm, ft´lbf): Specified torque
� Non reusable part
Drive Belt
18 (185, 13)
Generator
10 (100, 7)
Discharge Hose
Compressor25 (250, 18)
10 (100, 7)
25 (250, 18)
25 (250, 18)
25 (250, 18)
Compressor
Stator
� Snap Ring Rotor
Shim Pressure Plate
13.2 (135, 9)
Suction Hose
56 (570, 41)
Drive Belt Adjusting
Bar Bracket
- AIR CONDITIONINGCOMPRESSOR AND MAGNETIC CLUTCH
AC-43
1965 Author�: Date�:
2001 AVALON (RM808U)
COMPONENTS
Page 47 of 1897
AC1N2-04
AC0943
SST
AC0944
SST
AC0945
SST
AC0946
Shim
Pressure
Plate
AC0947
SST AC-46
- AIR CONDITIONINGCOMPRESSOR AND MAGNETIC CLUTCH
1968 Author�: Date�:
2001 AVALON (RM808U)
DISASSEMBLY
1. REMOVE PRESSURE PLATE
(a) Using SST and a socket wrench, remove the shaft bolt.
SST 07112-76060
Torque: 13.2 N´m (135 kgf´cm, 9 ft´lbf)
(b) IInstall SST on the pressure plate.
SST 07112-66040
(c) Using SST and socket wrench, remove the pressure
plate.
SST 07112-76060, 07112-66040
(d) Remove the shims from the pressure plate.
2. REMOVE ROTOR
(a) Using SST, remove the snap ring.
SST 95994-10020
Page 48 of 1897
N20013
R-Shape
RotorSnap Ring
Compressor
AC1743
AC1744
AC0950
SST
N20012
R-Shape
Snap Ring
CompressorStator
- AIR CONDITIONINGCOMPRESSOR AND MAGNETIC CLUTCH
AC-47
1969 Author�: Date�:
2001 AVALON (RM808U)
NOTICE:
At the time of reassembly, please refer to the following
item.
The snap ring should be installed so that beveled side
faces up.
(b) Using a plastic hammer, tap the rotor off the shaft.
NOTICE:
Be careful not to damage the pulley when tapping on the ro-
tor.
3. REMOVE STATOR
(a) Disconnect the stator lead wire from the compressor
housing.
(b) Using SST, remove the snap ring.
SST 95994-10020
NOTICE:
At the time of reassembly, please refer to the following
item.
The snap ring should be installed so that its beveled side
faces up.
Page 49 of 1897
AC0951
Stator AC-48
- AIR CONDITIONINGCOMPRESSOR AND MAGNETIC CLUTCH
1970 Author�: Date�:
2001 AVALON (RM808U)
(c) Remove the stator.
Page 50 of 1897

AC1N4-02
N20259
(A)
(B)
AC-50
- AIR CONDITIONINGCOMPRESSOR AND MAGNETIC CLUTCH
1972 Author�: Date�:
2001 AVALON (RM808U)
INSTALLATION
1. INSTALL COMPRESSOR
(a) Install the compressor with 3 nuts.
Torque: 25 N´m (250 kgf´cm, 18 ft´lbf)
(b) Install the generator drive belt adjusting bar bracket with
2 bolts and a nut.
Torque:
Bolt (A): 18 N´m (185 kgf´cm, 13 ft´lbf)
Bolt (B): 25 N´m (250 kgf´cm, 18 ft´lbf)
Nut: 25 N´m (250 kgf´cm, 18 ft´lbf)
2. INSTALL GENERATOR
(a) Mount generator on the generator bracket with the pivot
bolt and adjusting lock bolt. Do not tighten the bolts yet.
(b) Connect the generator connector.
(c) Connect the generator wire with the nut.
3. CONNECT DISCHARGE AND SUCTION HOSES
Connect both hoses with the bolt and nut.
Torque: 10 N´m (100 kgf´cm, 7 ft´lbf)
NOTICE:
Hoses should be connected immediately after the caps
have been removed.
HINT:
Lubricate 2 new O-ring with compressor oil and install them to
the tube.
4. INSTALL AND CHECK DRIVE BELT
(See page AC-19, AC-17)
5. CONNECT NEGATIVE (-) TERMINAL CABLE TO BAT-
TERY
6. EVACUATE AIR FROM REFRIGERATION SYSTEM
AND CHARGE WITH REFRIGERANT
Specified amount: 600 ± 50 g (21.16 ± 1.76 oz.)
7. INSPECT FOR LEAKAGE OF REFRIGERANT
Using a gas leak detector, check for leakage of refrigerant.
If there is leakage, check the tightening torque at the joints.
8. INSPECT A/C OPERATION