2001 NISSAN X-TRAIL bulb
[x] Cancel search: bulbPage 3493 of 3833
PRECAUTION
LT-3
C
D
E
F
G
H
I
J
L
MA
B
LT
PRECAUTION PFP:00011
Precautions for Supplemental Restraint System (SRS) “AIR BAG” and “SEAT
BELT PRE-TENSIONER”
EKS0079M
The Supplemental Restraint System such as “AIR BAG” and “SEAT BELT PRE-TENSIONER”, used along
with a front seat belt, helps to reduce the risk or severity of injury to the driver and front passenger for certain
types of collision. Information necessary to service the system safely is included in the SRS and SB section of
this Service Manual.
WARNING:
●To avoid rendering the SRS inoperative, which could increase the risk of personal injury or death
in the event of a collision which would result in air bag inflation, all maintenance must be per-
formed by an authorized NISSAN/INFINITI dealer.
●Improper maintenance, including incorrect removal and installation of the SRS, can lead to per-
sonal injury caused by unintentional activation of the system. For removal of Spiral Cable and Air
Bag Module, see the SRS section.
●Do not use electrical test equipment on any circuit related to the SRS unless instructed to in this
Service Manual. SRS wiring harnesses can be identified by yellow and/or orange harness connec-
tors.
Precaution EKS003KS
●Do not touch the glass of bulb directly by hand. Keep grease and other oily matters away from it. Do not
touch bulb by hand while it is lit or right after being turned off. Burning may result.
●Do not leave bulb out of headlamp reflector for a long time because dust, moisture smoke, etc. may affect
the performance of the headlamp. When replacing the bulb, be sure to replace it with a new one.
●Adjust aiming by tightening aiming screw. (To adjust it toward loosening side, first loosen adjusting screw,
and then make adjustment by tightening.)
●To remove soil or sealant of bulbs, do not use organic solvent (thinner, gasoline, etc.)
●When replacing bulb, be sure to hold bulb socket and pull it out straight. If wiring harness of the bulb is
pulled at an angle, the bulb may be caught in the lamp, making it difficult to take out.
Wiring Diagrams and Trouble Diagnosis EKS003KT
When you read wiring diagrams, refer to the followings:
●Refer to GI-13, "How to Read Wiring Diagrams" in GI section
●Refer to PG-2, "POWER SUPPLY ROUTING" for power distribution circuit in PG section
When you perform trouble diagnosis, refer to the followings:
●Refer to GI-10, "HOW TO FOLLOW TEST GROUPS IN TROUBLE DIAGNOSES" in GI section
●Refer toGI-23, "How to Perform Efficient Diagnosis for an Electrical Incident" in GI section
Page 3496 of 3833
LT-6
HEADLAMP
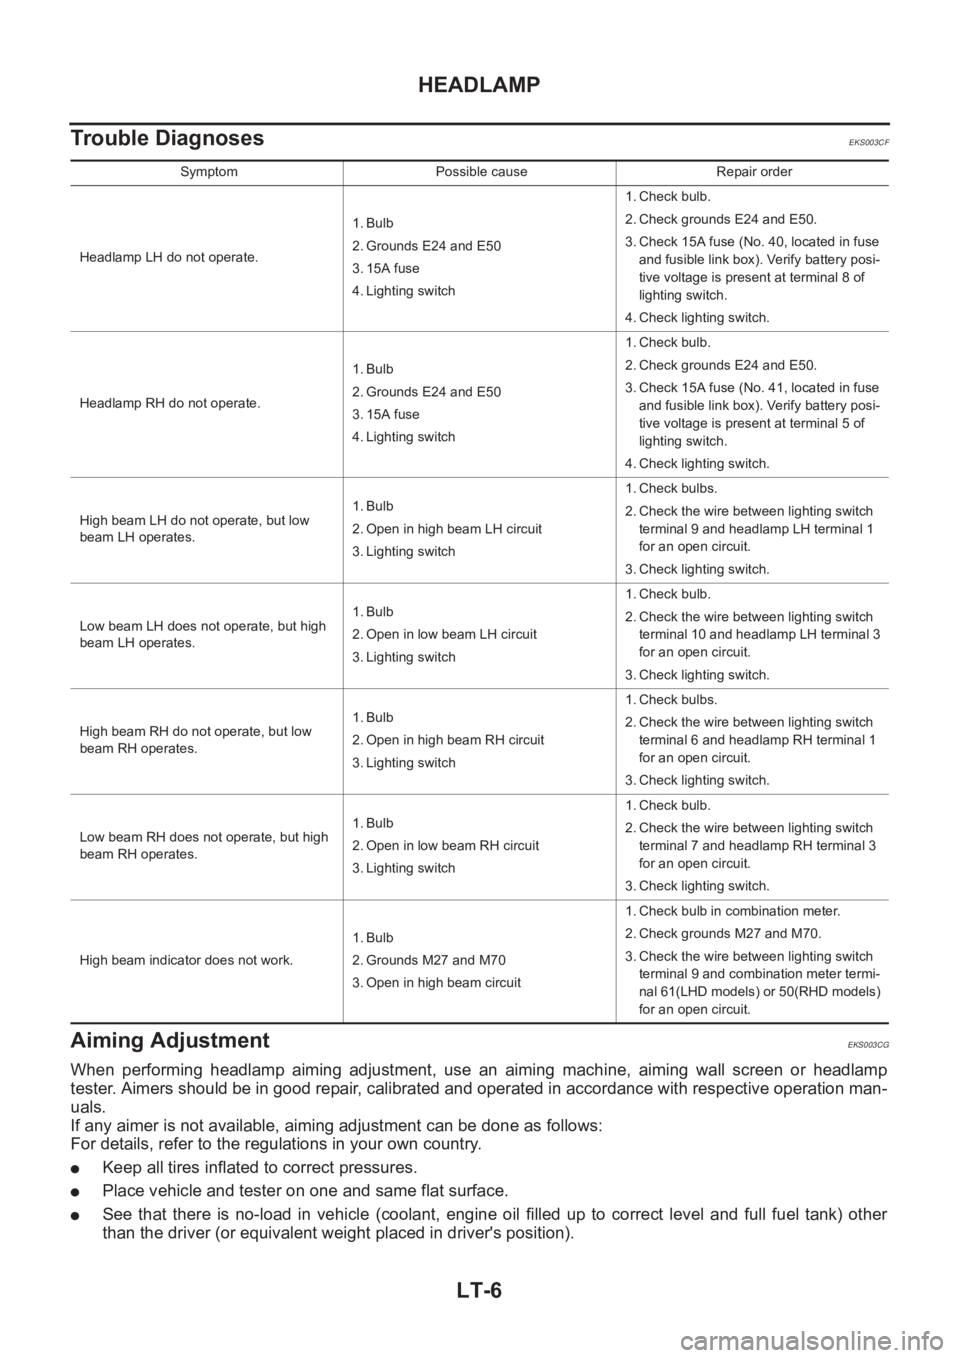
Trouble Diagnoses
EKS003CF
Aiming Adjustment EKS003CG
When performing headlamp aiming adjustment, use an aiming machine, aiming wall screen or headlamp
tester. Aimers should be in good repair, calibrated and operated in accordance with respective operation man-
uals.
If any aimer is not available, aiming adjustment can be done as follows:
For details, refer to the regulations in your own country.
●Keep all tires inflated to correct pressures.
●Place vehicle and tester on one and same flat surface.
●See that there is no-load in vehicle (coolant, engine oil filled up to correct level and full fuel tank) other
than the driver (or equivalent weight placed in driver's position).
Symptom Possible cause Repair order
Headlamp LH do not operate.1. Bulb
2. Grounds E24 and E50
3. 15A fuse
4. Lighting switch1. Check bulb.
2. Check grounds E24 and E50.
3. Check 15A fuse (No. 40, located in fuse
and fusible link box). Verify battery posi-
tive voltage is present at terminal 8 of
lighting switch.
4. Check lighting switch.
Headlamp RH do not operate.1. Bulb
2. Grounds E24 and E50
3. 15A fuse
4. Lighting switch1. Check bulb.
2. Check grounds E24 and E50.
3. Check 15A fuse (No. 41, located in fuse
and fusible link box). Verify battery posi-
tive voltage is present at terminal 5 of
lighting switch.
4. Check lighting switch.
High beam LH do not operate, but low
beam LH operates.1. Bulb
2. Open in high beam LH circuit
3. Lighting switch1. Check bulbs.
2. Check the wire between lighting switch
terminal 9 and headlamp LH terminal 1
for an open circuit.
3. Check lighting switch.
Low beam LH does not operate, but high
beam LH operates.1. Bulb
2. Open in low beam LH circuit
3. Lighting switch1. Check bulb.
2. Check the wire between lighting switch
terminal 10 and headlamp LH terminal 3
for an open circuit.
3. Check lighting switch.
High beam RH do not operate, but low
beam RH operates.1. Bulb
2. Open in high beam RH circuit
3. Lighting switch1. Check bulbs.
2. Check the wire between lighting switch
terminal 6 and headlamp RH terminal 1
for an open circuit.
3. Check lighting switch.
Low beam RH does not operate, but high
beam RH operates.1. Bulb
2. Open in low beam RH circuit
3. Lighting switch1. Check bulb.
2. Check the wire between lighting switch
terminal 7 and headlamp RH terminal 3
for an open circuit.
3. Check lighting switch.
High beam indicator does not work.1. Bulb
2. Grounds M27 and M70
3. Open in high beam circuit1. Check bulb in combination meter.
2. Check grounds M27 and M70.
3. Check the wire between lighting switch
terminal 9 and combination meter termi-
nal 61(LHD models) or 50(RHD models)
for an open circuit.
Page 3498 of 3833
LT-8
HEADLAMP
Bulb Replacement
EKS003CH
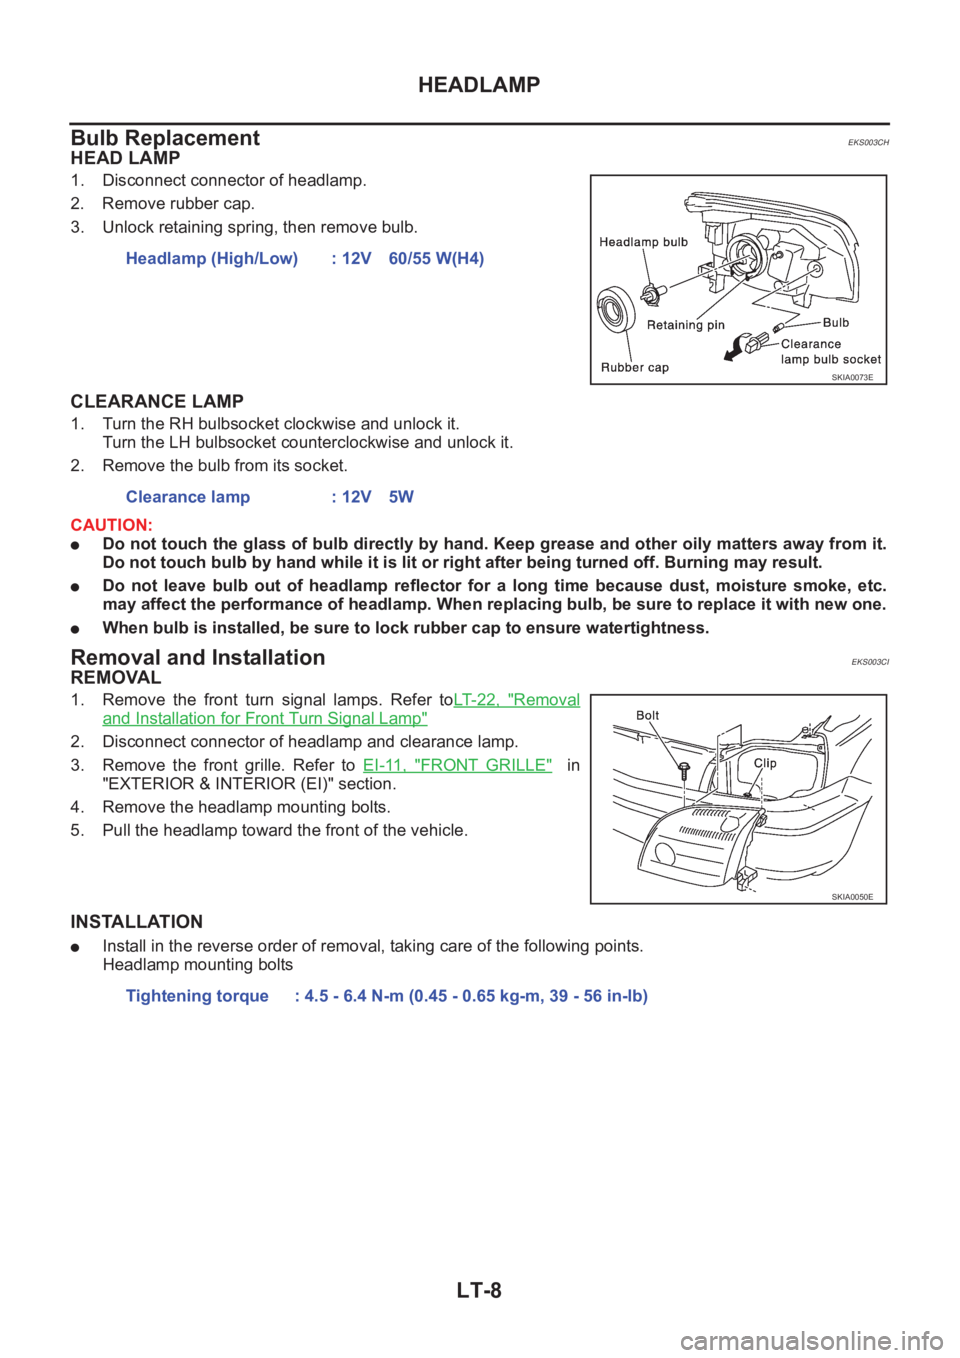
HEAD LAMP
1. Disconnect connector of headlamp.
2. Remove rubber cap.
3. Unlock retaining spring, then remove bulb.
CLEARANCE LAMP
1. Turn the RH bulbsocket clockwise and unlock it.
Turn the LH bulbsocket counterclockwise and unlock it.
2. Remove the bulb from its socket.
CAUTION:
●Do not touch the glass of bulb directly by hand. Keep grease and other oily matters away from it.
Do not touch bulb by hand while it is lit or right after being turned off. Burning may result.
●Do not leave bulb out of headlamp reflector for a long time because dust, moisture smoke, etc.
may affect the performance of headlamp. When replacing bulb, be sure to replace it with new one.
●When bulb is installed, be sure to lock rubber cap to ensure watertightness.
Removal and Installation EKS003CI
REMOVAL
1. Remove the front turn signal lamps. Refer toLT- 2 2 , "Removal
and Installation for Front Turn Signal Lamp"
2. Disconnect connector of headlamp and clearance lamp.
3. Remove the front grille. Refer to EI-11, "
FRONT GRILLE" in
"EXTERIOR & INTERIOR (EI)" section.
4. Remove the headlamp mounting bolts.
5. Pull the headlamp toward the front of the vehicle.
INSTALLATION
●Install in the reverse order of removal, taking care of the following points.
Headlamp mounting boltsHeadlamp (High/Low) : 12V 60/55 W(H4)
SKIA0073E
Clearance lamp : 12V 5W
SKIA0050E
Tightening torque : 4.5 - 6.4 N-m (0.45 - 0.65 kg-m, 39 - 56 in-lb)
Page 3504 of 3833
LT-14
HEADLAMP - DAYTIME LIGHT SYSTEM -
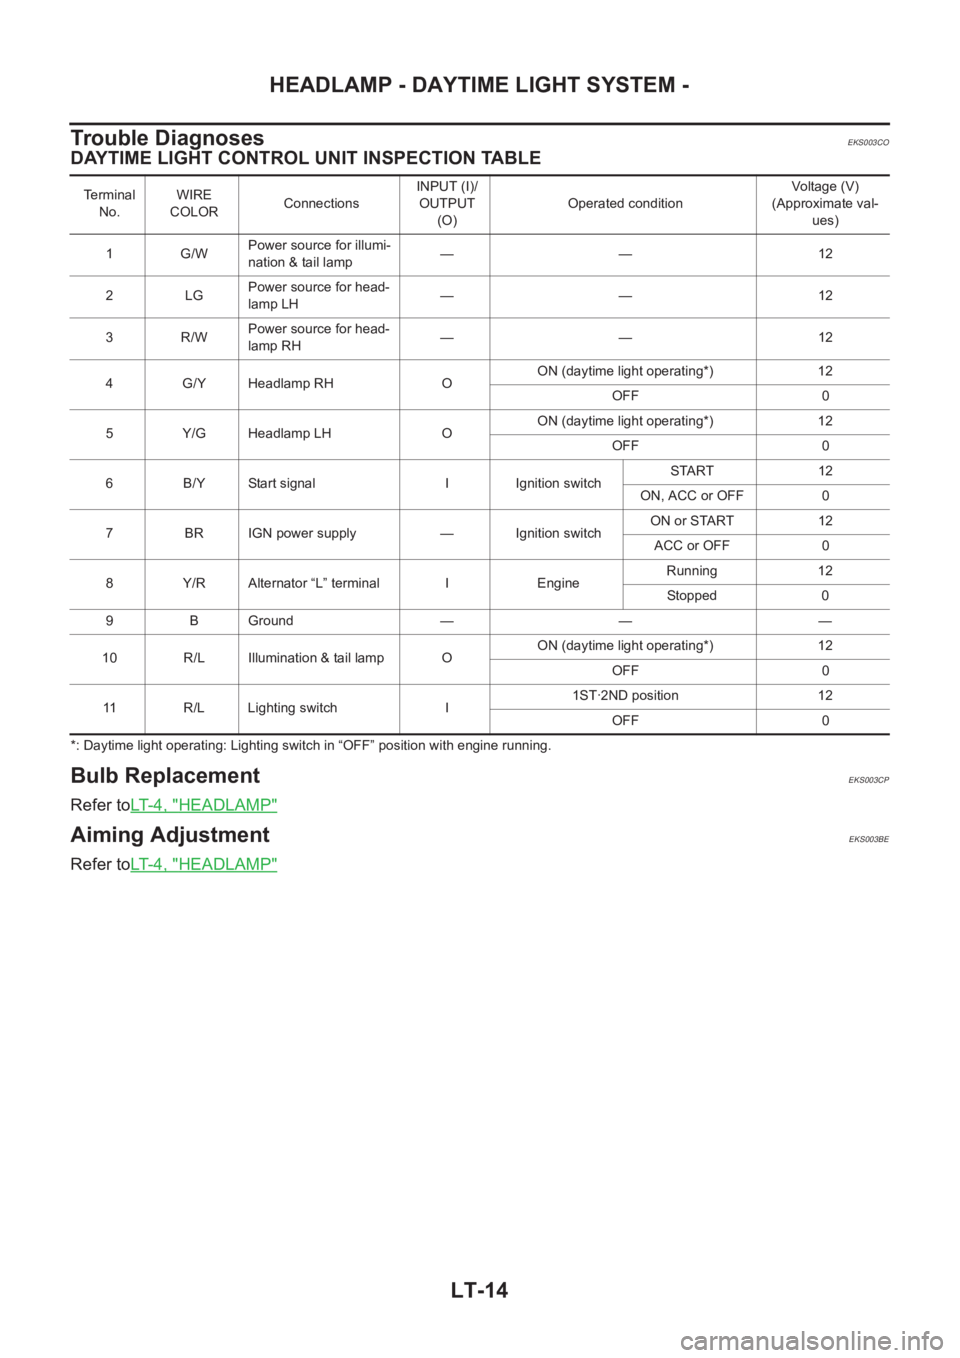
Trouble Diagnoses
EKS003CO
DAYTIME LIGHT CONTROL UNIT INSPECTION TABLE
*: Daytime light operating: Lighting switch in “OFF” position with engine running.
Bulb ReplacementEKS003CP
Refer toLT-4, "HEADLAMP"
Aiming AdjustmentEKS003BE
Refer toLT-4, "HEADLAMP"
Terminal
No.WIRE
COLORConnectionsINPUT (I)/
OUTPUT
(O)Operated conditionVoltage (V)
(Approximate val-
ues)
1 G/WPower source for illumi-
nation & tail lamp—— 12
2LGPower source for head-
lamp LH—— 12
3R/WPower source for head-
lamp RH—— 12
4 G/Y Headlamp RH OON (daytime light operating*) 12
OFF 0
5 Y/G Headlamp LH OON (daytime light operating*) 12
OFF 0
6 B/Y Start signal I Ignition switchSTART 12
ON, ACC or OFF 0
7 BR IGN power supply — Ignition switchON or START 12
ACC or OFF 0
8 Y/R Alternator “L” terminal I EngineRunning 12
Stopped 0
9 B Ground — — —
10 R/L Illumination & tail lamp OON (daytime light operating*) 12
OFF 0
11 R/L Lighting switch I1ST·2ND position 12
OFF 0
Page 3511 of 3833
TURN SIGNAL AND HAZARD WARNING LAMPS
LT-21
C
D
E
F
G
H
I
J
L
MA
B
LT
Trouble Diagnoses EKS003BG
Electrical Components InspectionEKS0034C
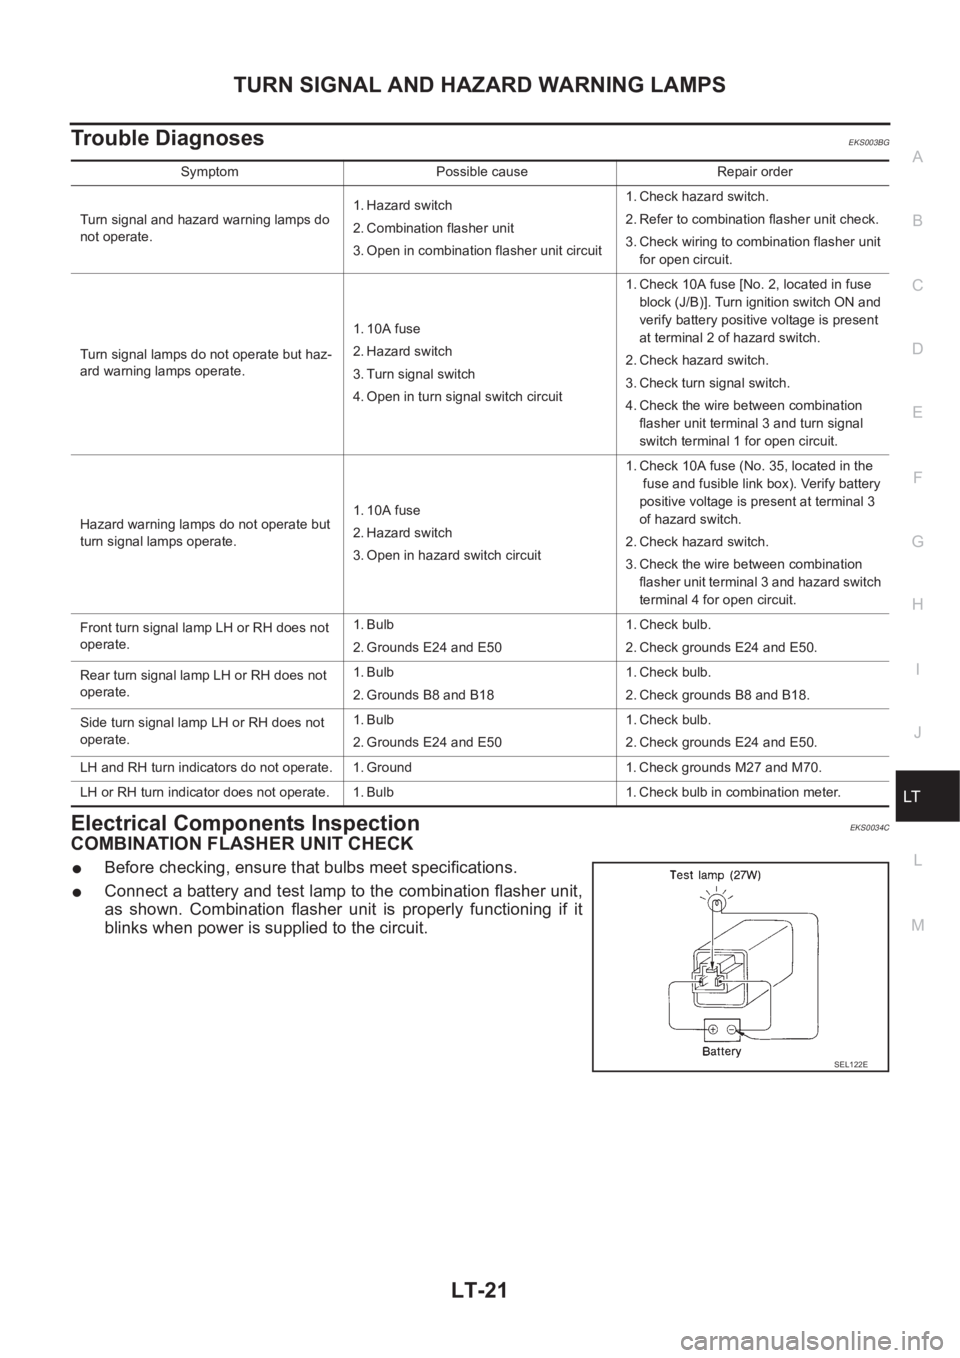
COMBINATION FLASHER UNIT CHECK
●Before checking, ensure that bulbs meet specifications.
●Connect a battery and test lamp to the combination flasher unit,
as shown. Combination flasher unit is properly functioning if it
blinks when power is supplied to the circuit.
Symptom Possible cause Repair order
Turn signal and hazard warning lamps do
not operate.1. Hazard switch
2. Combination flasher unit
3. Open in combination flasher unit circuit1. Check hazard switch.
2. Refer to combination flasher unit check.
3. Check wiring to combination flasher unit
for open circuit.
Turn signal lamps do not operate but haz-
ard warning lamps operate.1. 10A fuse
2. Hazard switch
3. Turn signal switch
4. Open in turn signal switch circuit1. Check 10A fuse [No. 2, located in fuse
block (J/B)]. Turn ignition switch ON and
verify battery positive voltage is present
at terminal 2 of hazard switch.
2. Check hazard switch.
3. Check turn signal switch.
4. Check the wire between combination
flasher unit terminal 3 and turn signal
switch terminal 1 for open circuit.
Hazard warning lamps do not operate but
turn signal lamps operate.1. 10A fuse
2. Hazard switch
3. Open in hazard switch circuit1. Check 10A fuse (No. 35, located in the
fuse and fusible link box). Verify battery
positive voltage is present at terminal 3
of hazard switch.
2. Check hazard switch.
3. Check the wire between combination
flasher unit terminal 3 and hazard switch
terminal 4 for open circuit.
Front turn signal lamp LH or RH does not
operate.1. Bulb
2. Grounds E24 and E501. Check bulb.
2. Check grounds E24 and E50.
Rear turn signal lamp LH or RH does not
operate.1. Bulb
2. Grounds B8 and B181. Check bulb.
2. Check grounds B8 and B18.
Side turn signal lamp LH or RH does not
operate.1. Bulb
2. Grounds E24 and E501. Check bulb.
2. Check grounds E24 and E50.
LH and RH turn indicators do not operate. 1. Ground 1. Check grounds M27 and M70.
LH or RH turn indicator does not operate. 1. Bulb 1. Check bulb in combination meter.
SEL122E
Page 3512 of 3833
LT-22
TURN SIGNAL AND HAZARD WARNING LAMPS
Bulb Replacement
EKS0034D
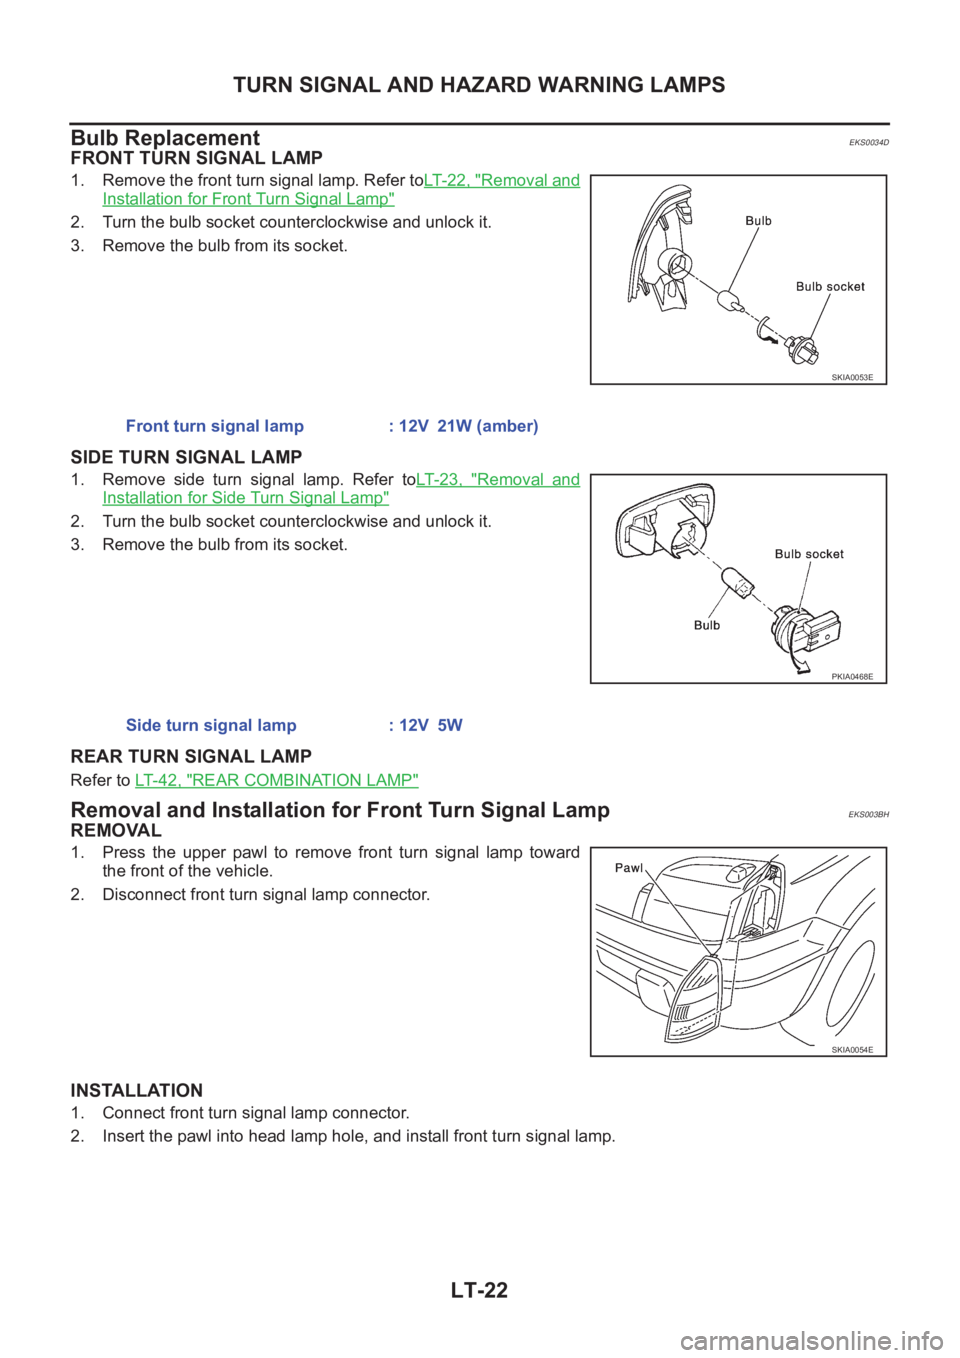
FRONT TURN SIGNAL LAMP
1. Remove the front turn signal lamp. Refer toLT- 2 2 , "Removal and
Installation for Front Turn Signal Lamp"
2. Turn the bulb socket counterclockwise and unlock it.
3. Remove the bulb from its socket.
SIDE TURN SIGNAL LAMP
1. Remove side turn signal lamp. Refer toLT- 2 3 , "Removal and
Installation for Side Turn Signal Lamp"
2. Turn the bulb socket counterclockwise and unlock it.
3. Remove the bulb from its socket.
REAR TURN SIGNAL LAMP
Refer to LT-42, "REAR COMBINATION LAMP"
Removal and Installation for Front Turn Signal LampEKS003BH
REMOVAL
1. Press the upper pawl to remove front turn signal lamp toward
the front of the vehicle.
2. Disconnect front turn signal lamp connector.
INSTALLATION
1. Connect front turn signal lamp connector.
2. Insert the pawl into head lamp hole, and install front turn signal lamp.
SKIA0053E
Front turn signal lamp : 12V 21W (amber)
PKIA0468E
Side turn signal lamp : 12V 5W
SKIA0054E
Page 3517 of 3833
STOP LAMP
LT-27
C
D
E
F
G
H
I
J
L
MA
B
LT
Bulb ReplacementEKS0034K
STOP LAMP
Refer to LT- 4 2 , "REAR COMBINATION LAMP"
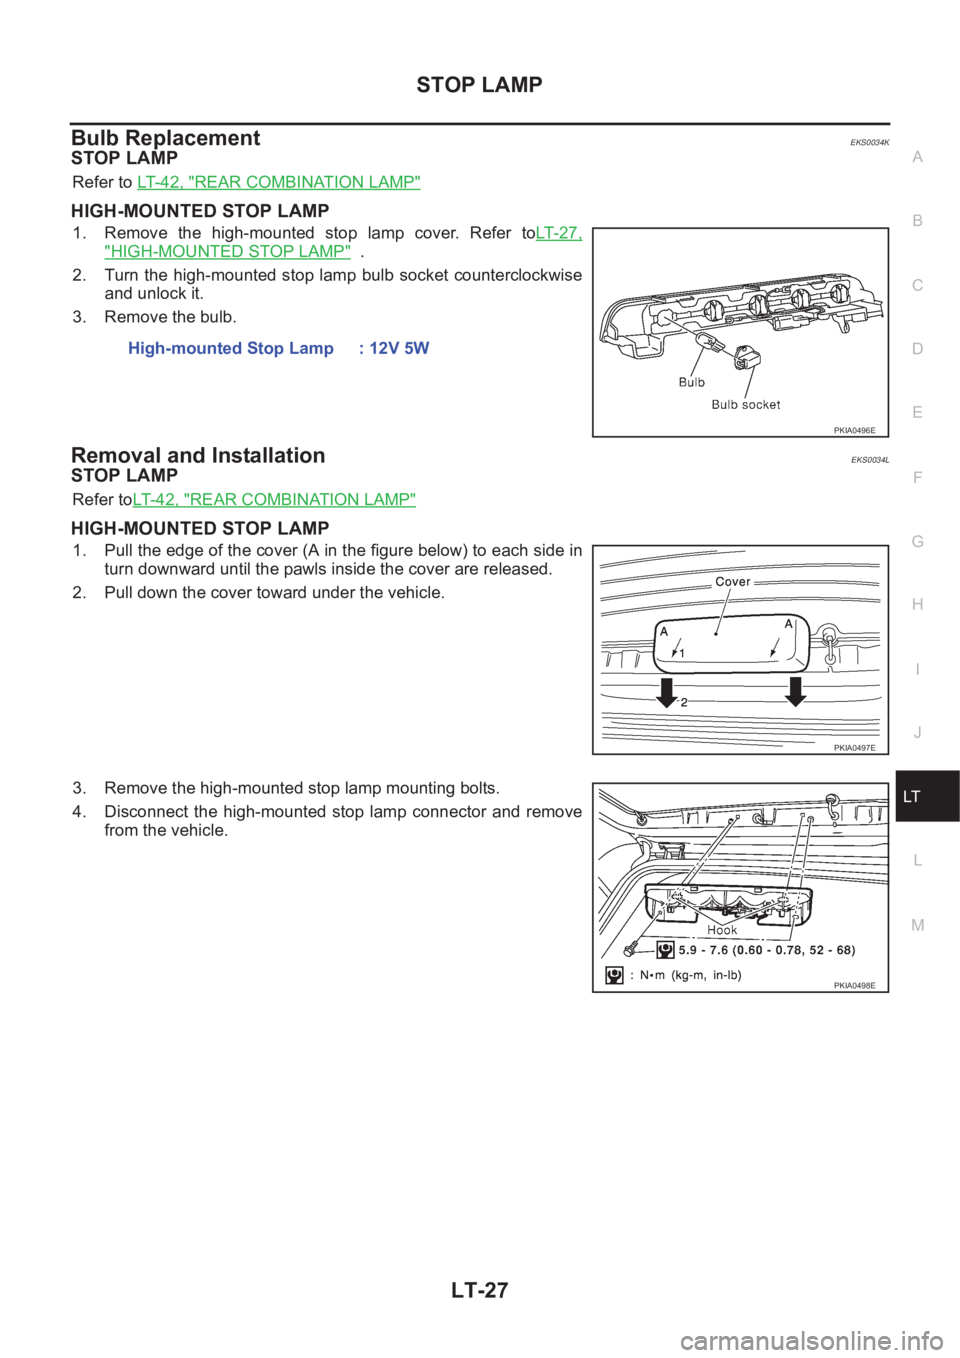
HIGH-MOUNTED STOP LAMP
1. Remove the high-mounted stop lamp cover. Refer toLT- 2 7 ,
"HIGH-MOUNTED STOP LAMP" .
2. Turn the high-mounted stop lamp bulb socket counterclockwise
and unlock it.
3. Remove the bulb.
Removal and InstallationEKS0034L
STOP LAMP
Refer toLT-42, "REAR COMBINATION LAMP"
HIGH-MOUNTED STOP LAMP
1. Pull the edge of the cover (A in the figure below) to each side in
turn downward until the pawls inside the cover are released.
2. Pull down the cover toward under the vehicle.
3. Remove the high-mounted stop lamp mounting bolts.
4. Disconnect the high-mounted stop lamp connector and remove
from the vehicle.High-mounted Stop Lamp : 12V 5W
PKIA0496E
PKIA0497E
PKIA0498E
Page 3519 of 3833
BACK-UP LAMP
LT-29
C
D
E
F
G
H
I
J
L
MA
B
LT
Bulb Replacement EKS003C4
Refer to LT- 4 2 , "REAR COMBINATION LAMP" .
Removal and Installation EKS003C5
Refer to LT- 4 2 , "REAR COMBINATION LAMP" .