Page 3624 of 3833
DI-66
WARNING CHIME
Door Unlock Sensor Check
EKS002YG
1. CHECK DOOR UNLOCK SENSOR INPUT SIGNAL
Check voltage between time control unit harness connector M31 ter-
minal 28 (Y/G) and ground.
OK or NG
OK >> Door unlock sensor is OK.
NG >>
●GO TO 2 (LHD models).
●GO TO 3 (RHD models)
2. CHECK DOOR UNLOCK SENSOR CIRCUIT (LHD MODELS)
1. Disconnect door unlock sensor connector.
2. Check continuity between time control unit harness connector
M31 terminal 28 (Y/G) and front door lock actuator (driver side)
harness connector D9 terminal 5 (Y/G).
3. Check continuity between time control unit harness connector
M31 terminal 28 (Y/G) and ground.
OK or NG
OK >> GO TO 4.
NG >> Repair harness or connector.
Terminals
Condition
(Driver's door)Voltage [V]
(+) (–)
28 GroundLocked Approx. 5
Unlocked 0
SKIA0999E
Continuity should exist.
SKIA4411E
Continuity should not exist.
SKIA4412E
Page 3625 of 3833
WARNING CHIME
DI-67
C
D
E
F
G
H
I
J
L
MA
B
DI
3.CHECK DOOR UNLOCK SENSOR CIRCUIT (RHD MODELS)
1. Disconnect door unlock sensor connector.
2. Check continuity between time control unit harness connector
M31 terminal 28 (Y/G) and front door lock actuator (driver side)
harness connector D9 terminal 5 (Y/G).
3. Check continuity between time control unit harness connector
M31 terminal 28 (Y/G) and ground.
OK or NG
OK >> GO TO 4.
NG >> Repair harness or connector.
4.CHECK DOOR UNLOCK SENSOR GROUND CIRCUIT
Check continuity between front door lock actuator (driver side) har-
ness connector D9 terminal 2 (B) and ground.
OK or NG
OK >> Replace front door lock actuator (driver side).
NG >> Repair harness or connector.Continuity should exist.
SKIA4413E
Continuity should not exist.
SKIA4412E
Continuity should exist.
SKIA4415E
Page 3659 of 3833

TIME CONTROL UNIT
BCS-3
C
D
E
F
G
H
I
J
L
MA
B
BCS
TIME CONTROL UNITPFP:28491
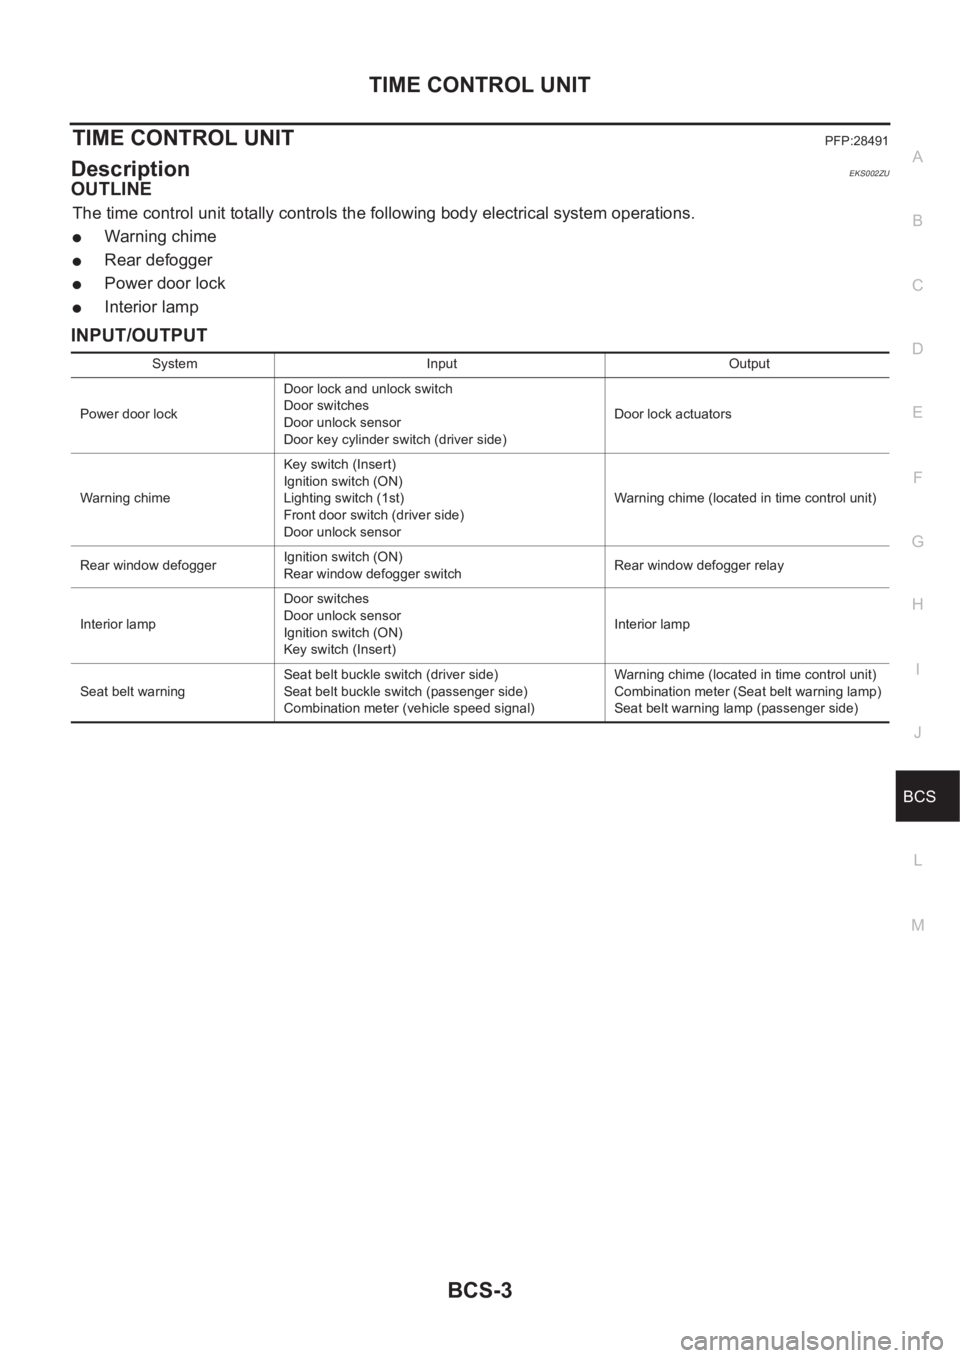
DescriptionEKS002ZU
OUTLINE
The time control unit totally controls the following body electrical system operations.
●Warning chime
●Rear defogger
●Power door lock
●Interior lamp
INPUT/OUTPUT
System Input Output
Power door lockDoor lock and unlock switch
Door switches
Door unlock sensor
Door key cylinder switch (driver side)Door lock actuators
Warning chimeKey switch (Insert)
Ignition switch (ON)
Lighting switch (1st)
Front door switch (driver side)
Door unlock sensorWarning chime (located in time control unit)
Rear window defoggerIgnition switch (ON)
Rear window defogger switchRear window defogger relay
Interior lampDoor switches
Door unlock sensor
Ignition switch (ON)
Key switch (Insert)Interior lamp
Seat belt warningSeat belt buckle switch (driver side)
Seat belt buckle switch (passenger side)
Combination meter (vehicle speed signal)Warning chime (located in time control unit)
Combination meter (Seat belt warning lamp)
Seat belt warning lamp (passenger side)
Page 3661 of 3833

TIME CONTROL UNIT
BCS-5
C
D
E
F
G
H
I
J
L
MA
B
BCS
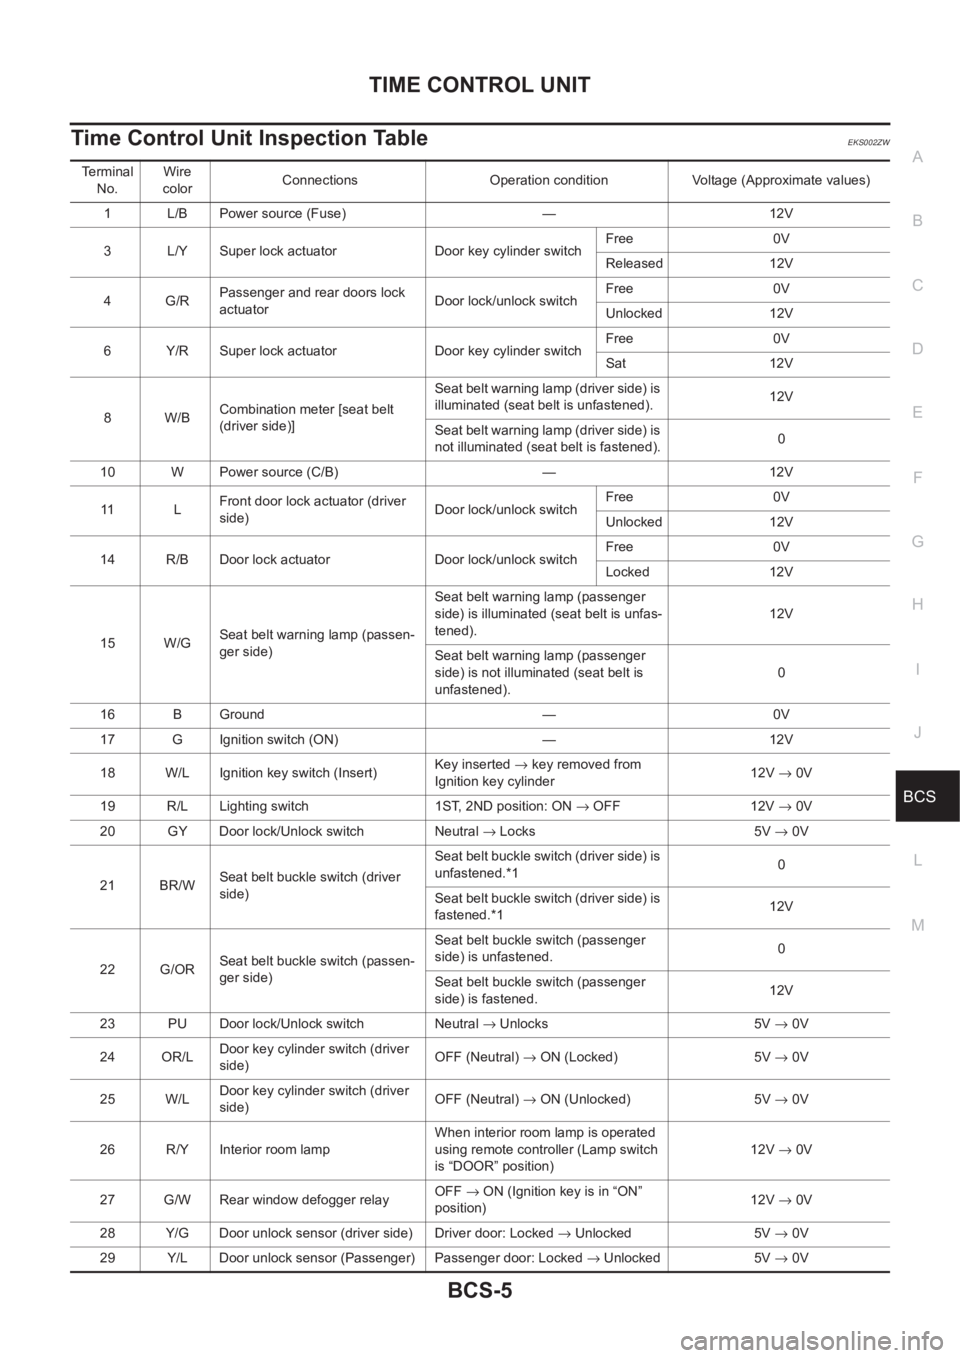
Time Control Unit Inspection TableEKS002ZW
Terminal
No.Wire
colorConnections Operation condition Voltage (Approximate values)
1 L/B Power source (Fuse) — 12V
3 L/Y Super lock actuator Door key cylinder switchFree 0V
Released 12V
4G/RPassenger and rear doors lock
actuatorDoor lock/unlock switchFree 0V
Unlocked 12V
6 Y/R Super lock actuator Door key cylinder switchFree 0V
Sat 12V
8W/BCombination meter [seat belt
(driver side)]Seat belt warning lamp (driver side) is
illuminated (seat belt is unfastened).12V
Seat belt warning lamp (driver side) is
not illuminated (seat belt is fastened).0
10 W Power source (C/B) — 12V
11 LFront door lock actuator (driver
side)Door lock/unlock switchFree 0V
Unlocked 12V
14 R/B Door lock actuator Door lock/unlock switchFree 0V
Locked 12V
15 W/GSeat belt warning lamp (passen-
ger side)Seat belt warning lamp (passenger
side) is illuminated (seat belt is unfas-
tened).12V
Seat belt warning lamp (passenger
side) is not illuminated (seat belt is
unfastened).0
16 B Ground — 0V
17 G Ignition switch (ON) — 12V
18 W/L Ignition key switch (Insert)Key inserted → key removed from
Ignition key cylinder12V → 0V
19 R/L Lighting switch 1ST, 2ND position: ON → OFF 12V → 0V
20 GY Door lock/Unlock switch Neutral → Locks 5V → 0V
21 BR/WSeat belt buckle switch (driver
side)Seat be lt buckle switch (d river side) is
unfastened.*10
Seat be lt buckle switch (d river side) is
fastened.*112V
22 G/ORSeat belt buckle switch (passen-
ger side)Seat belt buckle switch (passenger
side) is unfastened.0
Seat belt buckle switch (passenger
side) is fastened.12V
23 PU Door lock/Unlock switch Neutral → Unlocks 5V → 0V
24 OR/LDoor key cylinder switch (driver
side)OFF (Neutral) → ON (Locked) 5V → 0V
25 W/LDoor key cylinder switch (driver
side)OFF (Neutral) → ON (Unlocked) 5V → 0V
26 R/Y Interior room lampWhen interior room lamp is operated
using remote controller (Lamp switch
is “DOOR” position)12V → 0V
27 G/W Rear window defogger relayOFF→ ON (Ignition key is in “ON”
position)12V → 0V
28 Y/G Door unlock sensor (driver side) Driver door: Locked → Unlocked 5V → 0V
29 Y/L Door unlock sensor (Passenger) Passenger door: Locked → Unlocked 5V → 0V
Page 3663 of 3833

LAN-1
LAN SYSTEM
K ELECTRICAL
CONTENTS
C
D
E
F
G
H
I
J
L
M
SECTION
A
B
LAN
LAN SYSTEM
CAN
PRECAUTIONS .......................................................... 2
Precautions for Supplemental Restraint System
(SRS) “AIR BAG” and “SEAT BELT PRE-TEN-
SIONER” .................................................................. 2
Precautions For Trouble Diagnosis .......................... 2
CAN SYSTEM ....................................................... 2
Precautions For Harness Repair .............................. 2
CAN SYSTEM ....................................................... 2
CAN COMMUNICATION ............................................ 3
System Description .................................................. 3
FOR A/T MODELS ................................................ 3
FOR M/T MODELS ............................................... 3
CAN SYSTEM (FOR A/T MODELS) ........................... 5
System Description .................................................. 5
Component Parts and Harness Connector Location ..... 5
Wiring Diagram — CAN — ....................................... 6
Work Flow ................................................................ 7
CHECK SHEET ..................................................... 8
CHECK SHEET RESULTS (EXAMPLE) ............... 9
INSPECTION ........................................................ 9CAN Communication Circuit Check .......................... 9
Component Inspection ............................................ 11
ECM/TCM INTERNAL CIRCUIT INSPECTION ... 11
CAN SYSTEM (FOR M/T MODELS) ........................ 12
System Description ................................................. 12
Component Parts and Harness Connector Location ... 12
Wiring Diagram — CAN — ..................................... 13
Work Flow ............................................................... 14
CHECK SHEET ................................................... 15
CHECK SHEET RESULTS (EXAMPLE) ............. 16
INSPECTION ...................................................... 17
Circuit Check Between Steering Wheel Angle Sen-
sor and 4WD Control Unit ....................................... 17
ECM Circuit Check .............................................. ... 18
4WD Control Unit Circuit Check ............................. 19
Steering Wheel Angle Sensor Circuit Check .......... 20
ESP/TCS/ABS Control Unit Circuit Check .............. 20
CAN Communication Circuit Check ........................ 21
Component Inspection ............................................ 25
ECM / ESP/TCS/ABS CONTROL UNIT INTER-
NAL CIRCUIT INSPECTION ............................... 25
Page 3665 of 3833
![NISSAN X-TRAIL 2001 Service Repair Manual CAN COMMUNICATION
LAN-3
[CAN]
C
D
E
F
G
H
I
J
L
MA
B
LAN
CAN COMMUNICATIONPFP:23710
System DescriptionEKS001U3
CAN (Controller Area Network) is a serial communication line for real time application. I NISSAN X-TRAIL 2001 Service Repair Manual CAN COMMUNICATION
LAN-3
[CAN]
C
D
E
F
G
H
I
J
L
MA
B
LAN
CAN COMMUNICATIONPFP:23710
System DescriptionEKS001U3
CAN (Controller Area Network) is a serial communication line for real time application. I](/manual-img/5/57405/w960_57405-3664.png)
CAN COMMUNICATION
LAN-3
[CAN]
C
D
E
F
G
H
I
J
L
MA
B
LAN
CAN COMMUNICATIONPFP:23710
System DescriptionEKS001U3
CAN (Controller Area Network) is a serial communication line for real time application. It is an on-vehicle mul-
tiplex communication line with high data communication speed and excellent error detection ability. Many elec-
tronic control units are equipped onto a vehicle, and each control unit shares information and links with other
control units during operation (not independent). In CAN communication, control units are connected with 2
communication lines (CAN H line, CAN L line) allowing a high rate of information transmission with less wiring.
Each control unit transmits/receives data but selectively reads required data only.
FOR A/T MODELS
System diagram
Input/output signal chart
T: Transmit R: Receive
FOR M/T MODELS
System diagram
Input/output signal chart
T: Transmit R: Receive
SKIA0884E
Signals ECM TCM
Engine coolant temperature signal T R
Accelerator pedal position signal T R
A/T self-diagnosis signal R T
SKIA0885E
Signals ECMSteering wheel
angle sensor4WD control unitESP/ TCS / ABS
control unit
Engine speed signal T R R
Accelerator pedal position signal T R
ESP operation signal R R T
TCS operation signal R R T
ABS operation signal R R T
Stop lamp switch signalRT
Steering wheel angle sensor signal T R
ESP-OFF switch signalRT
Page 3666 of 3833
LAN-4
[CAN]
CAN COMMUNICATION
Wheel speed sensor signalRT
4WD mode signalTR Signals ECMSteering wheel
angle sensor4WD control unitESP/ TCS / ABS
control unit
Page 3676 of 3833
![NISSAN X-TRAIL 2001 Service Repair Manual LAN-14
[CAN]
CAN SYSTEM (FOR M/T MODELS)
Work Flow
EKS002FN
1. Print all the data of “SELF-DIAG RESULTS” and “DATA MONITOR” for “ENGINE”, “ALL MODE 4WD”,
and “ABS” dis NISSAN X-TRAIL 2001 Service Repair Manual LAN-14
[CAN]
CAN SYSTEM (FOR M/T MODELS)
Work Flow
EKS002FN
1. Print all the data of “SELF-DIAG RESULTS” and “DATA MONITOR” for “ENGINE”, “ALL MODE 4WD”,
and “ABS” dis](/manual-img/5/57405/w960_57405-3675.png)
LAN-14
[CAN]
CAN SYSTEM (FOR M/T MODELS)
Work Flow
EKS002FN
1. Print all the data of “SELF-DIAG RESULTS” and “DATA MONITOR” for “ENGINE”, “ALL MODE 4WD”,
and “ABS” displayed on CONSULT-II. Refer to the following:
●EC-854, "DTC U1000 CAN COMMUNICATION LINE" (QR20 WITH EURO-OBD) for “ENGINE”
●EC-1199, "DTC U1000 CAN COMMUNICATION LINE" (QR20 WITHOUT EURO-OBD) for “ENGINE”
●EC-1448, "DTC U1000 CAN COMMUNICATION LINE" (YD) for “ENGINE”
●TF-53, "CAN COMMUNICATION SYSTEM" for “ALL MODE 4WD”
●BRC-110, "Inspection 15 CAN Communication Circuit, ESP/TCS/ABS Control Unit and Steering Wheel
Angle Sensor" for “ABS”
2. Attach the printed sheet of “SELF-DIAG RESULTS” and “DATA MONITOR” onto the check sheet. Refer to
LAN-15, "
CHECK SHEET" .
3. Based on the data monitor results, put “v” marks onto the items with “UNKWN” or “NG” in the check sheet
table. Refer to LAN-15, "
CHECK SHEET" .
NOTE:
If “NG” is displayed on “CAN COMM” for the diagnosed control unit, replace the control unit.
4. According to the check sheet results (example), start inspection. Refer to LAN-16, "
CHECK SHEET
RESULTS (EXAMPLE)" .