2001 INFINITI QX4 power seat
[x] Cancel search: power seatPage 2115 of 2395
SRS020-B
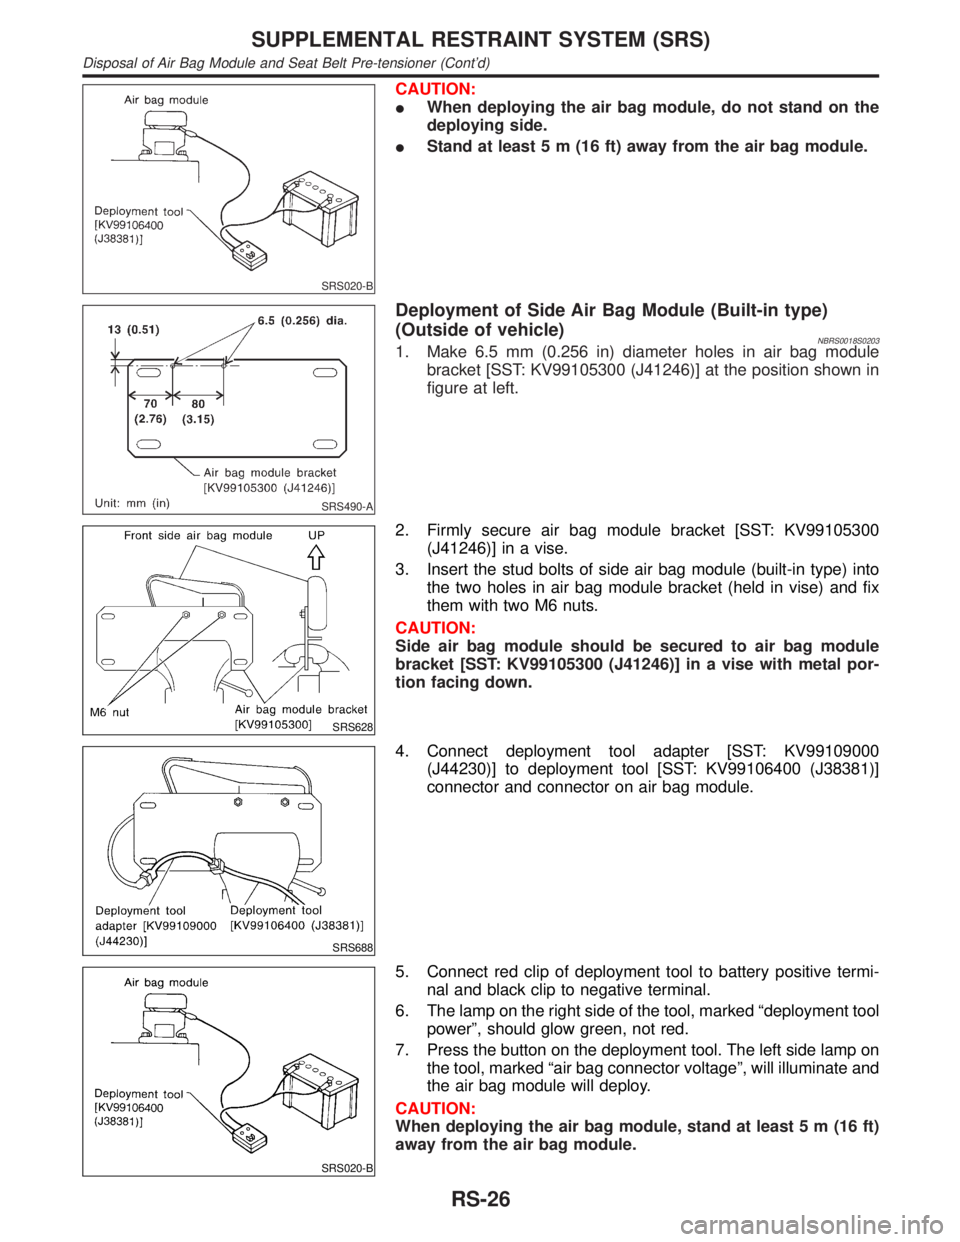
CAUTION:
IWhen deploying the air bag module, do not stand on the
deploying side.
IStand at least 5 m (16 ft) away from the air bag module.
SRS490-A
Deployment of Side Air Bag Module (Built-in type)
(Outside of vehicle)
NBRS0018S02031. Make 6.5 mm (0.256 in) diameter holes in air bag module
bracket [SST: KV99105300 (J41246)] at the position shown in
figure at left.
SRS628
2. Firmly secure air bag module bracket [SST: KV99105300
(J41246)] in a vise.
3. Insert the stud bolts of side air bag module (built-in type) into
the two holes in air bag module bracket (held in vise) and fix
them with two M6 nuts.
CAUTION:
Side air bag module should be secured to air bag module
bracket [SST: KV99105300 (J41246)] in a vise with metal por-
tion facing down.
SRS688
4. Connect deployment tool adapter [SST: KV99109000
(J44230)] to deployment tool [SST: KV99106400 (J38381)]
connector and connector on air bag module.
SRS020-B
5. Connect red clip of deployment tool to battery positive termi-
nal and black clip to negative terminal.
6. The lamp on the right side of the tool, marked ªdeployment tool
powerº, should glow green, not red.
7. Press the button on the deployment tool. The left side lamp on
the tool, marked ªair bag connector voltageº, will illuminate and
the air bag module will deploy.
CAUTION:
When deploying the air bag module, stand at least 5 m (16 ft)
away from the air bag module.
SUPPLEMENTAL RESTRAINT SYSTEM (SRS)
Disposal of Air Bag Module and Seat Belt Pre-tensioner (Cont'd)
RS-26
Page 2116 of 2395
SRS662
DEPLOYMENT PROCEDURES FOR SEAT BELT PRE-
TENSIONER (OUTSIDE OF VEHICLE)
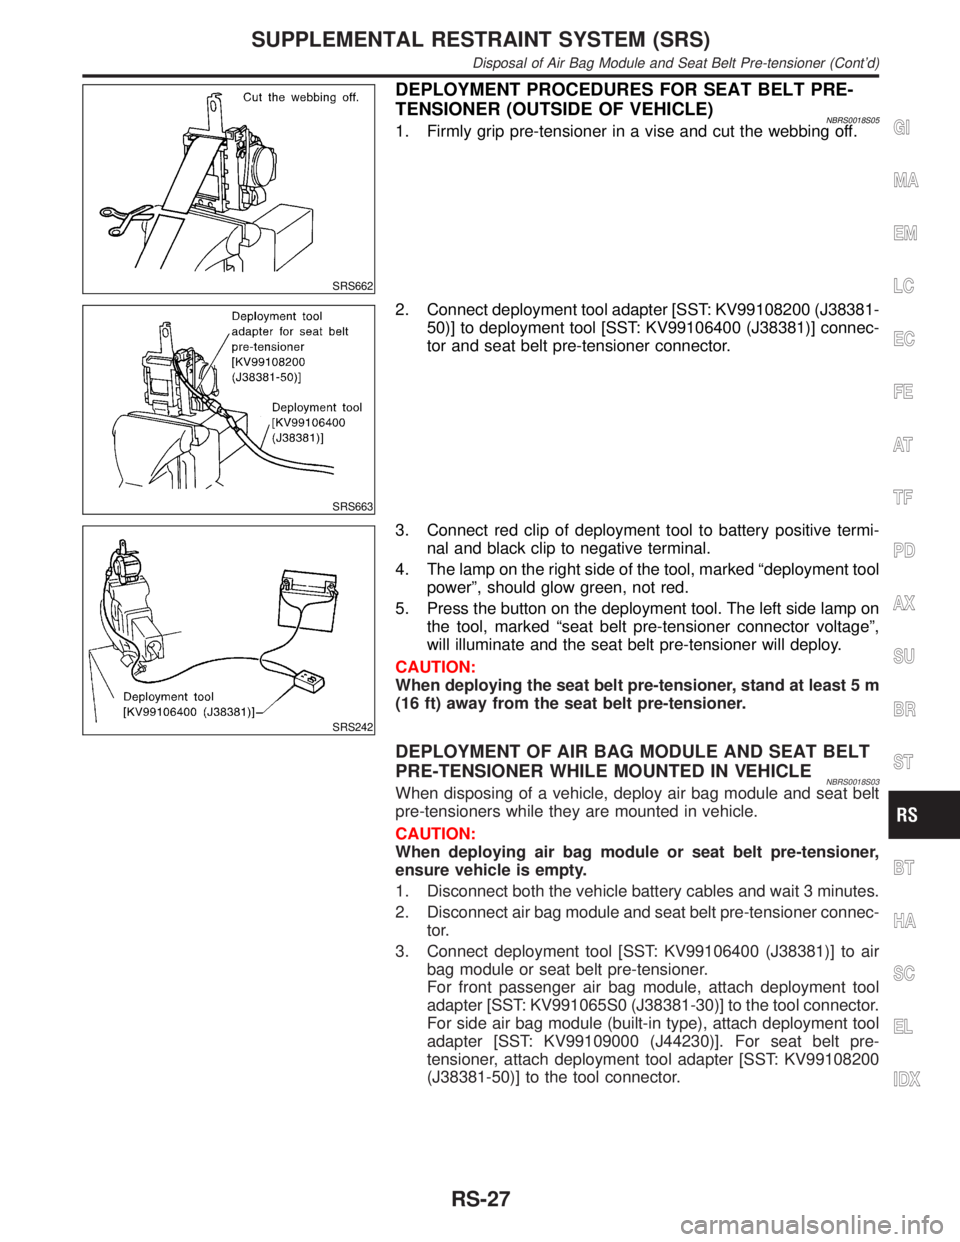
NBRS0018S051. Firmly grip pre-tensioner in a vise and cut the webbing off.
SRS663
2. Connect deployment tool adapter [SST: KV99108200 (J38381-
50)] to deployment tool [SST: KV99106400 (J38381)] connec-
tor and seat belt pre-tensioner connector.
SRS242
3. Connect red clip of deployment tool to battery positive termi-
nal and black clip to negative terminal.
4. The lamp on the right side of the tool, marked ªdeployment tool
powerº, should glow green, not red.
5. Press the button on the deployment tool. The left side lamp on
the tool, marked ªseat belt pre-tensioner connector voltageº,
will illuminate and the seat belt pre-tensioner will deploy.
CAUTION:
When deploying the seat belt pre-tensioner, stand at least 5 m
(16 ft) away from the seat belt pre-tensioner.
DEPLOYMENT OF AIR BAG MODULE AND SEAT BELT
PRE-TENSIONER WHILE MOUNTED IN VEHICLE
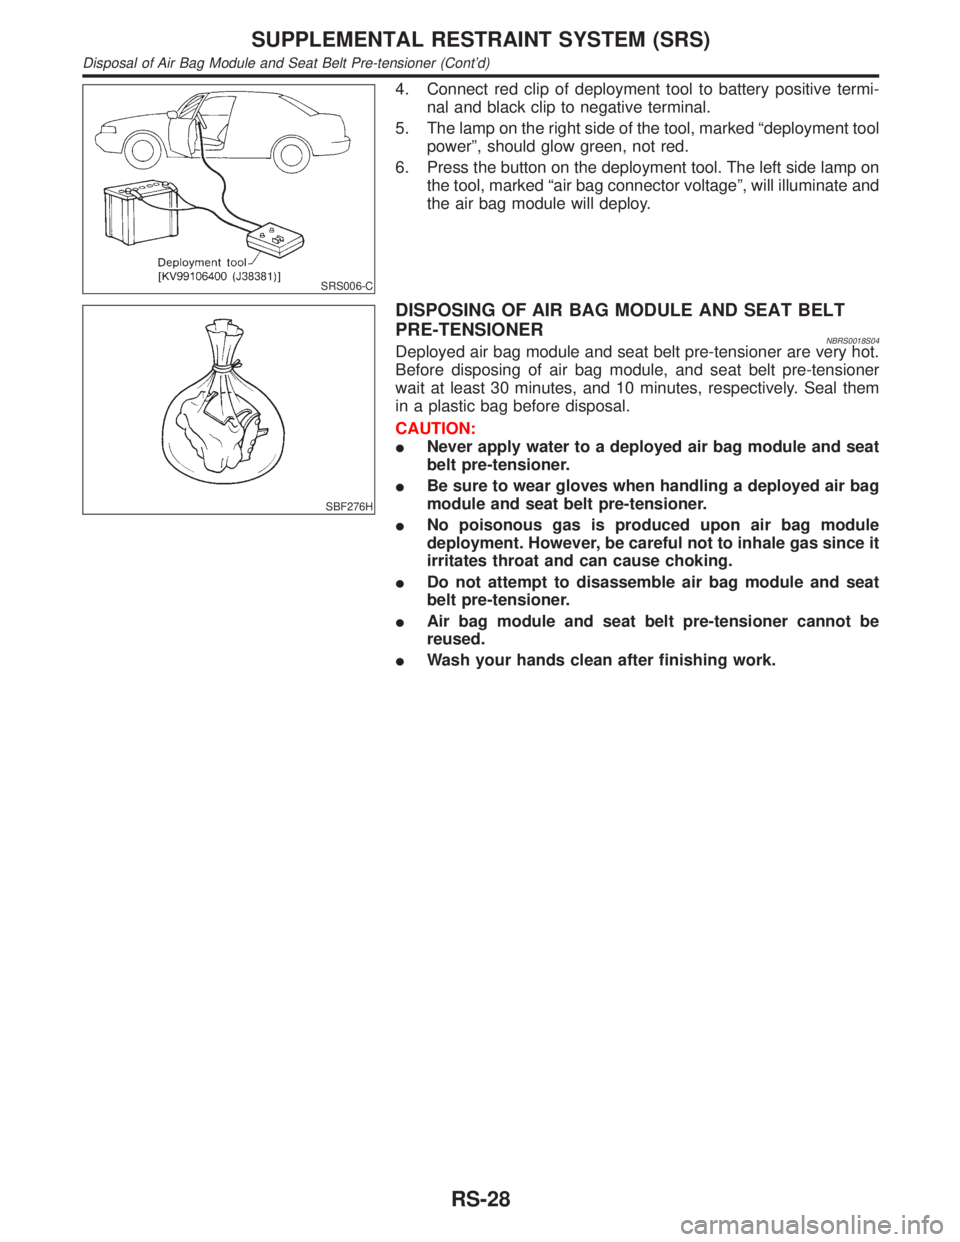
NBRS0018S03When disposing of a vehicle, deploy air bag module and seat belt
pre-tensioners while they are mounted in vehicle.
CAUTION:
When deploying air bag module or seat belt pre-tensioner,
ensure vehicle is empty.
1. Disconnect both the vehicle battery cables and wait 3 minutes.
2. Disconnect air bag module and seat belt pre-tensioner connec-
tor.
3. Connect deployment tool [SST: KV99106400 (J38381)] to air
bag module or seat belt pre-tensioner.
For front passenger air bag module, attach deployment tool
adapter [SST: KV991065S0 (J38381-30)] to the tool connector.
For side air bag module (built-in type), attach deployment tool
adapter [SST: KV99109000 (J44230)]. For seat belt pre-
tensioner, attach deployment tool adapter [SST: KV99108200
(J38381-50)] to the tool connector.
GI
MA
EM
LC
EC
FE
AT
TF
PD
AX
SU
BR
ST
BT
HA
SC
EL
IDX
SUPPLEMENTAL RESTRAINT SYSTEM (SRS)
Disposal of Air Bag Module and Seat Belt Pre-tensioner (Cont'd)
RS-27
Page 2117 of 2395
SRS006-C
4. Connect red clip of deployment tool to battery positive termi-
nal and black clip to negative terminal.
5. The lamp on the right side of the tool, marked ªdeployment tool
powerº, should glow green, not red.
6. Press the button on the deployment tool. The left side lamp on
the tool, marked ªair bag connector voltageº, will illuminate and
the air bag module will deploy.
SBF276H
DISPOSING OF AIR BAG MODULE AND SEAT BELT
PRE-TENSIONER
NBRS0018S04Deployed air bag module and seat belt pre-tensioner are very hot.
Before disposing of air bag module, and seat belt pre-tensioner
wait at least 30 minutes, and 10 minutes, respectively. Seal them
in a plastic bag before disposal.
CAUTION:
INever apply water to a deployed air bag module and seat
belt pre-tensioner.
IBe sure to wear gloves when handling a deployed air bag
module and seat belt pre-tensioner.
INo poisonous gas is produced upon air bag module
deployment. However, be careful not to inhale gas since it
irritates throat and can cause choking.
IDo not attempt to disassemble air bag module and seat
belt pre-tensioner.
IAir bag module and seat belt pre-tensioner cannot be
reused.
IWash your hands clean after finishing work.
SUPPLEMENTAL RESTRAINT SYSTEM (SRS)
Disposal of Air Bag Module and Seat Belt Pre-tensioner (Cont'd)
RS-28
Page 2131 of 2395
![INFINITI QX4 2001 Factory Service Manual Diagnostic item ExplanationRepair order
ªRecheck SRS at each replace-
ment.º
PRE-TEN FRONT LH
[OPEN/VB-SHORT]IThe circuit for front LH pre-tensioner is open or shorted to
some power supply circuit.1 INFINITI QX4 2001 Factory Service Manual Diagnostic item ExplanationRepair order
ªRecheck SRS at each replace-
ment.º
PRE-TEN FRONT LH
[OPEN/VB-SHORT]IThe circuit for front LH pre-tensioner is open or shorted to
some power supply circuit.1](/manual-img/42/57027/w960_57027-2130.png)
Diagnostic item ExplanationRepair order
ªRecheck SRS at each replace-
ment.º
PRE-TEN FRONT LH
[OPEN/VB-SHORT]IThe circuit for front LH pre-tensioner is open or shorted to
some power supply circuit.1. Visually check the wiring harness
connections.
2. Replace the harness if it has visible
damage.
3. Replace front LH seat belt.
(Before disposing, it must be deacti-
vated.)
4. Replace the diagnosis sensor unit.
5. Replace the related harness. PRE-TEN FRONT LH
[GND-SHORT]IThe circuit for front LH pre-tensioner is shorted to ground.
PRE-TEN FRONT RH
[OPEN/VB-SHORT]IThe circuit for front RH pre-tensioner is open or shorted to
some power supply circuit.1. Visually check the wiring harness
connections.
2. Replace the harness if it has visible
damage.
3. Replace front RH seat belt.
(Before disposing, it must be deacti-
vated.)
4. Replace the diagnosis sensor unit.
5. Replace the related harness. PRE-TEN FRONT RH
[GND-SHORT]IThe circuit for front RH pre-tensioner is shorted to ground.
CONTROL UNITIDiagnosis sensor unit is malfunctioning. 1. Visually check the wiring harness
connection.
2. Replace the diagnosis sensor unit.
* Follow the procedures in numerical order when repairing malfunctioning parts. Confirm whether malfunction is eliminated
using the air bag warning lamp or CONSULT-II each time repair is finished. If malfunction is still observed, proceed to the next
step. When malfunction is eliminated, further repair work is not required.
SRS844
DIAGNOSTIC PROCEDURE 3NBRS0045S02Final checking after repairing SRS by using CONSULT-II Ð
Diagnosis mode
1. After repairing SRS, connect both battery cables.
2. Connect CONSULT-II to Data link connector.
3. Turn ignition switch from ªOFFº to ªONº.
SRS695
4. Touch ªSTARTº.
SUPPLEMENTAL RESTRAINT SYSTEM (SRS)
Trouble Diagnoses with CONSULT-II (Cont'd)
RS-42
Page 2136 of 2395
![INFINITI QX4 2001 Factory Service Manual Diagnostic item Explanation Repair order
SIDE MODULE LH
[OPEN]ISide air bag module (LH) circuit is open. 1. Visually check the wiring harness
connection.
2. Replace the harness if it has visible
damag INFINITI QX4 2001 Factory Service Manual Diagnostic item Explanation Repair order
SIDE MODULE LH
[OPEN]ISide air bag module (LH) circuit is open. 1. Visually check the wiring harness
connection.
2. Replace the harness if it has visible
damag](/manual-img/42/57027/w960_57027-2135.png)
Diagnostic item Explanation Repair order
SIDE MODULE LH
[OPEN]ISide air bag module (LH) circuit is open. 1. Visually check the wiring harness
connection.
2. Replace the harness if it has visible
damage.
3. If the harness check is OK, replace
the diagnosis sensor unit and side
air bag module (LH). (Before dis-
posing the side air bag module
(LH), it must be deployed.) SIDE MODULE LH
[VB-SHORT]ISide air bag module (LH) circuit is shorted to some power
supply circuits.
SIDE MODULE LH
[GND-SHORT]ISide air bag module (LH) circuit is shorted to ground.
SIDE MODULE LH
[SHORT]ISide air bag module (LH) circuits are shorted to each other.
SIDE MODULE RH
[OPEN]ISide air bag module (RH) circuit is open. 1. Visually check the wiring harness
connection.
2. Replace the harness if it has visible
damage.
3. If the harness check is OK, replace
the diagnosis sensor unit and side
air bag module (RH). (Before dis-
posing the side air bag module
(RH), it must be deployed.) SIDE MODULE RH
[VB-SHORT]ISide air bag module (RH) circuit is shorted to some power
supply circuits.
SIDE MODULE RH
[GND-SHORT]ISide air bag module (RH) circuit is shorted to ground.
SIDE MODULE RH
[SHORT]ISide air bag module (RH) circuits are shorted to each other.
SATELLITE SENS LH
[UNIT FAIL]
SATELLITE SENS LH
[COMM FAIL]ISatellite sensor (LH) 1. Visually check the wiring harness
connection.
2. Replace the harness if it has visible
damage.
3. If the harness check is OK, replace
the diagnosis sensor unit and satel-
lite sensor (LH).
SATELLITE SENS RH
[UNIT FAIL]
SATELLITE SENS RH
[COMM FAIL]ISatellite sensor (RH) 1. Visually check the wiring harness
connection.
2. Replace the harness if it has visible
damage.
3. If the harness check is OK, replace
the diagnosis sensor unit and satel-
lite sensor (RH).
PRE-TEN FRONT LH
[OPEN/VB-SHORT]IThe circuit for front LH pre-tensioner is open or shorted to
some power supply circuit.1. Visually check the wiring harness
connections.
2. Replace the harness if it has visible
damage.
3. If the harness check is OK, replace
the diagnosis sensor unit and front
LH seat belt.
(Before disposing the front LH seat
belt pre-tensioner, it must be
deployed.) PRE-TEN FRONT LH
[GND-SHORT]IThe circuit for front LH pre-tensioner is shorted to ground.
PRE-TEN FRONT RH
[OPEN/VB-SHORT]IThe circuit for front RH pre-tensioner is open or shorted to
some power supply circuit.1. Visually check the wiring harness
connections.
2. Replace the harness if it has visible
damage.
3. If the harness check is OK, replace
the diagnosis sensor unit and front
RH seat belt.
(Before disposing the front RH seat
belt pre-tensioner, it must be
deployed.) PRE-TEN FRONT RH
[GND-SHORT]IThe circuit for front RH pre-tensioner is shorted to ground.
GI
MA
EM
LC
EC
FE
AT
TF
PD
AX
SU
BR
ST
BT
HA
SC
EL
IDX
SUPPLEMENTAL RESTRAINT SYSTEM (SRS)
Trouble Diagnoses with CONSULT-II (Cont'd)
RS-47
Page 2153 of 2395
Supplemental Restraint System (SRS) ªAIR
BAGº and ªSEAT BELT PRE-TENSIONERº
NBSC0001The Supplemental Restraint System such as ªAIR BAGº and ªSEAT BELT PRE-TENSIONERº used along with
a seat belt, helps to reduce the risk or severity of injury to the driver and front passenger for certain types of
collision. The SRS system composition which is available to INFINITI QX4 is as follows:
IFor a frontal collision
The Supplemental Restraint System consists of driver air bag module (located in the center of the steer-
ing wheel), front passenger air bag module (located on the instrument panel on passenger side), seat belt
pre-tensioners, a diagnosis sensor unit, warning lamp, wiring harness and spiral cable.
IFor a side collision
The Supplemental Restraint System consists of side air bag module (located in the outer side of front seat),
satellite sensor, diagnosis sensor unit (one of components of air bags for a frontal collision), wiring harness,
warning lamp (one of components of air bags for a frontal collision).
Information necessary to service the system safely is included in theRS sectionof this Service Manual.
WARNING:
ITo avoid rendering the SRS inoperative, which could increase the risk of personal injury or death
in the event of a collision which would result in air bag inflation, all maintenance must be performed
by an authorized INFINITI dealer.
IImproper maintenance, including incorrect removal and installation of the SRS, can lead to per-
sonal injury caused by unintentional activation of the system. For removal of Spiral Cable and Air
Bag Module, see the RS section.
IDo not use electrical test equipment on any circuit related to the SRS unless instructed to in this
Service Manual. Spiral cable and wiring harnesses covered with yellow insulation tape either just
before the harness connectors or for the complete harness are related to the SRS.
Wiring Diagrams and Trouble DiagnosisNBSC0002When you read wiring diagrams, refer to the following:
IGI-11, ªHOW TO READ WIRING DIAGRAMSº
IEL-9, ªPOWER SUPPLY ROUTINGº for power distribution circuit
When you perform trouble diagnosis, refer to the following:
IGI-35, ªHOW TO FOLLOW TEST GROUP IN TROUBLE DIAGNOSISº
IGI-24, ªHOW TO PERFORM EFFICIENT DIAGNOSIS FOR AN ELECTRICAL INCIDENTº
PRECAUTIONS
Supplemental Restraint System (SRS) ªAIR BAGº and ªSEAT BELT PRE-TENSIONERº
SC-2
Page 2182 of 2395
STEERING SYSTEM
SECTION
ST
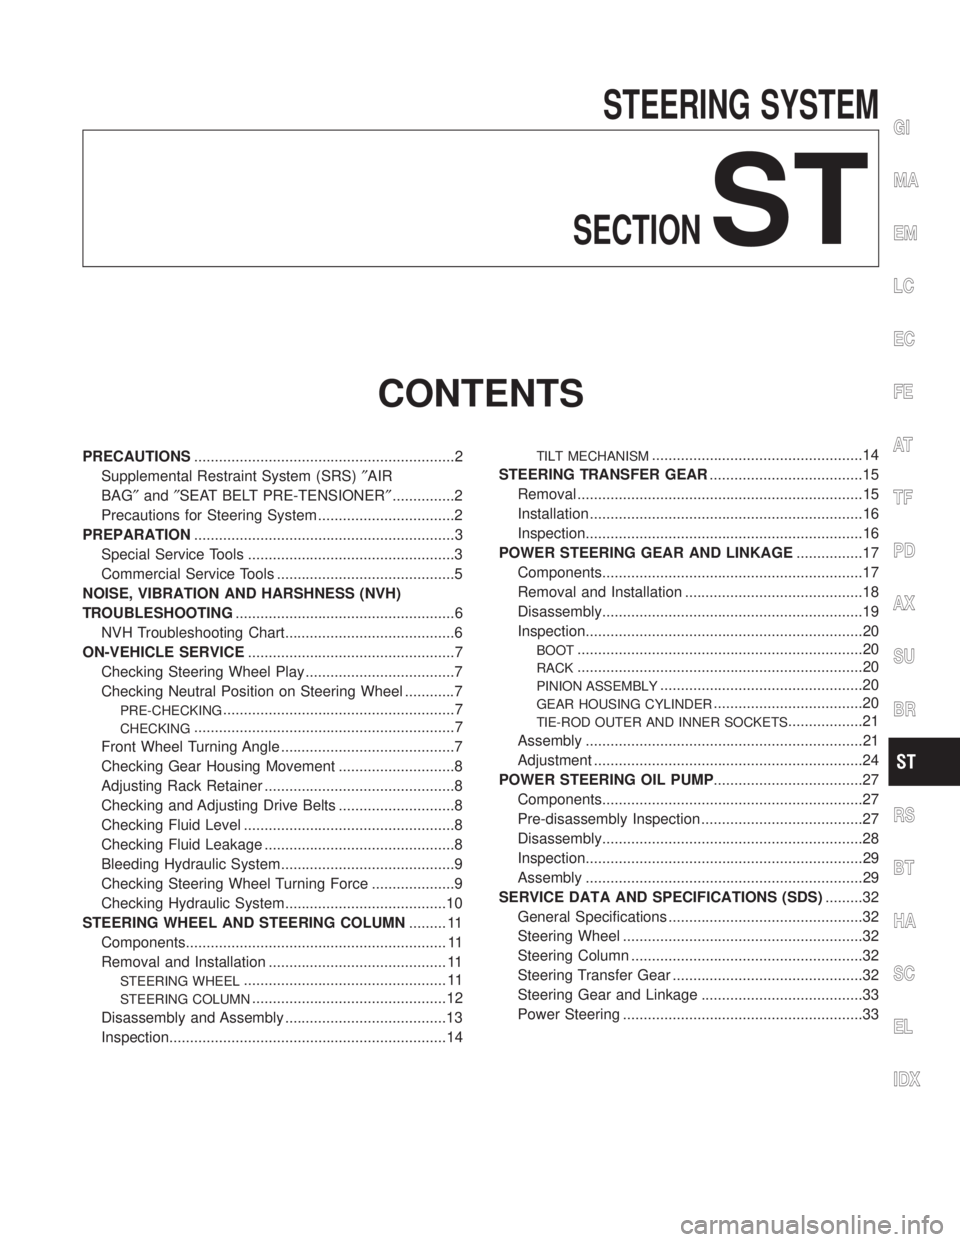
CONTENTS
PRECAUTIONS...............................................................2
Supplemental Restraint System (SRS)²AIR
BAG²and²SEAT BELT PRE-TENSIONER²...............2
Precautions for Steering System .................................2
PREPARATION...............................................................3
Special Service Tools ..................................................3
Commercial Service Tools ...........................................5
NOISE, VIBRATION AND HARSHNESS (NVH)
TROUBLESHOOTING.....................................................6
NVH Troubleshooting Chart.........................................6
ON-VEHICLE SERVICE..................................................7
Checking Steering Wheel Play ....................................7
Checking Neutral Position on Steering Wheel ............7
PRE-CHECKING........................................................7
CHECKING...............................................................7
Front Wheel Turning Angle ..........................................7
Checking Gear Housing Movement ............................8
Adjusting Rack Retainer ..............................................8
Checking and Adjusting Drive Belts ............................8
Checking Fluid Level ...................................................8
Checking Fluid Leakage ..............................................8
Bleeding Hydraulic System..........................................9
Checking Steering Wheel Turning Force ....................9
Checking Hydraulic System.......................................10
STEERING WHEEL AND STEERING COLUMN......... 11
Components............................................................... 11
Removal and Installation ........................................... 11
STEERING WHEEL................................................. 11
STEERING COLUMN...............................................12
Disassembly and Assembly .......................................13
Inspection...................................................................14
TILT MECHANISM...................................................14
STEERING TRANSFER GEAR.....................................15
Removal .....................................................................15
Installation ..................................................................16
Inspection...................................................................16
POWER STEERING GEAR AND LINKAGE................17
Components...............................................................17
Removal and Installation ...........................................18
Disassembly...............................................................19
Inspection...................................................................20
BOOT.....................................................................20
RACK.....................................................................20
PINION ASSEMBLY.................................................20
GEAR HOUSING CYLINDER....................................20
TIE-ROD OUTER AND INNER SOCKETS..................21
Assembly ...................................................................21
Adjustment .................................................................24
POWER STEERING OIL PUMP....................................27
Components...............................................................27
Pre-disassembly Inspection .......................................27
Disassembly...............................................................28
Inspection...................................................................29
Assembly ...................................................................29
SERVICE DATA AND SPECIFICATIONS (SDS).........32
General Specifications ...............................................32
Steering Wheel ..........................................................32
Steering Column ........................................................32
Steering Transfer Gear ..............................................32
Steering Gear and Linkage .......................................33
Power Steering ..........................................................33
GI
MA
EM
LC
EC
FE
AT
TF
PD
AX
SU
BR
RS
BT
HA
SC
EL
IDX
Page 2183 of 2395
Supplemental Restraint System (SRS) ªAIR
BAGº and ªSEAT BELT PRE-TENSIONERº
NBST0044The Supplemental Restraint System such as ªAIR BAGº and ªSEAT BELT PRE-TENSIONERº used along with
a seat belt, helps to reduce the risk or severity of injury to the driver and front passenger for certain types of
collision. The SRS system composition which is available to INFINITI QX4 is as follows:
IFor a frontal collision
The Supplemental Restraint System consists of driver air bag module (located in the center of the steer-
ing wheel), front passenger air bag module (located on the instrument panel on passenger side), seat belt
pre-tensioners, a diagnosis sensor unit, warning lamp, wiring harness and spiral cable.
IFor a side collision
The Supplemental Restraint System consists of side air bag module (located in the outer side of front seat),
satellite sensor, diagnosis sensor unit (one of components of air bags for a frontal collision), wiring harness,
warning lamp (one of components of air bags for a frontal collision).
Information necessary to service the system safely is included in theRS sectionof this Service Manual.
WARNING:
ITo avoid rendering the SRS inoperative, which could increase the risk of personal injury or death
in the event of a collision which would result in air bag inflation, all maintenance must be performed
by an authorized INFINITI dealer.
IImproper maintenance, including incorrect removal and installation of the SRS, can lead to per-
sonal injury caused by unintentional activation of the system. For removal of Spiral Cable and Air
Bag Module, see the RS section.
IDo not use electrical test equipment on any circuit related to the SRS unless instructed to in this
Service Manual. Spiral cable and wiring harnesses covered with yellow insulation tape either just
before the harness connectors or for the complete harness are related to the SRS.
Precautions for Steering SystemNBST0002IBefore disassembly, thoroughly clean the outside of the unit.
IDisassembly should be done in a clean work area. It is important to prevent the internal parts from
becoming contaminated by dirt or other foreign matter.
IPlace disassembled parts in order, on a parts rack, for easier and proper assembly.
IUse nylon cloths or paper towels to clean the parts; common shop rags can leave lint that might
interfere with their operation.
IBefore inspection or reassembly, carefully clean all parts with a general purpose, non-flammable
solvent.
IBefore assembly, apply a coat of recommended power steering fluid* to hydraulic parts. Vaseline
may be applied to O-rings and seals. Do not use any grease.
IReplace all gaskets, seals and O-rings. Avoid damaging O-rings, seals and gaskets during instal-
lation. Perform functional tests whenever designated.
*: Genuine Nissan PSF II or equivalent. Refer to MA-11, ªFluids and Lubricantsº.
PRECAUTIONS
Supplemental Restraint System (SRS) ªAIR BAGº and ªSEAT BELT PRE-TENSIONERº
ST-2