Page 2047 of 2395
SPD024
2. Loosen ring gear bolts in a criss-cross pattern.
3. Tap ring gear off the differential case with a soft hammer.
Tap evenly all around to keep ring gear from binding.
SPD025
4. Punch off pinion mate shaft lock pin from ring gear side.
SPD236A
DIFFERENTIAL SIDE SHAFTNBPD0018S041. Cut collar with cold chisel. Be careful not to damage differen-
tial side shaft.
SPD672
2. Reinstall differential side shaft into extension tube and secure
with bolts. Remove rear axle bearing by drawing out differen-
tial side shaft from rear axle bearing with puller.
FRONT FINAL DRIVER200A
Disassembly (Cont'd)
PD-22
Page 2050 of 2395

SPD194A
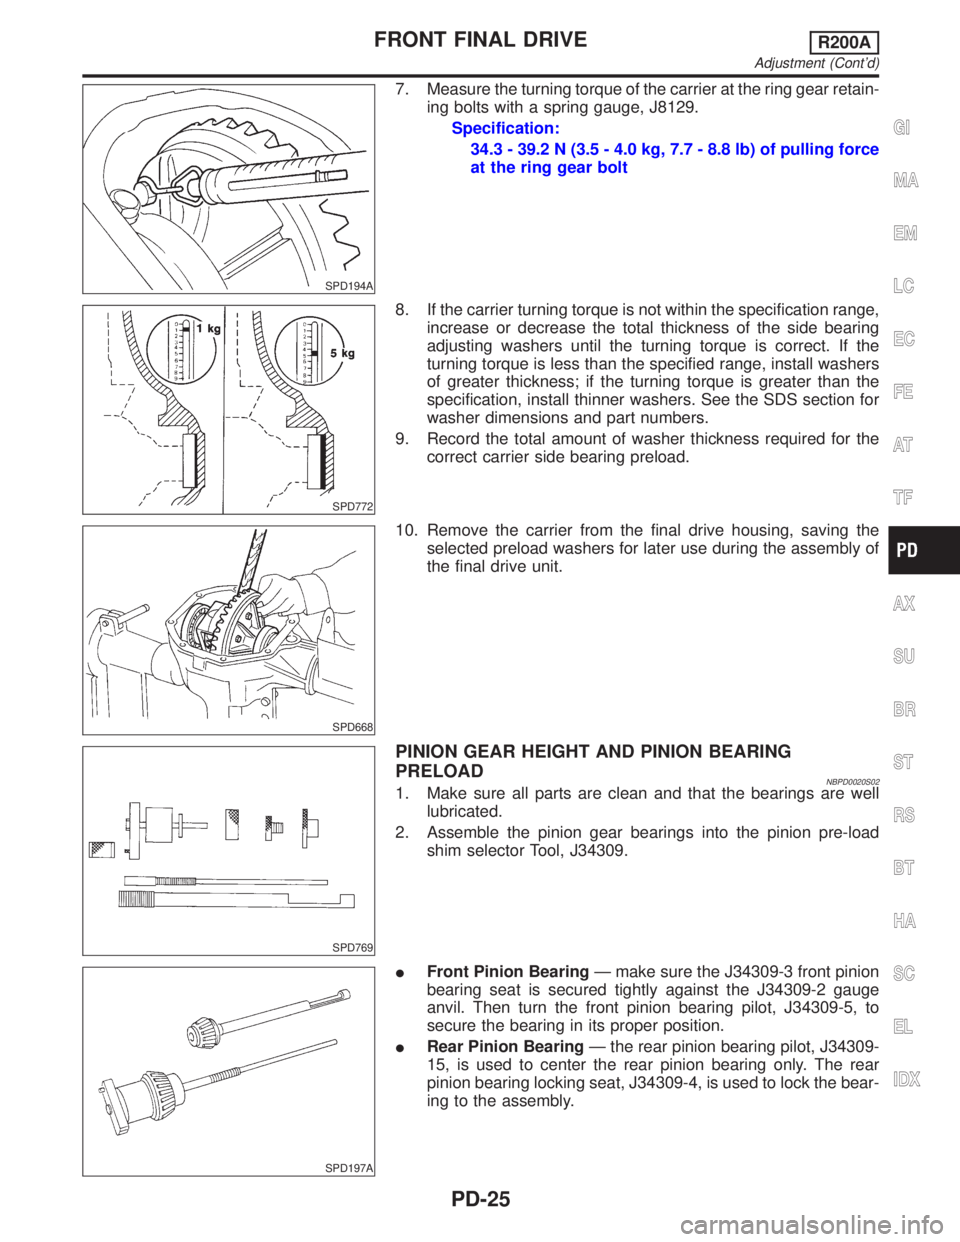
7. Measure the turning torque of the carrier at the ring gear retain-
ing bolts with a spring gauge, J8129.
Specification:
34.3 - 39.2 N (3.5 - 4.0 kg, 7.7 - 8.8 lb) of pulling force
at the ring gear bolt
SPD772
8. If the carrier turning torque is not within the specification range,
increase or decrease the total thickness of the side bearing
adjusting washers until the turning torque is correct. If the
turning torque is less than the specified range, install washers
of greater thickness; if the turning torque is greater than the
specification, install thinner washers. See the SDS section for
washer dimensions and part numbers.
9. Record the total amount of washer thickness required for the
correct carrier side bearing preload.
SPD668
10. Remove the carrier from the final drive housing, saving the
selected preload washers for later use during the assembly of
the final drive unit.
SPD769
PINION GEAR HEIGHT AND PINION BEARING
PRELOAD
NBPD0020S021. Make sure all parts are clean and that the bearings are well
lubricated.
2. Assemble the pinion gear bearings into the pinion pre-load
shim selector Tool, J34309.
SPD197A
IFront Pinion BearingÐ make sure the J34309-3 front pinion
bearing seat is secured tightly against the J34309-2 gauge
anvil. Then turn the front pinion bearing pilot, J34309-5, to
secure the bearing in its proper position.
IRear Pinion BearingÐ the rear pinion bearing pilot, J34309-
15, is used to center the rear pinion bearing only. The rear
pinion bearing locking seat, J34309-4, is used to lock the bear-
ing to the assembly.
GI
MA
EM
LC
EC
FE
AT
TF
AX
SU
BR
ST
RS
BT
HA
SC
EL
IDX
FRONT FINAL DRIVER200A
Adjustment (Cont'd)
PD-25
Page 2056 of 2395
SPD655
2. Install extension tube retainer, rear axle bearing and rear axle
shaft bearing collar on differential side shaft.
SPD552
DIFFERENTIAL CASENBPD0021S021. Install side gears, pinion mate gears and thrust washers into
differential case.
SPD258
2. Fit pinion mate shaft to differential case so that it meets lock
pin holes.
3. Adjust backlash between side gear and pinion mate gear by
selecting side gear thrust washer.
Refer to SDS, PD-36.
Backlash between side gear and pinion mate gear
(Clearance between side gear thrust washer and differ-
ential case):
Less than 0.15 mm (0.0059 in)
SPD030
4. Install pinion mate shaft lock pin with a punch.
Make sure lock pin is flush with case.
SPD322
5. Apply gear oil to gear tooth surfaces and thrust surfaces and
check to see they turn properly.
GI
MA
EM
LC
EC
FE
AT
TF
AX
SU
BR
ST
RS
BT
HA
SC
EL
IDX
FRONT FINAL DRIVER200A
Assembly (Cont'd)
PD-31
Page 2057 of 2395
SPD554
6. Install differential case assembly on ring gear.
7. Apply locking agent [Locktite (stud lock) or equivalent] to ring
gear bolts, and install them.
Tighten bolts in a criss-cross pattern, lightly tapping bolt head
with a hammer.
PD353
8. Press-fit side bearing inner cones on differential case with Tool.
Tool number:
A KV38100300 (J25523)
B ST33061000 (J8107-2)
SPD679
FINAL DRIVE HOUSINGNBPD0021S031. Press-fit front and rear bearing outer races with Tools.
Tool number:
A ST30611000 (J25742-1)
B ST30621000 (J25742-5)
C ST30613000 (J25742-3)
SPD377
2. Select drive pinion height adjusting washer and pinion bearing
adjusting washer. Refer to ªPINION GEAR HEIGHT AND PIN-
ION BEARING PRELOADº, PD-25.
3. Install drive pinion height adjusting washer in drive pinion, and
press-fit pinion rear bearing inner cone in it, using press and
Tool.
Tool number:
ST30901000 (J26010-01)
FRONT FINAL DRIVER200A
Assembly (Cont'd)
PD-32
Page 2063 of 2395

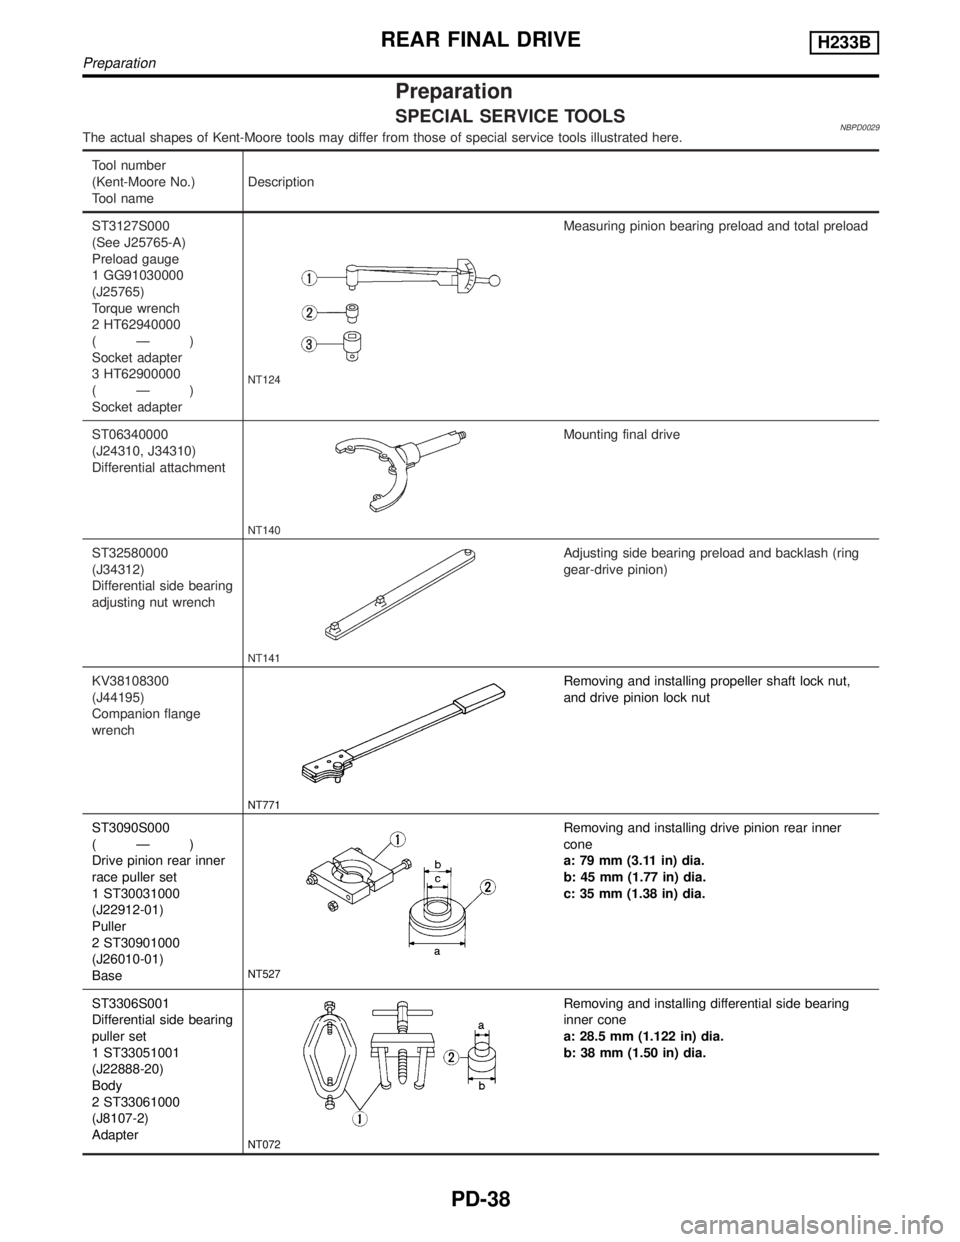
Preparation
SPECIAL SERVICE TOOLSNBPD0029The actual shapes of Kent-Moore tools may differ from those of special service tools illustrated here.
Tool number
(Kent-Moore No.)
Tool nameDescription
ST3127S000
(See J25765-A)
Preload gauge
1 GG91030000
(J25765)
Torque wrench
2 HT62940000
(Ð)
Socket adapter
3 HT62900000
(Ð)
Socket adapter
NT124
Measuring pinion bearing preload and total preload
ST06340000
(J24310, J34310)
Differential attachment
NT140
Mounting final drive
ST32580000
(J34312)
Differential side bearing
adjusting nut wrench
NT141
Adjusting side bearing preload and backlash (ring
gear-drive pinion)
KV38108300
(J44195)
Companion flange
wrench
NT771
Removing and installing propeller shaft lock nut,
and drive pinion lock nut
ST3090S000
(Ð)
Drive pinion rear inner
race puller set
1 ST30031000
(J22912-01)
Puller
2 ST30901000
(J26010-01)
Base
NT527
Removing and installing drive pinion rear inner
cone
a: 79 mm (3.11 in) dia.
b: 45 mm (1.77 in) dia.
c: 35 mm (1.38 in) dia.
ST3306S001
Differential side bearing
puller set
1 ST33051001
(J22888-20)
Body
2 ST33061000
(J8107-2)
Adapter
NT072
Removing and installing differential side bearing
inner cone
a: 28.5 mm (1.122 in) dia.
b: 38 mm (1.50 in) dia.
REAR FINAL DRIVEH233B
Preparation
PD-38
Page 2069 of 2395
SPD247
IRing gear runout
Check runout of ring gear with a dial indicator.
Runout limit:
0.08 mm (0.0031 in)
SPD004
ITooth contact
Check tooth contact. Refer to ªTOOTH CONTACTº, PD-56.
ISide gear to pinion mate gear backlash
Measure clearance between side gear thrust washer and dif-
ferential case with a feeler gauge.
Clearance between side gear thrust washer and differ-
ential case:
0.10 - 0.20 mm (0.0039 - 0.0079 in)
SPD683
DIFFERENTIAL CARRIERNBPD0033S021. Mount final drive assembly on Tool.
Tool number:
ST06340000 (J24310, J34310)
SPD249
2. Put matchmarks on one side of side bearing cap with paint or
punch to ensure that it is replaced in proper position during
reassembly.
Bearing caps are line-bored during manufacture and should
be put back in their original places.
SPD250
3. Remove side lock fingers and side bearing caps.
REAR FINAL DRIVEH233B
Disassembly (Cont'd)
PD-44
Page 2072 of 2395

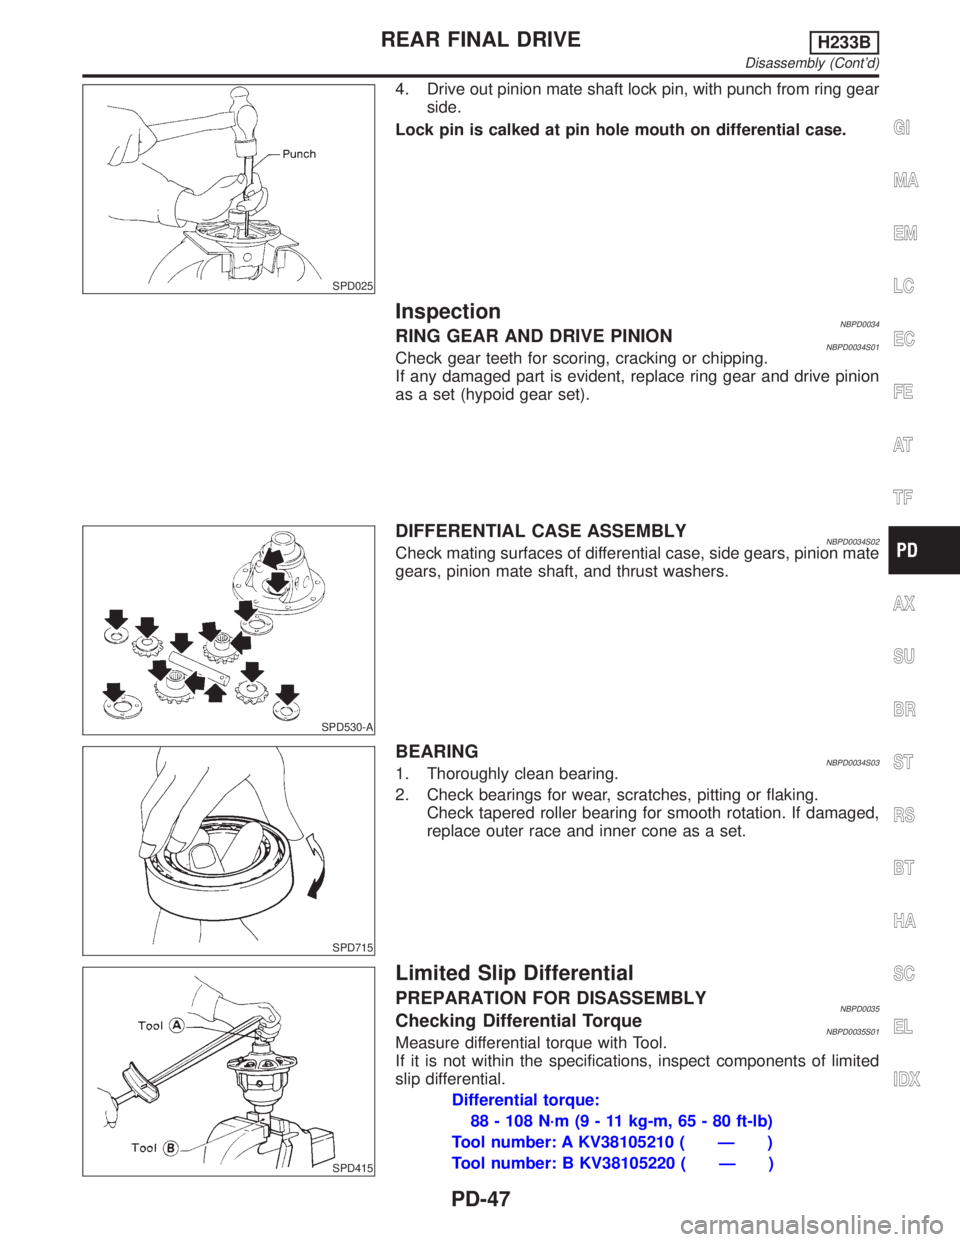
SPD025
4. Drive out pinion mate shaft lock pin, with punch from ring gear
side.
Lock pin is calked at pin hole mouth on differential case.
InspectionNBPD0034RING GEAR AND DRIVE PINIONNBPD0034S01Check gear teeth for scoring, cracking or chipping.
If any damaged part is evident, replace ring gear and drive pinion
as a set (hypoid gear set).
SPD530-A
DIFFERENTIAL CASE ASSEMBLYNBPD0034S02Check mating surfaces of differential case, side gears, pinion mate
gears, pinion mate shaft, and thrust washers.
SPD715
BEARINGNBPD0034S031. Thoroughly clean bearing.
2. Check bearings for wear, scratches, pitting or flaking.
Check tapered roller bearing for smooth rotation. If damaged,
replace outer race and inner cone as a set.
SPD415
Limited Slip Differential
PREPARATION FOR DISASSEMBLYNBPD0035Checking Differential TorqueNBPD0035S01Measure differential torque with Tool.
If it is not within the specifications, inspect components of limited
slip differential.
Differential torque:
88 - 108 N´m (9 - 11 kg-m, 65 - 80 ft-lb)
Tool number: A KV38105210 ( Ð )
Tool number: B KV38105220 ( Ð )
GI
MA
EM
LC
EC
FE
AT
TF
AX
SU
BR
ST
RS
BT
HA
SC
EL
IDX
REAR FINAL DRIVEH233B
Disassembly (Cont'd)
PD-47
Page 2078 of 2395

SPD364A
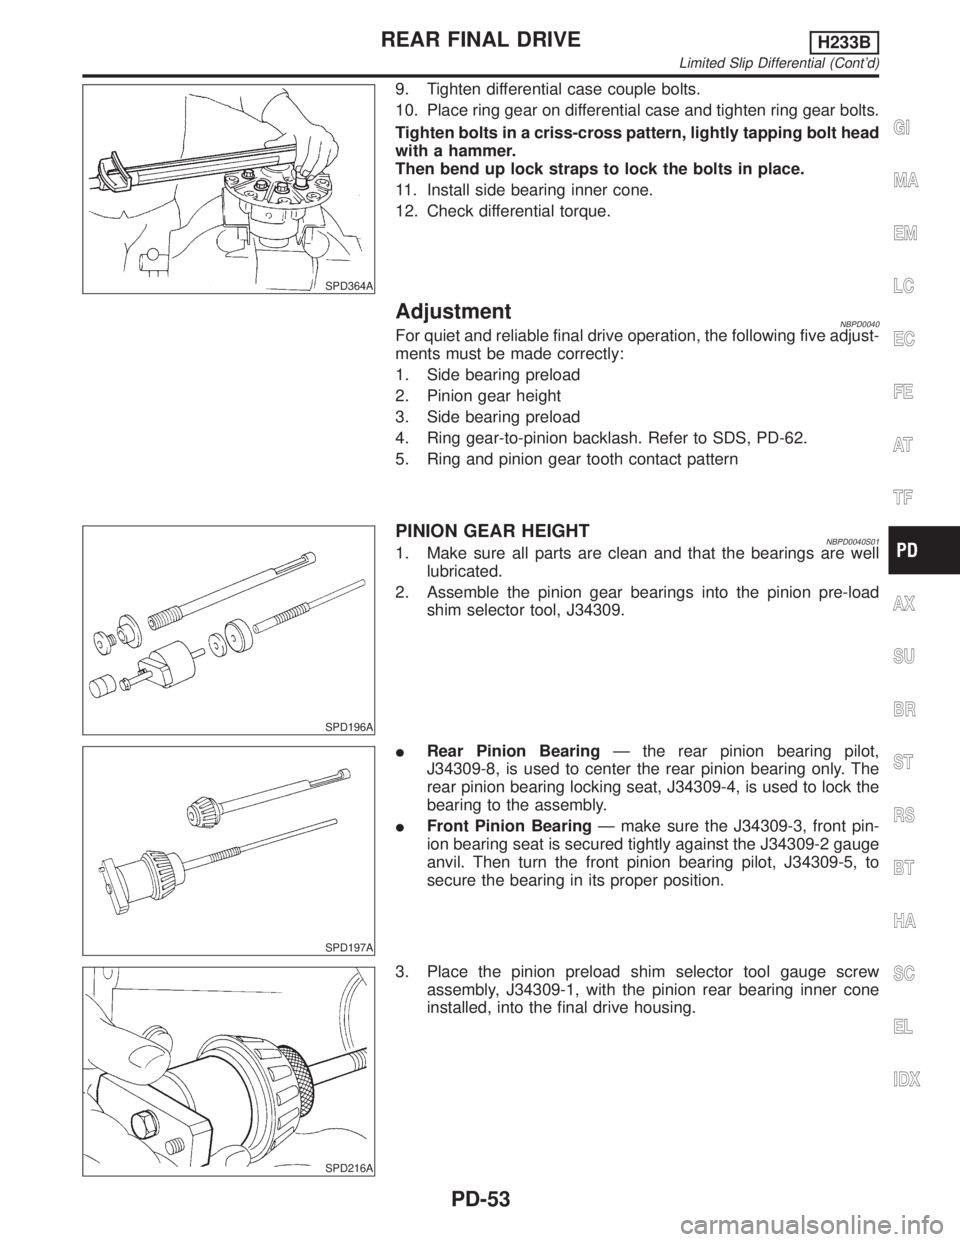
9. Tighten differential case couple bolts.
10. Place ring gear on differential case and tighten ring gear bolts.
Tighten bolts in a criss-cross pattern, lightly tapping bolt head
with a hammer.
Then bend up lock straps to lock the bolts in place.
11. Install side bearing inner cone.
12. Check differential torque.
AdjustmentNBPD0040For quiet and reliable final drive operation, the following five adjust-
ments must be made correctly:
1. Side bearing preload
2. Pinion gear height
3. Side bearing preload
4. Ring gear-to-pinion backlash. Refer to SDS, PD-62.
5. Ring and pinion gear tooth contact pattern
SPD196A
PINION GEAR HEIGHTNBPD0040S011. Make sure all parts are clean and that the bearings are well
lubricated.
2. Assemble the pinion gear bearings into the pinion pre-load
shim selector tool, J34309.
SPD197A
IRear Pinion BearingÐ the rear pinion bearing pilot,
J34309-8, is used to center the rear pinion bearing only. The
rear pinion bearing locking seat, J34309-4, is used to lock the
bearing to the assembly.
IFront Pinion BearingÐ make sure the J34309-3, front pin-
ion bearing seat is secured tightly against the J34309-2 gauge
anvil. Then turn the front pinion bearing pilot, J34309-5, to
secure the bearing in its proper position.
SPD216A
3. Place the pinion preload shim selector tool gauge screw
assembly, J34309-1, with the pinion rear bearing inner cone
installed, into the final drive housing.
GI
MA
EM
LC
EC
FE
AT
TF
AX
SU
BR
ST
RS
BT
HA
SC
EL
IDX
REAR FINAL DRIVEH233B
Limited Slip Differential (Cont'd)
PD-53