Page 1048 of 2395
Wiring DiagramNBEC0579
MEC960C
GI
MA
EM
LC
FE
AT
TF
PD
AX
SU
BR
ST
RS
BT
HA
SC
EL
IDX
DTC P1335 CRANKSHAFT POSITION SENSOR (CKPS) (REF)
Wiring Diagram
EC-513
Page 1049 of 2395
Diagnostic ProcedureNBEC0580
1 RETIGHTEN GROUND SCREWS
1. Turn ignition switch ªOFFº.
2. Loosen and retighten engine ground screws.
SEF959Y
©GO TO 2.
2 CHECK CKPS (REF) INPUT SIGNAL CIRCUIT FOR OPEN AND SHORT
1. Disconnect CKPS (REF) harness connector.
SEF011Z
2. Disconnect ECM harness connector.
3. Check harness continuity between ECM terminals 65, 75 and CKPS (REF) terminal 2. Refer to Wiring Diagram.
Continuity should exist.
4. Also check harness for short to ground and short to power.
OK or NG
OK©GO TO 4.
NG©GO TO 3.
3 DETECT MALFUNCTIONING PART
Check the following.
IHarness connectors E132, E135
IHarness connectors E116, M114 and M32, F23
IHarness for open or short between crankshaft position sensor (REF) and ECM
©Repair open circuit or short to ground or short to power in harness or connectors.
DTC P1335 CRANKSHAFT POSITION SENSOR (CKPS) (REF)
Diagnostic Procedure
EC-514
Page 1055 of 2395
Wiring DiagramNBEC0296
MEC959C
DTC P1336 CRANKSHAFT POSITION SENSOR (CKPS) (POS) (COG)
Wiring Diagram
EC-520
Page 1057 of 2395

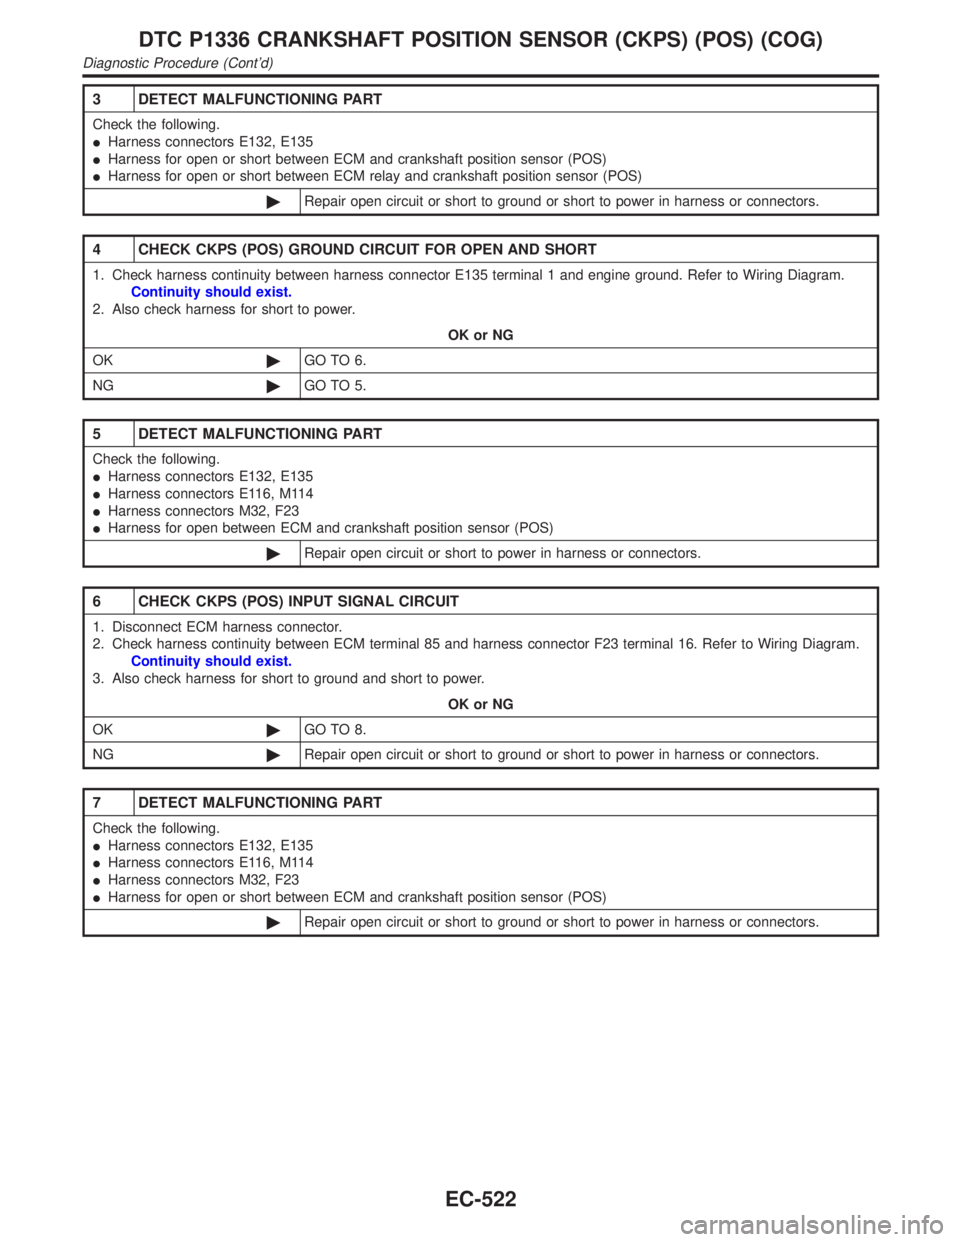
3 DETECT MALFUNCTIONING PART
Check the following.
IHarness connectors E132, E135
IHarness for open or short between ECM and crankshaft position sensor (POS)
IHarness for open or short between ECM relay and crankshaft position sensor (POS)
©Repair open circuit or short to ground or short to power in harness or connectors.
4 CHECK CKPS (POS) GROUND CIRCUIT FOR OPEN AND SHORT
1. Check harness continuity between harness connector E135 terminal 1 and engine ground. Refer to Wiring Diagram.
Continuity should exist.
2. Also check harness for short to power.
OK or NG
OK©GO TO 6.
NG©GO TO 5.
5 DETECT MALFUNCTIONING PART
Check the following.
IHarness connectors E132, E135
IHarness connectors E116, M114
IHarness connectors M32, F23
IHarness for open between ECM and crankshaft position sensor (POS)
©Repair open circuit or short to power in harness or connectors.
6 CHECK CKPS (POS) INPUT SIGNAL CIRCUIT
1. Disconnect ECM harness connector.
2. Check harness continuity between ECM terminal 85 and harness connector F23 terminal 16. Refer to Wiring Diagram.
Continuity should exist.
3. Also check harness for short to ground and short to power.
OK or NG
OK©GO TO 8.
NG©Repair open circuit or short to ground or short to power in harness or connectors.
7 DETECT MALFUNCTIONING PART
Check the following.
IHarness connectors E132, E135
IHarness connectors E116, M114
IHarness connectors M32, F23
IHarness for open or short between ECM and crankshaft position sensor (POS)
©Repair open circuit or short to ground or short to power in harness or connectors.
DTC P1336 CRANKSHAFT POSITION SENSOR (CKPS) (POS) (COG)
Diagnostic Procedure (Cont'd)
EC-522
Page 1059 of 2395

10 CHECK CRANKSHAFT POSITION SENSOR (POS)
1. Disconnect crankshaft position sensor (POS) harness connector.
2. Loosen the fixing bolt of the sensor.
3. Remove the sensor.
4. Visually check the sensor for chipping.
SEF981Y
OK or NG
OK©GO TO 11.
NG©Replace crankshaft position sensor (POS).
11 CHECK CRANKSHAFT POSITION SENSOR (POS)-II
1. Reconnect harness connectors disconnected.
2. Turn ignition switch ON.
3. Check voltage between ECM terminal 85 and ground by briefly touching the sensor core with a flat-bladed screwdriver.
SEF343Z
OK or NG
OK©GO TO 12.
NG©Replace crankshaft position sensor (POS).
12 CHECK CKPS (POS) SHIELD CIRCUIT FOR OPEN AND SHORT
1. Disconnect harness connectors E132, E135.
2. Check harness continuity between harness connector E135 terminal 2 and engine ground. Refer to Wiring Diagram.
Continuity should exist.
3. Also check harness for short to power.
OK or NG
OK©GO TO 14.
NG©GO TO 13.
DTC P1336 CRANKSHAFT POSITION SENSOR (CKPS) (POS) (COG)
Diagnostic Procedure (Cont'd)
EC-524
Page 1079 of 2395
Wiring DiagramNBEC0324
MEC962C
DTC P1444 EVAP CANISTER PURGE VOLUME CONTROL SOLENOID VALVE
Wiring Diagram
EC-544
Page 1080 of 2395

Diagnostic ProcedureNBEC0325
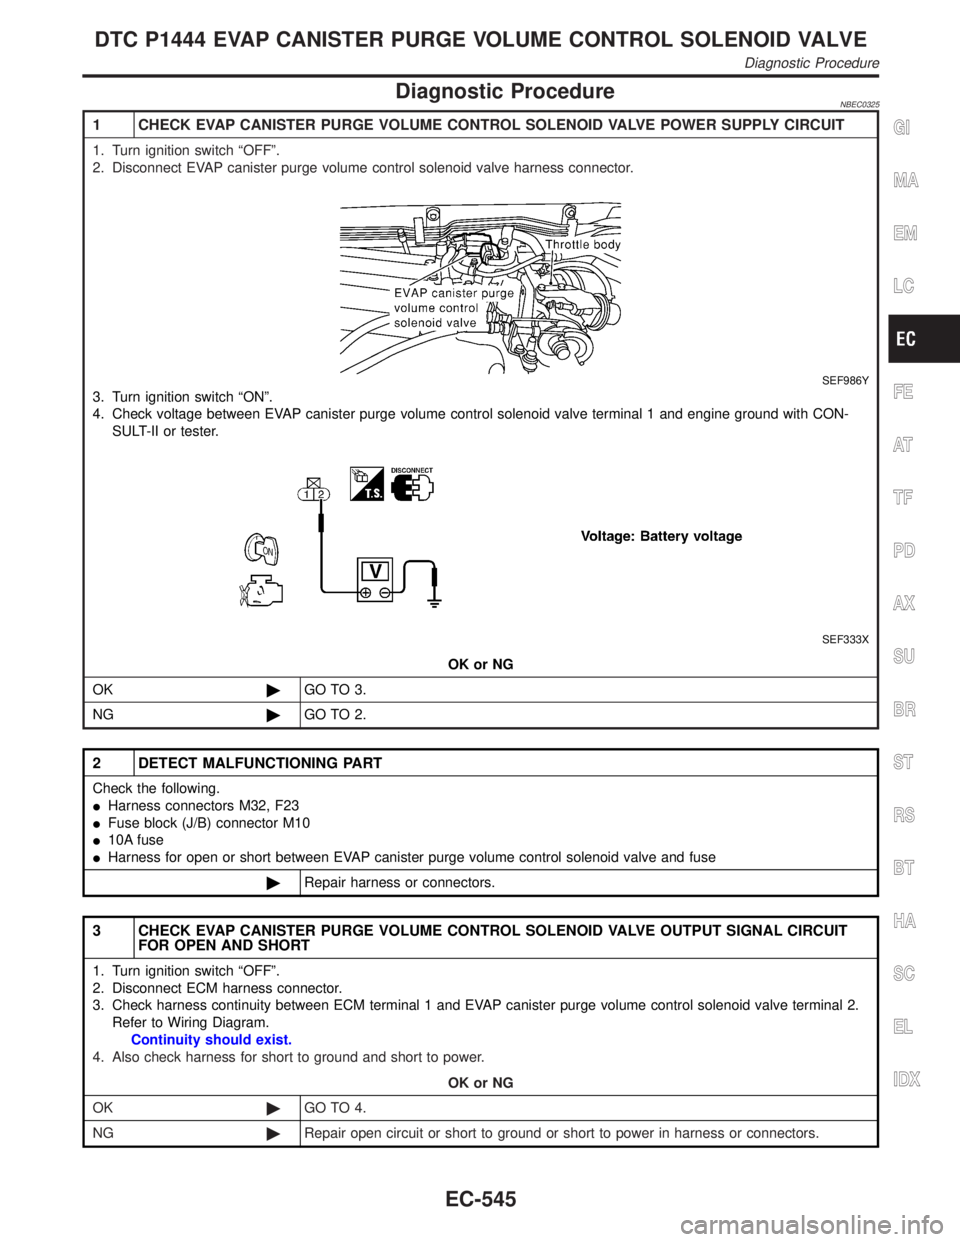
1 CHECK EVAP CANISTER PURGE VOLUME CONTROL SOLENOID VALVE POWER SUPPLY CIRCUIT
1. Turn ignition switch ªOFFº.
2. Disconnect EVAP canister purge volume control solenoid valve harness connector.
SEF986Y
3. Turn ignition switch ªONº.
4. Check voltage between EVAP canister purge volume control solenoid valve terminal 1 and engine ground with CON-
SULT-II or tester.
SEF333X
OK or NG
OK©GO TO 3.
NG©GO TO 2.
2 DETECT MALFUNCTIONING PART
Check the following.
IHarness connectors M32, F23
IFuse block (J/B) connector M10
I10A fuse
IHarness for open or short between EVAP canister purge volume control solenoid valve and fuse
©Repair harness or connectors.
3 CHECK EVAP CANISTER PURGE VOLUME CONTROL SOLENOID VALVE OUTPUT SIGNAL CIRCUIT
FOR OPEN AND SHORT
1. Turn ignition switch ªOFFº.
2. Disconnect ECM harness connector.
3. Check harness continuity between ECM terminal 1 and EVAP canister purge volume control solenoid valve terminal 2.
Refer to Wiring Diagram.
Continuity should exist.
4. Also check harness for short to ground and short to power.
OK or NG
OK©GO TO 4.
NG©Repair open circuit or short to ground or short to power in harness or connectors.
GI
MA
EM
LC
FE
AT
TF
PD
AX
SU
BR
ST
RS
BT
HA
SC
EL
IDX
DTC P1444 EVAP CANISTER PURGE VOLUME CONTROL SOLENOID VALVE
Diagnostic Procedure
EC-545
Page 1090 of 2395
Wiring DiagramNBEC0331
MEC963C
GI
MA
EM
LC
FE
AT
TF
PD
AX
SU
BR
ST
RS
BT
HA
SC
EL
IDX
DTC P1446 EVAPORATIVE EMISSION (EVAP) CANISTER VENT CONTROL
VALVE (CLOSE)
Wiring Diagram
EC-555