2001 INFINITI QX4 lock
[x] Cancel search: lockPage 1190 of 2395
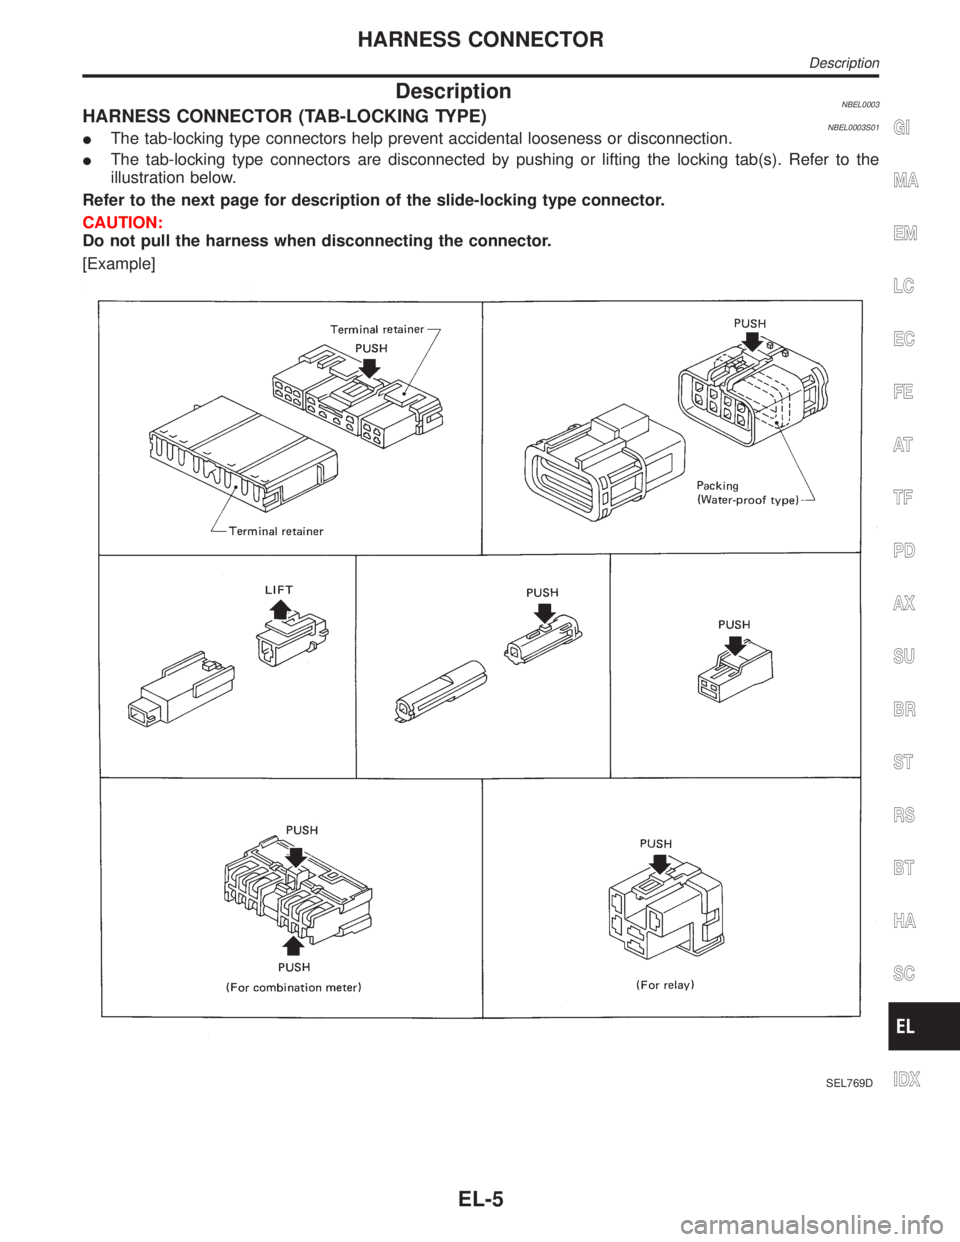
DescriptionNBEL0003HARNESS CONNECTOR (TAB-LOCKING TYPE)NBEL0003S01IThe tab-locking type connectors help prevent accidental looseness or disconnection.
IThe tab-locking type connectors are disconnected by pushing or lifting the locking tab(s). Refer to the
illustration below.
Refer to the next page for description of the slide-locking type connector.
CAUTION:
Do not pull the harness when disconnecting the connector.
[Example]
SEL769D
GI
MA
EM
LC
EC
FE
AT
TF
PD
AX
SU
BR
ST
RS
BT
HA
SC
IDX
HARNESS CONNECTOR
Description
EL-5
Page 1191 of 2395
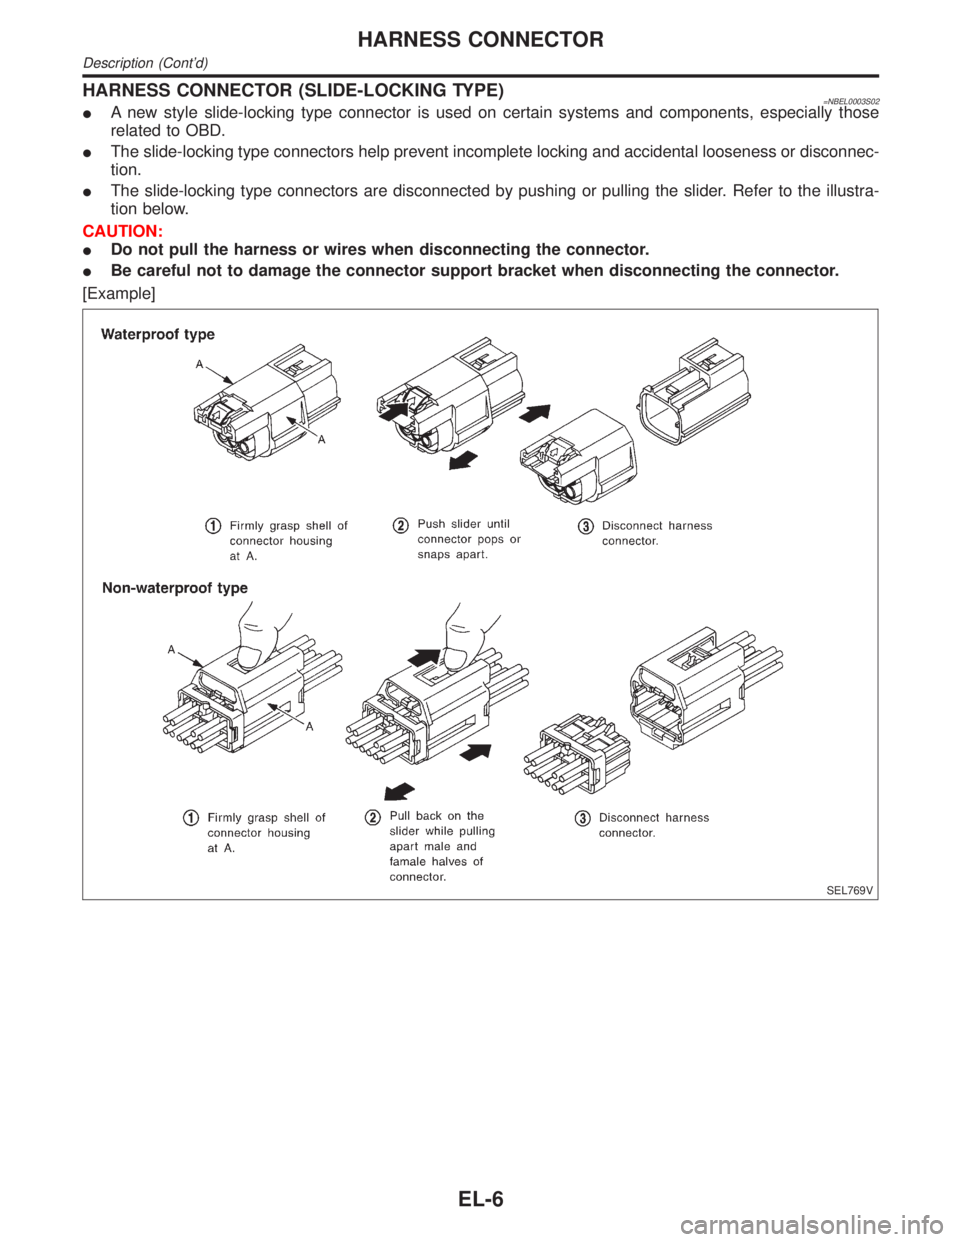
HARNESS CONNECTOR (SLIDE-LOCKING TYPE)=NBEL0003S02IA new style slide-locking type connector is used on certain systems and components, especially those
related to OBD.
IThe slide-locking type connectors help prevent incomplete locking and accidental looseness or disconnec-
tion.
IThe slide-locking type connectors are disconnected by pushing or pulling the slider. Refer to the illustra-
tion below.
CAUTION:
IDo not pull the harness or wires when disconnecting the connector.
IBe careful not to damage the connector support bracket when disconnecting the connector.
[Example]
SEL769V
HARNESS CONNECTOR
Description (Cont'd)
EL-6
Page 1216 of 2395

Component Parts and Harness Connector
Location
NBEL0159
SEL460X
System DescriptionNBEL0188The headlamp operation is controlled by the lighting switch which is built into the combination switch and
headlamp battery saver control unit. And the headlamp battery saver system is controlled by the headlamp
battery saver control unit and smart entrance control unit.
OUTLINENBEL0188S01Power is supplied at all times
Ito headlamp LH relay terminals 1 and 3
Ithrough 15A fuse (No. 60, located in the fuse and fusible link box), and
Ito headlamp LH relay terminal 6
Ithrough 20A fuse (No. 32, located in the fuse and fusible link box), and
Ito headlamp RH relay terminals 1 and 3
Ithrough 15A fuse (No. 59, located in the fuse and fusible link box), and
Ito headlamp RH relay terminal 6
Ithrough 20A fuse (No. 31, located in the fuse and fusible link box), and
Ito headlamp battery saver control unit terminal 7, and
Ito smart entrance control unit terminal 10
Ithrough 7.5A fuse [No. 24, located in the fuse block (J/B)].
When the ignition switch is in the ON or START position, power is supplied
Ito headlamp battery saver control unit terminal 1
Ithrough 10A fuse [No. 16, located in the fuse block (J/B)], and
Ito headlamp battery saver control unit terminal 10,
Ito auto light control unit terminal 1 and
Ito smart entrance control unit terminal 33
Ithrough 7.5A fuse [No. 11, located in the fuse block (J/B)].
GI
MA
EM
LC
EC
FE
AT
TF
PD
AX
SU
BR
ST
RS
BT
HA
SC
IDX
HEADLAMP (FOR USA) Ð XENON TYPE Ð
Component Parts and Harness Connector Location
EL-31
Page 1217 of 2395
![INFINITI QX4 2001 Factory Service Manual When the ignition switch is in the ACC or ON position, power is supplied
Ito auto light control unit terminal 2
Ithrough 10A fuse [No. 9, located in the fuse block (J/B)]
Ground is supplied
Ito headla INFINITI QX4 2001 Factory Service Manual When the ignition switch is in the ACC or ON position, power is supplied
Ito auto light control unit terminal 2
Ithrough 10A fuse [No. 9, located in the fuse block (J/B)]
Ground is supplied
Ito headla](/manual-img/42/57027/w960_57027-1216.png)
When the ignition switch is in the ACC or ON position, power is supplied
Ito auto light control unit terminal 2
Ithrough 10A fuse [No. 9, located in the fuse block (J/B)]
Ground is supplied
Ito headlamp battery saver control unit terminals 4 and 11
Ithrough body grounds M77 and M111, and M4,M66 and M147
Ito auto light control unit terminal 5
Ithrough body grounds M4, M66 and M147.
Power Supply to Low Beam and High BeamNBEL0188S0101When lighting switch is in 2ND or PASS position, ground is supplied
Ito headlamp relay (LH and RH) terminal 2 from headlamp battery saver control unit terminals 2 and 8
Ithrough headlamp battery saver control unit terminals 3 and 9,
Ifrom lighting switch terminal 12.
Headlamp relays (LH and RH) are energized and then power is supplied to headlamps (LH and RH).
LOW BEAM OPERATIONNBEL0188S02When the lighting switch is turned to the 2ND position and placed in LOW (ªBº) position, power is supplied
Ifrom terminal 7 of each headlamp relay
Ito terminal 3 of each headlamp
Ground is supplied
Ito terminal 4 of each headlamp
Ithrough body grounds E13 and E41.
With power and ground supplied, the headlamp(s) will illuminate.
HIGH BEAM OPERATION/FLASH-TO-PASS OPERATIONNBEL0188S03When the lighting switch is turned to the 2ND position and placed in HIGH (ªAº) position or PASS (ªCº) position,
power is supplied
Ifrom terminal 5 of headlamp LH relay
Ito terminal 1 of headlamp LH, and
Ito combination meter terminal 26 for the HIGH BEAM indicator
Ifrom terminal 5 of headlamp RH relay
Ito terminal 1 of headlamp RH.
Ground is supplied
Ito headlamp LH terminal 2
Ito combination meter terminal 27 for the HIGH BEAM indicator
Ithrough lighting switch terminals 6 and 5
Ithrough body grounds E13 and E41, and
Ito headlamp RH terminal 2
Ithrough lighting switch terminals 9 and 8
Ithrough body grounds E13 and E41.
With power and ground supplied, the high beams and the high beam indicator illuminate.
BATTERY SAVER CONTROLNBEL0188S04When the ignition switch is turned from ON (or START) to OFF (or ACC) positions while headlamps illuminate,
the RAP signal is supplied to terminal 10 of the headlamp battery saver control unit from smart entrance con-
trol unit terminal 5.
After counting 45 seconds by the RAP signal from the smart entrance control unit to headlamp battery saver
control unit, the ground supply to terminal 2 of the headlamp LH and RH relay from headlamp battery saver
control unit terminals 2 and 8 is terminated.
Then the headlamps are turned off.
The headlamps are turned off when driver or passenger side door is opened even if 45 seconds have not
passed after ignition switch is turned from ON (or START) to OFF (or ACC) positions while headlamps are
illuminated.
When the lighting switch is turned from OFF to 2ND after headlamps are turned to off by the battery saver
control, ground is supplied
HEADLAMP (FOR USA) Ð XENON TYPE Ð
System Description (Cont'd)
EL-32
Page 1225 of 2395
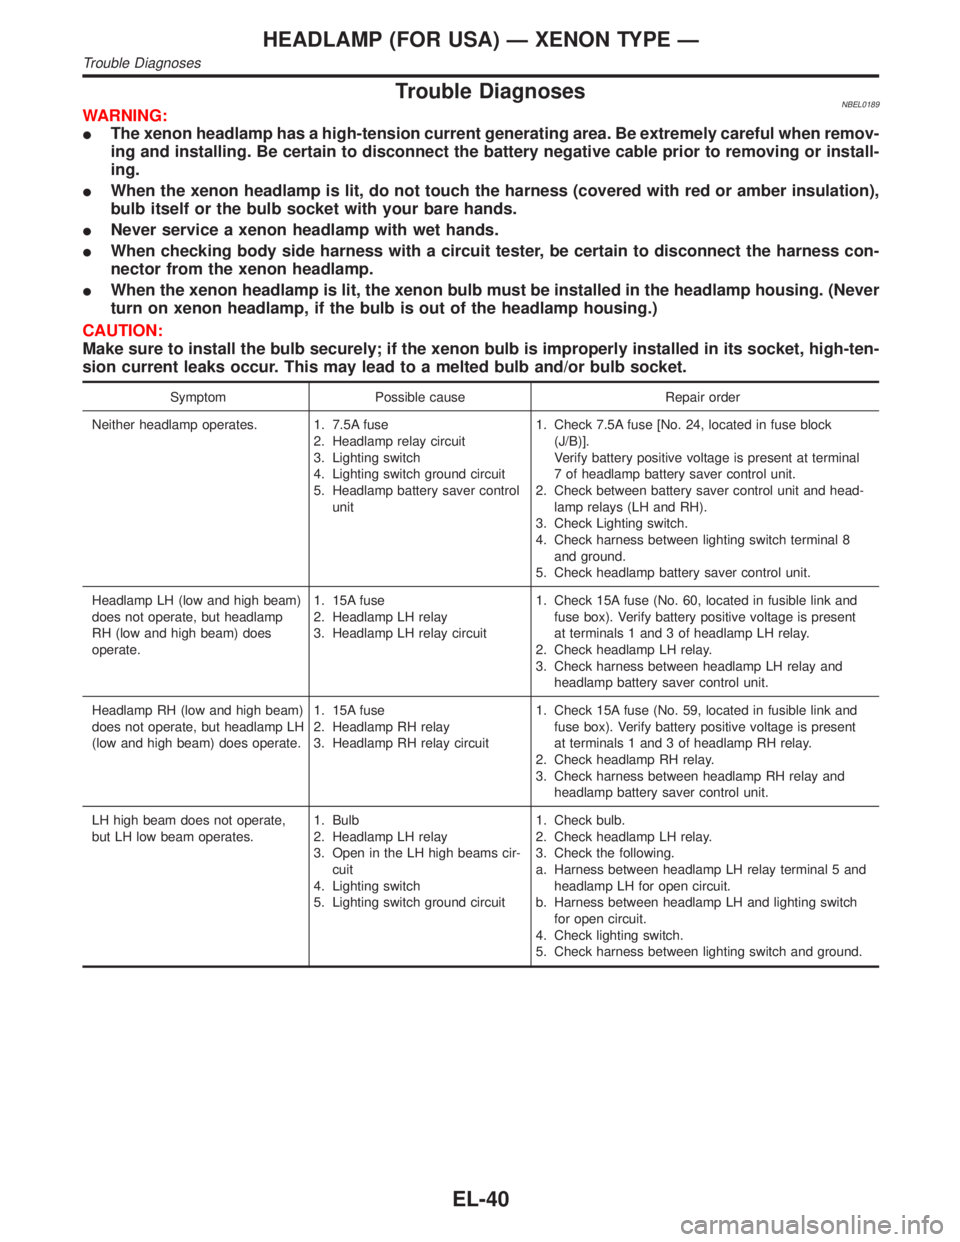
Trouble DiagnosesNBEL0189WARNING:
IThe xenon headlamp has a high-tension current generating area. Be extremely careful when remov-
ing and installing. Be certain to disconnect the battery negative cable prior to removing or install-
ing.
IWhen the xenon headlamp is lit, do not touch the harness (covered with red or amber insulation),
bulb itself or the bulb socket with your bare hands.
INever service a xenon headlamp with wet hands.
IWhen checking body side harness with a circuit tester, be certain to disconnect the harness con-
nector from the xenon headlamp.
IWhen the xenon headlamp is lit, the xenon bulb must be installed in the headlamp housing. (Never
turn on xenon headlamp, if the bulb is out of the headlamp housing.)
CAUTION:
Make sure to install the bulb securely; if the xenon bulb is improperly installed in its socket, high-ten-
sion current leaks occur. This may lead to a melted bulb and/or bulb socket.
Symptom Possible cause Repair order
Neither headlamp operates. 1. 7.5A fuse
2. Headlamp relay circuit
3. Lighting switch
4. Lighting switch ground circuit
5. Headlamp battery saver control
unit1. Check 7.5A fuse [No. 24, located in fuse block
(J/B)].
Verify battery positive voltage is present at terminal
7 of headlamp battery saver control unit.
2. Check between battery saver control unit and head-
lamp relays (LH and RH).
3. Check Lighting switch.
4. Check harness between lighting switch terminal 8
and ground.
5. Check headlamp battery saver control unit.
Headlamp LH (low and high beam)
does not operate, but headlamp
RH (low and high beam) does
operate.1. 15A fuse
2. Headlamp LH relay
3. Headlamp LH relay circuit1. Check 15A fuse (No. 60, located in fusible link and
fuse box). Verify battery positive voltage is present
at terminals 1 and 3 of headlamp LH relay.
2. Check headlamp LH relay.
3. Check harness between headlamp LH relay and
headlamp battery saver control unit.
Headlamp RH (low and high beam)
does not operate, but headlamp LH
(low and high beam) does operate.1. 15A fuse
2. Headlamp RH relay
3. Headlamp RH relay circuit1. Check 15A fuse (No. 59, located in fusible link and
fuse box). Verify battery positive voltage is present
at terminals 1 and 3 of headlamp RH relay.
2. Check headlamp RH relay.
3. Check harness between headlamp RH relay and
headlamp battery saver control unit.
LH high beam does not operate,
but LH low beam operates.1. Bulb
2. Headlamp LH relay
3. Open in the LH high beams cir-
cuit
4. Lighting switch
5. Lighting switch ground circuit1. Check bulb.
2. Check headlamp LH relay.
3. Check the following.
a. Harness between headlamp LH relay terminal 5 and
headlamp LH for open circuit.
b. Harness between headlamp LH and lighting switch
for open circuit.
4. Check lighting switch.
5. Check harness between lighting switch and ground.
HEADLAMP (FOR USA) Ð XENON TYPE Ð
Trouble Diagnoses
EL-40
Page 1229 of 2395
SEL461X
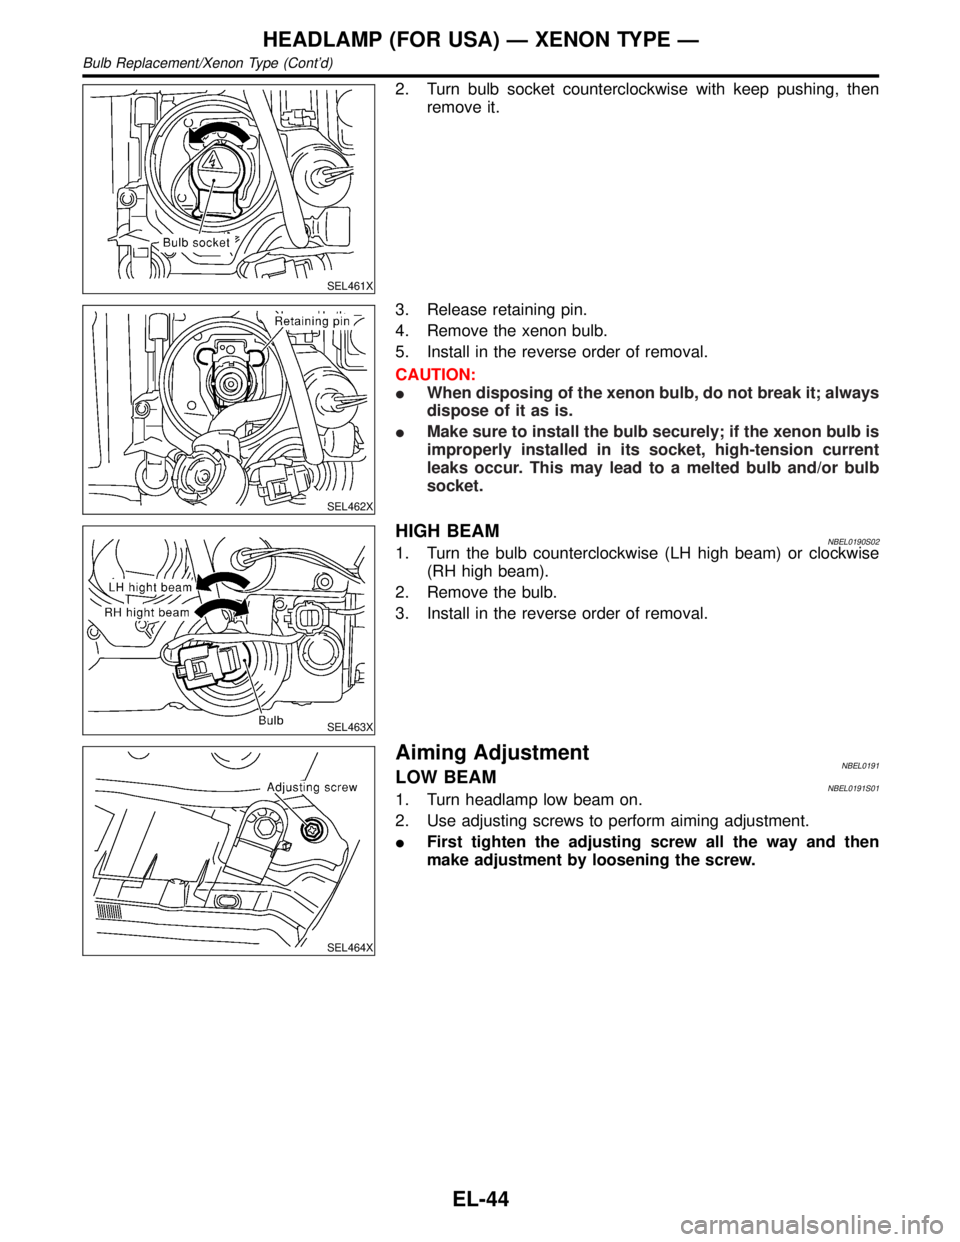
2. Turn bulb socket counterclockwise with keep pushing, then
remove it.
SEL462X
3. Release retaining pin.
4. Remove the xenon bulb.
5. Install in the reverse order of removal.
CAUTION:
IWhen disposing of the xenon bulb, do not break it; always
dispose of it as is.
IMake sure to install the bulb securely; if the xenon bulb is
improperly installed in its socket, high-tension current
leaks occur. This may lead to a melted bulb and/or bulb
socket.
SEL463X
HIGH BEAMNBEL0190S021. Turn the bulb counterclockwise (LH high beam) or clockwise
(RH high beam).
2. Remove the bulb.
3. Install in the reverse order of removal.
SEL464X
Aiming AdjustmentNBEL0191LOW BEAMNBEL0191S011. Turn headlamp low beam on.
2. Use adjusting screws to perform aiming adjustment.
IFirst tighten the adjusting screw all the way and then
make adjustment by loosening the screw.
HEADLAMP (FOR USA) Ð XENON TYPE Ð
Bulb Replacement/Xenon Type (Cont'd)
EL-44
Page 1231 of 2395

Component Parts and Harness Connector
Location
NBEL0161
SEL460X
System DescriptionNBEL0192The headlamp system for Canada vehicles contains a daytime light control unit that activates the high beam
headlamps at approximately half illumination whenever the engine is running. If the parking brake is applied
before the engine is started the daytime lights will not be illuminated. The daytime lights will illuminate once
the parking brake is released. Thereafter, the daytime lights will continue to operate when the parking brake
is applied.
And battery saver system is controlled by the headlamp battery saver control unit and smart entrance control
unit.
Power is supplied at all times
Ito headlamp LH relay terminals 1 and 3
Ithrough 15A fuse (No. 60, located in the fuse and fusible link box), and
Ito headlamp LH relay terminal 6
Ithrough 20A fuse (No. 32, located in the fuse and fusible link box), and
Ito headlamp RH relay terminals 1 and 3
Ithrough 15A fuse (No. 59, located in the fuse and fusible link box), and
Ito headlamp RH relay terminal 6
Ithrough 20A fuse (No. 31, located in the fuse and fusible link box), and
Ito headlamp battery saver control unit terminal 7, and
Ito smart entrance control unit terminal 10
Ithrough 7.5A fuse [No. 24, located in the fuse block (J/B)].
Ground is supplied
Ito daytime light control unit terminal 16,
Ito auto light control unit terminal 5 and
Ito headlamp battery saver control unit terminals 4 and 11.
When the ignition switch is in the ON or START position, power is also supplied
HEADLAMP (FOR CANADA) Ð DAYTIME LIGHT SYSTEM Ð
Component Parts and Harness Connector Location
EL-46
Page 1232 of 2395
Ito daytime light control unit terminal 3,
Ito auto light control unit terminal 1,
Ito headlamp battery saver control unit terminal 10, and
Ito smart entrance control unit terminal 33
Ithrough 7.5A fuse [No. 11, located in the fuse block (J/B)], and
Ito headlamp battery saver control unit terminal 1
Ithrough 10A fuse [No. 16, located in the fuse block (J/B)].
When the ignition switch is in the START position, power is supplied
Ito daytime light control unit terminal 2
Ithrough 7.5A fuse [No. 26, located in the fuse block (J/B)].
When the ignition switch is in the ACC or ON position, power is supplied
Ito auto light control unit terminal 2
Ithrough 10A fuse [No. 9, located in the fuse block (J/B)].
HEADLAMP OPERATIONNBEL0192S01Power Supply to Low Beam and High BeamNBEL0192S0101When lighting switch is in 2ND or PASS position, ground is supplied
Ito headlamp relay (LH and RH) terminal 2 from headlamp battery saver control unit terminals 2 and 8
Ithrough headlamp battery saver control unit terminal 3 and 9
Ifrom lighting switch terminal 12.
Headlamp relays (LH and RH) are energized.
Low Beam OperationNBEL0192S0102When the lighting switch is turned to 2ND and LOW (ªBº) positions, power is supplied
Ifrom terminal 7 of each headlamp relay
Ito terminal 3 of each headlamp
Ground is supplied
Ito terminal 4 of each headlamp
Ithrough body grounds E13 and E41.
With power and ground supplied, the low beam headlamps illuminate.
High Beam Operation/Flash-to-pass OperationNBEL0192S0103When the lighting switch is turned to 2ND and HIGH (ªAº) or PASS (ªCº) positions, power is supplied
Ito terminal 1 of headlamp LH
Ithrough daytime light control unit terminals 6 and 5
Ifrom headlamp LH relay terminal 5
Ito terminal 1 of headlamp RH
Ithrough daytime light control unit terminals 7 and 4
Ifrom headlamp RH relay terminal 5, and
Ito combination meter terminal 26 for HIGH BEAM indicator
Ifrom headlamp LH relay terminal 5.
Ground is supplied
Ito terminal 2 of LH headlamp
Ithrough daytime light control unit terminals 10 and 13, and
Ito combination meter terminal 27 for the HIGH BEAM indicator
Ithrough lighting switch terminals 6 and 5
Ithrough body grounds E13 and E41, and
Ito terminal 2 of RH headlamp
Ithrough daytime light control unit terminals 9 and 14
Ithrough lighting switch terminals 9 and 8
Ithrough body grounds E13 and E41.
With power and ground supplied, the high beam headlamps and HIGH BEAM indicator illuminate.
GI
MA
EM
LC
EC
FE
AT
TF
PD
AX
SU
BR
ST
RS
BT
HA
SC
IDX
HEADLAMP (FOR CANADA) Ð DAYTIME LIGHT SYSTEM Ð
System Description (Cont'd)
EL-47