Page 255 of 363
When the coolant stops draining,
tightenthedrainplugatthe
bottom of the radiator.
Tighten the drain bolt at the rear
of the engine cylinder block
securely.
Tightening torque:
Remove the reserve tank f rom its
holder by pulling it straight up.
Drain the coolant, then put the
tank back in its holder.
Install a rubber hose on the drain
bolt in the back of the engine
block. Loosen the drain bolt. 6.
4. 5. 7.
Cooling Syst em
Maint enance
256
RREESSEERRVVEETTAANNKKRREESSEERRVVEETTAANNKKCCAAPP
HHOOLLDDEERR 7 lbf·ft (10 N·m , 1.0 kgf·m)
Page 262 of 363
Disconnect the clip f rom the bolt
on the air cleaner housing, then
remove the air cleaner housing
cover.Place the new air cleaner element
in the air cleaner housing.
Reinstall the air cleaner housing
cover. Reinstall the clip on the
bolt; make sure the clip is under
the washer. Tighten the f our bolts.
Reinstall the air intake cover.
Reinstall the two pins and secure
thembypushingontheheads
until they lock.
The coolant lines inside the air
cleaner housing may be warm.
Caref ully clean the inside of the
air cleaner housing with a damp
rag.
Remove the old air cleaner
element.
Do not open the hot air valve when
cleaning the inside of the air cleanerhousing.
3. 4. 6. 7.
5. 8.
A ir Cleaner Element
Maint enance263
CCLLIIPPAAIIRRCCLLEEAANNEERREELLEEMMEENNTTHHOOTTAAIIRRVVAALLVVEE
Page 265 of 363
�´ �µ
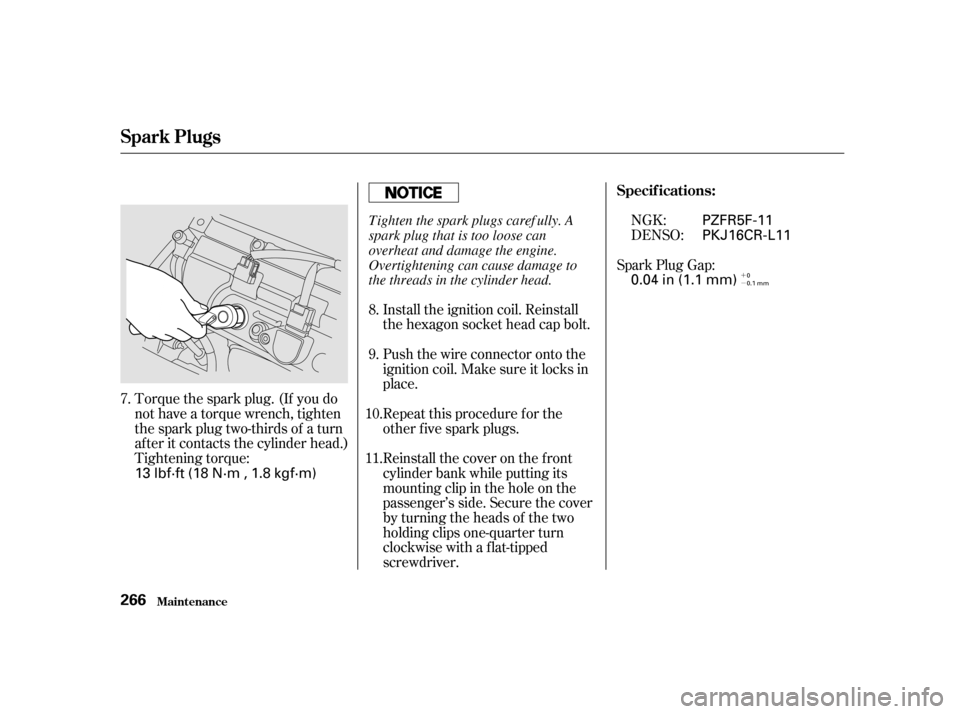
Torque the spark plug. (If you do
not have a torque wrench, tighten
the spark plug two-thirds of a turn
af ter it contacts the cylinder head.)
Tightening torque: Spark Plug Gap:
Install the ignition coil. Reinstall
the hexagon socket head cap bolt.
Push the wire connector onto the
ignition coil. Make sure it locks in
place.
Repeat this procedure f or the
other f ive spark plugs.
Reinstall the cover on the front
cylinder bank while putting its
mounting clip in the hole on the
passenger’s side. Secure the cover
by turning the heads of the two
holding clips one-quarter turn
clockwise with a f lat-tipped
screwdriver. NGK:
DENSO:
7. 8. 9.
10. 11. Specif ications:
Spark Plugs
Maint enance
266 13 lbf·ft (18 N·m , 1.8 kgf·m) 0.04 in (1.1 mm)
PKJ16CR-L11
PZFR5F-11
0
0.1 mm
Tighten the spark plugs caref ully. A
spark plug that is too loose can
overheat and damage the engine.
Overtightening can cause damage to
the threads in the cylinder head.
Page 286 of 363
CONT INUED
Put the socket back into the light
assembly and turn it clockwise to
lock it in place.
Test the light to make sure the
new bulb is working.
Put the light assembly back into
the tailgate. Install the screw and
tighten it securely. Reinstall the
lens piece.Remove the license light assembly
by caref ully prying on the lef t
edge of the lens with a f lat-tip
screwdriver and pulling the
assembly out.Remove the lens f rom the bulb
holder by pulling the lens while
squeezing the tabs on both sides
of the holder.
Pull the bulb straight out of its
socket. Push the new bulb in until
it bottoms in the socket.
2. 3.
6. 7. 8.
1.
Lights
Maint enance
Replacing a Rear License Plate Bulb
287
Page 293 of 363

Frequent washing helps preserve
your vehicle’s beauty. Dirt and grit
can scratch the paint, while tree sap
and bird droppings can permanently
ruin the f inish.
Wash your vehicle in a shady area,
not in direct sunlight. If the vehicle is
parked in the sun, move it into the
shade and let the exterior cool down
bef ore you start.When you have washed and rinsed
the whole exterior, dry it with a
chamois or sof t towel. Letting it
air-dry will cause dulling and water
spots.
As you dry the vehicle, inspect it f or
chips and scratches that could allow
corrosion to start. Repair them with
touch-up paint (see page ).
Rinse the vehicle thoroughly with
cool water to remove loose dirt.
Only use the solvents and cleaners
recommendedinthisOwner’s
Manual. Fill a bucket with cool water. Mix
in a mild detergent, such as
dishwashing liquid or a product
made especially f or car washing.
Wash the vehicle using the water
and detergent solution and a sof t-
bristle brush, sponge, or sof t cloth.
Start at the top and work your way
down. Rinse f requently.
Check the body f or road tar, tree
sap, etc. Remove these stains with
tar remover or turpentine. Rinse it
of f immediately so it does not
harm the f inish. Remember to re-
wax these areas, even if the rest of
the vehicle does not need waxing.
295
Exterior Care
Appearance Care
Washing 294
Chemical solvents and strong cleaners
can damage the paint, metal, and
plastic on your vehicle.
The radio antenna on your vehicle does
not need to be removed when you use a
‘‘drive-through’’ car wash. However, if
you remove the antenna, make sure to
reinstall it and tighten it securely using
an appropriate tool.
Page 297 of 363
Clean the windows, inside and out,
with a commercially-available glass
cleaner. You can also use a mixture
of one part white vinegar to ten parts
water. This will remove the haze that
builds up on the inside of the
windows. Use a sof t cloth or paper
towels to clean all glass and clear
plastic surf aces.If you want to use an air f reshener/
deodorizer in the interior of your
vehicle, it is best to use a solid type.
Some liquid air f resheners contain
chemicals that may cause parts of
the interior trim and f abric to crack
or discolor.
If you use a liquid air f reshener,
make sure you f asten it securely so it
does not spill as you drive.
Interior Care
Appearance Care
Windows A ir Fresheners 298
The rear window def ogger wires are
bonded to the inside of the glass.
Wiping vigorously up-and-down can
dislodge and break the def ogger wires.
When cleaning the rear window, use
gentle pressure and wipe side-to-side.
Page 307 of 363
Tighten the wheel nuts securely in
the same crisscross pattern. Have
the wheel nut torque checked at
the nearest automotive service
f acility.
Tighten the wheel nuts to:
Lower the vehicle to the ground
and remove the jack.
Put the flat tire in the supplied
vinyl bag. This bag is stored in the
rear compartment on the driver’s
side panel in the third row. Knot
the top of the vinyl bag.
18.
19. 20.
Changing a Flat T ire
T aking Care of t he Unexpect ed
308 80 lbf·ft (108 N·m , 11 kgf·m)
Page 308 of 363
CONT INUED
You will f ind a u-shaped slit on the
carpet behind the seat bottom of
the third seat. Pull up the carpet at
theslitandremovetheplastic
screw with a coin.
When the third seat is not f olded,
the f lat tire is secured behind the
third seat.
Remove the bracket and the wing
bolt f rom the spare tire lid by
unscrewing the bracket mounting
bolt.
Turn on the sliding door MAIN
switch so you can open the door.
21.
22.
Storing the f lat tire behind the thirdseat
On EX model
Changing a Flat T ire
T aking Care of t he Unexpect ed 309
BBRRAACCKKEETTPPLLAASSTTIICCSSCCRREEWW
BBRRAACCKKEETTMMOOUUNNTTIINNGGBBOOLLTT
BBRRAACCKKEETTMMOOUUNNTTIINNGGBBOOLLTT
BBRRAACCKKEETT
WWIINNGGBBOOLLTT