Page 81 of 363

�µ
If the f ront wheels are turned, the
anti-thef t lock may sometimes make
it difficult to turn the key from
LOCK to ACCESSORY. Firmly turn
the steering wheel to the lef t or to
the right as you turn the key. You can insert or
remove the key only in this position.
To switch f rom ACCESSORY to
LOCK, you must push the key in
slightly as you turn it. The shif t lever
must also be in Park. The anti-thef t
lock will lock the steering column
when you remove the key.
The ignition switch is on the right
side of the steering column. It has
f our positions:
LOCK(0)
ACCESSORY (I)
ON (II)
START (III)As required by the FCC: This device complies with Part 15 of theFCC rules. Operation is subject to thef ollowing two conditions: (1) This devicemay not cause harmf ul interf erence, and(2) this device must accept anyinterf erence received, includinginterf erence that may cause undesired
operation.
Changes or modif ications not expresslyapproved by the party responsible f orcompliance could void the user’sauthority to operate the equipment.
This device complies with IndustryCanada Standard RSS-210.Operation is subject to the f ollowing twoconditions: (1) this device may not causeinterf erence, and (2) this device mustaccept any interf erence that may causeundesired operation of the device.LOCK (0)
Ignition Switch
Inst rument s and Cont rols
Keys and Locks
82
Page 82 of 363
 when you let go of
the key.
This is the normal key
position when driving. All f eatures
and accessories on the ve")
�µ
�µ �µ
Use this position
only to start the engine. The switch
returns to ON (II) when you let go of
the key.
This is the normal key
position when driving. All f eatures
and accessories on the vehicle are
usable. Several of the lights on the
instrument panel come on as a test
when you turn the ignition switch
f rom ACCESSORY to ON. The engine will not start if the
Immobilizer System does not
recognize the key’s coding (see page
).
In this position,
you can operate the audio system
and the accessory power socket.
You will hear a reminder beeper if
you leave the key in the ignition
switch in the LOCK (0) or
ACCESSORY (I) position and open
thedriver’sdoor.Removethekeyto
turn of f the beeper.Each f ront door has a master door
lock switch. Either switch locks and
unlocks all doors and the tailgate.
Push the switch down to lock all
doors and the tailgate, and up to
unlock them.
81
CONT INUED
ST A RT (III) Power Door L ocks
ON (II)
A CCESSORY (I)
Keys and Locks
Inst rument s and Cont rols
83
MMAASSTTEERRDDOOOORRLLOOCCKKSSWWIITTCCHH
Page 83 of 363

Each f ront door has a lock tab on the
top. When you push down the lock
tab on the driver’s door, all the doors
and the tailgate lock. Pulling up the
lock tab on the driver’s door unlocks
only that door. The lock tab on the
f ront passenger’s door locks and
unlocks only that door.If you f orget and leave the key in the
ignition switch, Lockout Prevention
will not allow you to lock the driver’s
door. With the driver’s door open
andthekeyintheignition,both
master door lock switches are
disabled. However, if the driver’s
door is not open, the master door
lock switches are not disabled.
Pushing the switch down on the
open passenger’s door will lock all
doors. If you try to lock an open
driver’s door by pushing in the lock
tab, the tabs on both f ront doors pop
out and the lock knobs on the rear
sliding doors slide out. Pushing in
the lock tab on the passenger’s door
only locks that door.
To lock the f ront passenger’s door
when getting out of the vehicle, push
the lock tab down and close the door. To lock the driver’s door, along with
the remaining doors and the tailgate,
push the lock tab down or push the
master switch down, then close the
door.
All doors and the tailgate can be
locked f rom the outside by using the
key in either f ront door. To unlock
only the driver’s door f rom the
outside, turn the key and release it.
If you turn the key and hold it, all
doors and the tailgate will unlock. All
f our doors and the tailgate will
unlock when you unlock the
passenger’s door with the key.
Inst rument s and Cont rols
Keys and Locks
L ockout Prevent ion
84
LLOOCCKKTTAABB
Page 84 of 363

When you push the UNLOCK button
once, only the driver’s door unlocks.
The remaining doors and the tailgate
unlock when you push the button a
second time. The parking lights, side
marker lights, taillights and
instrument panel lights f lash twice
when you push the button the f irst
time.If you unlock the doors and the
tailgate with the remote transmitter,
but do not open any door or the
tailgate within 30 seconds, all doors
and the tailgate automatically relock.
You cannot lock the doors and the
tailgate with the remote transmitter
if any door or the tailgate is not f ully
closed. You cannot lock or unlock
thedoorsandthetailgatewiththe
key in the ignition switch.
You can lock and unlock your vehicle
with the remote transmitter. When
you push the LOCK button, all doors
and the tailgate lock. The parking
lights, side marker lights, taillights
and instrument panel lights f lash
once. When you press the UNLOCK
button, the f ront and rear individual
map lights and the cargo area light,
depending on their switch positions,
will come on (see page ). If you
do not open any door or the tailgate,
the lights stay on for about 10
seconds, then go out. If you relock
thedoorsandthetailgatewiththe
remote transmitter before 10
seconds have elapsed, the lights will
go of f immediately.
133
CONT INUED
On EX model
Keys and Locks
Inst rument s and Cont rols
Remote Transmitter
85
LLEEDD
UUNNLLOOCCKKBBUUTTTTOONNLLOOCCKKBBUUTTTTOONN
PPAANNIICCBBUUTTTTOONN
Page 85 of 363

Youcanopenorcloseeachrear
sliding door with the remote
transmitter. The right button
controls the passenger’s side door
and the left button controls the
driver’s side door.If the power sliding door MAIN
switch on the dashboard is in the
OFF position, you cannot open or
close the sliding doors with the
remote transmitter.Panic mode allows you to remotely
activate your vehicle’s horn and
lights to attract attention. When
activated, the horn will sound, and
the headlights, parking lights, side
marker lights, taillights and
instrument panel lights will f lash f or
about 30 seconds. To activate panic
mode,pressandholdthePANIC
button f or about one second.
To cancel Panic mode bef ore 30
seconds, press any button on the
remote transmitter. You can also
turn the ignition switch to ON (II).
Panic mode will not activate if the
key is in the ON (II) position.
Keys and Locks
Inst rument s and Cont rols
Opening or Closing t he Power Sliding
Doors Panic Mode
86
LLEEDD
PPOOWWEERRSSLLIIDDIINNGGDDOOOORRMMAAIINNSSWWIITTCCHH
DDRRIIVVEERR’’SSSSIIDDEESSLLIIDDIINNGGDDOOOORRBBUUTTTTOONNPPAASSSSEENNGGEERR’’SSSSIIDDEESSLLIIDDIINNGGDDOOOORRBBUUTTTTOONN
Page 92 of 363

When parking f acing downhill, make
sure the manual doors are latched in
the f ully-open position, then hold the
door open while allowing your
passengers to enter or exit the
vehicle. Do not pull the inside or
outside door handle, or the latch will
release and the door will slam shut.Your Honda is equipped with dual
power sliding doors. The doors on
the EX model are electrically
powered and can be operated with
the remote transmitter, the door
handles, or the switches on the
dashboard.
Be sure all passengers are clear of
the sliding doors bef ore closing them.The power sliding doors operate
with the ignition switch in any
position. In addition:
TheshiftlevermustbeinPark.
The MAIN switch on the
dashboard must be in the ON
position.
The sliding door you want to
operate must be unlocked.
To open the door with the inside
handle, the childproof door lock
on the door you want to operate
must be unlocked (see page ).
Make sure both sliding doors are
closed bef ore you start driving.
If you shif t out of Park while a door
is closing, you will hear a beep until
the power sliding door closes
completely. 89
CONT INUED
Inst rument s and Cont rols
Manual Sliding Doors (L X Model), Power Sliding Doors (EX Model)
Parking Facing DownhillPower Sliding Doors
93
Closing a power sliding door
while any part of a passenger is
in the door’s path can cause
serious injury.
Make sure all passengers are
clear of the doorway before
closing a sliding door.
Page 107 of 363
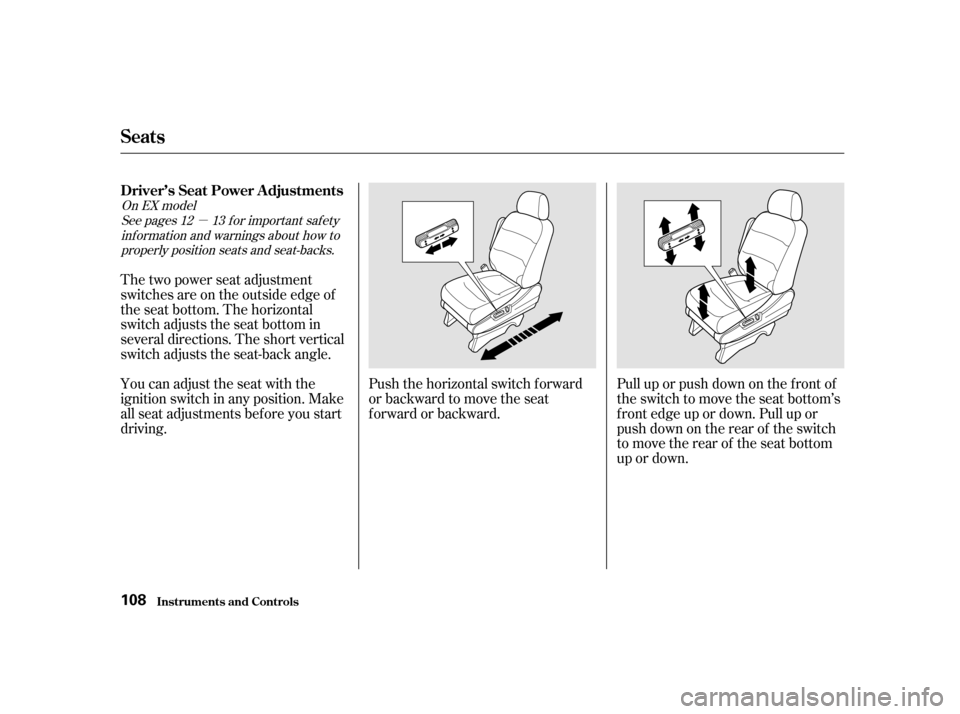
�µ
Pull up or push down on the f ront of
the switch to move the seat bottom’s
f ront edge up or down. Pull up or
push down on the rear of the switch
to move the rear of the seat bottom
up or down.
Push the horizontal switch forward
or backward to move the seat
forward or backward.
The two power seat adjustment
switches are on the outside edge of
the seat bottom. The horizontal
switch adjusts the seat bottom in
several directions. The short vertical
switch adjusts the seat-back angle.
You can adjust the seat with the
ignition switch in any position. Make
all seat adjustments bef ore you start
driving.
See pages f or important saf ety
inf ormation and warnings about how toproperly position seats and seat-backs. 12 13
On EX model
Inst rument s and Cont rols
Driver’s Seat Power A djustments
Seats
108
Page 117 of 363
Your vehicle’s f ront windows are
electrically-powered. Turn the
ignition switch to ON (II) to raise or
lower either window.
Therearwindowsarealso
electrically-powered (see page ).Each f ront door has a switch that
controls its window. To open the
window, push the switch down and
hold it. Release the switch when you
want the window to stop. Close the
window by pulling back on the
switch and holding it.The driver’s door armrest has a
master power window control panel.
To open the f ront passenger’s
window, push down on the switch
and hold it down until the window
reaches the desired position. To
close the window, pull back on the
window switch. Release the switch
when the window gets to the position
you want.
120
Power Windows
Inst rument s and Cont rols
118
DDRRIIVVEERR’’SSWWIINNDDOOWWSSWWIITTCCHHMMAAIINNSSWWIITTCCHH
 to raise or
lower either window.
Therearwindowsarealso
electrically-powered (see page ).Each f ront doo")