2001 CHRYSLER VOYAGER air condition
[x] Cancel search: air conditionPage 3735 of 4284
(10) Install and tighten the nut that secures the
suction line fitting to the compressor. Tighten the nut
to 23 N´m (17 ft. lbs.).
(11) Reconnect the drain tube to the wiper module
drain on the right side of the engine compartment.
(12) Reinstall the air cleaner top cover and snorkel
onto the air cleaner housing located on the right side
of the engine compartment.
(13) Reconnect the battery negative cable.
(14) If the vehicle is equipped with the optional
rear air conditioner, go to Step 15. If the vehicle does
not have the optional rear air conditioner, go to Step
21.
(15) Raise and support the vehicle.
(16) Remove the tape or plugs from the suction
line extension fitting and the underbody suction line
fitting (Fig. 35).
(17) Lubricate a new rubber O-ring seal with clean
refrigerant oil and install it on the underbody suction
line fitting.
(18) Reconnect the suction line extension fitting to
the underbody suction line fitting. Tighten the fit-
tings to 23 N´m (17 ft. lbs.).
(19) Install a new tie strap just forward of the con-
nections between the underbody plumbing and the
engine compartment plumbing for the rear heater
and air conditioner.
(20) Lower the vehicle.
(21) Evacuate the refrigerant system. (Refer to 24
- HEATING & AIR CONDITIONING/PLUMBING -
FRONT/REFRIGERANT - STANDARD PROCE-
DURE - REFRIGERANT SYSTEM EVACUATE).
(22) Charge the refrigerant system. (Refer to 24 -
HEATING & AIR CONDITIONING/PLUMBING -
FRONT/REFRIGERANT - STANDARD PROCE-
DURE - REFRIGERANT SYSTEM CHARGE).UNDERBODY LINES
DESCRIPTION
The rear heater-A/C unit plumbing is used only on
models with the optional rear heater-A/C unit. The
formed metal rear heater-A/C unit suction line, liquid
line, and heater lines are available for separate ser-
vice replacement. The molded and straight heater
hoses used on the rear heater-A/C unit can be ser-
viced in the vehicle. Refer to Group 7 - Cooling Sys-
tem for the heater hose service procedures.
OPERATION
The rear heater and A/C lines are all serviced as
individual pieces. When disconnecting any line or
block ensure that the area around it is clean of any
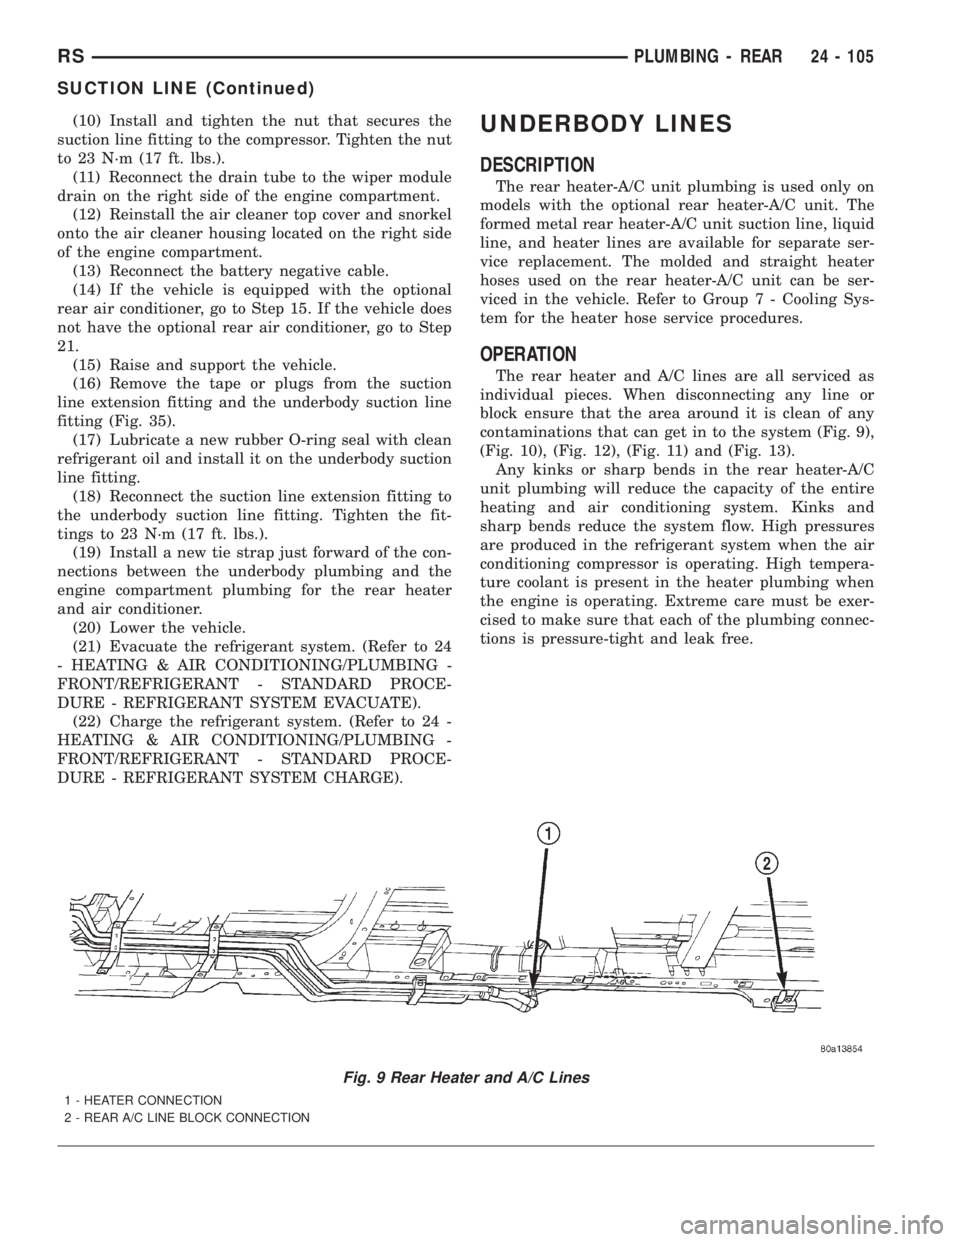
contaminations that can get in to the system (Fig. 9),
(Fig. 10), (Fig. 12), (Fig. 11) and (Fig. 13).
Any kinks or sharp bends in the rear heater-A/C
unit plumbing will reduce the capacity of the entire
heating and air conditioning system. Kinks and
sharp bends reduce the system flow. High pressures
are produced in the refrigerant system when the air
conditioning compressor is operating. High tempera-
ture coolant is present in the heater plumbing when
the engine is operating. Extreme care must be exer-
cised to make sure that each of the plumbing connec-
tions is pressure-tight and leak free.
Fig. 9 Rear Heater and A/C Lines
1 - HEATER CONNECTION
2 - REAR A/C LINE BLOCK CONNECTION
RSPLUMBING - REAR24 - 105
SUCTION LINE (Continued)
Page 3736 of 4284
REMOVAL - REAR HEATER LINES
(1) Raise and support vehicle.
(2) Pinch off rubber heater line hose.
(3) Disconnect quick connect fitting at C-pillar.
(4) Loosen one screw and remove the other screw
at each of the three brackets holding the front of the
line to the underbody.
(5) Lower rear of line and drain coolant into a
suitable container.
(6) Loosen hose clamps at front of line and remove
line from vehicle.
REMOVAL - REAR AIR CONDITIONING LINES
(1) Recover A/C system.
(2) Hoist and support vehicle.
(3) Loosen one screw and remove the other screw
at each of the three brackets holding the A/C lines to
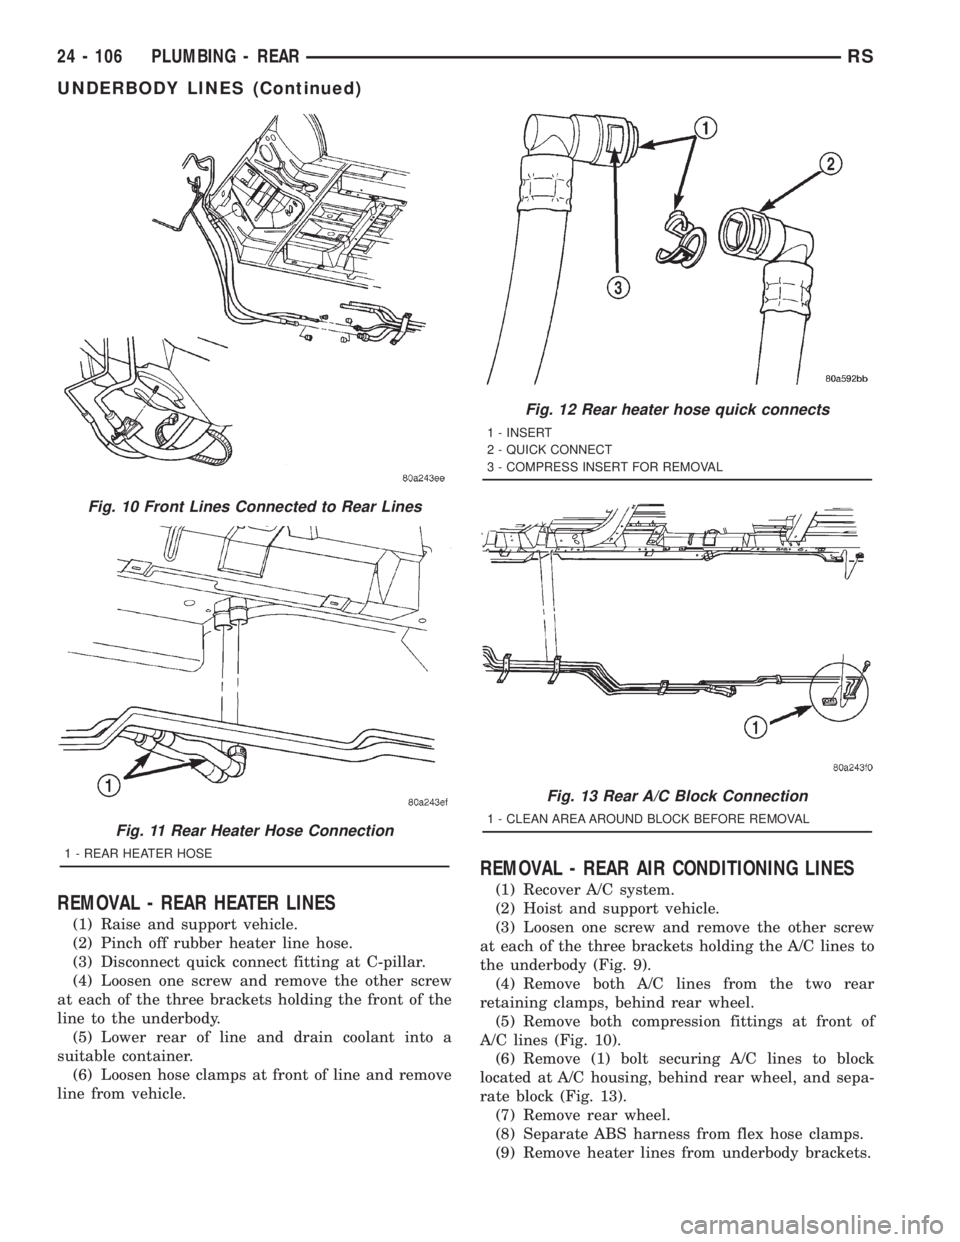
the underbody (Fig. 9).
(4) Remove both A/C lines from the two rear
retaining clamps, behind rear wheel.
(5) Remove both compression fittings at front of
A/C lines (Fig. 10).
(6) Remove (1) bolt securing A/C lines to block
located at A/C housing, behind rear wheel, and sepa-
rate block (Fig. 13).
(7) Remove rear wheel.
(8) Separate ABS harness from flex hose clamps.
(9) Remove heater lines from underbody brackets.
Fig. 10 Front Lines Connected to Rear Lines
Fig. 11 Rear Heater Hose Connection
1 - REAR HEATER HOSE
Fig. 12 Rear heater hose quick connects
1 - INSERT
2 - QUICK CONNECT
3 - COMPRESS INSERT FOR REMOVAL
Fig. 13 Rear A/C Block Connection
1 - CLEAN AREA AROUND BLOCK BEFORE REMOVAL
24 - 106 PLUMBING - REARRS
UNDERBODY LINES (Continued)
Page 3737 of 4284
(10) Pinch off rubber heater line hoses at front of
vehicle.
(11) Loosen hose clamps at front of heater lines
and allow them to hang from vehicle.
(12) Remove rear A/C lines from vehicle.
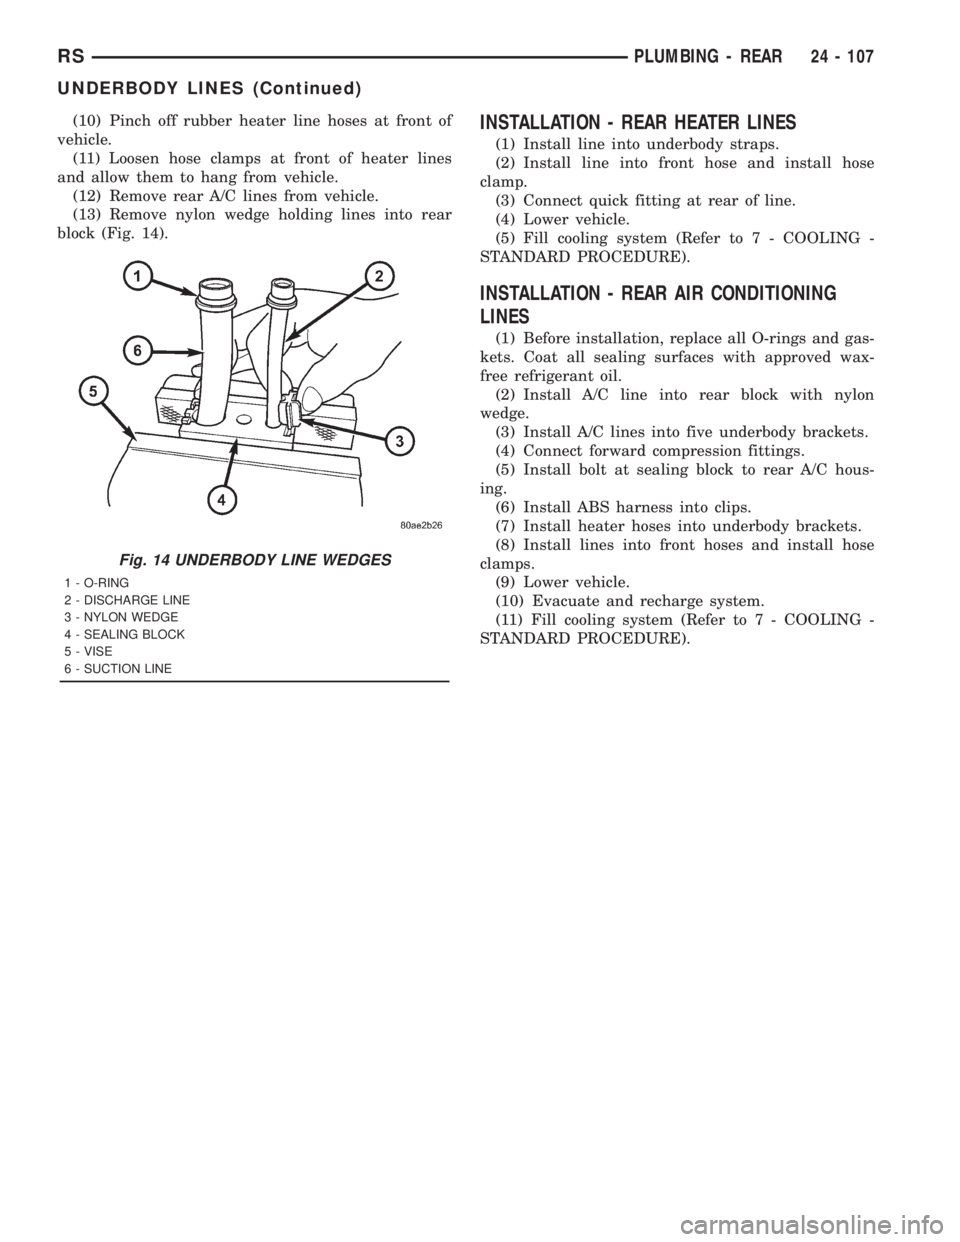
(13) Remove nylon wedge holding lines into rear
block (Fig. 14).INSTALLATION - REAR HEATER LINES
(1) Install line into underbody straps.
(2) Install line into front hose and install hose
clamp.
(3) Connect quick fitting at rear of line.
(4) Lower vehicle.
(5) Fill cooling system (Refer to 7 - COOLING -
STANDARD PROCEDURE).
INSTALLATION - REAR AIR CONDITIONING
LINES
(1) Before installation, replace all O-rings and gas-
kets. Coat all sealing surfaces with approved wax-
free refrigerant oil.
(2) Install A/C line into rear block with nylon
wedge.
(3) Install A/C lines into five underbody brackets.
(4) Connect forward compression fittings.
(5) Install bolt at sealing block to rear A/C hous-
ing.
(6) Install ABS harness into clips.
(7) Install heater hoses into underbody brackets.
(8) Install lines into front hoses and install hose
clamps.
(9) Lower vehicle.
(10) Evacuate and recharge system.
(11) Fill cooling system (Refer to 7 - COOLING -
STANDARD PROCEDURE).
Fig. 14 UNDERBODY LINE WEDGES
1 - O-RING
2 - DISCHARGE LINE
3 - NYLON WEDGE
4 - SEALING BLOCK
5 - VISE
6 - SUCTION LINE
RSPLUMBING - REAR24 - 107
UNDERBODY LINES (Continued)
Page 3739 of 4284
HEATING & AIR CONDITIONING
TABLE OF CONTENTS
page page
PLUMBING - FRONT
WARNING...............................1
HEATER HOSES - DIESEL SUPPLEMENTAL
HEATER
REMOVAL...............................1
INSTALLATION............................2
HEATER PIPES - DIESEL SUPPLEMENTAL
HEATER
REMOVAL...............................2
INSTALLATION............................2
REFRIGERANT
DIAGNOSIS AND TESTING..................4
DIAGNOSIS & TESTING - REFRIGERANT
CHARGE LEVEL 2.5L DIESEL...............4
DIESEL SUPPLEMENTAL HEATER - DCHA
DESCRIPTION............................5
OPERATION.............................6
DIAGNOSIS AND TESTING..................6
DIESEL SUPPLEMENTAL HEATER - DCHA....6
EXHAUST TUBE
REMOVAL...............................6INSTALLATION............................7
FUEL DOSING PUMP
DESCRIPTION............................7
OPERATION.............................7
REMOVAL...............................7
INSTALLATION............................8
FUEL LINE
STANDARD PROCEDURE...................8
CLEANING.............................8
REMOVAL...............................8
INSTALLATION............................9
HEATER UNIT
REMOVAL..............................10
INSTALLATION...........................10
SUPPLEMENTAL DIESEL HEATER WIRING
REMOVAL..............................11
INSTALLATION...........................11
AIR INTAKE PIPE
REMOVAL..............................11
INSTALLATION...........................12
PLUMBING - FRONT
WARNING
WARNING:: DO NOT OPERATE DCHA IN AN
ENCLOSED AREA SUCH AS A GARAGE THAT
DOES NOT HAVE EXHAUST VENTILATION FACILI-
TIES. ALWAYS VENT THE DCHA'S EXHAUST WHEN
OPERATING THE DCHA. FAILURE TO FOLLOW
THESE INSTRUCTION MAY RESULT IN PERSONAL
INJURY OR DEATH.
ALLOW THE DCHA ASSEMBLY TO COOL BEFORE
PERFORMING A COMPONENT INSPECTION/RE-
PAIR/REPLACEMENT. FAILURE TO FOLLOW THESE
INSTRUCTIONS MY RESULT IN PERSONAL INJURY.
VERIFY THAT ALL DCHA FUEL LINES ARE
SECURELY FASTENED TO THEIR RESPECTIVE
COMPONENTS BEFORE THIS PROCEDURE.
HEATER HOSES - DIESEL
SUPPLEMENTAL HEATER
REMOVAL
(1) Elevate vehicle on a lift taking note of the
exhaust tube flexible section.
(2) Drain cooling system(Refer to 7 - COOLING -
STANDARD PROCEDURE).
(3) Lower heater unit from vehicle(Refer to 24 -
HEATING & AIR CONDITIONING/CABIN HEAT-
ER/HEATER UNIT - REMOVAL).
NOTE: Complete removal of cabin heater from vehi-
cle is not required, lowering unit allows easier
access to coolant line clamps.
(4) Remove clamps from both flexible coolant line
ends.
(5) Remove both lines from vehicle.
NOTE: If either line is damaged it is recommended
that both flexible lines be replaced.
RGHEATING & AIR CONDITIONING24a-1
Page 3740 of 4284
INSTALLATION
(1) Install both flexible coolant lines to the heater
unit and install clamps.
(2) Install flexible coolant lines to the coolant pipes
and install clamps.
(3) Install heater unit into vehicle(Refer to 24 -
HEATING & AIR CONDITIONING/CABIN HEAT-
ER/HEATER UNIT - INSTALLATION).
(4) Lower vehicle.
(5) Refill cooling system(Refer to 7 - COOLING -
STANDARD PROCEDURE).
(6) Verify operation of heater unit.
HEATER PIPES - DIESEL
SUPPLEMENTAL HEATER
REMOVAL
CAUTION: Allow cooling system to cool completely
before removing radiator cap or draining cooling
system. Injury could result is system is opened
while system coolant is hot and under pressure.
NOTE: Steel heater lines from engine compartment
to heater unit are part of an assembly that includes
the air intake pipe. If the heater lines or air intake
pipe require removal or replacement the entire
assembly must be removed or replaced.
(1) Open hood.
(2) Drain the cooling system(Refer to 7 - COOL-
ING - STANDARD PROCEDURE).
(3) Remove clamps from both the EGR cooler and
the lower heater port. Separate hoses from the mat-
ing plumbing port. (Fig. 1).
(4) Remove retaining nut from heater line under
hood bracket.(5) Elevate vehicle on a lift.
NOTE: When supporting vehicle care should be
taken not to damage the heater exhaust tube.
(6) Remove clamps from heater lines to the rubber
connection nearest the tubes. Separate the hoses
from the tube assembly leaving the rubber hose
attached to the supplemental heater.
(7) Remove heater unit intake pipe from heater-
(Refer to 24 - HEATING & AIR CONDITIONING/
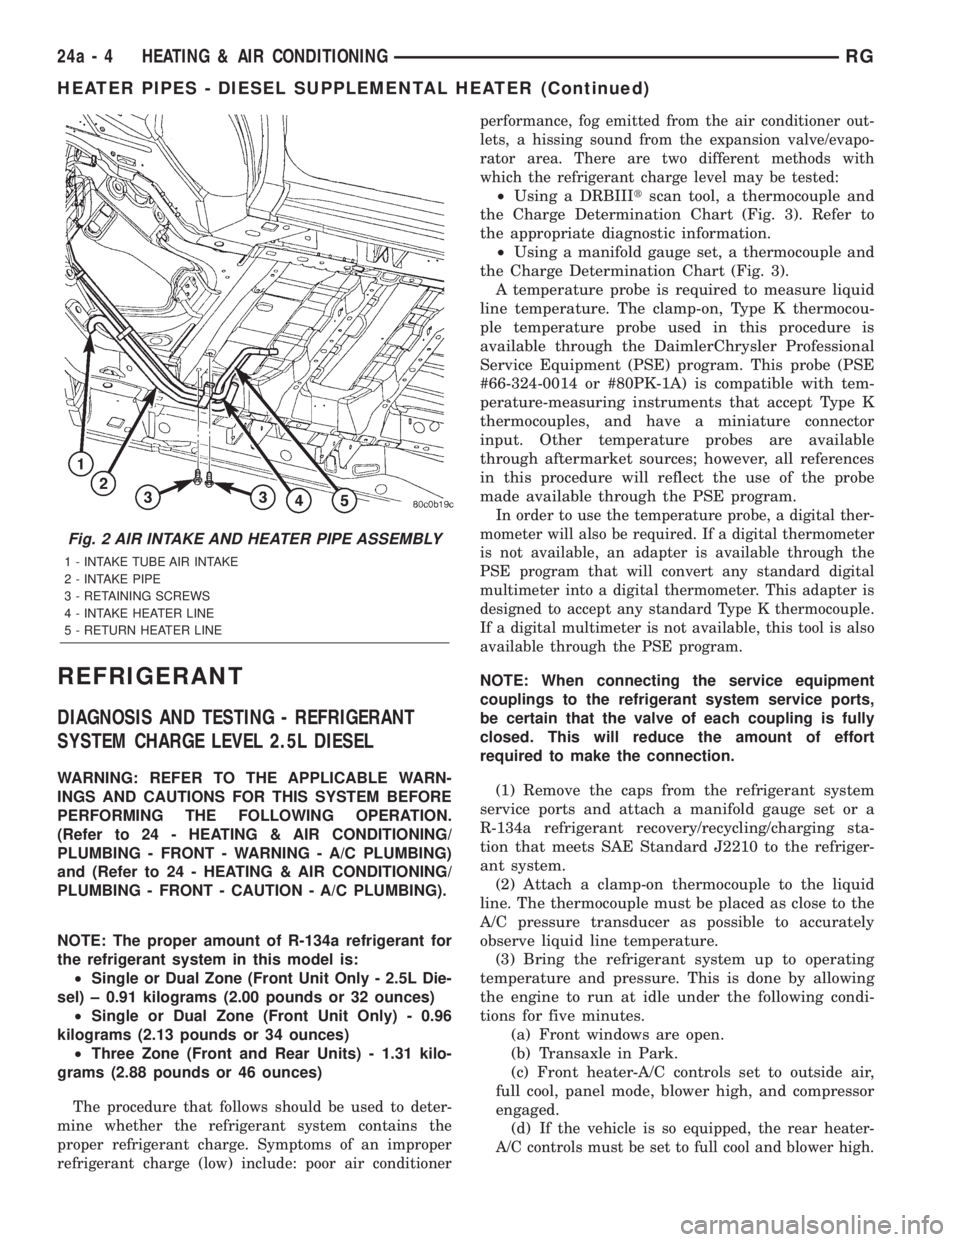
CABIN HEATER/INLET HOSE - REMOVAL) (Fig.
2).
(8) Remove heater pipe assembly retaining screws
and remove assembly from vehicle.
INSTALLATION
(1) With vehicle on a lift position the heater pipe
assembly and install the retaining screws.
(2) Install the heater unit intake pipe to the
heater unit(Refer to 24 - HEATING & AIR CONDI-
TIONING/CABIN HEATER/INLET HOSE - INSTAL-
LATION).
(3) Connect heater hoses to the heater unit and
tighten the clamps.
(4) Install heater unit intake pipe to heater uni-
t(Refer to 24 - HEATING & AIR CONDITIONING/
CABIN HEATER/INLET HOSE - INSTALLATION).
(5) Lower vehicle on lift.
(6) Install retaining nut to heater line under hood
bracket and tighten.
(7) Connect heater lines to heater hoses at heater
core and EGR port. Position spring clamps onto the
installed hoses.
(8) Refill cooling system(Refer to 7 - COOLING -
STANDARD PROCEDURE).
(9) Close hood.
24a - 2 HEATING & AIR CONDITIONINGRG
HEATER HOSES - DIESEL SUPPLEMENTAL HEATER (Continued)
Page 3741 of 4284
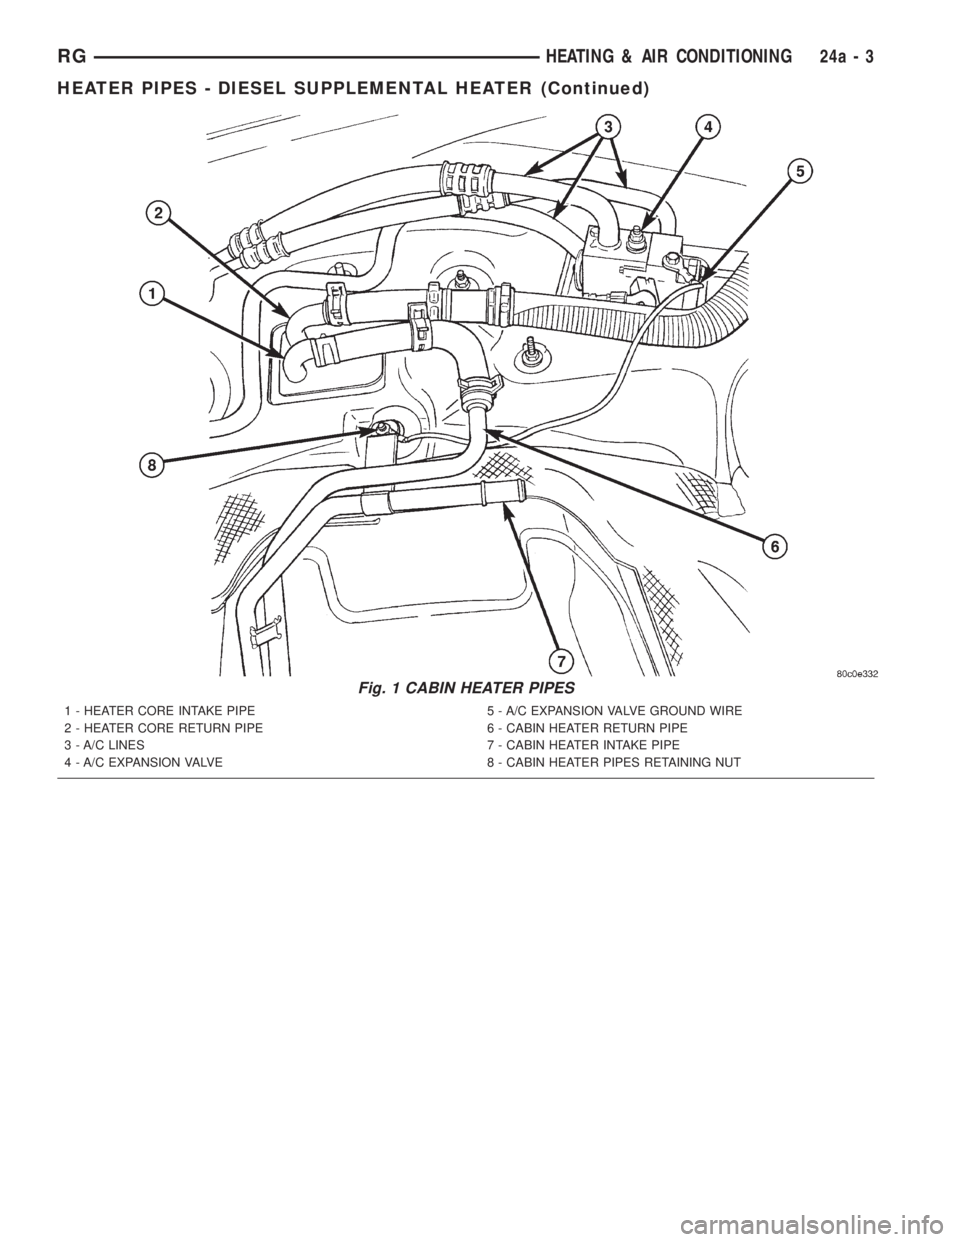
Fig. 1 CABIN HEATER PIPES
1 - HEATER CORE INTAKE PIPE
2 - HEATER CORE RETURN PIPE
3 - A/C LINES
4 - A/C EXPANSION VALVE5 - A/C EXPANSION VALVE GROUND WIRE
6 - CABIN HEATER RETURN PIPE
7 - CABIN HEATER INTAKE PIPE
8 - CABIN HEATER PIPES RETAINING NUT
RGHEATING & AIR CONDITIONING24a-3
HEATER PIPES - DIESEL SUPPLEMENTAL HEATER (Continued)
Page 3742 of 4284
REFRIGERANT
DIAGNOSIS AND TESTING - REFRIGERANT
SYSTEM CHARGE LEVEL 2.5L DIESEL
WARNING: REFER TO THE APPLICABLE WARN-
INGS AND CAUTIONS FOR THIS SYSTEM BEFORE
PERFORMING THE FOLLOWING OPERATION.
(Refer to 24 - HEATING & AIR CONDITIONING/
PLUMBING - FRONT - WARNING - A/C PLUMBING)
and (Refer to 24 - HEATING & AIR CONDITIONING/
PLUMBING - FRONT - CAUTION - A/C PLUMBING).
NOTE: The proper amount of R-134a refrigerant for
the refrigerant system in this model is:
²Single or Dual Zone (Front Unit Only - 2.5L Die-
sel) ± 0.91 kilograms (2.00 pounds or 32 ounces)
²Single or Dual Zone (Front Unit Only) - 0.96
kilograms (2.13 pounds or 34 ounces)
²Three Zone (Front and Rear Units) - 1.31 kilo-
grams (2.88 pounds or 46 ounces)
The procedure that follows should be used to deter-
mine whether the refrigerant system contains the
proper refrigerant charge. Symptoms of an improper
refrigerant charge (low) include: poor air conditionerperformance, fog emitted from the air conditioner out-
lets, a hissing sound from the expansion valve/evapo-
rator area. There are two different methods with
which the refrigerant charge level may be tested:
²Using a DRBIIItscan tool, a thermocouple and
the Charge Determination Chart (Fig. 3). Refer to
the appropriate diagnostic information.
²Using a manifold gauge set, a thermocouple and
the Charge Determination Chart (Fig. 3).
A temperature probe is required to measure liquid
line temperature. The clamp-on, Type K thermocou-
ple temperature probe used in this procedure is
available through the DaimlerChrysler Professional
Service Equipment (PSE) program. This probe (PSE
#66-324-0014 or #80PK-1A) is compatible with tem-
perature-measuring instruments that accept Type K
thermocouples, and have a miniature connector
input. Other temperature probes are available
through aftermarket sources; however, all references
in this procedure will reflect the use of the probe
made available through the PSE program.
In order to use the temperature probe, a digital ther-
mometer will also be required. If a digital thermometer
is not available, an adapter is available through the
PSE program that will convert any standard digital
multimeter into a digital thermometer. This adapter is
designed to accept any standard Type K thermocouple.
If a digital multimeter is not available, this tool is also
available through the PSE program.
NOTE: When connecting the service equipment
couplings to the refrigerant system service ports,
be certain that the valve of each coupling is fully
closed. This will reduce the amount of effort
required to make the connection.
(1) Remove the caps from the refrigerant system
service ports and attach a manifold gauge set or a
R-134a refrigerant recovery/recycling/charging sta-
tion that meets SAE Standard J2210 to the refriger-
ant system.
(2) Attach a clamp-on thermocouple to the liquid
line. The thermocouple must be placed as close to the
A/C pressure transducer as possible to accurately
observe liquid line temperature.
(3) Bring the refrigerant system up to operating
temperature and pressure. This is done by allowing
the engine to run at idle under the following condi-
tions for five minutes.
(a) Front windows are open.
(b) Transaxle in Park.
(c) Front heater-A/C controls set to outside air,
full cool, panel mode, blower high, and compressor
engaged.
(d)
If the vehicle is so equipped, the rear heater-
A/C controls must be set to full cool and blower high.
Fig. 2 AIR INTAKE AND HEATER PIPE ASSEMBLY
1 - INTAKE TUBE AIR INTAKE
2 - INTAKE PIPE
3 - RETAINING SCREWS
4 - INTAKE HEATER LINE
5 - RETURN HEATER LINE
24a - 4 HEATING & AIR CONDITIONINGRG
HEATER PIPES - DIESEL SUPPLEMENTAL HEATER (Continued)
Page 3743 of 4284
(4) Raise the liquid line (discharge) pressure to
about 1793 kPa (260 psi) by placing a piece of card-
board over part of the front side of the condenser. To
place the cardboard properly, remove the upper radi-
ator sight shield from the front fascia. Cover only
enough of the condenser to raise and maintain the
liquid line pressure at the specified level.
(5) Observe the liquid line (discharge) pressure
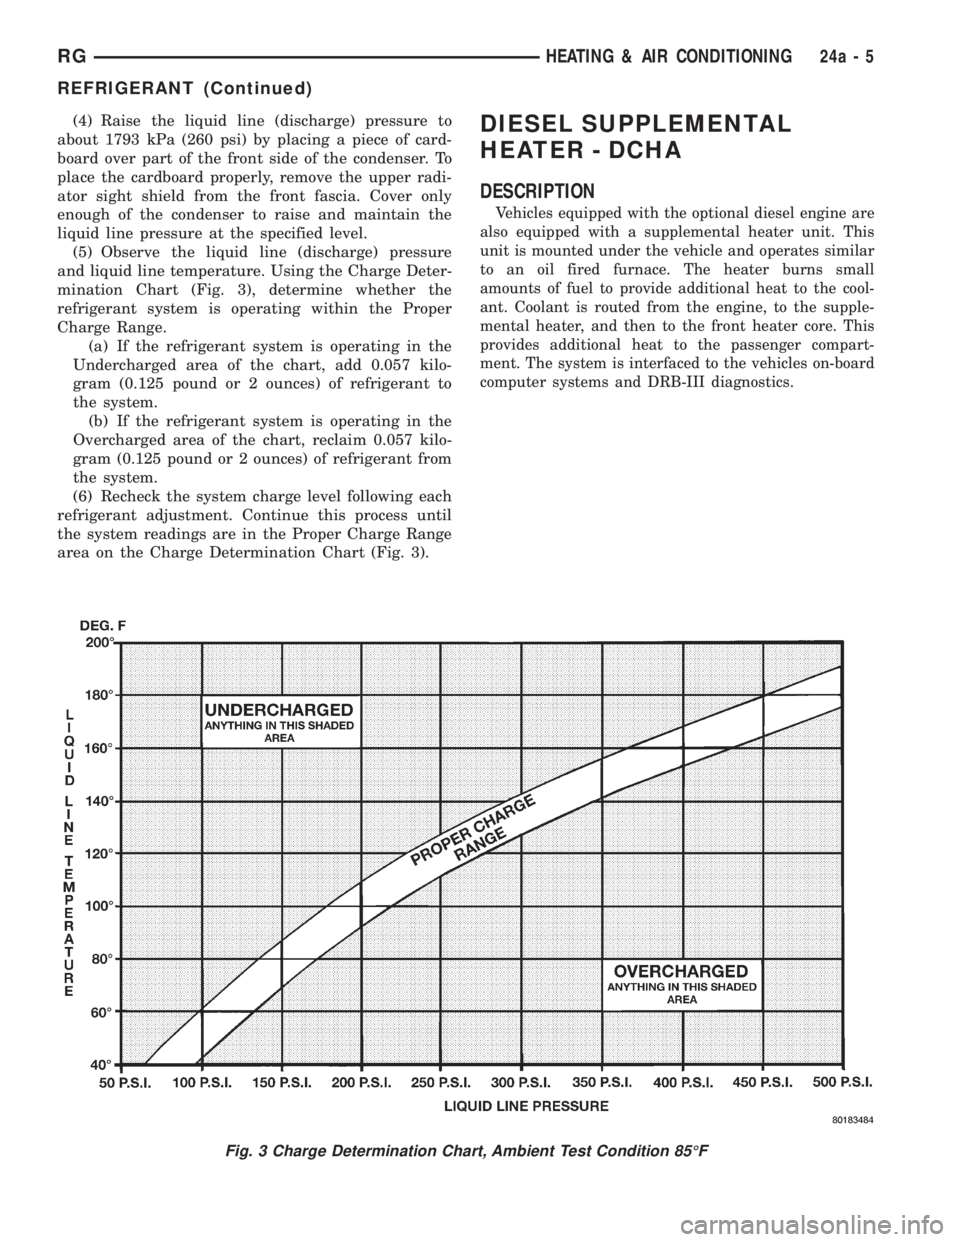
and liquid line temperature. Using the Charge Deter-
mination Chart (Fig. 3), determine whether the
refrigerant system is operating within the Proper
Charge Range.
(a) If the refrigerant system is operating in the
Undercharged area of the chart, add 0.057 kilo-
gram (0.125 pound or 2 ounces) of refrigerant to
the system.
(b) If the refrigerant system is operating in the
Overcharged area of the chart, reclaim 0.057 kilo-
gram (0.125 pound or 2 ounces) of refrigerant from
the system.
(6) Recheck the system charge level following each
refrigerant adjustment. Continue this process until
the system readings are in the Proper Charge Range
area on the Charge Determination Chart (Fig. 3).DIESEL SUPPLEMENTAL
HEATER - DCHA
DESCRIPTION
Vehicles equipped with the optional diesel engine are
also equipped with a supplemental heater unit. This
unit is mounted under the vehicle and operates similar
to an oil fired furnace. The heater burns small
amounts of fuel to provide additional heat to the cool-
ant. Coolant is routed from the engine, to the supple-
mental heater, and then to the front heater core. This
provides additional heat to the passenger compart-
ment. The system is interfaced to the vehicles on-board
computer systems and DRB-III diagnostics.
Fig. 3 Charge Determination Chart, Ambient Test Condition 85ÉF
RGHEATING & AIR CONDITIONING24a-5
REFRIGERANT (Continued)