2001 CHRYSLER VOYAGER engine
[x] Cancel search: enginePage 54 of 4284

opening either front door, the Body Control Module
will unfold the mirrors in the following manner
depending on which front door is opened. If the
driver door is opened, only the driver side mirror
will unfold. If the passenger door is opened, both
mirrors will unfold. The passenger mirror is pre-
vented from unfolding when the driver 's door is
opened by the Passenger Folding Mirror Relay,
which opens the driver circuit to the passenger side
mirror.
3.17 POWER LIFTGATE SYSTEM
3.17.1 POWER LIFTGATE
The power liftgate (PLG) system is activated
through the use of the following: remote keyless
entry (RKE), overhead console switches, outside
liftgate handle switch or the DRBIIIt. These inputs
are hardwired to the body control module (BCM)
and can be monitored with a diagnostic tool. The
BCM will send the message via PCI bus to the
power liftgate module (PLGM). The liftgate must be
in the full open or full closed position to operate.
Once the BCM sends a button activation message to
the PLGM, the module shall read all inputs, out-
puts and vehicle conditions to determine whether it
shall open, close or inhibit the PLG operation. Once
the PLGM determines the vehicle conditions are
safe for operation, the PLGM will initiate a chime
for 2 seconds prior to the liftgate activation and 2
seconds during the open or close cycle.
During an opening or closing cycle, the PLGM can
detect an obstacle present should it meet sufficient
resistance by the hall effect sensors (integrated in
the gear motor assembly GMA).
During an open cycle, multiple liftgate activa-
tions (RKE, overhead console, B pillar) are ignored
until the liftgate reaches the full open position.
However, during a close cycle, a 2nd liftgate activa-
tion (RKE, overhead console, B pillar) will reverse
the liftgate to the full open position.
If the engine is cranked during a power open/close
the PLG will pause then resume after engine crank-
ing. In addition, if the vehicle is placed in gear
during an open cycle, the PLG shall reverse direc-
tion and begin closing. If the vehicle is placed in
gear during a closing cycle, the PLG shall continue
closing until fully closed. If the outside handle is
activated during an open cycle, the PLG will become
a full manual liftgate. If the outside handle is
activated during a close cycle, the PLG shall reverse
direction of travel to the full open position.
3.17.2 DIAGNOSTIC FEATURES
The PLG can be flashed on vehicle via PCI bus
with a DRBIIItdiagnostic tool. The DRBIIItcanread all inputs, actuate all outputs, read module
information, and read diagnostic trouble codes. As a
reminder, some DTC's can be set during normal
PLG operation.
3.17.3 SYSTEM INHIBITORS
1. Battery voltage too high or too low (above 16V,
below 9.5V)
2. Vehicle in gear
3. Vehicle speed > 0 mph/km/h
4. Outside temperature too high, above 143ÉF
(62ÉC) or too low, below -12ÉF (-24ÉC).
5. O/H console lockout will inhibit the B pillar
switches only.
6. Liftgate locked will inhibit all interior switches
from opening (overhead console). A locked lift-
gate can be power closed.
7. Pinch Sensor switch stuck shall inhibit the
power close feature.
3.18 POWER SLIDING DOOR SYSTEM
3.18.1 POWER SLIDING DOOR
The Power Sliding Door (PSD) system is acti-
vated through the use of the following: Remote
Keyless Entry (RKE), overhead console switches, B
pillar switches or the DRBIIIt. These inputs are
hardwired to the body control module (BCM) and
can be monitored with a diagnostic tool. The BCM
will send the message via PCI bus to the power
sliding door module (PSDM). The sliding door must
be in the full open or full closed position to operate.
Once the BCM sends a button activation message to
the PSDM, the module shall read all inputs, out-
puts and vehicle conditions to determine whether it
shall open, close or inhibit the PSD operation.
During an opening or closing cycle, the PSDM can
detect an obstacle present should it meet sufficient
resistance by the hall effect sensors (integrated in
the drive motor).
During an open cycle, multiple door activations
(RKE, overhead console, B pillar) are ignored until
the door reaches the full open position. However,
during a close cycle, a 2nd door activation (RKE,
overhead console, B pillar) will reverse the door to
the full open position.
If the engine is cranked during a power open/close
the PSD will pause then resume after engine crank-
ing. In addition, if the vehicle is placed in gear
during an open cycle, the PSD shall reverse direc-
tion and begin closing. If the vehicle is placed in
gear during a closing cycle, the PSD shall continue
closing until fully closed.
If the inside or outside handle is activated during
an open or close cycle, the PSD will become a full
25
GENERAL INFORMATION
Page 55 of 4284

manual sliding door. When the child lock out switch
is on, the B pillar switches are disabled.
There is only one part number for the power
sliding door module (PSDM). The driver sliding
door harness has an additional ground circuit which
will identify it as the driver side. This eliminates
the need for a left and a right side module.
3.18.2 DIAGNOSTIC FEATURES
The PSDM can be flashed on vehicle via PCI bus
with a DRBIIItdiagnostic tool. The DRBIIItcan
read all inputs, actuate all outputs, read module
information, and read diagnostic trouble codes. As a
reminder, some DTC's can be set during normal
PSD operation.
3.18.3 SYSTEM INHIBITORS
1. Battery voltage too high or too low (above 16V,
below 9.5V)
2. Vehicle in gear
3. Vehicle speed > 0 mph/km/h
4. Child locks enabled inhibit the B pillar switch
operation
5. O/H console lockout will inhibit the B pillar
switches
6. Doors locked will inhibit all interior switches
from opening (Overhead Console, B Pillar). A
locked sliding door can be power closed.
3.19 REAR WINDOW DEFOG/HEATED
MIRROR/FRONT WIPER DE-ICE
The defroster button located on the HVAC control
controls the rear window defogger, heated side view
mirrors and front wiper de-icer grid. In addition the
front wiper de-ice function is turned on when front
defog/defrost mode is selected.
When the defroster button is pushed, the HVAC
control sends a bus message over the PCI bus to the
Front Control Module (FCM) which controls the
Rear Window Defogger relay. The defroster LED
will illuminate when the defroster function is on.
The defroster will function for 10 minutes or can be
cycled off sooner by pressing the defroster button
again. The front wiper de-icer grid receives its 12
volts from the accessory relay through fuse 11 and
the HVAC control module supplies the grid ground.
3.20 VEHICLE THEFT SECURITY SYSTEM
3.20.1 BASE ALARM SYSTEM
The Vehicle Theft Security System (VTSS) is part
of the Body Control Module (BCM). The BCM
monitors the vehicle doors, liftgate, hood, and theignition for unauthorized operation. The alarm ac-
tivates by sounding the horn, flashing the head-
lamps and the VTSS indicator lamp. The VTSS does
not prevent engine operation, this is done with the
Sentry Key Immobilizer Module (SKIM). Passive
arming occurs in one of two ways. Upon normal
vehicle exit by removing the ignition key, opening
the driver door, locking the doors with the power
lock, and closing the driver door, or by removing the
ignition key, opening the driver door, closing the
driver door, and locking the doors with the Remote
Keyless Entry (RKE) transmitter. The VTSS indi-
cator lamp will flash for approximately 15 seconds
during the arming process. If there is no interrup-
tion during the arming process, upon completion
the VTSS indicator lamp will flash at a slower rate.
When the BCM receives an input to trigger the
alarm, the BCM will control the outputs of the
headlamps, horn, and VTSS lamp for approxi-
mately 18 minutes.
Arming (Active and Passive)
Active arming occurs when the RKE transmitter
is used to lock the vehicle doors, whether the doors
are open or closed. The arming process is complete
only after all doors are closed.
Passive arming occurs when the ignition key is
removed, the driver door is opened, and the doors
are locked with the power door lock switch, and the
door is closed.
Disarming (Active and Passive)
Active disarming occurs when the RKE transmit-
ter is used to unlock the vehicle doors. This disarm-
ing will also halt the alarm once it has been acti-
vated.
Passive disarming occurs upon normal vehicle
entry (unlocking driver door with the key). This
disarming will also halt the alarm once it has been
activated.
Tamper Alert
The VTSS tamper alert will sound the horn three
times upon disarming to indicate a tamper condi-
tion has occurred.
Manual Override
The system will not arm if the doors are locked
using the manual lock control or if the locks are
actuated by an inside occupant after the doors are
closed.
Diagnosis
For complaints about the Vehicle Theft Alarm
triggering on its own, use the DRBIIItand read the
Last VTSS Cause status.
26
GENERAL INFORMATION
Page 57 of 4284

defined as the amount of time from the start of a
wipe to the beginning of the next wipe. The rear
wiper system delay time is based on the following:
7.75 - (MPH x .05) = Seconds delay
Examples:
At zero (0) MPH the delay is 7.75 seconds.
At 100 MPH the delay is 2.75 seconds.
3.21.8 WIPE AFTER WASH
When the driver presses the wash button for over
1.5 seconds and releases it, the wiper will continue
to run for 2 additional wipe cycles.
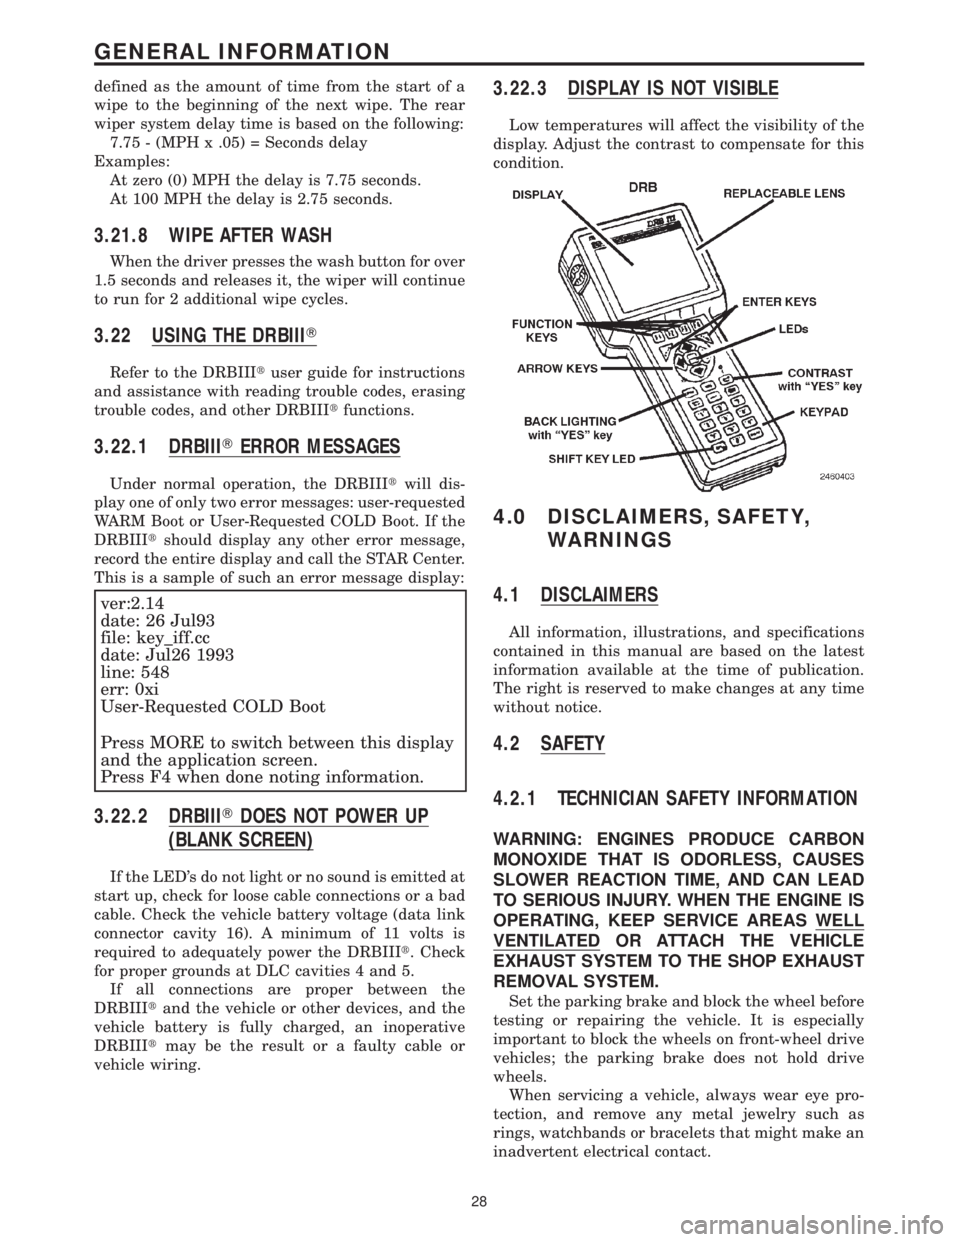
3.22 USING THE DRBIIIT
Refer to the DRBIIItuser guide for instructions
and assistance with reading trouble codes, erasing
trouble codes, and other DRBIIItfunctions.
3.22.1 DRBIIITERROR MESSAGES
Under normal operation, the DRBIIItwill dis-
play one of only two error messages: user-requested
WARM Boot or User-Requested COLD Boot. If the
DRBIIItshould display any other error message,
record the entire display and call the STAR Center.
This is a sample of such an error message display:
ver:2.14
date: 26 Jul93
file: key_iff.cc
date: Jul26 1993
line: 548
err: 0xi
User-Requested COLD Boot
Press MORE to switch between this display
and the application screen.
Press F4 when done noting information.
3.22.2 DRBIIITDOES NOT POWER UP
(BLANK SCREEN)
If the LED's do not light or no sound is emitted at
start up, check for loose cable connections or a bad
cable. Check the vehicle battery voltage (data link
connector cavity 16). A minimum of 11 volts is
required to adequately power the DRBIIIt. Check
for proper grounds at DLC cavities 4 and 5.
If all connections are proper between the
DRBIIItand the vehicle or other devices, and the
vehicle battery is fully charged, an inoperative
DRBIIItmay be the result or a faulty cable or
vehicle wiring.
3.22.3 DISPLAY IS NOT VISIBLE
Low temperatures will affect the visibility of the
display. Adjust the contrast to compensate for this
condition.
4.0 DISCLAIMERS, SAFETY,
WARNINGS
4.1 DISCLAIMERS
All information, illustrations, and specifications
contained in this manual are based on the latest
information available at the time of publication.
The right is reserved to make changes at any time
without notice.
4.2 SAFETY
4.2.1 TECHNICIAN SAFETY INFORMATION
WARNING: ENGINES PRODUCE CARBON
MONOXIDE THAT IS ODORLESS, CAUSES
SLOWER REACTION TIME, AND CAN LEAD
TO SERIOUS INJURY. WHEN THE ENGINE IS
OPERATING, KEEP SERVICE AREAS WELL
VENTILATED OR ATTACH THE VEHICLE
EXHAUST SYSTEM TO THE SHOP EXHAUST
REMOVAL SYSTEM.
Set the parking brake and block the wheel before
testing or repairing the vehicle. It is especially
important to block the wheels on front-wheel drive
vehicles; the parking brake does not hold drive
wheels.
When servicing a vehicle, always wear eye pro-
tection, and remove any metal jewelry such as
rings, watchbands or bracelets that might make an
inadvertent electrical contact.
28
GENERAL INFORMATION
Page 59 of 4284

WARNING: BEFORE ROAD TESTING A
VEHICLE, BE SURE THAT ALL
COMPONENTS ARE REASSEMBLED.
DURING THE TEST DRIVE, DO NOT TRY TO
READ THE DRBIIITSCREEN WHILE IN
MOTION. DO NOT HANG THE DRBIIITFROM
THE REAR VIEW MIRROR OR OPERATE IT
YOURSELF. HAVE AN ASSISTANT
AVAILABLE TO OPERATE THE DRBIIIT.
5.0 REQUIRED TOOLS AND
EQUIPMENT
DRBIIIt(diagnostic read-out box)
Jumper wires
Ohmmeter
Voltmeter
Sentry Key Tester
Test Light
8310 Airbag System Load Tool
8443 SRS Airbag System Load Tool
Diagnostic Junction Port Tester 8339
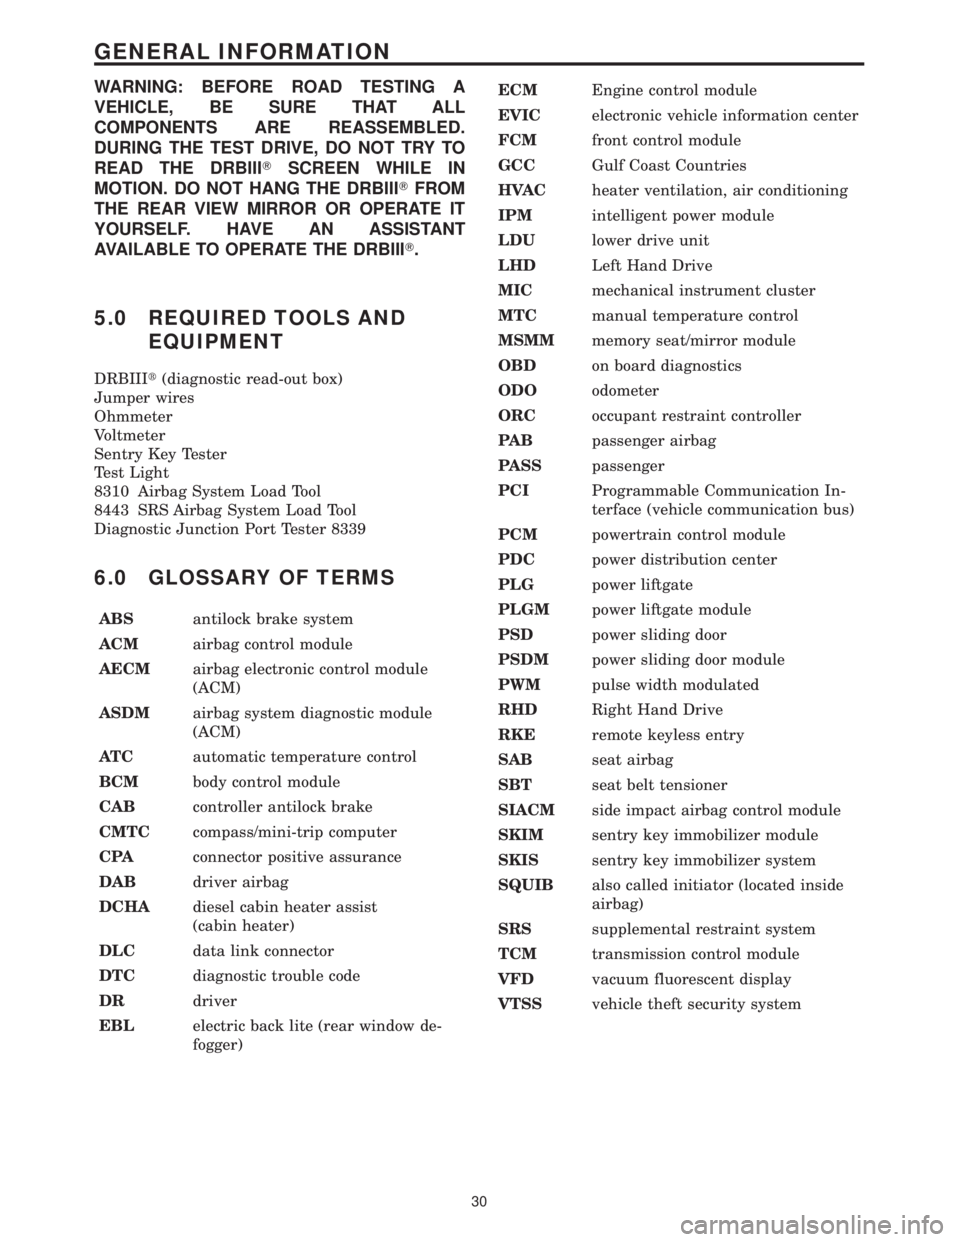
6.0 GLOSSARY OF TERMS
ABSantilock brake system
ACMairbag control module
AECMairbag electronic control module
(ACM)
ASDMairbag system diagnostic module
(ACM)
AT Cautomatic temperature control
BCMbody control module
CABcontroller antilock brake
CMTCcompass/mini-trip computer
CPAconnector positive assurance
DABdriver airbag
DCHAdiesel cabin heater assist
(cabin heater)
DLCdata link connector
DTCdiagnostic trouble code
DRdriver
EBLelectric back lite (rear window de-
fogger)ECMEngine control module
EVICelectronic vehicle information center
FCMfront control module
GCCGulf Coast Countries
HVACheater ventilation, air conditioning
IPMintelligent power module
LDUlower drive unit
LHDLeft Hand Drive
MICmechanical instrument cluster
MTCmanual temperature control
MSMMmemory seat/mirror module
OBDon board diagnostics
ODOodometer
ORCoccupant restraint controller
PA Bpassenger airbag
PASSpassenger
PCIProgrammable Communication In-
terface (vehicle communication bus)
PCMpowertrain control module
PDCpower distribution center
PLGpower liftgate
PLGMpower liftgate module
PSDpower sliding door
PSDMpower sliding door module
PWMpulse width modulated
RHDRight Hand Drive
RKEremote keyless entry
SABseat airbag
SBTseat belt tensioner
SIACMside impact airbag control module
SKIMsentry key immobilizer module
SKISsentry key immobilizer system
SQUIBalso called initiator (located inside
airbag)
SRSsupplemental restraint system
TCMtransmission control module
VFDvacuum fluorescent display
VTSSvehicle theft security system
30
GENERAL INFORMATION
Page 102 of 4284

Symptom:
ORC, CALIBRATION MISMATCH - ACTIVE
When Monitored and Set Condition:
ORC, CALIBRATION MISMATCH - ACTIVE
When Monitored: With ignition on, the ORC monitors the PCI Bus for the VIN message
containing the body style. The PCM transmits the complete VIN message every 14 seconds.
Note: The VIN message should match the vehicle VIN plate.
Set Condition: If the Body style stored in ORC does not exactly match the vehicle body
style indicated by the PCM, then the fault shall be set.
POSSIBLE CAUSES
PCM, PCI COMMUNICATION FAILURE
COMPARE VEHICLE IDENTIFICATION NUMBERS
ORC, ORC CALIBRATION MISMATCH
TEST ACTION APPLICABILITY
1 Turn the ignition on.
Connect the DRB to the data link connector and select PASSIVE RESTRAINTS,
AIRBAG, SYSTEM TEST.
With the DRBIIIt, read the system test.
Does the DRB show PCM Active on the Bus:?All
Ye s®Go To 2
No®Refer to category COMMUNICATION CATEGORY and select the
related symptom.
Perform AIRBAG VERIFICATION TEST - VER 1.
2 With the DRB select ENGINE MISCELLANEOUS, select MISC FUNCTION, and
then CHECK VIN to read the Vehicle Identification Number in the Powertrain
Control Module.
Compare the VIN displayed on the DRB screen and the Vehicle VIN plate.
Does the VIN plate and the PCM VIN match?All
Ye s®Go To 3
No®Replace the Powertrain Control Module and program with the
correct vehicle identification number.
Perform AIRBAG VERIFICATION TEST - VER 1.
73
AIRBAG
Page 198 of 4284

Symptom:
ORC, VEHICLE BODY STYLE UNKNOWN - ACTIVE
When Monitored and Set Condition:
ORC, VEHICLE BODY STYLE UNKNOWN - ACTIVE
When Monitored: With ignition on, the ORC monitors the PCI Bus for the VIN message
containing the vehicle body style from the Powertrain Control Module. The PCM transmits
the VIN message every 14 seconds.
Set Condition: With ignition on, If the ORC does not receive the 2 consecutive matching
(vehicle Body Style) VIN messages on the bus the code will set.
POSSIBLE CAUSES
PCM, PCI COMMUNICATION FAILURE
VEHICLE BODY STYLE UNKNOWN
ORC, VEHICLE BODY STYLE UNKNOWN
TEST ACTION APPLICABILITY
1 Turn the ignition on.
Connect the DRBIIItto the data link connector and select PASSIVE RESTRAINTS,
AIRBAG, SYSTEM TEST.
With the DRBIIIt, read the PCM Active on the Bus:.
Does the DRB show PCM ACTIVE ON THE BUS:?All
Ye s®Go To 2
No®Refer to category COMMUNICATION CATEGORY and select the
related symptom.
Perform AIRBAG VERIFICATION TEST - VER 1.
2 With the DRB select ENGINE, MISCELLANEOUS, SELECT MISC FUNCTION,
and then CHECK VIN to read the Vehicle Identification Number in the Powertrain
Control Module.
Compare the VIN displayed on the DRB screen and the Vehicle VIN plate.
Does the VIN plate and the PCM VIN match?All
Ye s®Go To 3
No®Replace the Powertrain Control Module and program with the
correct vehicle identification number.
Perform AIRBAG VERIFICATION TEST - VER 1.
169
AIRBAG
Page 226 of 4284

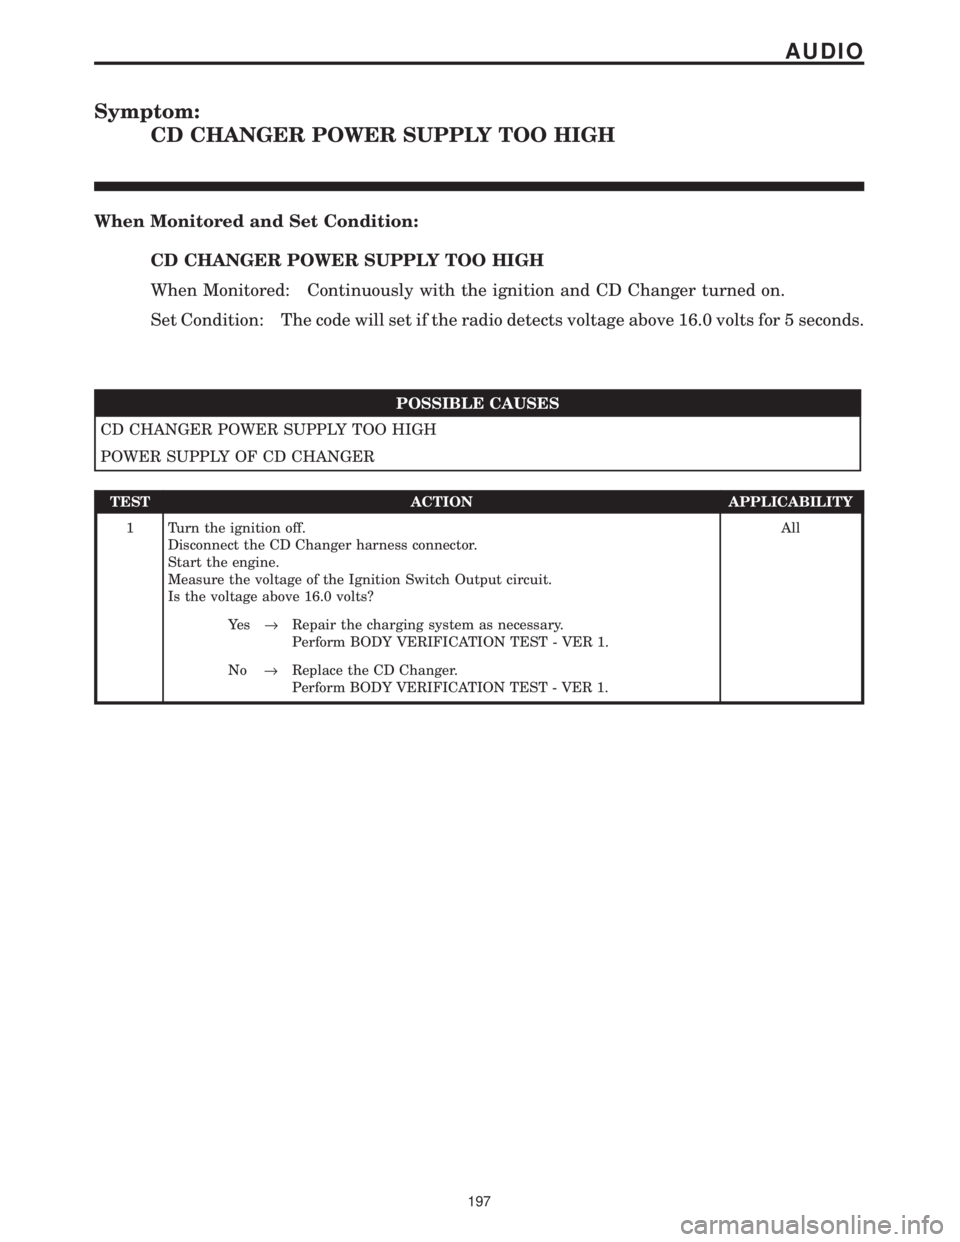
Symptom:
CD CHANGER POWER SUPPLY TOO HIGH
When Monitored and Set Condition:
CD CHANGER POWER SUPPLY TOO HIGH
When Monitored: Continuously with the ignition and CD Changer turned on.
Set Condition: The code will set if the radio detects voltage above 16.0 volts for 5 seconds.
POSSIBLE CAUSES
CD CHANGER POWER SUPPLY TOO HIGH
POWER SUPPLY OF CD CHANGER
TEST ACTION APPLICABILITY
1 Turn the ignition off.
Disconnect the CD Changer harness connector.
Start the engine.
Measure the voltage of the Ignition Switch Output circuit.
Is the voltage above 16.0 volts?All
Ye s®Repair the charging system as necessary.
Perform BODY VERIFICATION TEST - VER 1.
No®Replace the CD Changer.
Perform BODY VERIFICATION TEST - VER 1.
197
AUDIO
Page 227 of 4284

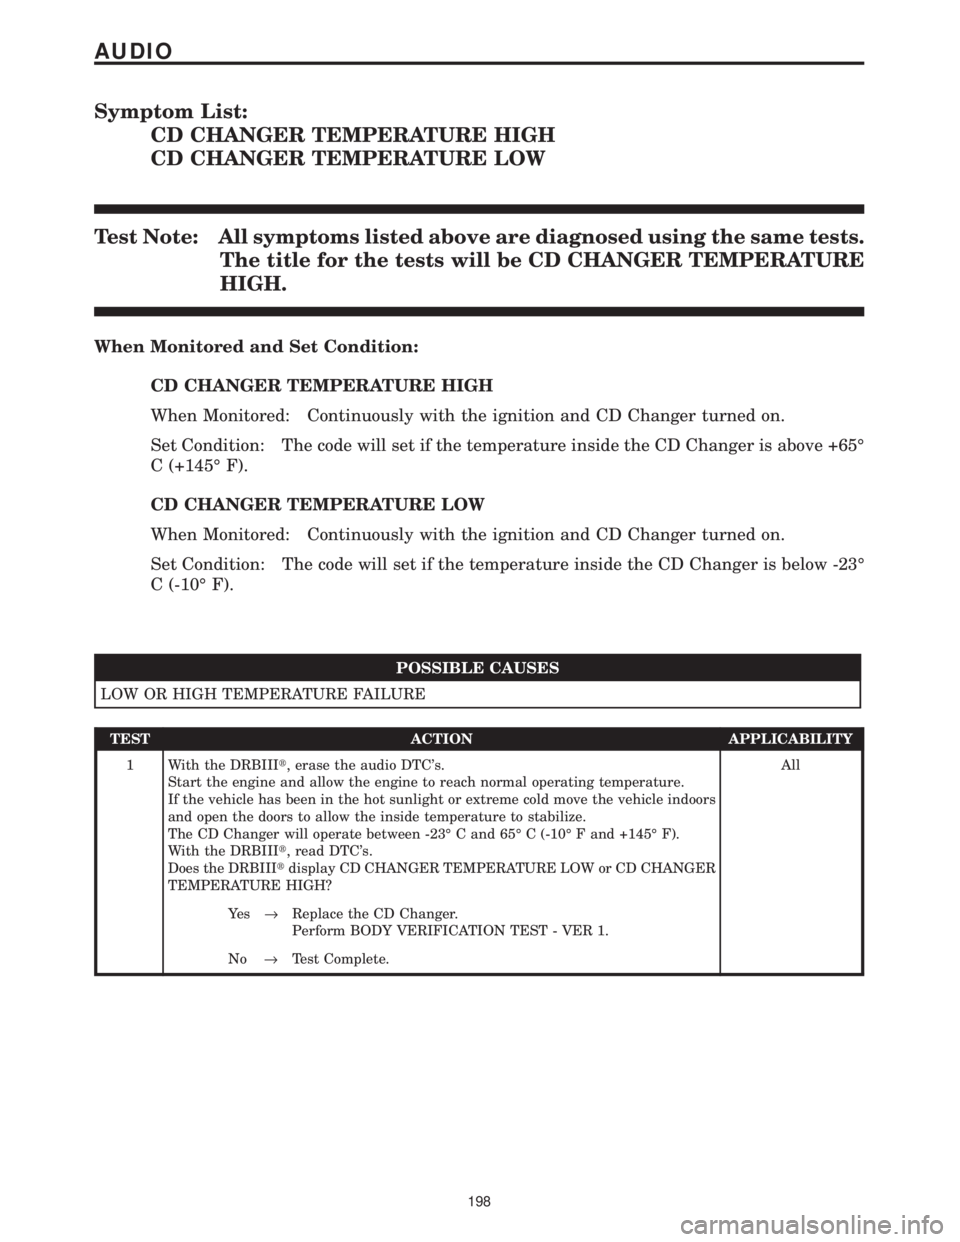
Symptom List:
CD CHANGER TEMPERATURE HIGH
CD CHANGER TEMPERATURE LOW
Test Note: All symptoms listed above are diagnosed using the same tests.
The title for the tests will be CD CHANGER TEMPERATURE
HIGH.
When Monitored and Set Condition:
CD CHANGER TEMPERATURE HIGH
When Monitored: Continuously with the ignition and CD Changer turned on.
Set Condition: The code will set if the temperature inside the CD Changer is above +65É
C (+145É F).
CD CHANGER TEMPERATURE LOW
When Monitored: Continuously with the ignition and CD Changer turned on.
Set Condition: The code will set if the temperature inside the CD Changer is below -23É
C (-10É F).
POSSIBLE CAUSES
LOW OR HIGH TEMPERATURE FAILURE
TEST ACTION APPLICABILITY
1 With the DRBIIIt, erase the audio DTC's.
Start the engine and allow the engine to reach normal operating temperature.
If the vehicle has been in the hot sunlight or extreme cold move the vehicle indoors
and open the doors to allow the inside temperature to stabilize.
The CD Changer will operate between -23É C and 65É C (-10É F and +145É F).
With the DRBIIIt, read DTC's.
Does the DRBIIItdisplay CD CHANGER TEMPERATURE LOW or CD CHANGER
TEMPERATURE HIGH?All
Ye s®Replace the CD Changer.
Perform BODY VERIFICATION TEST - VER 1.
No®Test Complete.
198
AUDIO