Page 3319 of 4284

STANDARD PROCEDURE - FLUID DRAIN AND
FILL
NOTE: For proper fluid change intervals, (Refer to
LUBRICATION & MAINTENANCE/MAINTENANCE
SCHEDULES - DESCRIPTION)
The fluid required in this transaxle is Mopart
ATF+4 (Automatic Transmission FluidÐType 9602).
Use of substitute fluids may result in improper
transaxle operation and/or failure.
FLUID DRAIN
(1) Raise vehicle on hoist.
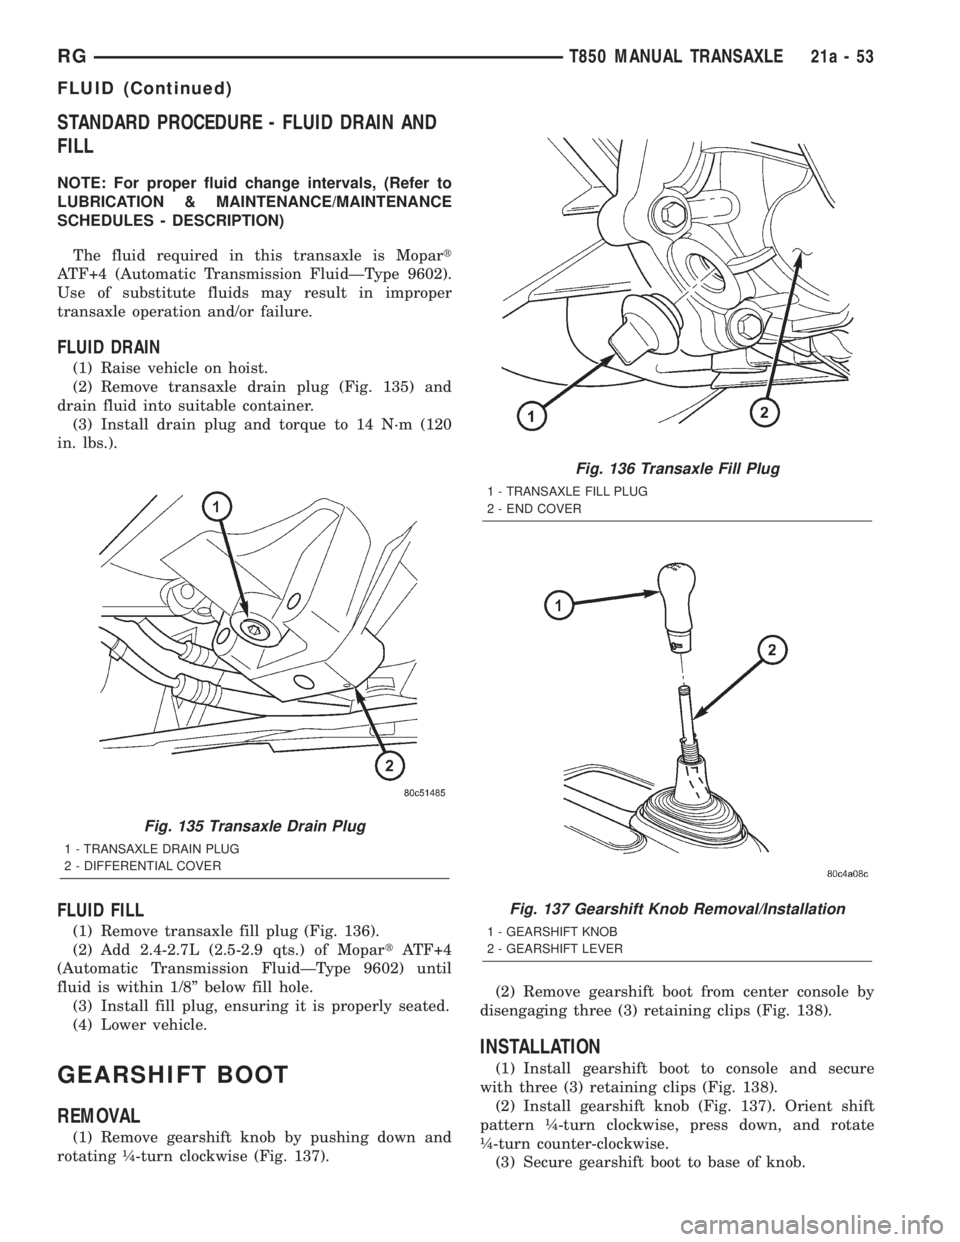
(2) Remove transaxle drain plug (Fig. 135) and
drain fluid into suitable container.
(3) Install drain plug and torque to 14 N´m (120
in. lbs.).
FLUID FILL
(1) Remove transaxle fill plug (Fig. 136).
(2) Add 2.4-2.7L (2.5-2.9 qts.) of MopartATF+4
(Automatic Transmission FluidÐType 9602) until
fluid is within 1/8º below fill hole.
(3) Install fill plug, ensuring it is properly seated.
(4) Lower vehicle.
GEARSHIFT BOOT
REMOVAL
(1) Remove gearshift knob by pushing down and
rotating ò-turn clockwise (Fig. 137).(2) Remove gearshift boot from center console by
disengaging three (3) retaining clips (Fig. 138).
INSTALLATION
(1) Install gearshift boot to console and secure
with three (3) retaining clips (Fig. 138).
(2) Install gearshift knob (Fig. 137). Orient shift
pattern ò-turn clockwise, press down, and rotate
ò-turn counter-clockwise.
(3) Secure gearshift boot to base of knob.
Fig. 135 Transaxle Drain Plug
1 - TRANSAXLE DRAIN PLUG
2 - DIFFERENTIAL COVER
Fig. 136 Transaxle Fill Plug
1 - TRANSAXLE FILL PLUG
2 - END COVER
Fig. 137 Gearshift Knob Removal/Installation
1 - GEARSHIFT KNOB
2 - GEARSHIFT LEVER
RGT850 MANUAL TRANSAXLE21a-53
FLUID (Continued)
Page 3320 of 4284
GEARSHIFT CABLE -
CROSSOVER
REMOVAL
(1) Disconnect battery negative cable.
(2) Remove gearshift knob by pushing down and
rotating ò-turn clock-wise (Fig. 139).(3) Remove gearshift boot from center console by
disengaging at three (3) retaining clips (Fig. 140).
(4) Apply park brake to allow park brake handle to
clear center console upon removal.
(5) Remove two (2) cupholder bottom plugs (Fig.
141).
(6) Remove four (4) center console-to-gearshift
mechanism screws. Remove console assembly (Fig.
142).
Fig. 138 Gearshift Boot Removal/Installation
1 - GEARSHIFT BOOT
2 - CENTER CONSOLE
Fig. 139 Gearshift Knob Removal/Installation
1 - GEARSHIFT KNOB
2 - GEARSHIFT LEVER
Fig. 140 Gearshift Boot Removal/Installation
1 - GEARSHIFT BOOT
2 - CENTER CONSOLE
Fig. 141 Cup Holder Plugs
1 - CUPHOLDER PLUG (2)
21a - 54 T850 MANUAL TRANSAXLERG
GEARSHIFT BOOT (Continued)
Page 3325 of 4284

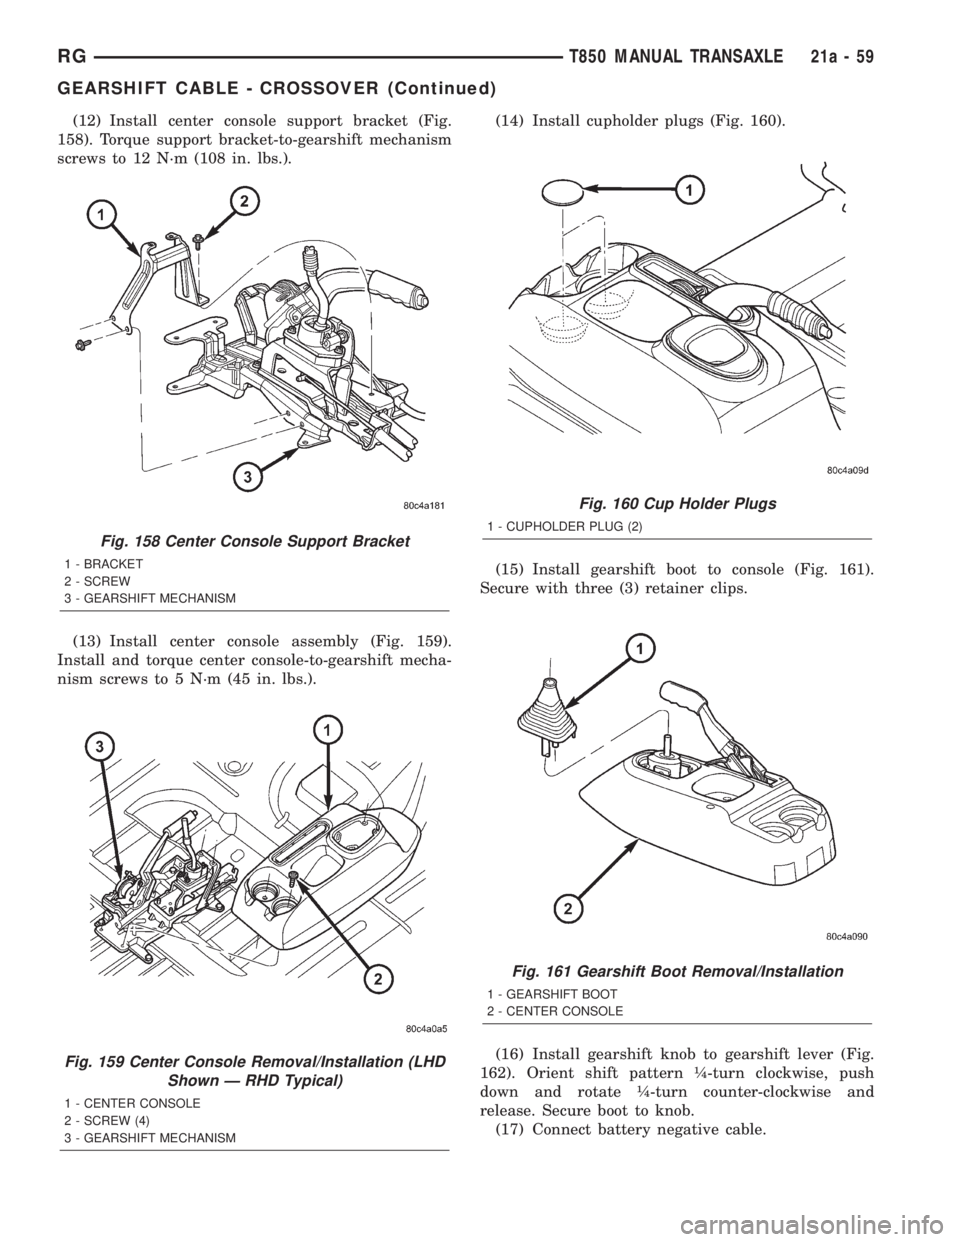
(12) Install center console support bracket (Fig.
158). Torque support bracket-to-gearshift mechanism
screws to 12 N´m (108 in. lbs.).
(13) Install center console assembly (Fig. 159).
Install and torque center console-to-gearshift mecha-
nism screws to 5 N´m (45 in. lbs.).(14) Install cupholder plugs (Fig. 160).
(15) Install gearshift boot to console (Fig. 161).
Secure with three (3) retainer clips.
(16) Install gearshift knob to gearshift lever (Fig.
162). Orient shift pattern ò-turn clockwise, push
down and rotate ò-turn counter-clockwise and
release. Secure boot to knob.
(17) Connect battery negative cable.
Fig. 158 Center Console Support Bracket
1 - BRACKET
2 - SCREW
3 - GEARSHIFT MECHANISM
Fig. 159 Center Console Removal/Installation (LHD
Shown Ð RHD Typical)
1 - CENTER CONSOLE
2 - SCREW (4)
3 - GEARSHIFT MECHANISM
Fig. 160 Cup Holder Plugs
1 - CUPHOLDER PLUG (2)
Fig. 161 Gearshift Boot Removal/Installation
1 - GEARSHIFT BOOT
2 - CENTER CONSOLE
RGT850 MANUAL TRANSAXLE21a-59
GEARSHIFT CABLE - CROSSOVER (Continued)
Page 3326 of 4284
ADJUSTMENT
(1) Disconnect battery negative cable.
(2) Remove gearshift knob by pushing down and
rotating ò-turn clock-wise (Fig. 163).(3) Remove gearshift boot from center console by
disengaging at three (3) retaining clips (Fig. 164).
(4) Apply park brake to allow park brake handle to
clear center console upon removal.
(5) Remove two (2) cupholder bottom plugs (Fig.
165).
Fig. 162 Gearshift Knob Removal/Installation
1 - GEARSHIFT KNOB
2 - GEARSHIFT LEVER
Fig. 163 Gearshift Knob Removal/Installation
1 - GEARSHIFT KNOB
2 - GEARSHIFT LEVER
Fig. 164 Gearshift Boot Removal/Installation
1 - GEARSHIFT BOOT
2 - CENTER CONSOLE
Fig. 165 Cup Holder Plugs
1 - CUPHOLDER PLUG (2)
21a - 60 T850 MANUAL TRANSAXLERG
GEARSHIFT CABLE - CROSSOVER (Continued)
Page 3327 of 4284

(6) Remove four (4) center console-to-gearshift
mechanism screws. Remove console assembly (Fig.
166).
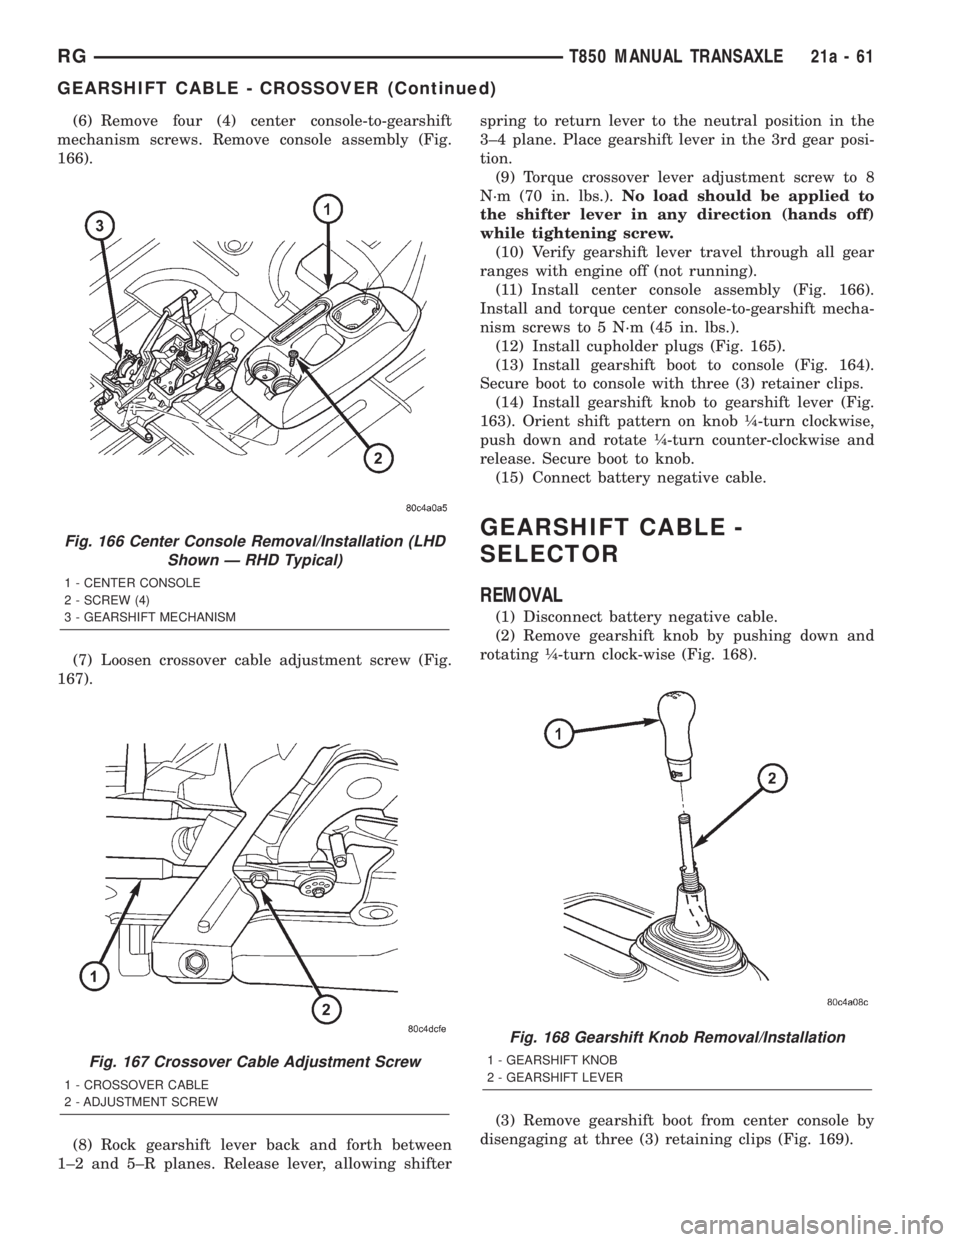
(7) Loosen crossover cable adjustment screw (Fig.
167).
(8) Rock gearshift lever back and forth between
1±2 and 5±R planes. Release lever, allowing shifterspring to return lever to the neutral position in the
3±4 plane. Place gearshift lever in the 3rd gear posi-
tion.
(9) Torque crossover lever adjustment screw to 8
N´m (70 in. lbs.).No load should be applied to
the shifter lever in any direction (hands off)
while tightening screw.
(10) Verify gearshift lever travel through all gear
ranges with engine off (not running).
(11) Install center console assembly (Fig. 166).
Install and torque center console-to-gearshift mecha-
nism screws to 5 N´m (45 in. lbs.).
(12) Install cupholder plugs (Fig. 165).
(13) Install gearshift boot to console (Fig. 164).
Secure boot to console with three (3) retainer clips.
(14) Install gearshift knob to gearshift lever (Fig.
163). Orient shift pattern on knob ò-turn clockwise,
push down and rotate ò-turn counter-clockwise and
release. Secure boot to knob.
(15) Connect battery negative cable.
GEARSHIFT CABLE -
SELECTOR
REMOVAL
(1) Disconnect battery negative cable.
(2) Remove gearshift knob by pushing down and
rotating ò-turn clock-wise (Fig. 168).
(3) Remove gearshift boot from center console by
disengaging at three (3) retaining clips (Fig. 169).
Fig. 166 Center Console Removal/Installation (LHD
Shown Ð RHD Typical)
1 - CENTER CONSOLE
2 - SCREW (4)
3 - GEARSHIFT MECHANISM
Fig. 167 Crossover Cable Adjustment Screw
1 - CROSSOVER CABLE
2 - ADJUSTMENT SCREW
Fig. 168 Gearshift Knob Removal/Installation
1 - GEARSHIFT KNOB
2 - GEARSHIFT LEVER
RGT850 MANUAL TRANSAXLE21a-61
GEARSHIFT CABLE - CROSSOVER (Continued)
Page 3333 of 4284

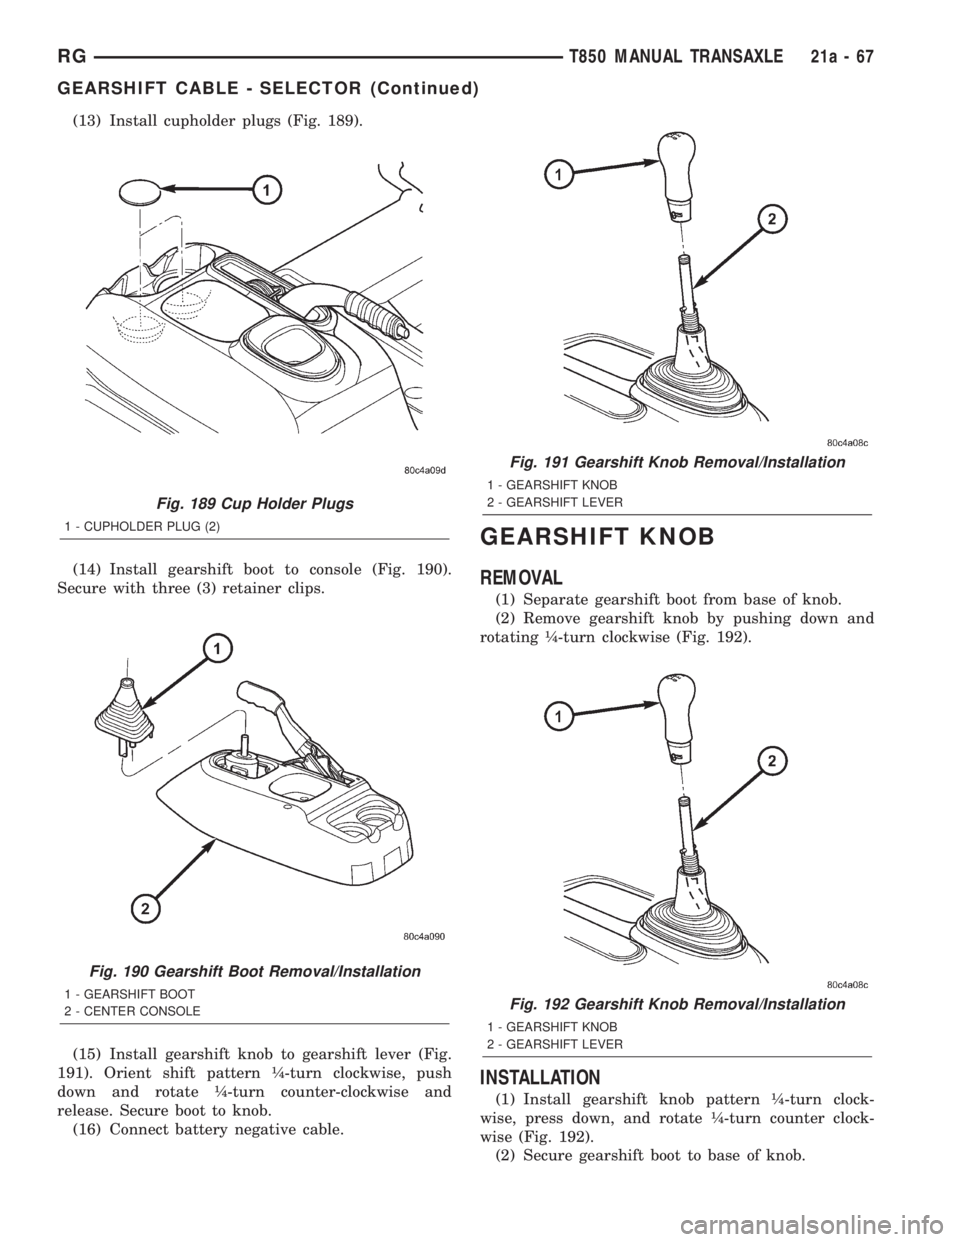
(13) Install cupholder plugs (Fig. 189).
(14) Install gearshift boot to console (Fig. 190).
Secure with three (3) retainer clips.
(15) Install gearshift knob to gearshift lever (Fig.
191). Orient shift pattern ò-turn clockwise, push
down and rotate ò-turn counter-clockwise and
release. Secure boot to knob.
(16) Connect battery negative cable.
GEARSHIFT KNOB
REMOVAL
(1) Separate gearshift boot from base of knob.
(2) Remove gearshift knob by pushing down and
rotating ò-turn clockwise (Fig. 192).
INSTALLATION
(1) Install gearshift knob pattern ò-turn clock-
wise, press down, and rotate ò-turn counter clock-
wise (Fig. 192).
(2) Secure gearshift boot to base of knob.
Fig. 189 Cup Holder Plugs
1 - CUPHOLDER PLUG (2)
Fig. 190 Gearshift Boot Removal/Installation
1 - GEARSHIFT BOOT
2 - CENTER CONSOLE
Fig. 191 Gearshift Knob Removal/Installation
1 - GEARSHIFT KNOB
2 - GEARSHIFT LEVER
Fig. 192 Gearshift Knob Removal/Installation
1 - GEARSHIFT KNOB
2 - GEARSHIFT LEVER
RGT850 MANUAL TRANSAXLE21a-67
GEARSHIFT CABLE - SELECTOR (Continued)
Page 3334 of 4284
GEARSHIFT MECHANISM
REMOVAL
(1) Disconnect battery negative cable.
(2) Remove gearshift knob by pushing down and
rotating ò turn clock-wise (Fig. 193).
(3) Remove gearshift boot from center console by
disengaging at three (3) retaining clips (Fig. 194).(4) Apply park brake to allow park brake handle to
clear center console upon removal.
(5) Remove two (2) cupholder bottom plugs (Fig.
195).
(6) Remove four (4) center console-to-gearshift
mechanism screws. Remove console assembly (Fig.
196).
Fig. 193 Gearshift Knob Removal/Installation
1 - GEARSHIFT KNOB
2 - GEARSHIFT LEVER
Fig. 194 Gearshift Boot Removal/Installation
1 - GEARSHIFT BOOT
2 - CENTER CONSOLE
Fig. 195 Cup Holder Plugs
1 - CUPHOLDER PLUG (2)
Fig. 196 Center Console Removal/Installation (LHD
Shown Ð RHD Typical)
1 - CENTER CONSOLE
2 - SCREW (4)
3 - GEARSHIFT MECHANISM
21a - 68 T850 MANUAL TRANSAXLERG
Page 3338 of 4284
(6) Install center console assembly (Fig. 209).
Install and torque center console-to-gearshift mecha-
nism screws to 5 N´m (45 in. lbs.).
(7) Install cupholder plugs (Fig. 210).(8) Install gearshift boot to console (Fig. 211).
Secure with three (3) retainer clips.
(9) Install gearshift knob to gearshift lever (Fig.
212). Orient shift pattern ò-turn clockwise, push
down and rotate ò-turn counter-clockwise and
release. Secure boot to knob.
(10) Connect battery negative cable.
Fig. 209 Center Console Removal/Installation (LHD
Shown Ð RHD Typical)
1 - CENTER CONSOLE
2 - SCREW (4)
3 - GEARSHIFT MECHANISM
Fig. 210 Cup Holder Plugs
1 - CUPHOLDER PLUG (2)
Fig. 211 Gearshift Boot Removal/Installation
1 - GEARSHIFT BOOT
2 - CENTER CONSOLE
Fig. 212 Gearshift Knob Removal/Installation
1 - GEARSHIFT KNOB
2 - GEARSHIFT LEVER
21a - 72 T850 MANUAL TRANSAXLERG
GEARSHIFT MECHANISM (Continued)