2001 CHRYSLER VOYAGER ESP
[x] Cancel search: ESPPage 816 of 4284

Symptom:
INCOMPLETE LATCH RELEASE- OVERCURRENT
When Monitored and Set Condition:
INCOMPLETE LATCH RELEASE- OVERCURRENT
When Monitored: Whenever the power liftgate is operating.
Set Condition: The latch motor stall current of 6.2 amps was detected during a release.
The main causes of this code setting is some type of blockage during the release. This code
is set during the power releasing operation.
POSSIBLE CAUSES
DTC PRESENT
BINDING LIFTGATE
LATCH ASSEMBLY
TEST ACTION APPLICABILITY
1NOTE: This DTC can be set if a redundant release command is sent during
a cinching operation. In that case it would not signify a failure of any
components.
With the DRBIIIt, record and erase DTC's.
Turn the ignition off, wait 10 seconds, then turn the ignition on.
Operate the power liftgate several times if possible.
With the DRBIIIt, read ACTIVE DTCs.
Does the DRBIIItdisplay INCOMPLETE LATCH RELEASE - OVER CURRENT?All
Ye s®Go To 2
No®Using the wiring diagram/schematic as a guide, inspect the
wiring and connectors for an intermittent condition. Operate the
door several times and check for any binding or other obstruc-
tions.
Perform BODY VERIFICATION TEST - VER 1.
2 Examine the liftgate for proper fit and alignment, loose/hard or torn seals, struts or
anything that would cause an obstruction to proper operation.
Manually operate the liftgate of a known good vehicle and notice the effort needed to
open and close.
Compare the effort needed on the disabled liftgate.
Especially notice the effort needed to unlatch and close the liftgate.
Does it take more effort to operate the liftgate than it should?All
Ye s®Refer to Service information for the related symptom(s).
Perform BODY VERIFICATION TEST - VER 1.
No®Replace the Latch Assembly.
Perform BODY VERIFICATION TEST - VER 1.
787
POWER DOORS - LIFTGATE
Page 817 of 4284
Symptom:
INCOMPLETE LATCH RELEASE- PAWL SWITCH FAILURE
When Monitored and Set Condition:
INCOMPLETE LATCH RELEASE- PAWL SWITCH FAILURE
When Monitored: Whenever the power liftgate is operating in an opening direction.
Set Condition: The release operation was not completed in 4 seconds or the release
operation has detected a stall condition. The ratchet switch was detected as grounded but
the pawl remained open. This code is set during the power releasing operation from a fully
closed liftgate.
POSSIBLE CAUSES
DTC PRESENT
BINDING DOOR
POWER LIFTGATE MODULE - PAWL CIRCUIT
GROUND WIRE OPEN
PAWL SWITCH SENSE WIRE OPEN
PAWL SWITCH
TEST ACTION APPLICABILITY
1NOTE: This DTC will only set during the cinching operation after the 4
second time out. This may make it difficult to reproduce.
With the DRBIIIt, record and erase DTC's.
Turn the ignition off, wait 10 seconds, then turn the ignition on.
Operate the power liftgate several times if possible.
With the DRBIIIt, read ACTIVE DTCs.
Does the DRBIIItdisplay INCOMPLETE LATCH RELEASE - PAWL SWITCH
FAILURE?All
Ye s®Go To 2
No®Using the wiring diagram/schematic as a guide, inspect the
wiring and connectors for an intermittent condition. Operate the
door several times and check for any binding or other obstruc-
tions.
Perform BODY VERIFICATION TEST - VER 1.
2 Examine the liftgate for proper fit and alignment, loose/ hard or torn seals, worn
teeth on the gears or anything that would cause an obstruction to proper operation.
Manually operate the liftgate of a known good vehicle and notice the effort needed to
open and close.
Compare the effort needed on the disabled liftgate.
Especially notice the effort needed to unlatch and close the liftgate.
Does it take more effort to operate the liftgate than it should?All
Ye s®Refer to Service information for the related symptom(s).
Perform BODY VERIFICATION TEST - VER 1.
No®Go To 3
788
POWER DOORS - LIFTGATE
Page 819 of 4284
Symptom:
INCOMPLETE LATCH RELEASE- SECTOR GEAR RETURN FAIL-
URE
When Monitored and Set Condition:
INCOMPLETE LATCH RELEASE- SECTOR GEAR RETURN FAILURE
When Monitored: Whenever the power liftgate is operating.
Set Condition: If the cinch release motor takes longer than 700 ms to perform a release
operation this code will set. The main causes of this code setting is some type of sticking
situation preventing the sector gear in the cinch release motor assembly to return to its
neutral position.
POSSIBLE CAUSES
DTC PRESENT
BINDING LIFTGATE
LIFTGATE CINCH RELEASE MOTOR ASSEMBLY
TEST ACTION APPLICABILITY
1 With the DRBIIIt, record and erase DTC's.
Turn the ignition off, wait 10 seconds, then turn the ignition on.
Operate the power liftgate several times if possible.
With the DRBIIIt, read ACTIVE DTCs.
Does the DRBIIItdisplay INCOMPLETE LATCH RELEASE - SECTOR GEAR
RETURN FAILURE?All
Ye s®Go To 2
No®Using the wiring diagram/schematic as a guide, inspect the
wiring and connectors for an intermittent condition. Operate the
door several times and check for any binding or other obstruc-
tions.
Perform BODY VERIFICATION TEST - VER 1.
2 Examine the liftgate for proper fit and alignment, loose/hard or torn seals, struts or
anything that would cause an obstruction to proper operation.
Manually operate the liftgate of a known good vehicle and notice the effort needed to
open and close.
Compare the effort needed on the disabled liftgate.
Especially notice the effort needed to unlatch and close the liftgate.
Does it take more effort to operate the liftgate than it should?All
Ye s®Refer to Service information for the related symptom(s).
Perform BODY VERIFICATION TEST - VER 1.
No®Replace the Liftgate Cinch Release Motor Assembly..
Perform BODY VERIFICATION TEST - VER 1.
790
POWER DOORS - LIFTGATE
Page 823 of 4284
TEST ACTION APPLICABILITY
2 Examine the liftgate for proper alignment, worn or binding hinges, weak liftgate prop
assembly, loose/ hard weatherstrip, and gear teeth on the power liftgate motor
assembly for wear or anything that would cause an obstruction to proper operation.
If necessary manually operate the power liftgate on a known good vehicle and notice
the effort needed to open and close for comparison.
Especially notice the effort needed to unlatch and close the liftgate.
Does it take more effort to operate the liftgate than it should?All
Ye s®Refer to Service information for the related symptom(s).
Perform BODY VERIFICATION TEST - VER 1.
No®Go To 3
3 Operate the liftgate from the full open position and put an obstacle in its path to
make it reverse.
Did the liftgate reverse back to the open position?All
Ye s®Go To 4
No®Replace the Power Liftgate Module.
Perform BODY VERIFICATION TEST - VER 1.
4 Disconnect the Power Liftgate Motor connector.
Using a 12-volt test light connected to 12-volts, check the Ground circuit.
Does the test light illuminate brightly?All
Ye s®Go To 5
No®Repair the hall effect ground circuit for an open.
Perform BODY VERIFICATION TEST - VER 1.
5 Disconnect the Power Liftgate Motor connector.
Disconnect the Power Liftgate Module C2 connector.
Measure the resistance of the Liftgate Hall Effect Supply circuit between the Power
Liftgate Motor connector and the Power Liftgate Module C2 connector.
Is the resistance below 5.0 ohms?All
Ye s®Go To 6
No®Repair the Liftgate Hall Effect Supply wire for an open.
Perform BODY VERIFICATION TEST - VER 1.
6 Disconnect the Power Liftgate Motor connector.
Disconnect the Power Liftgate Module C2 connector.
Measure the resistance between ground and the Liftgate Hall Effect Supply circuit.
Is the resistance below 100.0 ohms?All
Ye s®Repair the Liftgate Hall Effect Supply wire for a short to ground.
Perform BODY VERIFICATION TEST - VER 1.
No®Go To 7
7 Disconnect the Power Liftgate Motor connector.
Disconnect the Power Liftgate Module C2 connector.
Measure the resistance between the Ground circuit (cavity 20) and the Liftgate Hall
Effect Supply circuit.
Is the resistance below 1000.0 ohms?All
Ye s®Repair the Liftgate Hall Effect Supply wire for a short to the
Ground circuit.
Perform BODY VERIFICATION TEST - VER 1.
No®Go To 8
794
POWER DOORS - LIFTGATE
INCOMPLETE POWER CLOSE - MISSING HALL SIGNAL ÐContinued
Page 825 of 4284
Symptom:
INCOMPLETE POWER CLOSE - OVER CURRENT
When Monitored and Set Condition:
INCOMPLETE POWER CLOSE - OVER CURRENT
When Monitored: Anytime the liftgate is in a closing operation.
Set Condition: The drive motor stall current of over 24 amps has been detected for over
500 ms. during a close operation.
POSSIBLE CAUSES
DTC PRESENT
BINDING LIFTGATE
GROUND CIRCUIT OPEN
LIFTGATE CLOSE DRIVER CIRCUIT SHORT TO GROUND
LIFTGATE LATCH RELEASE DRIVER CIRCUIT SHORT TO GROUND
LIFTGATE LATCH RELEASE DRIVER CIRCUIT SHORT TO HARNESS GROUND
LIFTGATE GEAR ENGAGE DRIVER CIRCUIT SHORT TO GROUND
LIFTGATE GEAR ENGAGE DRIVER CIRCUIT SHORT TO HARNESS GROUND
LIFTGATE MODULE
POWER LIFTGATE MOTOR
TEST ACTION APPLICABILITY
1 With the DRBIIIt, record and erase DTC's.
Turn the ignition off, wait 10 seconds, then turn the ignition on.
Operate the power liftgate several times (if possible).
With the DRBIIIt, read DTCs.
Does the DRBIIItdisplay INCOMPLETE POWER CLOSE- OVERCURRENT?All
Ye s®Go To 2
No®Using the wiring diagram/schematic as a guide, inspect the
wiring and connectors for an intermittent condition. Operate the
liftgate several times and check for any binding conditions.
Perform BODY VERIFICATION TEST - VER 1.
2 Examine the liftgate for proper alignment, worn or binding hinges, weak or binding
liftgate prop rods, loose/ hard weatherstrip, and gear teeth on the power liftgate
motor assembly for wear or anything that would cause an obstruction to proper
operation.
Compare the effort needed on the disabled vehicle.
Especially notice the effort needed to unlatch and close the liftgate.
Does it take more effort to operate the liftgate than it should?All
Ye s®Refer to Service information for the related symptom(s).
Perform BODY VERIFICATION TEST - VER 1.
No®Go To 3
796
POWER DOORS - LIFTGATE
Page 828 of 4284
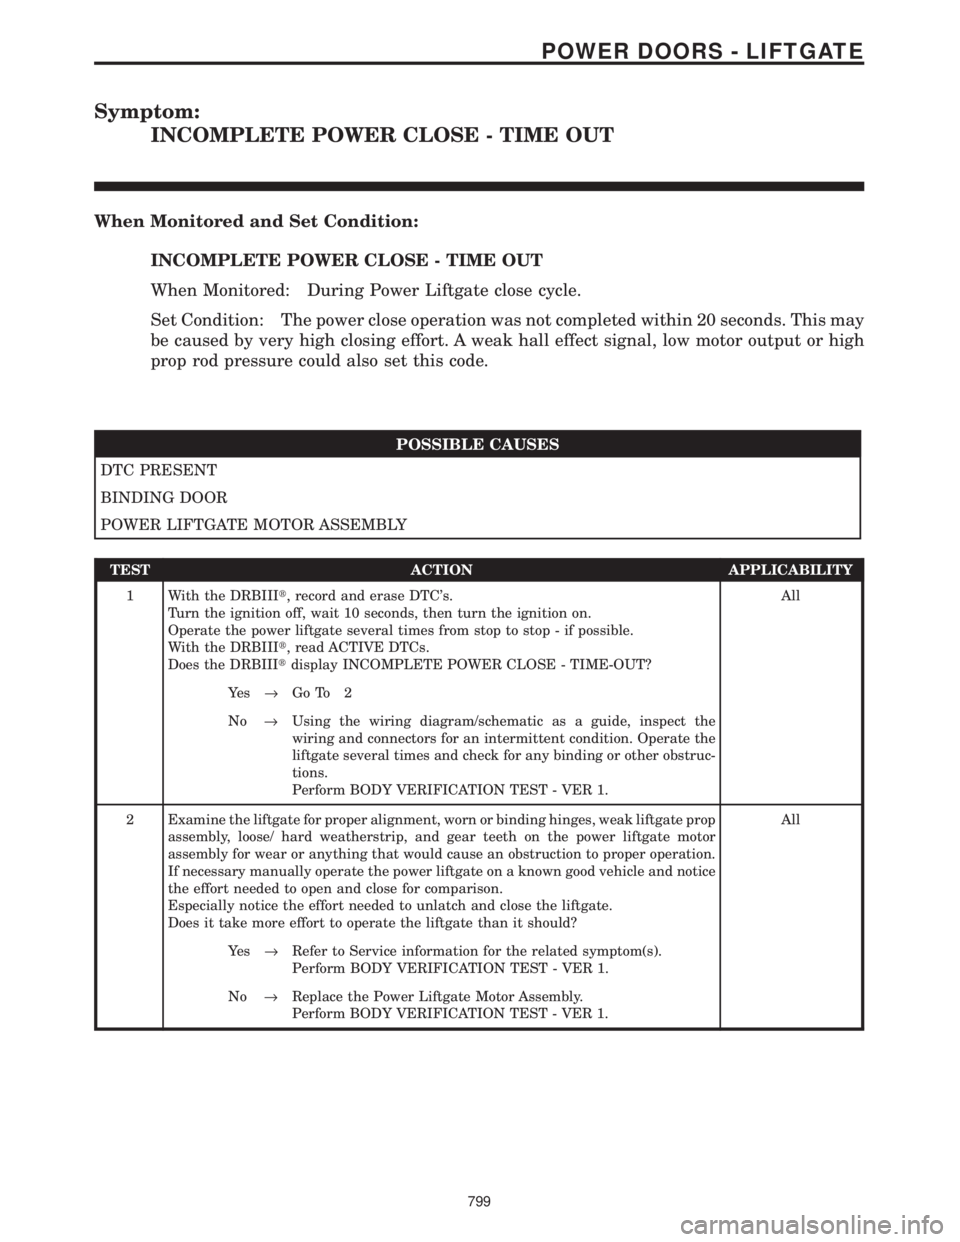
Symptom:
INCOMPLETE POWER CLOSE - TIME OUT
When Monitored and Set Condition:
INCOMPLETE POWER CLOSE - TIME OUT
When Monitored: During Power Liftgate close cycle.
Set Condition: The power close operation was not completed within 20 seconds. This may
be caused by very high closing effort. A weak hall effect signal, low motor output or high
prop rod pressure could also set this code.
POSSIBLE CAUSES
DTC PRESENT
BINDING DOOR
POWER LIFTGATE MOTOR ASSEMBLY
TEST ACTION APPLICABILITY
1 With the DRBIIIt, record and erase DTC's.
Turn the ignition off, wait 10 seconds, then turn the ignition on.
Operate the power liftgate several times from stop to stop - if possible.
With the DRBIIIt, read ACTIVE DTCs.
Does the DRBIIItdisplay INCOMPLETE POWER CLOSE - TIME-OUT?All
Ye s®Go To 2
No®Using the wiring diagram/schematic as a guide, inspect the
wiring and connectors for an intermittent condition. Operate the
liftgate several times and check for any binding or other obstruc-
tions.
Perform BODY VERIFICATION TEST - VER 1.
2 Examine the liftgate for proper alignment, worn or binding hinges, weak liftgate prop
assembly, loose/ hard weatherstrip, and gear teeth on the power liftgate motor
assembly for wear or anything that would cause an obstruction to proper operation.
If necessary manually operate the power liftgate on a known good vehicle and notice
the effort needed to open and close for comparison.
Especially notice the effort needed to unlatch and close the liftgate.
Does it take more effort to operate the liftgate than it should?All
Ye s®Refer to Service information for the related symptom(s).
Perform BODY VERIFICATION TEST - VER 1.
No®Replace the Power Liftgate Motor Assembly.
Perform BODY VERIFICATION TEST - VER 1.
799
POWER DOORS - LIFTGATE
Page 832 of 4284
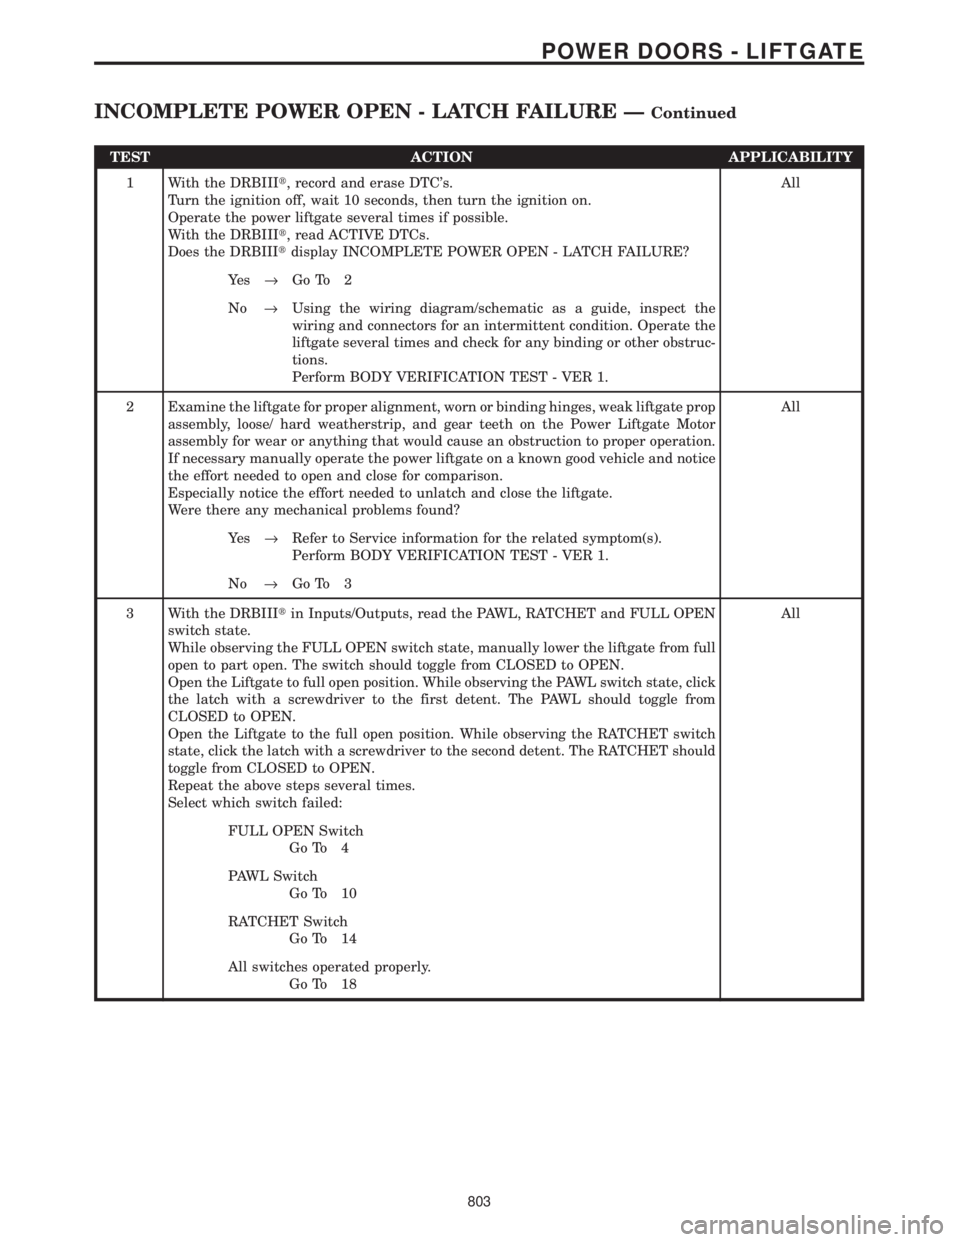
TEST ACTION APPLICABILITY
1 With the DRBIIIt, record and erase DTC's.
Turn the ignition off, wait 10 seconds, then turn the ignition on.
Operate the power liftgate several times if possible.
With the DRBIIIt, read ACTIVE DTCs.
Does the DRBIIItdisplay INCOMPLETE POWER OPEN - LATCH FAILURE?All
Ye s®Go To 2
No®Using the wiring diagram/schematic as a guide, inspect the
wiring and connectors for an intermittent condition. Operate the
liftgate several times and check for any binding or other obstruc-
tions.
Perform BODY VERIFICATION TEST - VER 1.
2 Examine the liftgate for proper alignment, worn or binding hinges, weak liftgate prop
assembly, loose/ hard weatherstrip, and gear teeth on the Power Liftgate Motor
assembly for wear or anything that would cause an obstruction to proper operation.
If necessary manually operate the power liftgate on a known good vehicle and notice
the effort needed to open and close for comparison.
Especially notice the effort needed to unlatch and close the liftgate.
Were there any mechanical problems found?All
Ye s®Refer to Service information for the related symptom(s).
Perform BODY VERIFICATION TEST - VER 1.
No®Go To 3
3 With the DRBIIItin Inputs/Outputs, read the PAWL, RATCHET and FULL OPEN
switch state.
While observing the FULL OPEN switch state, manually lower the liftgate from full
open to part open. The switch should toggle from CLOSED to OPEN.
Open the Liftgate to full open position. While observing the PAWL switch state, click
the latch with a screwdriver to the first detent. The PAWL should toggle from
CLOSED to OPEN.
Open the Liftgate to the full open position. While observing the RATCHET switch
state, click the latch with a screwdriver to the second detent. The RATCHET should
toggle from CLOSED to OPEN.
Repeat the above steps several times.
Select which switch failed:All
FULL OPEN Switch
Go To 4
PAWL Switch
Go To 10
RATCHET Switch
Go To 14
All switches operated properly.
Go To 18
803
POWER DOORS - LIFTGATE
INCOMPLETE POWER OPEN - LATCH FAILURE ÐContinued
Page 838 of 4284

TEST ACTION APPLICABILITY
2 Examine the liftgate for proper alignment, worn or binding hinges, weak liftgate prop
assembly, loose/ hard weatherstrip, and gear teeth on the Power Liftgate Motor
assembly for wear or anything that would cause an obstruction to proper operation.
If necessary manually operate the power liftgate on a known good vehicle and notice
the effort needed to open and close for comparison.
Especially notice the effort needed to unlatch and close the liftgate.
Were there any mechanical problems found?All
Ye s®Refer to Service information for the related symptom(s).
Perform BODY VERIFICATION TEST - VER 1.
No®Go To 3
3 Operate the liftgate from the full closed position and put an obstacle in it's path to
make it reverse.
Did the door reverse back to the closed position?All
Ye s®Go To 4
No®Replace the Power Liftgate Module.
Perform BODY VERIFICATION TEST - VER 1.
4 Disconnect the Power Liftgate Motor connector.
Using a 12-volt test light connected to 12-volts, check the Ground circuit.
Does the test light illuminate brightly?All
Ye s®Go To 5
No®Repair the hall effect ground circuit for an open.
Perform BODY VERIFICATION TEST - VER 1.
5 Disconnect the Power Liftgate Motor connector.
Disconnect the Power Liftgate Module C2 connector.
Measure the resistance of the Liftgate Hall Effect Supply circuit between the Power
Liftgate Motor connector and the Power Liftgate Module C2 connector.
Is the resistance below 5.0 ohms?All
Ye s®Go To 6
No®Repair the Liftgate Hall Effect Supply wire for an open.
Perform BODY VERIFICATION TEST - VER 1.
6 Disconnect the Power Liftgate Motor connector.
Disconnect the Power Liftgate Module C2 connector.
Measure the resistance between ground and the Liftgate Hall Effect Supply circuit.
Is the resistance below 100.0 ohms?All
Ye s®Repair the Door Motor Hall Effect Supply wire for a short to
ground.
Perform BODY VERIFICATION TEST - VER 1.
No®Go To 7
809
POWER DOORS - LIFTGATE
INCOMPLETE POWER OPEN - MISSING HALL SIGNAL ÐContinued