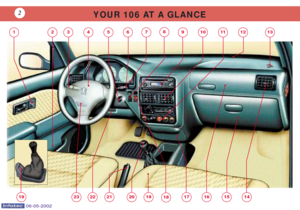
Page 65 of 107

Switching off the side lights
switches off the rear fog lamp orreturns to the front fog lamps onlyposition if the vehicle is Þtted withthem. Horn Press the end of the stalk.
Dipped/main beam. Light off. Rear fog lamp lit.
Lights off. Front fog lamps.
Front and rear fog lamps.
Lights off.
Side light on.
In both clear and rainy
weather, in daylight andat night, the rear foglamp dazzles and is the-refore prohibited.
Do not forget to switch it off assoon as it is no longer needed.
LIGHTS STALK Front lights Selection is by turning ring A.
Changing between dipped/main beam: Pull the stalk fully towards you.When your vehicle is equipped with long range light* these operatesimultaneously with the main beam. To ßash the headlamps: Flick the stalk towards you and release it. N.B.:
If the lights are left on when
you switch off the engine and open
a front door, a buzzer will sound. Direction indicators (ßashers) Left, downwards.
Right, upwards.
Fog lamps Operation is by turning ring B. The
position is shown by the warning lamps on the fascia. It operates with the dipped/main beam headlamps. These operate with the side lights, dipped and main beam headlamps.
These operate with the side lights, dipped and main beam headlamps.
Rear Front and rear
Y O U R 1 0 6 I N D E TA I L62
A
B
A
B
06-05-2002
Page 66 of 107

FRONT WINDSCREEN WIPER Windscreen wiper stalk positions: 3High speed wipe
2 Normal speed wipe
1 Intermittent wipe
0 Stop
4 A single wipe
To operate the windscreen wash: Pull the wiper stalk towards you. REAR WINDSCREEN WIPER
To operate the rear screen wiper*:
- Turn the wiper stalk
A1/8 turn
forwards for intermittent or conti- nuous wipe*.
To operate the rear screenwash:
- Turn the wiper stalk a further 1/8 turn forwards.
Headlamp wash*
To operate the headlamp wash*:
- Switch the headlamps to dipped or main beam.
- Pull the wiper stalk towards you.This operates simultaneously with the windscreen wash/wipe. * According to speciÞcation Digital clock The time is set with the ignition on,
engine off, by pressing button
Bfor
more than 3 seconds. The hourswill then ßash.
To set the hours
- A short press, the hours change slowly.
- Press and hold, the hours change swiftly. To memorise the hour displayed, release thebutton for 5 seconds, the minuteswill then ßash.
To set the minutes
- A short press, the minutes change slowly.
- Press and hold, the minutes change swiftly. To memorise the minutes displayed, release thebutton for 5 seconds.
Y O U R 1 0 6 I N D E TA I L63
0
4
1
2
3
AB
06-05-2002
Page 67 of 107
Y O U R 1 0 6 I N D E TA I L64
A
B
Front electric windows*To open or shut the windows: Ignition key in position ÒAÓor ÒMÓ . Press the appro-
priate button: Ð A: for the driverÕs window
Ð B: for the passengerÕs window
Operation is cancelled when the ignition is switched off.
* According to speciÞcation
06-05-2002
Page 68 of 107
Interior mirror The interior mirror has two posi- tions:
- Day (normal)
- Night (anti-dazzle)
To change from one to the other:push or pull the lever on the bottom edge.Manually controlled mirrors
To adjust: move the adjustment lever in all four directions.
Electrically controlled mirrors*
To adjust:
- Select the mirror using the two way
switch 1.
- Adjust the mirror using control 2.
- Return the two-way switch 1to
its central position.
* According to speciÞcation
When the vehicle is parked, the mirrors can be folded back manually.
Warning: The mirror on the driverÕs side is aspherical to eliminate the Çblind spotÈ. Therefore, objects viewed in the mirror
are, in reality, closer than they appear. This must be taken into account in order to correctly judge the distance of vehicles approaching from behind.
Y O U R 1 0 6 I N D E TA I L65
1
2
06-05-2002
Page 69 of 107
Y O U R 1 0 6 I N D E TA I L66
4
1
2 5
3
6AUDIO
RD S TA
2
12
11
10
9
8
7
5
6
31
4
CENTRAL PANEL
1- Passenger airbag disarming switch.
2- Radio cassette player.
3- Central adjustable vents for heating, ventilation
and air ßow.
4- Heating and ventilation controls.
5- Interior air recirculation or right-hand heated seat control*.
6- Ashtray.
7- Demisting control for rear screen and mirrors*.
8- Hazard warning switch.
9- Lighter.
10 - Air conditioning* or left-hand heated seat*control.
11 - Headlamps height adjustment.
12 - Lighting rheostat.
* According to speciÞcation
06-05-2002
Page 70 of 107

Heated seats*
Press the switch to operate the seat heating. Pressing it again stops the opera- tion. * According to speciÞcation
Lighting rheostat Adjustment can only be done with the engine running and the side-lights on, by pressing button
12on
the instrument panel, to increase ordecrease the instrument panel ligh-ting level.
Adjusting the headlamps
Depending on the load in your vehicle, it is recommended that theheadlamp beam is adjusted. 0- 1 or 2 people in the front seats.
Ð- 3 people.
1- 5 people.
2- 5 people + maximum authori- sed load.
3- Driver + maximum authorised load.
This adjustment can only be carriedout when the lighting control is inthe dipped/main beam position. Initial setting is position 0.
Hazard warning lights
The switch and the direction indica- tors ßash. Controls the direction indicators
simultaneously and continuously.
Use only in cases of danger, for an emergency stop or for driving inunusual conditions. Can operate with the ignition swit-
ched off.
Rear screen demister
Control for demisting the rearscreen (and exterior mirrors)*. Goes out automatically after approximately twelve minutes inorder to avoid excessive currentconsumption. Pushing it again restarts the opera- tion for twelve minutes.
Y O U R 1 0 6 I N D E TA I L67
06-05-2002
Page 71 of 107
Front ashtray:
To empty: -
press tab 1, pulling on the housing
- detach the assembly upwards.
To reÞt:
- engage the lower part,
- press tab 1,
- push downwards and close the assembly. Rear ashtray*: On 5-door:
- To empty: pull the ashtray pres-
sing downwards.
- To reÞt: push the ashtray while pressing downwards.
On 3-door:
- to empty, pull the assembly upwards. Rear parcel shelf
To remove:
Ð Unhook the two cords
1.
Ð Lift the shelf and remove it. Fixing a warning triangle The two restraining straps* located inside the boot enable a warning tri-angle to be Þxed. * According to speciÞcation.
Y O U R 1 0 6 I N D E TA I L69
1
11
06-05-2002
Page 72 of 107

Handbrake Application: When you have completed your parking manoeuvre, pull up thehandbrake to apply it.
To make application and release of
the handbrake easier, press thebrake pedal and pull the handbrakewith the engine running. Release: Press the button before releasing the handbrake.Anti-lock brake system(ABS)* In conjunction with approved tyres in good condition, the anti-lockbrake system improves the stabilityand handling of your 106, particu-larly on poor or slippery surfaces. The anti-lock brake system ope- rates automatically if there is a riskof wheel locking. Lighting of the ABS warning lamp may be due to the turning of awheel during an operation on thevehicle (changing a wheel, forexample) with the ignition on (posi-tion
M).
Note: In certain conditions, normal
operation of the system can berecognised by a light vibration ofthe brake pedal. Should an emergency stop be
necessary, press the brake pedal
Þrmly and continuously. Power steering*
This is a driving aid which offers the best compromise when parking andwhen driving at high speeds. Manual gearbox The gear positions are indicated on the gear lever knob.
1 - Reverse gear can only be
engaged with the vehicle stationary and the engineidling.
* According to speciÞcation.
Y O U R 1 0 6 I N D E TA I L70
1
06-05-2002
 1
1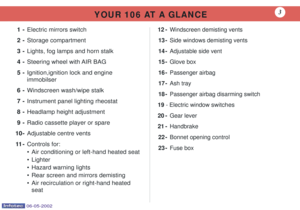 2
2 3
3 4
4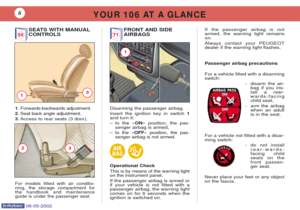 5
5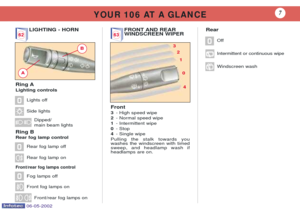 6
6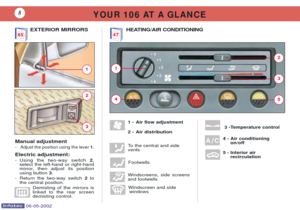 7
7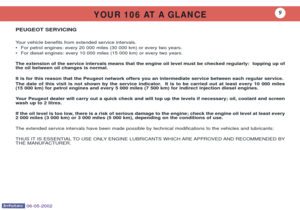 8
8 9
9 10
10 11
11 12
12 13
13 14
14 15
15 16
16 17
17 18
18 19
19 20
20 21
21 22
22 23
23 24
24 25
25 26
26 27
27 28
28 29
29 30
30 31
31 32
32 33
33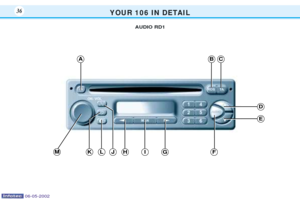 34
34 35
35 36
36 37
37 38
38 39
39 40
40 41
41 42
42 43
43 44
44 45
45 46
46 47
47 48
48 49
49 50
50 51
51 52
52 53
53 54
54 55
55 56
56 57
57 58
58 59
59 60
60 61
61 62
62 63
63 64
64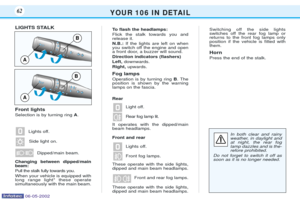 65
65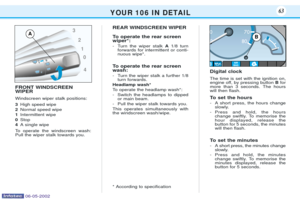 66
66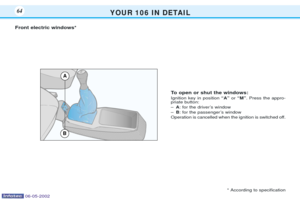 67
67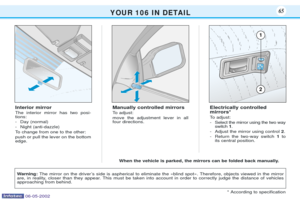 68
68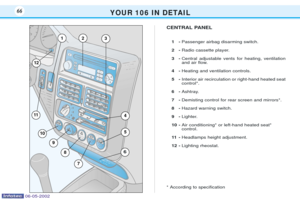 69
69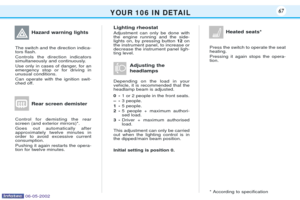 70
70 71
71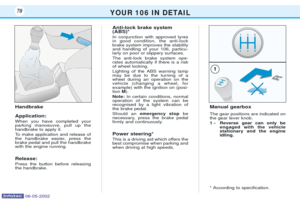 72
72 73
73 74
74 75
75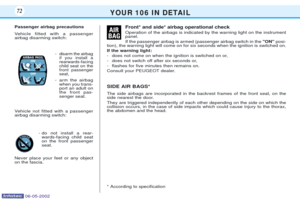 76
76 77
77 78
78 79
79 80
80 81
81 82
82 83
83 84
84 85
85 86
86 87
87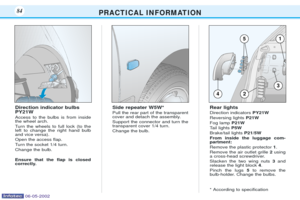 88
88 89
89 90
90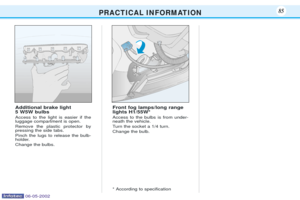 91
91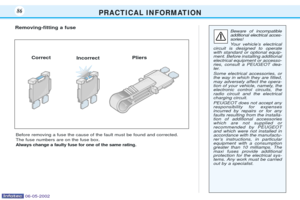 92
92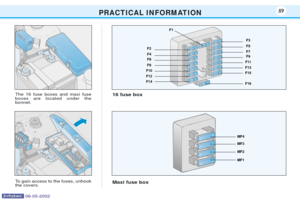 93
93 94
94 95
95 96
96 97
97 98
98 99
99 100
100 101
101 102
102 103
103 104
104 105
105 106
106

- Night (anti-dazzle)
To change from one to the other:push or pull the lever on the bottom edge.Manually controlled mirrors
To")

