Page 65 of 91

PERIODIC MAINTENANCE AND MINOR REPAIR
6-23
6
EAU02939
Front fork inspectionVisual check
EW000115
WARNING
@ Securely support the motorcycle so
there is no danger of it falling over. @Check for scratches or damage on the
inner tube and excessive oil leakage
from the front fork.
Operation check
1. Place the motorcycle on a level
place.
2. Hold the motorcycle in an upright
position and apply the front brake.
3. Push down hard on the handle-
bars several times and check if the
fork rebounds smoothly.
EC000098
CAUTION:@ If any damage or unsmooth move-
ment is found with the front fork,
consult a Yamaha dealer. @
EAU00800
BatteryThis motorcycle is equipped with a
sealed-type battery. Therefore it is not
necessary to check the electrolyte or fill
the battery with distilled water.l
If the battery seems to have dis-
charged, consult a Yamaha deal-
er.
l
If the motorcycle is equipped with
optional electrical accessories, the
battery tends to discharge more
quickly, so be sure to recharge it
periodically.
1. Battery
E_4YP_Periodic.fm Page 23 Wednesday, October 6, 1999 10:05 AM
Page 66 of 91

PERIODIC MAINTENANCE AND MINOR REPAIR
6-24
6
EC000101
CAUTION:@ Never try to remove the sealing caps
of the battery cells. The battery will
be damaged. @
EW000116
WARNING
@ Battery electrolyte is poisonous and
dangerous, causing severe burns,
etc. It contains sulfuric acid. Avoid
contact with skin, eyes or clothing.
ANTIDOTE:l
EXTERNAL: Flush with water.
l
INTERNAL: Drink large quanti-
ties of water or milk. Follow with
milk of magnesia, beaten egg,
or vegetable oil. Call a physi-
cian immediately.
l
EYES: Flush with water for
15 minutes and get prompt
medical attention.
Batteries produce explosive gases.
Keep sparks, flame, cigarettes etc.,
away. Ventilate when charging or
using in an enclosed space. Always
shield your eyes when working near
batteries. KEEP OUT OF REACH OF
CHILDREN.
@
Battery storage
When the motorcycle is not used for a
month or longer, remove the battery,
fully charge it and store it in a cool, dry
place.
EC000102
CAUTION:@ l
Completely recharge the bat-
tery before storing. Storing a
discharged battery can cause
permanent battery damage.
l
Use a battery charger designed
for a sealed-type (MF) battery.
Using a conventional battery
charger will cause battery dam-
age. If you do not have a sealed-
type battery charger, contact
your Yamaha dealer.
l
Always make sure the connec-
tions are correct when reinstall-
ing the battery.
@
E_4YP_Periodic.fm Page 24 Wednesday, October 6, 1999 10:05 AM
Page 67 of 91
PERIODIC MAINTENANCE AND MINOR REPAIR
6-25
6
EAU01702
Fuse replacementSub fuse box
The sub fuse box is located behind the
upper left side panel. To remove the
panel, remove the screw and pull the
panel outward.Main fuse box
The main fuse box is located behind
the lower left side panel.
To remove the panel
1. Remove the upper side panel.
(See under “Sub fuse box”.)
2. Remove the left passenger foot-
rest by removing the bolts.
3. Remove the screw and pull the
panel outward.1. Screw
1. Ignition fuse
2. Signaling system fuse
3. Headlight fuse
4. Fan fuse
5. Odometer fuse
6. Spare fuse (´ 3)
Specified fuses:
Ignition fuse: 10 A
Signaling system fuse: 20 A
Headlight fuse: 20 A
Fan fuse: 10 A
Odometer fuse: 5 A
1. Bolt (´ 2)
2. Screw
E_4YP_Periodic.fm Page 25 Wednesday, October 6, 1999 10:05 AM
Page 68 of 91
PERIODIC MAINTENANCE AND MINOR REPAIR
6-26
6 If any fuse is blown, turn off the main
switch and the switch of the circuit in
question. Install a new fuse of specified
amperage. Turn on the switches and
see if the electrical device operates. If
the fuse immediately blows again, con-
sult a Yamaha dealer.
EC000103
CAUTION:@ Do not use fuses of higher amper-
age rating than those recommend-
ed. Substitution of a fuse of
improper rating can cause extensive
electrical system damage and pos-
sibly a fire. @1. Main fuse
2. Spare fuseSpecified fuse:
Main fuse: 30 A
E_4YP_Periodic.fm Page 26 Wednesday, October 6, 1999 10:05 AM
Page 69 of 91

PERIODIC MAINTENANCE AND MINOR REPAIR
6-27
6
EAU00833
Headlight bulb replacementThis motorcycle is equipped with a
quartz bulb headlight.
If the headlight bulb burns out, replace
the bulb as follows:
1. Remove the headlight unit screws.2. Remove the connectors, the head-
light unit and then the bulb cover.
3. Turn the bulb holder counterclock-
wise to remove it and remove the
defective bulb.
EW000119
WARNING
@ Keep flammable products and your
hands away from a bulb while it is
on, as it is hot. Do not touch a bulb
until it cools down. @4. Put a new bulb into position and
secure it in place with the bulb
holder.
EC000105
CAUTION:@ Avoid touching the glass part of a
bulb. Keep it free from oil; other-
wise, the transparency of the glass,
life of the bulb, and luminous flux
will be adversely affected. If oil gets
on a bulb, thoroughly clean it with a
cloth moistened with alcohol or lac-
quer thinner. @5. Install the bulb cover, connectors
and headlight unit. Ask a Yamaha
dealer to adjust the headlight
beam if necessary.
1. Screw (´ 2)
1. Connector (´ 3)
E_4YP_Periodic.fm Page 27 Wednesday, October 6, 1999 10:05 AM
Page 70 of 91

PERIODIC MAINTENANCE AND MINOR REPAIR
6-28
6
EAU00855
Turn signal and taillight bulb
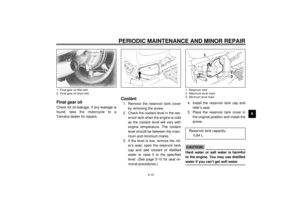
replacement1. Remove the screws and the lens.
2. Push the bulb inward and turn it
counterclockwise.
3. Place a new bulb in the socket.
Push the bulb inward and turn it
clockwise until it engages into the
socket.
4. Install the lens and the screws.
EC000108
CAUTION:@ Do not over-tighten the screws as
the lens may break. @
EAU01008
TroubleshootingAlthough Yamaha motorcycles receive
a rigid inspection before shipment from
the factory, trouble may occur during
operation.
Any problem in the fuel, compression,
or ignition systems can cause poor
starting and loss of power. The trouble-
shooting chart describes a quick, easy
procedure for making checks.
If your motorcycle requires any repair,
bring it to a Yamaha dealer. The skilled
technicians at a Yamaha dealership
have the tools, experience, and know-
how to properly service your motor-
cycle. Use only genuine Yamaha parts
on your motorcycle. Imitation parts may
look like Yamaha parts, but they are of-
ten inferior. Consequently, they have a
shorter service life and can lead to ex-
pensive repair bills.
1. Screw (´ 2)
1. Screw (´ 3)
E_4YP_Periodic.fm Page 28 Wednesday, October 6, 1999 10:05 AM
Page 71 of 91
PERIODIC MAINTENANCE AND MINOR REPAIR
6-29
6
EAU02990*
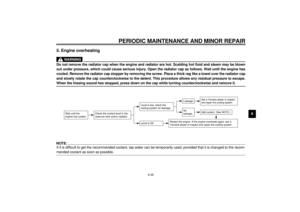
Troubleshooting chart
EW000125
WARNING
@ Never check the fuel system while smoking or in the vicinity of an open flame. @
Check if there is fuel
in the fuel tank.1. Fuel
Enough fuel.
No fuel.
Go to compression check.
Supply fuel.
Engine doesn’t start, go to compression check.
Use the electric starter.2. Compression
There is compression.
No compression.
Go to ignition check.
Ask a Yamaha dealer to
inspect.
Remove spark
plugs and
check electrodes.3. Ignition
Wet.
Dry.
Wipe clean with dry cloth and correct
spark gap or replace spark plugs.
Ask a Yamaha dealer to inspect.
Engine doesn’t start, ask a Yamaha
dealer to inspect.Engine doesn’t start, go to battery
check.Open throttle half-way and start
the engine.
Use the electric starter.4. Battery
Engine turns over
quickly.
Engine turns over
slowly.
Battery good.Check connections or
recharge.
E_4YP_Periodic.fm Page 29 Wednesday, October 6, 1999 10:05 AM
Page 72 of 91

PERIODIC MAINTENANCE AND MINOR REPAIR
6-30
6
5. Engine overheating
EW000070
WARNING
@ Do not remove the radiator cap when the engine and radiator are hot. Scalding hot fluid and steam may be blown
out under pressure, which could cause serious injury. Open the radiator cap as follows. Wait until the engine has
cooled. Remove the radiator cap stopper by removing the screw. Place a thick rag like a towel over the radiator cap
and slowly rotate the cap counterclockwise to the detent. This procedure allows any residual pressure to escape.
When the hissing sound has stopped, press down on the cap while turning counterclockwise and remove it. @NOTE:@ If it is difficult to get the recommended coolant, tap water can be temporarily used, provided that it is changed to the recom-
mended coolant as soon as possible. @
Wait until the
engine has cooled.
Check the coolant level in the
reservoir tank and/or radiator.
Level is OK.Level is low, check the
cooling system for leakage.
No
leakage.Leakage.
Ask a Yamaha dealer to inspect
and repair the cooling system.Add coolant. (See NOTE.)
Restart the engine. If the engine overheats again, ask a
Yamaha dealer to inspect and repair the cooling system.
E_4YP_Periodic.fm Page 30 Wednesday, October 6, 1999 10:05 AM