Page 57 of 101

6-11
PERIODIC MAINTENANCE AND MINOR REPAIR
1
2
3
4
5
6
7
8
9
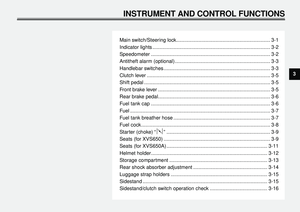
1. O-ring
2. Oil filter element
EC000066
CAUTION:
l
Do not put in any chemical ad-
ditives. Engine oil also lubri-
cates the clutch and additives
could cause clutch slippage.
l
Be sure no foreign material en-
ters the crankcase.
10. Start the engine and warm it up
for a few minutes. While warming
up, check for oil leakage. If oil
leakage is found, stop the engine
immediately and check for the
cause.
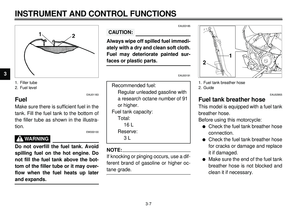
1. Final gear oil drain bolt
2. Final gear oil filler bolt
3. Proper level
EAU02943*
Final gear oil
EW000066
WARNING
Do not let foreign material enter the
final gear case. Be sure oil does not
get on the tire or wheel.
Oil level inspection
1. Place the motorcycle on a level
place and hold it in an upright po-
sition. The engine should be cool
at ambient temperature.2. Remove the oil filler bolt and
check the oil level. The oil level
should be at the brim of the filler
hole. Add the recommended oil if
necessary.
Oil replacement
1. Place an oil pan under the final
gear case.
2. Remove the oil filler bolt and drain
bolt to drain the oil.
3. Install and tighten the drain bolt to
the specified torque.
4. Fill the gear case to the brim of the
filler hole with the recommended
oil. Tightening torque:
Drain bolt:
23 Nm (2.3 m·kg)
Page 58 of 101
6-12
PERIODIC MAINTENANCE AND MINOR REPAIR
1
2
3
4
56
7
8
9
NOTE:“GL-4” is a quality and additive rating.
Hypoid gear oils rated “GL-5” or “GL-6”may also be used.
5. Install and tighten the filler bolt to
the specified torque.
6. After replacing the final gear oil,
be sure to check for oil leakage. Final gear oil quantity:
0.19 L
Recommended oil:
SAE 80 API GL-4 Hypoid gear oil
If desired, an SAE 80W90 hypoid
gear oil may be used for all
conditions.
Tightening torque:
Oil filler bolt:
23 Nm (2.3 m·kg)
1. Air filter case cover
2. Screw (´ 3)
EAU00586*
Air filterThe air filter should be cleaned at the
specified intervals. It should be
cleaned more frequently if you are
riding in unusually wet or dusty areas.
1. Remove the air filter case cover
by removing the screws.
2. Remove the air filter.
3. Tap the air filter lightly to remove
most of the dust and dirt. Blow out
the remaining dirt with com-
pressed air as shown. If the air fil-
ter is damaged, replace it.
Page 59 of 101
6-13
PERIODIC MAINTENANCE AND MINOR REPAIR
1
2
3
4
56
7
8
9
1. Holder
2. Projection
3. Slot4. Install the air filter into the air filter
case as shown.
1. Match marks5. Align the match marks and install
the air filter case cover.
EC000082
CAUTION:l
Make sure the air filter is prop-
erly seated in the air filter case.
l
The engine should never be run
without the air filter installed.
Excessive piston and/or cylin-der wear may result.
EAU00630
Carburetor adjustmentThe carburetors are important parts of
the engine and require very sophisti-
cated adjustment. Most adjustments
should be left to a Yamaha dealer who
has the professional knowledge and
experience to do so. However, the idle
speed may be adjusted by the owner
as part of routine maintenance.
EC000095
CAUTION:
The carburetors were set at the
Yamaha factory after many tests. If
they are changed, poor engine per-formance and damage may result.
Page 60 of 101
6-14
PERIODIC MAINTENANCE AND MINOR REPAIR
1
2
3
4
56
7
8
9
EAU01168
Idle speed adjustmentNOTE:A diagnostic tachometer must be usedfor this procedure.
1. Attach the tachometer. Start the
engine and warm it up for a few
minutes at approximately 1,000 to
2,000 r/min. Occasionally rev the
engine to 4,000 to 5,000 r/min.
The engine is warm when it quick-
ly responds to the throttle.
1. Throttle stop screw2. Set the idle to the specified en-
gine speed by adjusting the throt-
tle stop screw. Turn the screw in
direction a to increase engine
speed and in direction b to de-
crease engine speed.NOTE:If the specified idle speed cannot be
obtained by performing the above ad-justment, consult a Yamaha dealer.Standard idle speed:
1,150 ~ 1,250 r/min
Page 61 of 101
6-15
PERIODIC MAINTENANCE AND MINOR REPAIR
1
2
3
4
56
7
8
9
a. Free play
EAU00635
Throttle cable free play
inspectionThere should be a free play of 4 ~
6 mm at the throttle grip. If the free play
is incorrect, ask a Yamaha dealer to
make this adjustment.
EAU00637
Valve clearance adjustmentThe correct valve clearance changes
with use, resulting in improper fuel/air
supply or engine noise. To prevent
this, the valve clearance must be ad-
justed regularly. This adjustment how-
ever, should be left to a professional
Yamaha service technician.
a. Tread depth
1. Side wall
EAU00647*
TiresTo ensure maximum performance,
long service, and safe operation, note
the following:
Tire air pressure
Always check and adjust the tire pres-
sure before operating the motorcycle.
Page 62 of 101

6-16
PERIODIC MAINTENANCE AND MINOR REPAIR
1
2
3
4
56
7
8
9
EW000082
WARNING
Tire inflation pressure should be
checked and adjusted when the
temperature of the tire equals the
ambient air temperature. Tire infla-
tion pressure must be adjusted ac-
cording to total weight of cargo,
rider, passenger, and accessories
(fairing, saddlebags, etc. if ap-
proved for this model), and vehiclespeed.COPY CE-32ECE-32EXVS650
Maximum load* 180 kg
Cold tire pressure Front Rear
Up to 90 kg*200 kPa
(2.00 kg/cm
2,
2.00 bar)225 kPa
(2.25 kg/cm
2,
2.25 bar)
90 kg load ~
Maximum load*200 kPa
(2.00 kg/cm
2,
2.00 bar)250 kPa
(2.50 kg/cm
2,
2.50 bar)
* Load is the total weight of cargo, rider, passenger
and accessories.
COPY CE-32ECE-32EXVS650A
Maximum load*201 kg (except for D, A)
200 kg (for D, A)
Cold tire pressure Front Rear
Up to 90 kg*225 kPa
(2.25 kg/cm
2,
2.25 bar)225 kPa
(2.25 kg/cm
2,
2.25 bar)
90 kg load ~
Maximum load*225 kPa
(2.25 kg/cm
2,
2.25 bar)250 kPa
(2.50 kg/cm
2,
2.50 bar)
* Load is the total weight of cargo, rider, passenger
and accessories.
EW000083
WARNING
Proper loading of your motorcycle
is important for several characteris-
tics of your motorcycle, such as
handling, braking, performance and
safety. Do not carry loosely packed
items that can shift. Securely pack
your heaviest items close to the
center of the motorcycle, and dis-
tribute the weight evenly from side
to side. Properly adjust the suspen-
sion for your load, and check the
condition and pressure of your
tires. NEVER OVERLOAD YOUR
MOTORCYCLE. Make sure the total
weight of the cargo, rider, passen-
ger, and accessories (fairing, sad-
dlebags, etc. if approved for this
model) does not exceed the maxi-
mum load of the motorcycle. Opera-
tion of an overloaded motorcycle
could cause tire damage, an acci-dent, or even injury.
Page 63 of 101

6-17
PERIODIC MAINTENANCE AND MINOR REPAIR
1
2
3
4
56
7
8
9Tire inspection
Always check the tires before operat-
ing the motorcycle. If center tread
depth reaches the limit as shown, if the
tire has a nail or glass fragments in it,
or if the side wall is cracked, contact a
Yamaha dealer immediately and have
the tire replaced.
COPY CE-10ECE-10E
CE-10EFRONT (XVS650)
Manufacturer Size Type
Bridgestone 100/90-19 57S L309
Dunlop 100/90-19 57S F24
REAR (XVS650)
Manufacturer Size Type
Bridgestone 170/80-15M/C 77S G546
Dunlop 170/80-15M/C 77S K555
FRONT (XVS650A)
Manufacturer Size Type
Bridgestone 130/90-16 67S G703
Dunlop 130/90-16 67S D404F
REAR (XVS650A)
Manufacturer Size Type
Bridgestone 170/80-15M/C 77S G702
Dunlop 170/80-15M/C 77S D404
CE-26ECE-26ENOTE:These limits may be different by regu-
lation from country to country. If so,
conform to the limits specified by theregulations of your own country.
EAU00681
WARNING
l
Operating the motorcycle with
excessively worn tires de-
crease riding stability and can
lead to loss of control. Have ex-
cessively worn tires replaced
by a Yamaha dealer immediate-
ly. Brakes, tires, and related
wheel parts replacement
should be left to a Yamaha Ser-
vice Technician.
l
Patching a punctured tube is
not recommended. If it is abso-
lutely necessary to do so, use
great care and replace the tube
as soon as possible with agood quality replacement.
Minimum tire tread depth
(front and rear)1.6 mm
EAU00685
WheelsTo ensure maximum performance,
long service, and safe operation, note
the following:l
Always inspect the wheels before
a ride. Check for cracks, bends or
warpage of the wheel. Be sure
the spokes are tight and undam-
aged. If any abnormal condition
exists in a wheel, consult a
Yamaha dealer. Do not attempt
even small repairs to the wheel. If
a wheel is deformed or cracked, it
must be replaced.
l
Tires and wheels should be bal-
anced whenever either one is
changed or replaced. Failure to
have a wheel balanced can result
in poor performance, adverse
handling characteristics, and
shortened tire life.
l
Ride at moderate speeds after
changing a tire since the tire sur-
face must first be broken in for it to
develop its optimal characteristics.
Page 64 of 101
6-18
PERIODIC MAINTENANCE AND MINOR REPAIR
1
2
3
4
56
7
8
9
1. Locknut
2. Adjusting bolt
c. Free play
EAU00694
Clutch lever free play
adjustmentThe clutch lever free play should be
adjusted to 10 ~ 15 mm.
1. Loosen the locknut at the clutch
lever.
2. Turn the adjusting bolt at the
clutch lever in direction a to in-
crease free play or in direction b
to decrease free play.
3. Tighten the locknut at the clutch
lever.
1. Adjusting nut
2. LocknutIf the specified free play cannot be ob-
tained, proceed with the following
steps.
4. Loosen the locknut at the clutch
lever.
5. Turn the adjusting bolt at the
clutch lever in direction a to loos-
en the cable.
6. Loosen the locknut at the crank-
case side.
7. Turn the adjusting nut at the
crankcase in direction a to in-
crease free play or in direction b
to decrease free play.
8. Tighten the locknut at the crank-
case and the clutch lever.