2000 YAMAHA XV1600A brake fluid
[x] Cancel search: brake fluidPage 33 of 95
4-1
4
EAU01114
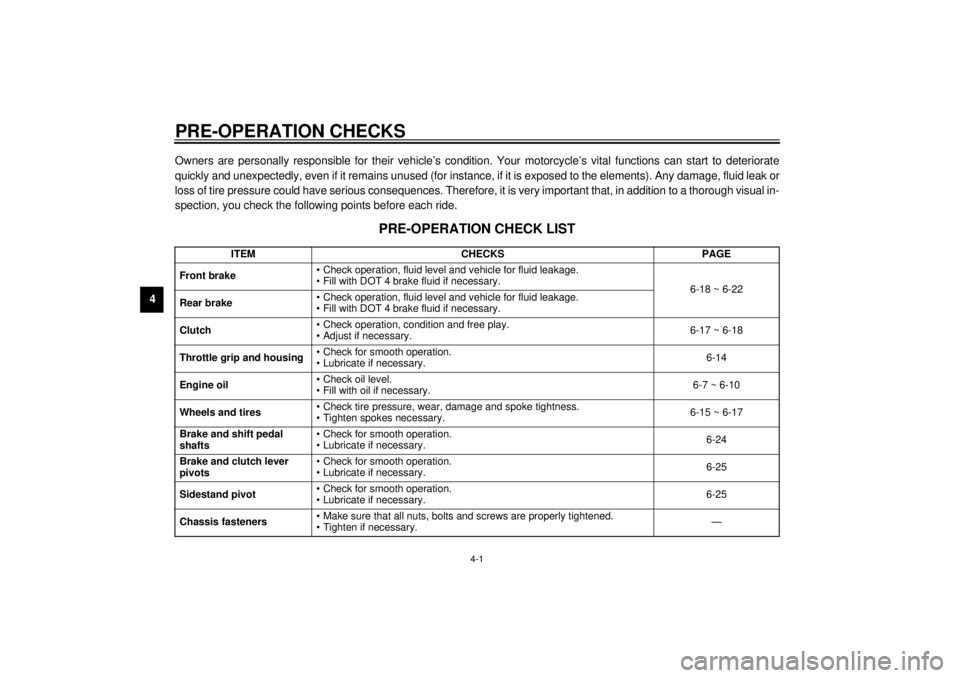
4-PRE-OPERATION CHECKSOwners are personally responsible for their vehicle’s condition. Your motorcycle’s vital functions can start to deteriorate
quickly and unexpectedly, even if it remains unused (for instance, if it is exposed to the elements). Any damage, fluid leak or
loss of tire pressure could have serious consequences. Therefore, it is very important that, in addition to a thorough visual in-
spection, you check the following points before each ride.
EAU00340
PRE-OPERATION CHECK LIST
ITEM CHECKS PAGE
Front brake• Check operation, fluid level and vehicle for fluid leakage.
• Fill with DOT 4 brake fluid if necessary.
6-18 ~ 6-22
Rear brake• Check operation, fluid level and vehicle for fluid leakage.
• Fill with DOT 4 brake fluid if necessary.
Clutch• Check operation, condition and free play.
• Adjust if necessary.6-17 ~ 6-18
Throttle grip and housing• Check for smooth operation.
• Lubricate if necessary.6-14
Engine oil• Check oil level.
• Fill with oil if necessary.6-7 ~ 6-10
Wheels and tires• Check tire pressure, wear, damage and spoke tightness.
• Tighten spokes necessary.6-15 ~ 6-17
Brake and shift pedal
shafts• Check for smooth operation.
• Lubricate if necessary.6-24
Brake and clutch lever
pivots• Check for smooth operation.
• Lubricate if necessary.6-25
Sidestand pivot• Check for smooth operation.
• Lubricate if necessary.6-25
Chassis fasteners• Make sure that all nuts, bolts and screws are properly tightened.
• Tighten if necessary.—
E_5ja_Preop.fm Page 1 Saturday, October 16, 1999 10:11 AM
Page 44 of 95

6
PERIODIC MAINTENANCE AND MINOR REPAIR
Tool kit................................................................... 6-1
Periodic maintenance and lubrication ................... 6-3
Spark plug inspection ........................................... 6-6
Engine oil .............................................................. 6-7
Transfer case oil .................................................. 6-10
Air filter ............................................................... 6-11
Carburetor adjustment ........................................ 6-13
Idle speed adjustment ........................................ 6-13
Throttle cable free play inspection ...................... 6-14
Valve clearance adjustment ................................ 6-14
Tires .................................................................... 6-15
Wheels ................................................................ 6-17
Clutch lever free play adjustment........................ 6-17
Front brake lever free play adjustment ................ 6-18
Rear brake pedal height adjustment ................... 6-19
Brake light switch adjustment ............................. 6-19
Checking the front and rear brake pads.............. 6-20Inspecting the brake fluid level ........................... 6-21
Brake fluid replacement ..................................... 6-22
Drive belt slack check ........................................ 6-22
Drive belt slack adjustment ................................ 6-23
Brake and shift pedal lubrication ........................ 6-24
Brake and clutch lever lubrication ...................... 6-25
Sidestand lubrication.......................................... 6-25
Front fork inspection ........................................... 6-26
Steering inspection ............................................ 6-26
Wheel bearings .................................................. 6-27
Battery................................................................ 6-27
Fuse replacement .............................................. 6-28
Headlight bulb replacement ............................... 6-29
Turn signal and tail/brake light bulb
replacement ..................................................... 6-31
Troubleshooting .................................................. 6-31
Troubleshooting chart ......................................... 6-32
E_5ja_PeriodicTOC.fm Page 1 Saturday, October 16, 1999 10:12 AM
Page 47 of 95

PERIODIC MAINTENANCE AND MINOR REPAIR
6-3
6
EAU00473
PERIODIC MAINTENANCE AND LUBRICATION
CP-01ENO. ITEM CHECKS AND MAINTENANCE JOBSINITIAL
(1,000 km)EVERY
6,000 km
or
6 months
(whichever
comes first)12,000 km
or
12 months
(whichever
comes first)
1
*Fuel line• Check fuel hoses for cracks or damage.
• Replace if necessary.ÖÖ
2*Fuel filter• Check condition.
• Replace if necessary.Ö
3 Spark plugs• Check condition.
• Clean, regap or replace if necessary.ÖÖÖ
4*Valves• Check valve clearance.
• Adjust if necessary.Every 24,000 km or 24 months
(whichever comes first)
5 Air filter• Clean or replace if necessary.ÖÖ
6Clutch• Check operation.
• Adjust or replace cable.ÖÖÖ
7*Front brake• Check operation, fluid level and vehicle for fluid leakage.
(See NOTE on page 6-5.)
• Correct accordingly.
• Replace brake pads if necessary.ÖÖÖ
8*Rear brake• Check operation, fluid level and vehicle for fluid leakage.
(See NOTE on page 6-5.)
• Correct accordingly.
• Replace brake pads if necessary.ÖÖÖ
9*Wheels• Check balance, runout, spoke tightness and for damage.
• Tighten spokes and rebalance, replace if necessary.ÖÖ
10*Tires• Check tread depth and for damage.
• Replace if necessary.
• Check air pressure.
• Correct if necessary.ÖÖ
E_5ja_Periodic.fm Page 3 Saturday, October 16, 1999 10:12 AM
Page 49 of 95
PERIODIC MAINTENANCE AND MINOR REPAIR
6-5
6
* Since these items require special tools, data and technical skills, they should be serviced by a Yamaha dealer.
EAU02970
NOTE:@ l
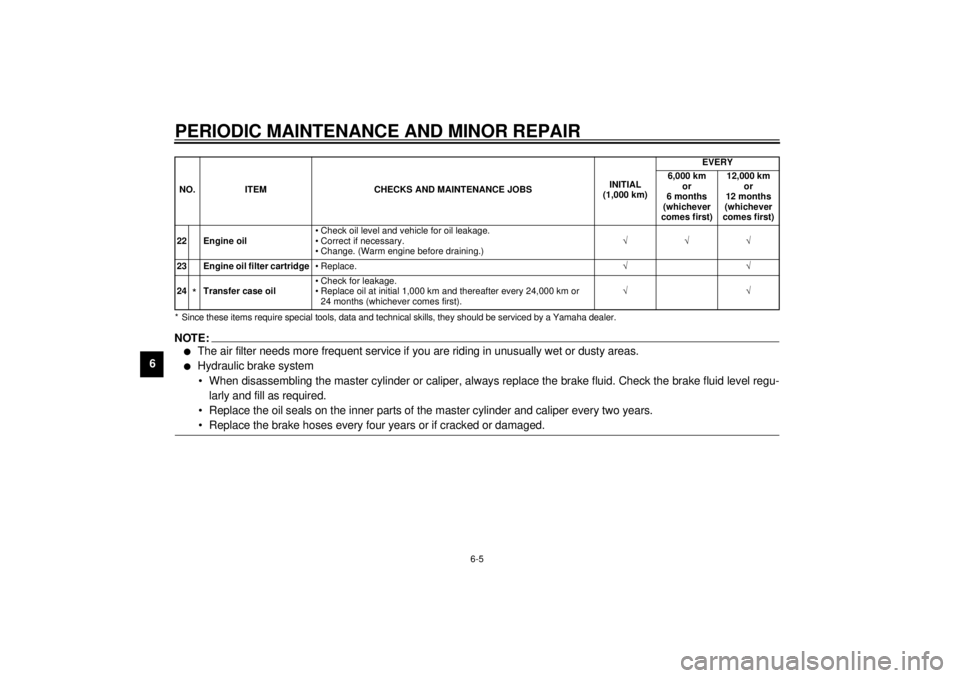
The air filter needs more frequent service if you are riding in unusually wet or dusty areas.
l
Hydraulic brake system
• When disassembling the master cylinder or caliper, always replace the brake fluid. Check the brake fluid level regu-
larly and fill as required.
• Replace the oil seals on the inner parts of the master cylinder and caliper every two years.
• Replace the brake hoses every four years or if cracked or damaged.
@22 Engine oil• Check oil level and vehicle for oil leakage.
• Correct if necessary.
• Change. (Warm engine before draining.)ÖÖÖ
23 Engine oil filter cartridge•Replace.ÖÖ
24
*Transfer case oil• Check for leakage.
• Replace oil at initial 1,000 km and thereafter every 24,000 km or
24 months (whichever comes first).ÖÖ NO. ITEM CHECKS AND MAINTENANCE JOBSINITIAL
(1,000 km)EVERY
6,000 km
or
6 months
(whichever
comes first)12,000 km
or
12 months
(whichever
comes first)
E_5ja_Periodic.fm Page 5 Saturday, October 16, 1999 10:12 AM
Page 65 of 95
PERIODIC MAINTENANCE AND MINOR REPAIR
6-21
6
EAU00731
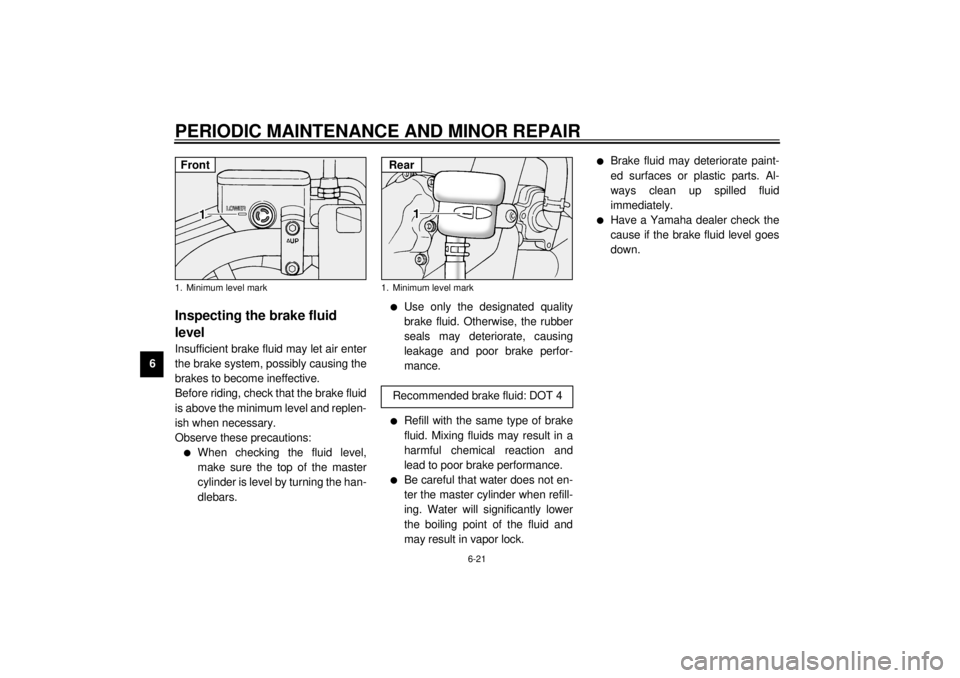
Inspecting the brake fluid
levelInsufficient brake fluid may let air enter
the brake system, possibly causing the
brakes to become ineffective.
Before riding, check that the brake fluid
is above the minimum level and replen-
ish when necessary.
Observe these precautions:l
When checking the fluid level,
make sure the top of the master
cylinder is level by turning the han-
dlebars.
l
Use only the designated quality
brake fluid. Otherwise, the rubber
seals may deteriorate, causing
leakage and poor brake perfor-
mance.
l
Refill with the same type of brake
fluid. Mixing fluids may result in a
harmful chemical reaction and
lead to poor brake performance.
l
Be careful that water does not en-
ter the master cylinder when refill-
ing. Water will significantly lower
the boiling point of the fluid and
may result in vapor lock.
l
Brake fluid may deteriorate paint-
ed surfaces or plastic parts. Al-
ways clean up spilled fluid
immediately.
l
Have a Yamaha dealer check the
cause if the brake fluid level goes
down.
1. Minimum level markFront
1. Minimum level mark
Recommended brake fluid: DOT 4Rear
E_5ja_Periodic.fm Page 21 Saturday, October 16, 1999 10:12 AM
Page 66 of 95
PERIODIC MAINTENANCE AND MINOR REPAIR
6-22
6
EAU00742
Brake fluid replacementThe brake fluid should be replaced only
by trained Yamaha service personnel.
Have the Yamaha dealer replace the
following components during periodic
maintenance or when they are dam-
aged or leaking:l
oil seals (every two years)
l
brake hoses (every four years)
EAU01830
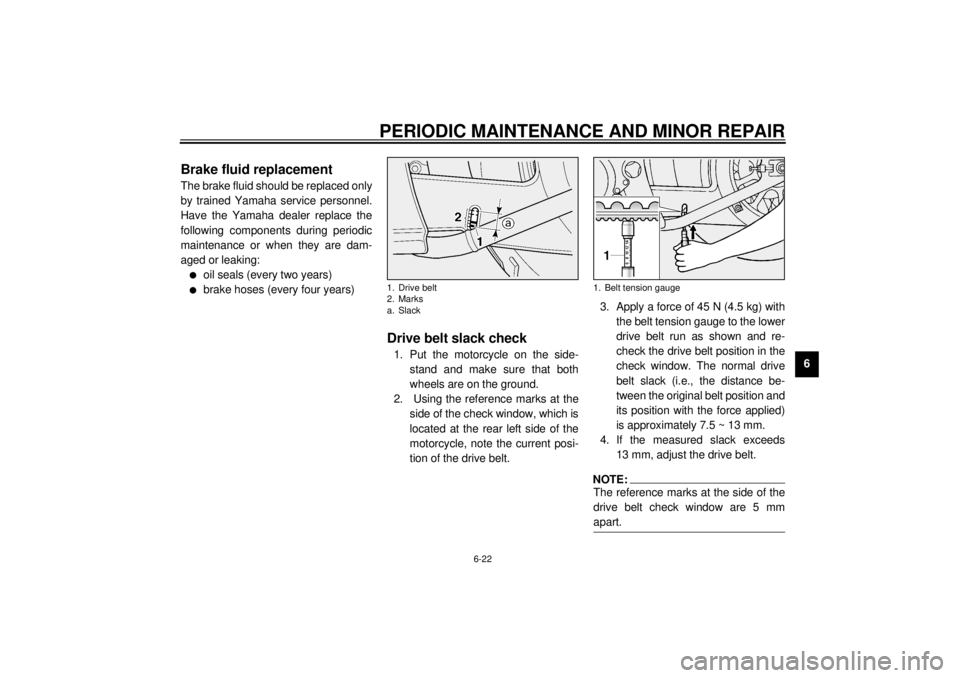
Drive belt slack check1. Put the motorcycle on the side-
stand and make sure that both
wheels are on the ground.
2. Using the reference marks at the
side of the check window, which is
located at the rear left side of the
motorcycle, note the current posi-
tion of the drive belt.3. Apply a force of 45 N (4.5 kg) with
the belt tension gauge to the lower
drive belt run as shown and re-
check the drive belt position in the
check window. The normal drive
belt slack (i.e., the distance be-
tween the original belt position and
its position with the force applied)
is approximately 7.5 ~ 13 mm.
4. If the measured slack exceeds
13 mm, adjust the drive belt.
NOTE:@ The reference marks at the side of the
drive belt check window are 5 mm
apart. @
1. Drive belt
2. Marks
a. Slack
1. Belt tension gauge
E_5ja_Periodic.fm Page 22 Saturday, October 16, 1999 10:12 AM
Page 87 of 95

SPECIFICATIONS
8-3
8
Maximum load* 196 kg
Air pressure (cold tire)
Up to 90 kg load*
Front 250 kPa (2.50 kg/cm
2, 2.50 bar)
Rear 250 kPa (2.50 kg/cm2, 2.50 bar)
90 kg load ~
maximum load*
Front 250 kPa (2.50 kg/cm2, 2.50 bar)
Rear 280 kPa (2.80 kg/cm2, 2.80 bar)
* Load is total weight of cargo, rider, passenger and accessories.
Wheels
Front
Type Spoke
Size 16 ´ MT 3.00
Rear
Type Spoke
Size 16 ´ MT 3.50
Brakes
Front
Type Dual disc brake
Operation Right hand operation
Fluid DOT 4Rear
Type Single disc brake
Operation Right foot operation
Fluid DOT 4
Suspension
Front
Ty p e Te l e s c o p i c f o r k
Rear
Type Swingarm (link suspension)
Shock absorber
Front Coil spring/oil damper
Rear Coil spring/gas-oil damper
Wheel travel
Front 140 mm
Rear 110 mm
Electrical
Ignition system T.C.I. (digital)
Charging system
Type A.C. magneto
Standard output 14 V, 21 A @ 5,000 r/min
Battery
Type YTX20L-BS
Voltage, capacity 12 V, 18 AH
E_5ja_Spec.fm Page 3 Saturday, October 16, 1999 10:18 AM
Page 93 of 95
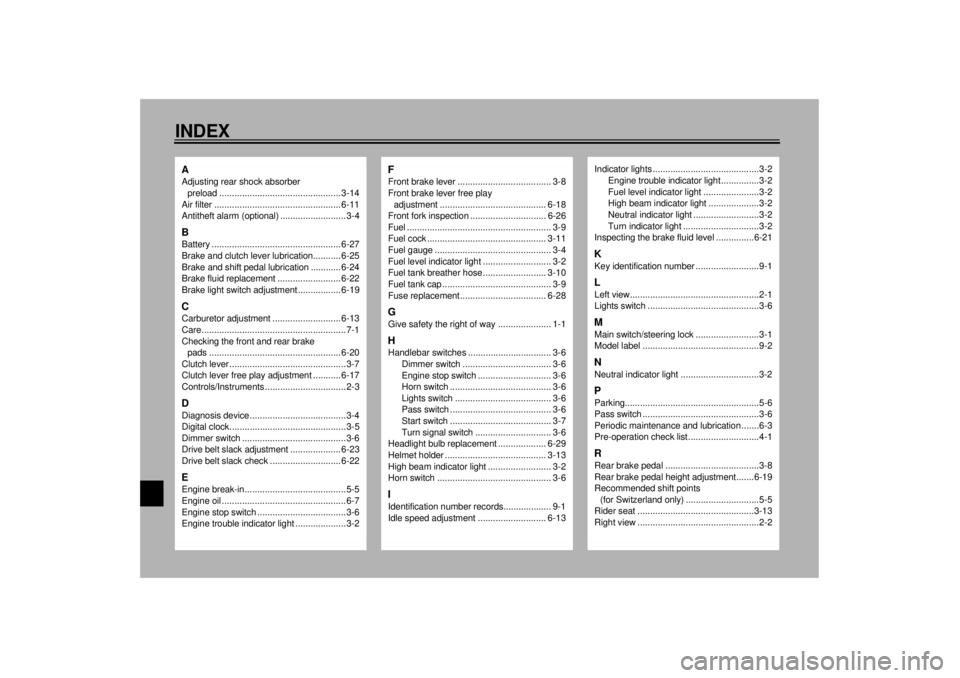
10-INDEXAAdjusting rear shock absorber
preload ................................................ 3-14
Air filter .................................................. 6-11
Antitheft alarm (optional) ..........................3-4BBattery ................................................... 6-27
Brake and clutch lever lubrication........... 6-25
Brake and shift pedal lubrication ............ 6-24
Brake fluid replacement ......................... 6-22
Brake light switch adjustment ................. 6-19CCarburetor adjustment ........................... 6-13
Care.........................................................7-1
Checking the front and rear brake
pads .................................................... 6-20
Clutch lever ..............................................3-7
Clutch lever free play adjustment ........... 6-17
Controls/Instruments ................................2-3DDiagnosis device......................................3-4
Digital clock..............................................3-5
Dimmer switch .........................................3-6
Drive belt slack adjustment .................... 6-23
Drive belt slack check ............................ 6-22EEngine break-in........................................5-5
Engine oil .................................................6-7
Engine stop switch ...................................3-6
Engine trouble indicator light ....................3-2
FFront brake lever ..................................... 3-8
Front brake lever free play
adjustment .......................................... 6-18
Front fork inspection .............................. 6-26
Fuel ......................................................... 3-9
Fuel cock ............................................... 3-11
Fuel gauge .............................................. 3-4
Fuel level indicator light ........................... 3-2
Fuel tank breather hose ......................... 3-10
Fuel tank cap ........................................... 3-9
Fuse replacement.................................. 6-28GGive safety the right of way ..................... 1-1HHandlebar switches ................................. 3-6
Dimmer switch ................................... 3-6
Engine stop switch ............................. 3-6
Horn switch ........................................ 3-6
Lights switch ...................................... 3-6
Pass switch ........................................ 3-6
Start switch ........................................ 3-7
Turn signal switch .............................. 3-6
Headlight bulb replacement ................... 6-29
Helmet holder ........................................ 3-13
High beam indicator light ......................... 3-2
Horn switch ............................................. 3-6IIdentification number records................... 9-1
Idle speed adjustment ........................... 6-13
Indicator lights ..........................................3-2
Engine trouble indicator light ...............3-2
Fuel level indicator light ......................3-2
High beam indicator light ....................3-2
Neutral indicator light ..........................3-2
Turn indicator light ..............................3-2
Inspecting the brake fluid level ...............6-21KKey identification number .........................9-1LLeft view...................................................2-1
Lights switch ............................................3-6MMain switch/steering lock .........................3-1
Model label ..............................................9-2NNeutral indicator light ...............................3-2PParking.....................................................5-6
Pass switch ..............................................3-6
Periodic maintenance and lubrication .......6-3
Pre-operation check list ............................4-1RRear brake pedal .....................................3-8
Rear brake pedal height adjustment.......6-19
Recommended shift points
(for Switzerland only) .............................5-5
Rider seat ..............................................3-13
Right view ................................................2-2
E_5jaIX.fm Page 1 Saturday, October 16, 1999 10:19 AM