2000 YAMAHA XV1600A air filter
[x] Cancel search: air filterPage 44 of 95

6
PERIODIC MAINTENANCE AND MINOR REPAIR
Tool kit................................................................... 6-1
Periodic maintenance and lubrication ................... 6-3
Spark plug inspection ........................................... 6-6
Engine oil .............................................................. 6-7
Transfer case oil .................................................. 6-10
Air filter ............................................................... 6-11
Carburetor adjustment ........................................ 6-13
Idle speed adjustment ........................................ 6-13
Throttle cable free play inspection ...................... 6-14
Valve clearance adjustment ................................ 6-14
Tires .................................................................... 6-15
Wheels ................................................................ 6-17
Clutch lever free play adjustment........................ 6-17
Front brake lever free play adjustment ................ 6-18
Rear brake pedal height adjustment ................... 6-19
Brake light switch adjustment ............................. 6-19
Checking the front and rear brake pads.............. 6-20Inspecting the brake fluid level ........................... 6-21
Brake fluid replacement ..................................... 6-22
Drive belt slack check ........................................ 6-22
Drive belt slack adjustment ................................ 6-23
Brake and shift pedal lubrication ........................ 6-24
Brake and clutch lever lubrication ...................... 6-25
Sidestand lubrication.......................................... 6-25
Front fork inspection ........................................... 6-26
Steering inspection ............................................ 6-26
Wheel bearings .................................................. 6-27
Battery................................................................ 6-27
Fuse replacement .............................................. 6-28
Headlight bulb replacement ............................... 6-29
Turn signal and tail/brake light bulb
replacement ..................................................... 6-31
Troubleshooting .................................................. 6-31
Troubleshooting chart ......................................... 6-32
E_5ja_PeriodicTOC.fm Page 1 Saturday, October 16, 1999 10:12 AM
Page 47 of 95

PERIODIC MAINTENANCE AND MINOR REPAIR
6-3
6
EAU00473
PERIODIC MAINTENANCE AND LUBRICATION
CP-01ENO. ITEM CHECKS AND MAINTENANCE JOBSINITIAL
(1,000 km)EVERY
6,000 km
or
6 months
(whichever
comes first)12,000 km
or
12 months
(whichever
comes first)
1
*Fuel line• Check fuel hoses for cracks or damage.
• Replace if necessary.ÖÖ
2*Fuel filter• Check condition.
• Replace if necessary.Ö
3 Spark plugs• Check condition.
• Clean, regap or replace if necessary.ÖÖÖ
4*Valves• Check valve clearance.
• Adjust if necessary.Every 24,000 km or 24 months
(whichever comes first)
5 Air filter• Clean or replace if necessary.ÖÖ
6Clutch• Check operation.
• Adjust or replace cable.ÖÖÖ
7*Front brake• Check operation, fluid level and vehicle for fluid leakage.
(See NOTE on page 6-5.)
• Correct accordingly.
• Replace brake pads if necessary.ÖÖÖ
8*Rear brake• Check operation, fluid level and vehicle for fluid leakage.
(See NOTE on page 6-5.)
• Correct accordingly.
• Replace brake pads if necessary.ÖÖÖ
9*Wheels• Check balance, runout, spoke tightness and for damage.
• Tighten spokes and rebalance, replace if necessary.ÖÖ
10*Tires• Check tread depth and for damage.
• Replace if necessary.
• Check air pressure.
• Correct if necessary.ÖÖ
E_5ja_Periodic.fm Page 3 Saturday, October 16, 1999 10:12 AM
Page 49 of 95
PERIODIC MAINTENANCE AND MINOR REPAIR
6-5
6
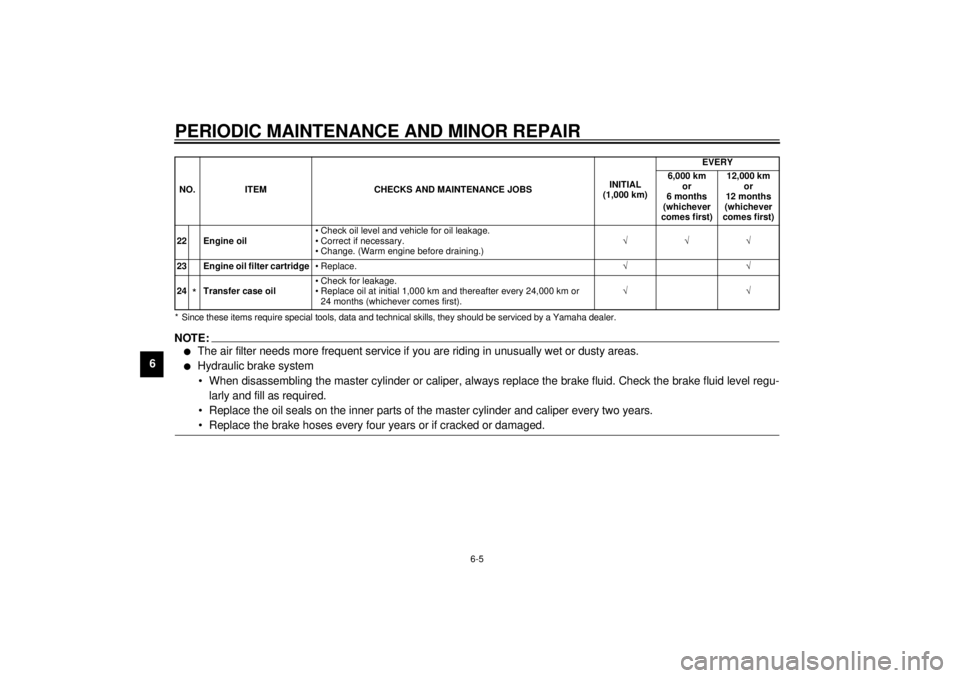
* Since these items require special tools, data and technical skills, they should be serviced by a Yamaha dealer.
EAU02970
NOTE:@ l
The air filter needs more frequent service if you are riding in unusually wet or dusty areas.
l
Hydraulic brake system
• When disassembling the master cylinder or caliper, always replace the brake fluid. Check the brake fluid level regu-
larly and fill as required.
• Replace the oil seals on the inner parts of the master cylinder and caliper every two years.
• Replace the brake hoses every four years or if cracked or damaged.
@22 Engine oil• Check oil level and vehicle for oil leakage.
• Correct if necessary.
• Change. (Warm engine before draining.)ÖÖÖ
23 Engine oil filter cartridge•Replace.ÖÖ
24
*Transfer case oil• Check for leakage.
• Replace oil at initial 1,000 km and thereafter every 24,000 km or
24 months (whichever comes first).ÖÖ NO. ITEM CHECKS AND MAINTENANCE JOBSINITIAL
(1,000 km)EVERY
6,000 km
or
6 months
(whichever
comes first)12,000 km
or
12 months
(whichever
comes first)
E_5ja_Periodic.fm Page 5 Saturday, October 16, 1999 10:12 AM
Page 52 of 95
PERIODIC MAINTENANCE AND MINOR REPAIR
6-8
6
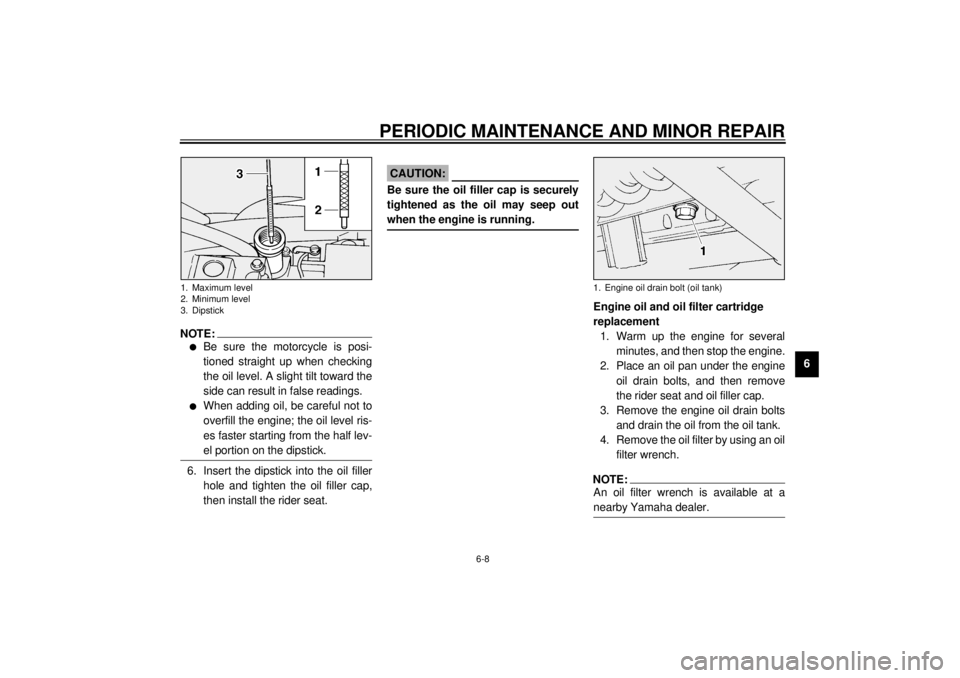
NOTE:@ l
Be sure the motorcycle is posi-
tioned straight up when checking
the oil level. A slight tilt toward the
side can result in false readings.
l
When adding oil, be careful not to
overfill the engine; the oil level ris-
es faster starting from the half lev-
el portion on the dipstick.
@6. Insert the dipstick into the oil filler
hole and tighten the oil filler cap,
then install the rider seat.
ECA00027
CAUTION:@ Be sure the oil filler cap is securely
tightened as the oil may seep out
when the engine is running. @
Engine oil and oil filter cartridge
replacement
1. Warm up the engine for several
minutes, and then stop the engine.
2. Place an oil pan under the engine
oil drain bolts, and then remove
the rider seat and oil filler cap.
3. Remove the engine oil drain bolts
and drain the oil from the oil tank.
4. Remove the oil filter by using an oil
filter wrench.NOTE:@ An oil filter wrench is available at a
nearby Yamaha dealer. @
1. Maximum level
2. Minimum level
3. Dipstick
1. Engine oil drain bolt (oil tank)
E_5ja_Periodic.fm Page 8 Saturday, October 16, 1999 10:12 AM
Page 53 of 95
PERIODIC MAINTENANCE AND MINOR REPAIR
6-9
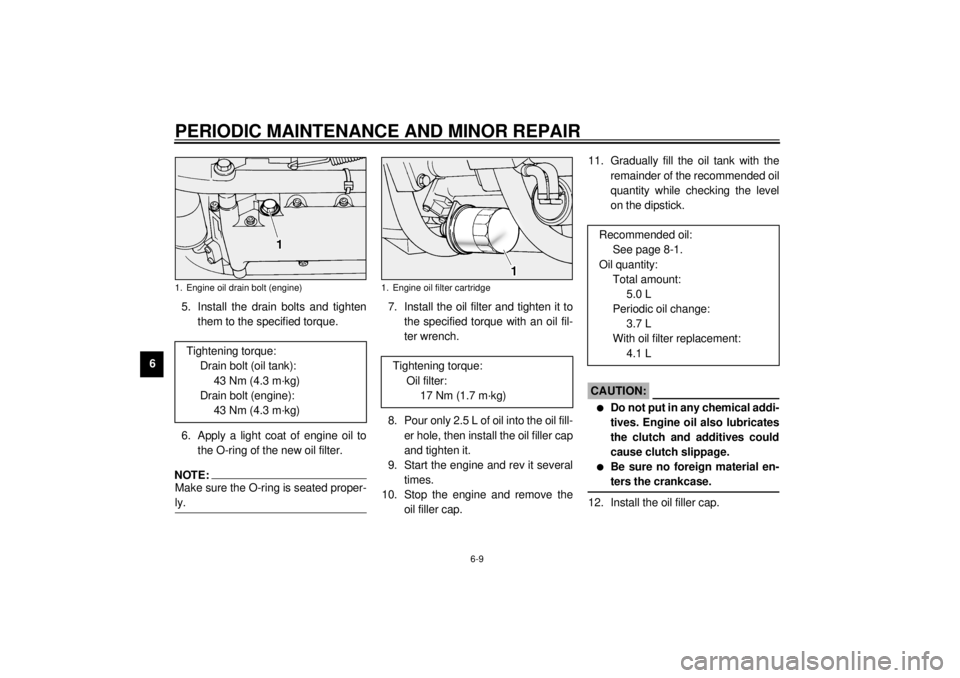
65. Install the drain bolts and tighten
them to the specified torque.
6. Apply a light coat of engine oil to
the O-ring of the new oil filter.
NOTE:@ Make sure the O-ring is seated proper-
ly. @
7. Install the oil filter and tighten it to
the specified torque with an oil fil-
ter wrench.
8. Pour only 2.5 L of oil into the oil fill-
er hole, then install the oil filler cap
and tighten it.
9. Start the engine and rev it several
times.
10. Stop the engine and remove the
oil filler cap.11. Gradually fill the oil tank with the
remainder of the recommended oil
quantity while checking the level
on the dipstick.
EC000066
CAUTION:@ l
Do not put in any chemical addi-
tives. Engine oil also lubricates
the clutch and additives could
cause clutch slippage.
l
Be sure no foreign material en-
ters the crankcase.
@12. Install the oil filler cap.
1. Engine oil drain bolt (engine)Tightening torque:
Drain bolt (oil tank):
43 Nm (4.3 m·kg)
Drain bolt (engine):
43 Nm (4.3 m·kg)
1. Engine oil filter cartridge
Tightening torque:
Oil filter:
17 Nm (1.7 m·kg)
Recommended oil:
See page 8-1.
Oil quantity:
Total amount:
5.0 L
Periodic oil change:
3.7 L
With oil filter replacement:
4.1 L
E_5ja_Periodic.fm Page 9 Saturday, October 16, 1999 10:12 AM
Page 55 of 95
PERIODIC MAINTENANCE AND MINOR REPAIR
6-11
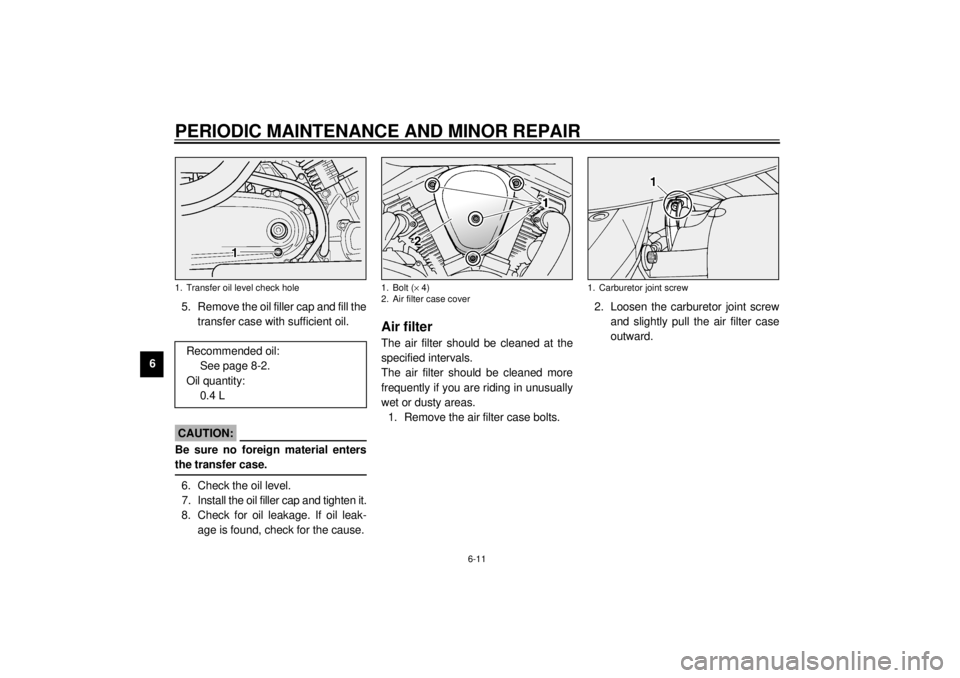
65. Remove the oil filler cap and fill the
transfer case with sufficient oil.
ECA00024
CAUTION:@ Be sure no foreign material enters
the transfer case. @6. Check the oil level.
7. Install the oil filler cap and tighten it.
8. Check for oil leakage. If oil leak-
age is found, check for the cause.
EAU01829
Air filterThe air filter should be cleaned at the
specified intervals.
The air filter should be cleaned more
frequently if you are riding in unusually
wet or dusty areas.
1. Remove the air filter case bolts.2. Loosen the carburetor joint screw
and slightly pull the air filter case
outward.
1. Transfer oil level check holeRecommended oil:
See page 8-2.
Oil quantity:
0.4 L
1. Bolt (´ 4)
2. Air filter case cover
1. Carburetor joint screw
E_5ja_Periodic.fm Page 11 Saturday, October 16, 1999 10:12 AM
Page 56 of 95
PERIODIC MAINTENANCE AND MINOR REPAIR
6-12
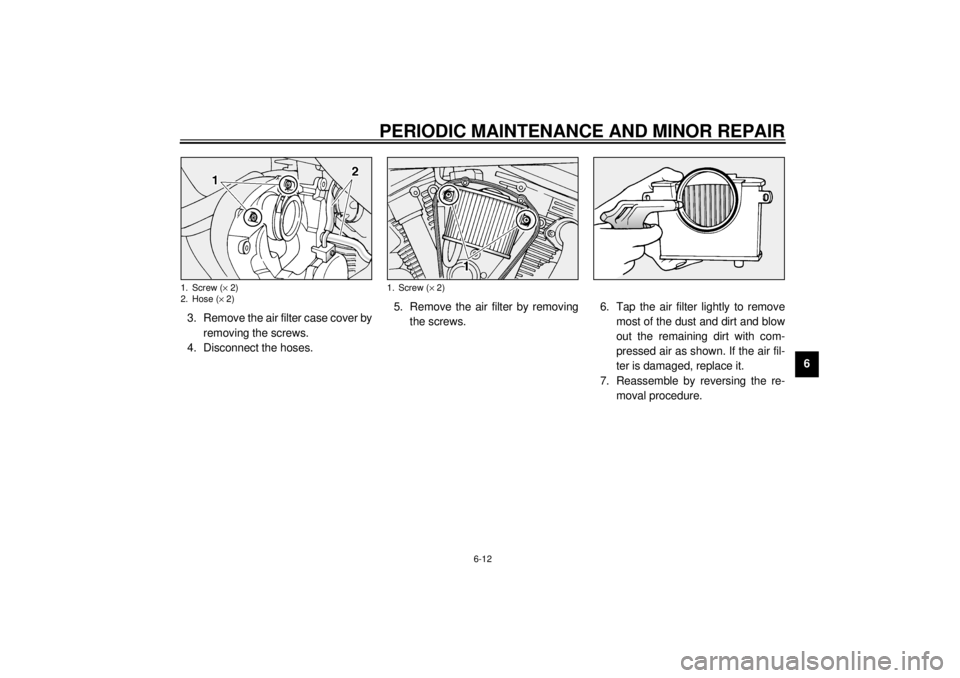
6 3. Remove the air filter case cover by
removing the screws.
4. Disconnect the hoses.5. Remove the air filter by removing
the screws.6. Tap the air filter lightly to remove
most of the dust and dirt and blow
out the remaining dirt with com-
pressed air as shown. If the air fil-
ter is damaged, replace it.
7. Reassemble by reversing the re-
moval procedure.
1. Screw (´ 2)
2. Hose (´ 2)
1. Screw (´ 2)
E_5ja_Periodic.fm Page 12 Saturday, October 16, 1999 10:12 AM
Page 57 of 95
PERIODIC MAINTENANCE AND MINOR REPAIR
6-13
6
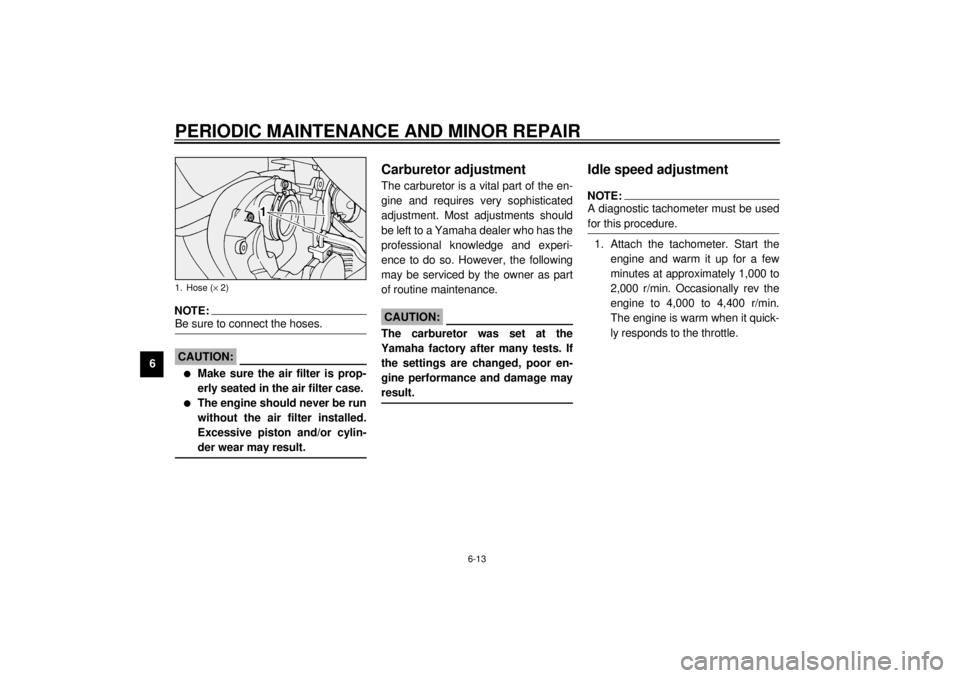
NOTE:@ Be sure to connect the hoses. @
EC000082
CAUTION:@ l
Make sure the air filter is prop-
erly seated in the air filter case.
l
The engine should never be run
without the air filter installed.
Excessive piston and/or cylin-
der wear may result.
@
EAU00629
Carburetor adjustmentThe carburetor is a vital part of the en-
gine and requires very sophisticated
adjustment. Most adjustments should
be left to a Yamaha dealer who has the
professional knowledge and experi-
ence to do so. However, the following
may be serviced by the owner as part
of routine maintenance.
EC000094
CAUTION:@ The carburetor was set at the
Yamaha factory after many tests. If
the settings are changed, poor en-
gine performance and damage may
result. @
EAU01168*
Idle speed adjustmentNOTE:@ A diagnostic tachometer must be used
for this procedure. @1. Attach the tachometer. Start the
engine and warm it up for a few
minutes at approximately 1,000 to
2,000 r/min. Occasionally rev the
engine to 4,000 to 4,400 r/min.
The engine is warm when it quick-
ly responds to the throttle.
1. Hose (´ 2)E_5ja_Periodic.fm Page 13 Saturday, October 16, 1999 10:12 AM