Page 15 of 95
3-1
3
EAU00027
3-INSTRUMENT AND CONTROL FUNCTIONS
EAU00029*
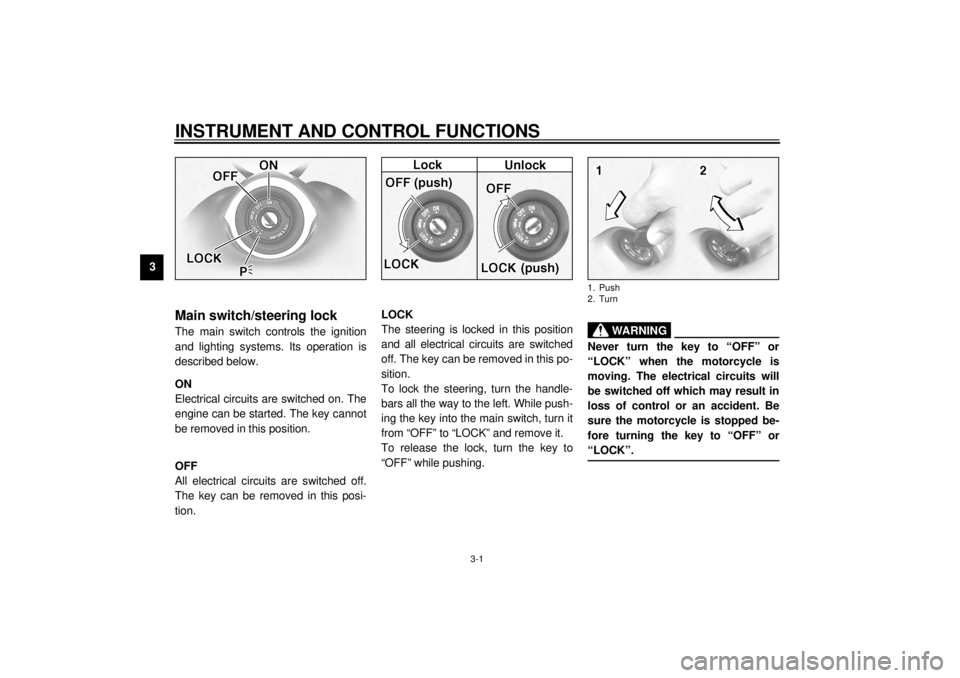
Main switch/steering lockThe main switch controls the ignition
and lighting systems. Its operation is
described below.
EAU00036
ON
Electrical circuits are switched on. The
engine can be started. The key cannot
be removed in this position.
EAU00038
OFF
All electrical circuits are switched off.
The key can be removed in this posi-
tion.
EAU00040
LOCK
The steering is locked in this position
and all electrical circuits are switched
off. The key can be removed in this po-
sition.
To lock the steering, turn the handle-
bars all the way to the left. While push-
ing the key into the main switch, turn it
from “OFF” to “LOCK” and remove it.
To release the lock, turn the key to
“OFF” while pushing.
EW000016
WARNING
@ Never turn the key to “OFF” or
“LOCK” when the motorcycle is
moving. The electrical circuits will
be switched off which may result in
loss of control or an accident. Be
sure the motorcycle is stopped be-
fore turning the key to “OFF” or
“LOCK”. @1. Push
2. Turn
E_5ja_Functions.fm Page 1 Saturday, October 16, 1999 10:10 AM
Page 20 of 95
INSTRUMENT AND CONTROL FUNCTIONS
3-6
3
EAU00118
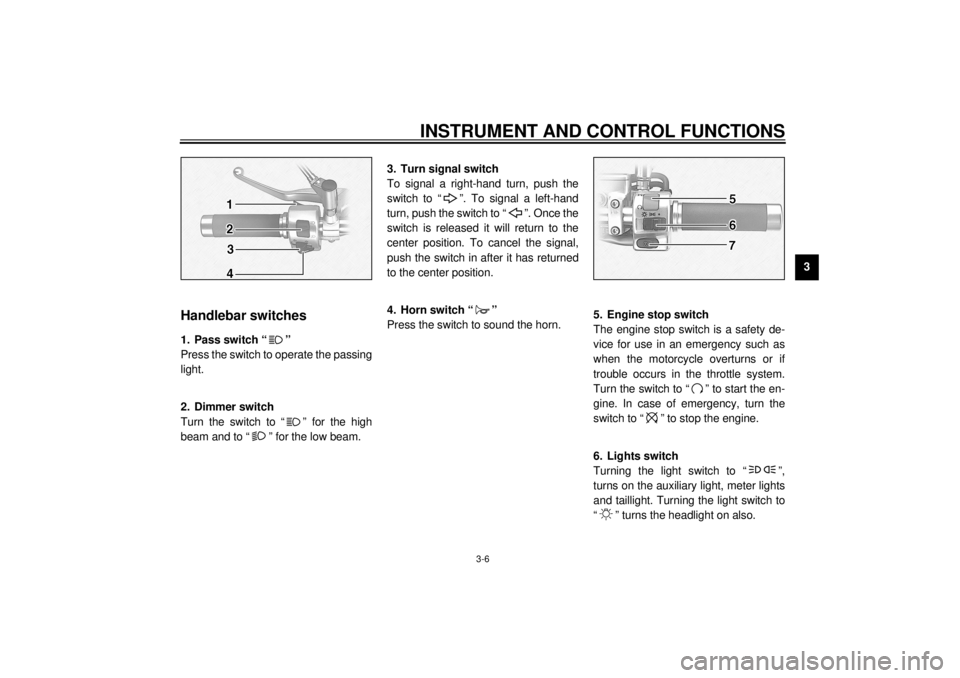
Handlebar switches
EAU00119
1. Pass switch “ ”
Press the switch to operate the passing
light.
EAU00121
2. Dimmer switch
Turn the switch to “ ” for the high
beam and to “ ” for the low beam.
EAU00127
3. Turn signal switch
To signal a right-hand turn, push the
switch to “ ”. To signal a left-hand
turn, push the switch to “ ”. Once the
switch is released it will return to the
center position. To cancel the signal,
push the switch in after it has returned
to the center position.
EAU00129
4. Horn switch “ ”
Press the switch to sound the horn.
EAU00138
5. Engine stop switch
The engine stop switch is a safety de-
vice for use in an emergency such as
when the motorcycle overturns or if
trouble occurs in the throttle system.
Turn the switch to “ ” to start the en-
gine. In case of emergency, turn the
switch to “ ” to stop the engine.
EAU00134
6. Lights switch
Turning the light switch to “ ”,
turns on the auxiliary light, meter lights
and taillight. Turning the light switch to
“ ” turns the headlight on also.
E_5ja_Functions.fm Page 6 Saturday, October 16, 1999 10:10 AM
Page 30 of 95
INSTRUMENT AND CONTROL FUNCTIONS
3-16
3
EAU00331
Sidestand/clutch switch
operation checkCheck the operation of the sidestand
switch and clutch switch against the in-
formation below.CD-11E
CD-11E
EW000045
WARNING
@ If improper operation is noted, con-
sult a Yamaha dealer immediately. @
TURN THE MAIN SWITCH TO “ON”
AND THE ENGINE STOP SWITCH TO
“”.TRANSMISSION IS IN GEAR AND
SIDESTAND IS UP.PULL IN CLUTCH LEVER AND
PUSH THE START SWITCH.ENGINE WILL START.SIDESTAND IS DOWN.CLUTCH SWITCH IS OK.
ENGINE WILL STALL.SIDESTAND SWITCH IS OK.
E_5ja_Functions.fm Page 16 Saturday, October 16, 1999 10:10 AM
Page 38 of 95
OPERATION AND IMPORTANT RIDING POINTS
5-2
5
CF-31E
TURN THE MAIN SWITCH TO "ON" AND THE
ENGINE STOP SWITCH TO “ ”.
IF THE TRANSMISSION IS IN NEUTRAL AND THE
SIDESTAND IS DOWN,PUSH THE START SWITCH.
THE ENGINE WILL START.RETRACT THE SIDESTAND AND PUT THE
TRANSMISSION IN GEAR.
IF THE TRANSMISSION IS IN GEAR AND THE
SIDESTAND IS UP,PULL IN THE CLUTCH LEVER AND PUSH THE
START SWITCH. THE ENGINE WILL START.
THE MOTORCYCLE CAN BE RIDDEN.
THE MOTORCYCLE CAN BE RIDDEN.
E_5ja_Operation.fm Page 2 Saturday, October 16, 1999 10:11 AM
Page 39 of 95
OPERATION AND IMPORTANT RIDING POINTS
5-3
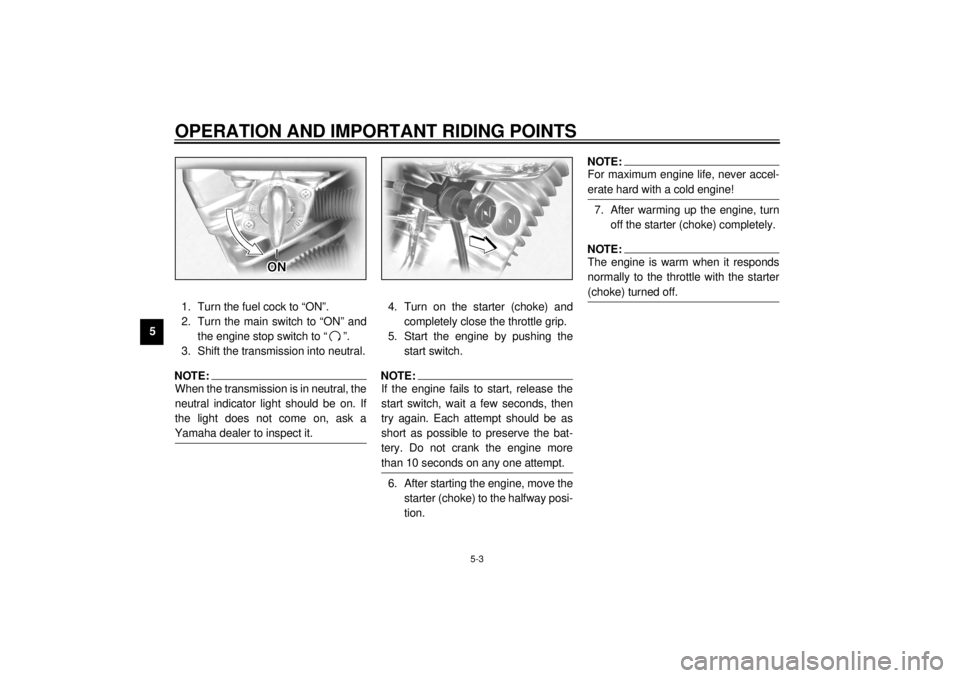
51. Turn the fuel cock to “ON”.
2. Turn the main switch to “ON” and
the engine stop switch to “ ”.
3. Shift the transmission into neutral.
NOTE:@ When the transmission is in neutral, the
neutral indicator light should be on. If
the light does not come on, ask a
Yamaha dealer to inspect it. @
4. Turn on the starter (choke) and
completely close the throttle grip.
5. Start the engine by pushing the
start switch.NOTE:@ If the engine fails to start, release the
start switch, wait a few seconds, then
try again. Each attempt should be as
short as possible to preserve the bat-
tery. Do not crank the engine more
than 10 seconds on any one attempt. @6. After starting the engine, move the
starter (choke) to the halfway posi-
tion.
NOTE:@ For maximum engine life, never accel-
erate hard with a cold engine! @7. After warming up the engine, turn
off the starter (choke) completely.NOTE:@ The engine is warm when it responds
normally to the throttle with the starter
(choke) turned off. @
E_5ja_Operation.fm Page 3 Saturday, October 16, 1999 10:11 AM
Page 51 of 95
PERIODIC MAINTENANCE AND MINOR REPAIR
6-7
6
ECA00021
CAUTION:@ Do not use any type of tools to re-
move or install the cap as the igni-
tion coil coupler may get damaged.
The spark plug cap may be difficult
to remove because a rubber seal on
the end of the cap is tightly fit into
the cylinder bore. To remove the
cap, simply twist it back and forth
while pulling it upward; when install-
ing the cap, twist it back and forth
while pushing it downward. @
EAU01827*
Engine oilOil level inspection
1. Place the motorcycle on a level
surface.
2. Remove the rider seat. (See page
3-13 for rider seat removal and in-
stallation procedures.)
3. Start and run the engine for seve-
ral minutes until the oil has
reached a normal temperature of
60 °C.NOTE:@ To achieve the proper engine oil tem-
perature for an accurate oil level read-
ing, the engine must have first
completely cooled down and then
warmed up again for several minutes to
normal operating temperature. @4. Place the motorcycle in an upright
position and continue idling for
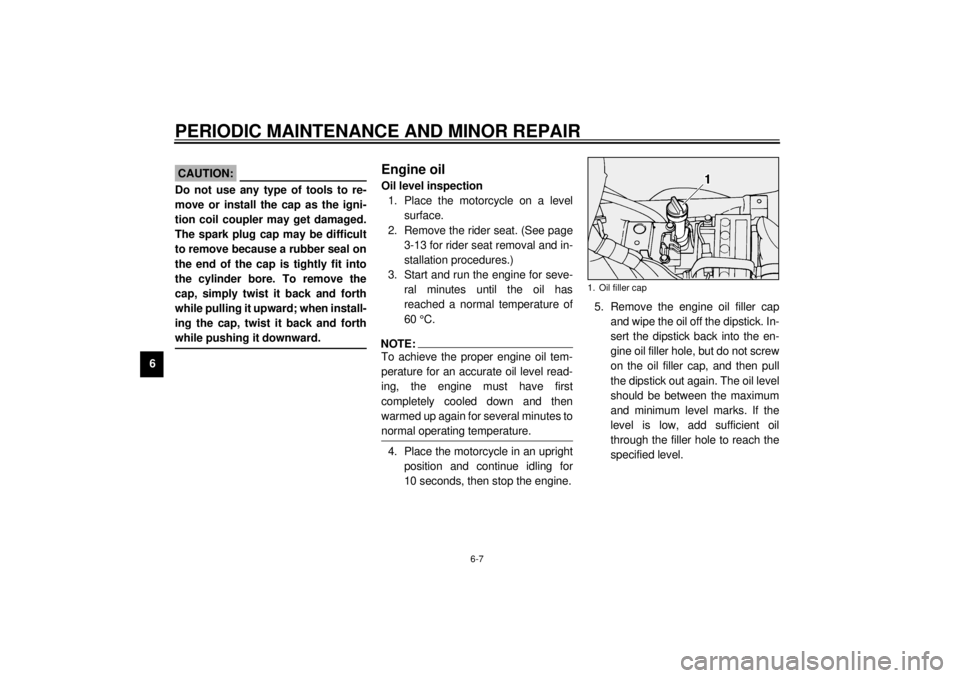
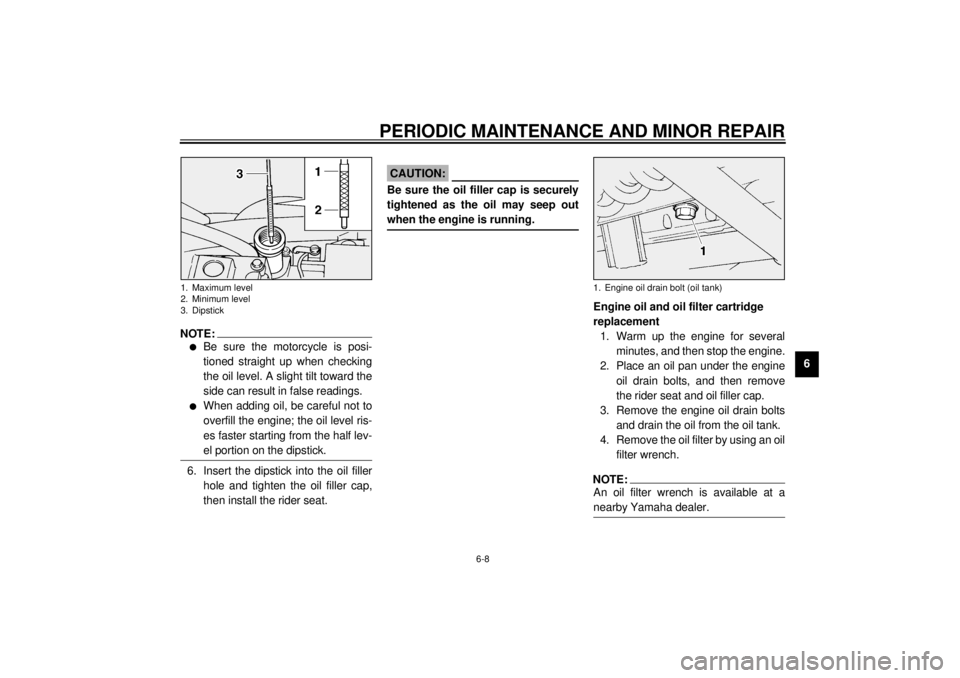
10 seconds, then stop the engine.5. Remove the engine oil filler cap
and wipe the oil off the dipstick. In-
sert the dipstick back into the en-
gine oil filler hole, but do not screw
on the oil filler cap, and then pull
the dipstick out again. The oil level
should be between the maximum
and minimum level marks. If the
level is low, add sufficient oil
through the filler hole to reach the
specified level.
1. Oil filler cap
E_5ja_Periodic.fm Page 7 Saturday, October 16, 1999 10:12 AM
Page 52 of 95
PERIODIC MAINTENANCE AND MINOR REPAIR
6-8
6
NOTE:@ l
Be sure the motorcycle is posi-
tioned straight up when checking
the oil level. A slight tilt toward the
side can result in false readings.
l
When adding oil, be careful not to
overfill the engine; the oil level ris-
es faster starting from the half lev-
el portion on the dipstick.
@6. Insert the dipstick into the oil filler
hole and tighten the oil filler cap,
then install the rider seat.
ECA00027
CAUTION:@ Be sure the oil filler cap is securely
tightened as the oil may seep out
when the engine is running. @
Engine oil and oil filter cartridge
replacement
1. Warm up the engine for several
minutes, and then stop the engine.
2. Place an oil pan under the engine
oil drain bolts, and then remove
the rider seat and oil filler cap.
3. Remove the engine oil drain bolts
and drain the oil from the oil tank.
4. Remove the oil filter by using an oil
filter wrench.NOTE:@ An oil filter wrench is available at a
nearby Yamaha dealer. @
1. Maximum level
2. Minimum level
3. Dipstick
1. Engine oil drain bolt (oil tank)
E_5ja_Periodic.fm Page 8 Saturday, October 16, 1999 10:12 AM
Page 53 of 95
PERIODIC MAINTENANCE AND MINOR REPAIR
6-9
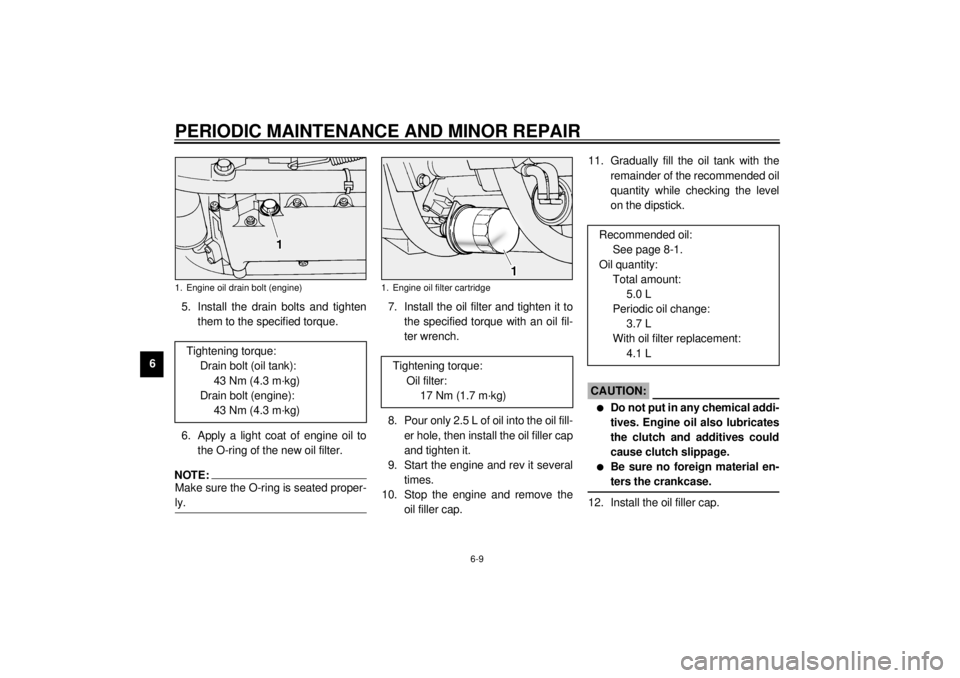
65. Install the drain bolts and tighten
them to the specified torque.
6. Apply a light coat of engine oil to
the O-ring of the new oil filter.
NOTE:@ Make sure the O-ring is seated proper-
ly. @
7. Install the oil filter and tighten it to
the specified torque with an oil fil-
ter wrench.
8. Pour only 2.5 L of oil into the oil fill-
er hole, then install the oil filler cap
and tighten it.
9. Start the engine and rev it several
times.
10. Stop the engine and remove the
oil filler cap.11. Gradually fill the oil tank with the
remainder of the recommended oil
quantity while checking the level
on the dipstick.
EC000066
CAUTION:@ l
Do not put in any chemical addi-
tives. Engine oil also lubricates
the clutch and additives could
cause clutch slippage.
l
Be sure no foreign material en-
ters the crankcase.
@12. Install the oil filler cap.
1. Engine oil drain bolt (engine)Tightening torque:
Drain bolt (oil tank):
43 Nm (4.3 m·kg)
Drain bolt (engine):
43 Nm (4.3 m·kg)
1. Engine oil filter cartridge
Tightening torque:
Oil filter:
17 Nm (1.7 m·kg)
Recommended oil:
See page 8-1.
Oil quantity:
Total amount:
5.0 L
Periodic oil change:
3.7 L
With oil filter replacement:
4.1 L
E_5ja_Periodic.fm Page 9 Saturday, October 16, 1999 10:12 AM