Page 49 of 95
PERIODIC MAINTENANCE AND MINOR REPAIR
6-5
6
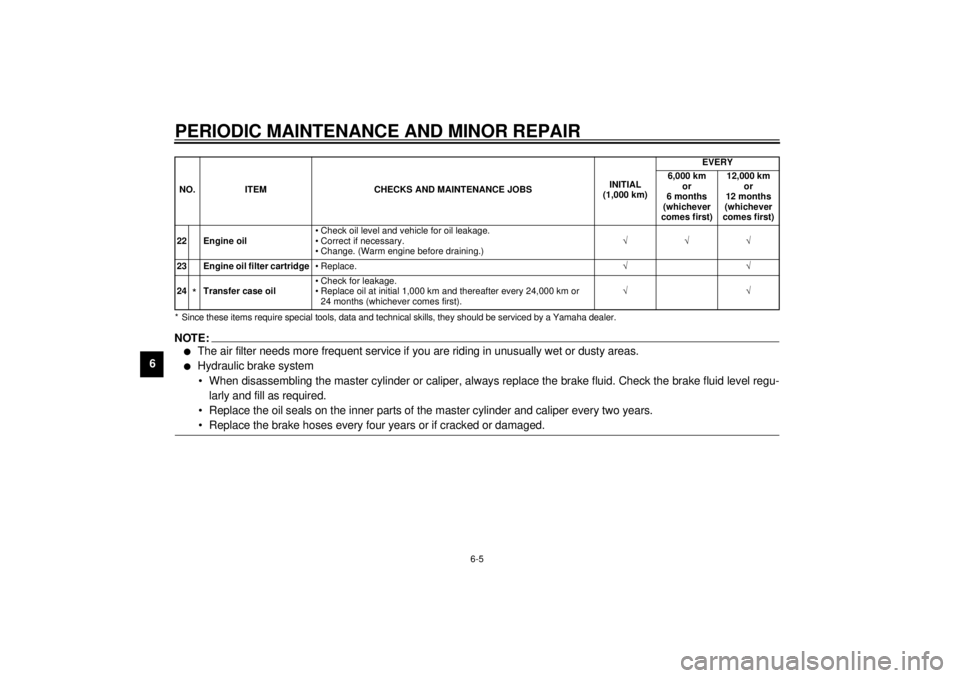
* Since these items require special tools, data and technical skills, they should be serviced by a Yamaha dealer.
EAU02970
NOTE:@ l
The air filter needs more frequent service if you are riding in unusually wet or dusty areas.
l
Hydraulic brake system
• When disassembling the master cylinder or caliper, always replace the brake fluid. Check the brake fluid level regu-
larly and fill as required.
• Replace the oil seals on the inner parts of the master cylinder and caliper every two years.
• Replace the brake hoses every four years or if cracked or damaged.
@22 Engine oil• Check oil level and vehicle for oil leakage.
• Correct if necessary.
• Change. (Warm engine before draining.)ÖÖÖ
23 Engine oil filter cartridge•Replace.ÖÖ
24
*Transfer case oil• Check for leakage.
• Replace oil at initial 1,000 km and thereafter every 24,000 km or
24 months (whichever comes first).ÖÖ NO. ITEM CHECKS AND MAINTENANCE JOBSINITIAL
(1,000 km)EVERY
6,000 km
or
6 months
(whichever
comes first)12,000 km
or
12 months
(whichever
comes first)
E_5ja_Periodic.fm Page 5 Saturday, October 16, 1999 10:12 AM
Page 50 of 95

PERIODIC MAINTENANCE AND MINOR REPAIR
6-6
6
EAU01639
Spark plug inspectionThe spark plug is an important engine
component and should be inspected
periodically, preferably by a Yamaha
dealer. The condition of the spark plug
can indicate the condition of the en-
gine.
Normally, all spark plugs from the
same engine should have the same
color on the white insulator around the
center electrode. The ideal color at this
point is a medium-to-light tan color for a
motorcycle that is being ridden normal-
ly. If one spark plug shows a distinctly
different color, there could be some-
thing wrong with the engine.Do not attempt to diagnose such prob-
lems yourself. Instead, take the motor-
cycle to a Yamaha dealer. The spark
plugs should be periodically removed
and inspected because heat and de-
posits will cause any spark plug to
slowly break down and erode. If elec-
trode erosion becomes excessive, or if
carbon and other deposits are exces-
sive, the spark plug should be replaced
with the specified plug.
Before installing any spark plug, mea-
sure the electrode gap with a wire
thickness gauge and adjust it to specifi-
cation.When installing a spark plug, the gas-
ket surface should always be cleaned
and a new gasket used. Any grime
should be wiped off from the threads
and the spark plug tightened to the
specified torque.
NOTE:@ If a torque wrench is not available when
installing a spark plug, a good estimate
of the correct torque is 1/4 to 1/2 turn
past finger tight. The spark plug should
be tightened to the specified torque as
soon as possible. @
a. Spark plug gap
Specified spark plug:
DPR7EA-9/NGK or
X22EPR-U9/DENSO
Spark plug gap:
0.8 ~ 0.9 mm
Tightening torque:
Spark plug:
17.5 Nm (1.75 m·kg)
E_5ja_Periodic.fm Page 6 Saturday, October 16, 1999 10:12 AM
Page 51 of 95
PERIODIC MAINTENANCE AND MINOR REPAIR
6-7
6
ECA00021
CAUTION:@ Do not use any type of tools to re-
move or install the cap as the igni-
tion coil coupler may get damaged.
The spark plug cap may be difficult
to remove because a rubber seal on
the end of the cap is tightly fit into
the cylinder bore. To remove the
cap, simply twist it back and forth
while pulling it upward; when install-
ing the cap, twist it back and forth
while pushing it downward. @
EAU01827*
Engine oilOil level inspection
1. Place the motorcycle on a level
surface.
2. Remove the rider seat. (See page
3-13 for rider seat removal and in-
stallation procedures.)
3. Start and run the engine for seve-
ral minutes until the oil has
reached a normal temperature of
60 °C.NOTE:@ To achieve the proper engine oil tem-
perature for an accurate oil level read-
ing, the engine must have first
completely cooled down and then
warmed up again for several minutes to
normal operating temperature. @4. Place the motorcycle in an upright
position and continue idling for
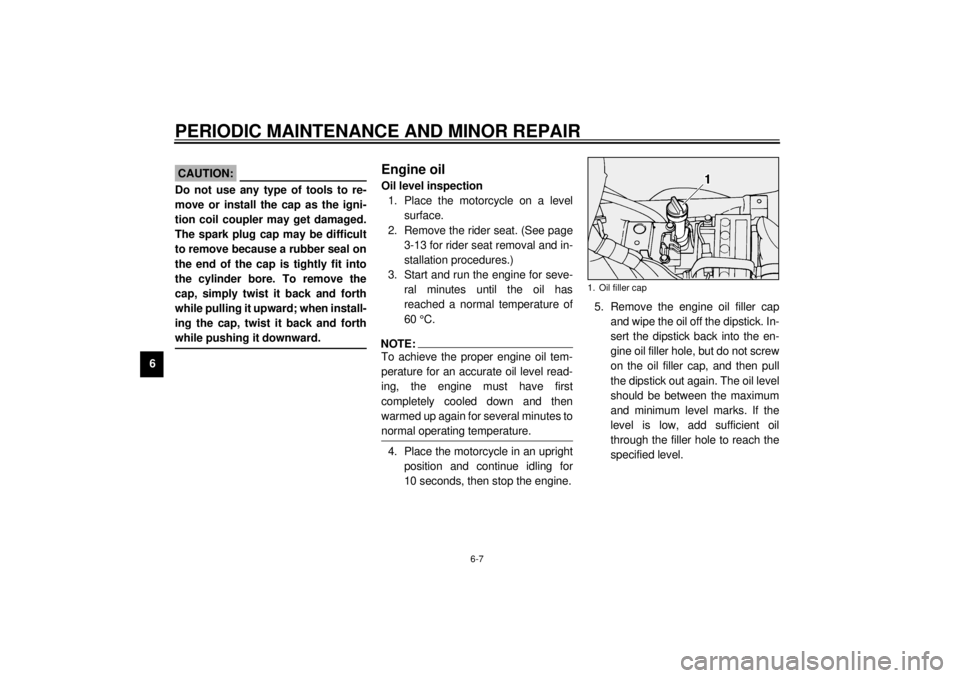
10 seconds, then stop the engine.5. Remove the engine oil filler cap
and wipe the oil off the dipstick. In-
sert the dipstick back into the en-
gine oil filler hole, but do not screw
on the oil filler cap, and then pull
the dipstick out again. The oil level
should be between the maximum
and minimum level marks. If the
level is low, add sufficient oil
through the filler hole to reach the
specified level.
1. Oil filler cap
E_5ja_Periodic.fm Page 7 Saturday, October 16, 1999 10:12 AM
Page 52 of 95
PERIODIC MAINTENANCE AND MINOR REPAIR
6-8
6
NOTE:@ l
Be sure the motorcycle is posi-
tioned straight up when checking
the oil level. A slight tilt toward the
side can result in false readings.
l
When adding oil, be careful not to
overfill the engine; the oil level ris-
es faster starting from the half lev-
el portion on the dipstick.
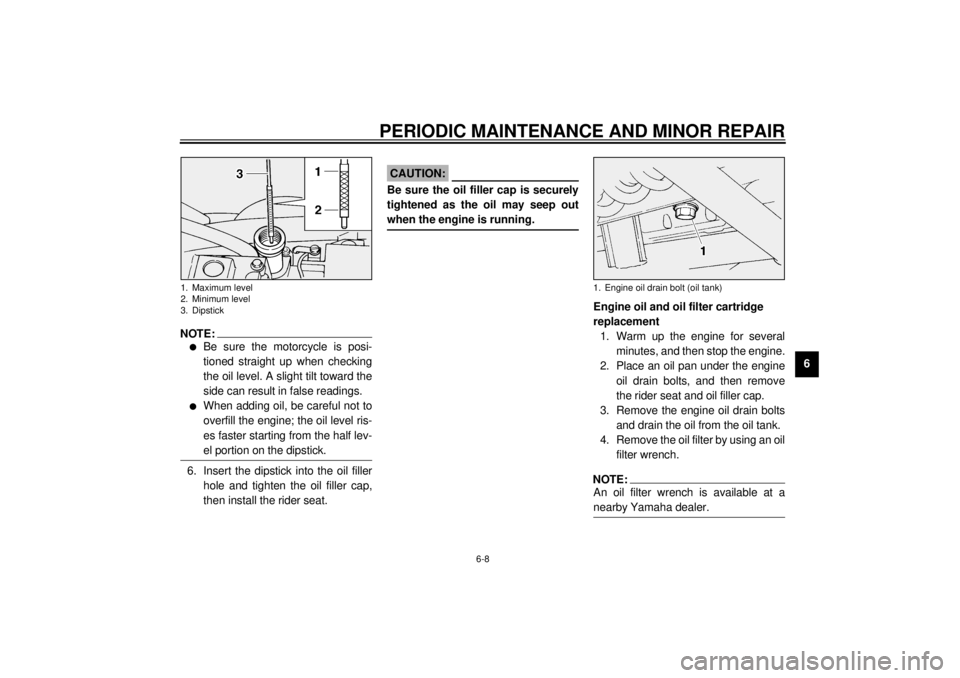
@6. Insert the dipstick into the oil filler
hole and tighten the oil filler cap,
then install the rider seat.
ECA00027
CAUTION:@ Be sure the oil filler cap is securely
tightened as the oil may seep out
when the engine is running. @
Engine oil and oil filter cartridge
replacement
1. Warm up the engine for several
minutes, and then stop the engine.
2. Place an oil pan under the engine
oil drain bolts, and then remove
the rider seat and oil filler cap.
3. Remove the engine oil drain bolts
and drain the oil from the oil tank.
4. Remove the oil filter by using an oil
filter wrench.NOTE:@ An oil filter wrench is available at a
nearby Yamaha dealer. @
1. Maximum level
2. Minimum level
3. Dipstick
1. Engine oil drain bolt (oil tank)
E_5ja_Periodic.fm Page 8 Saturday, October 16, 1999 10:12 AM
Page 53 of 95
PERIODIC MAINTENANCE AND MINOR REPAIR
6-9
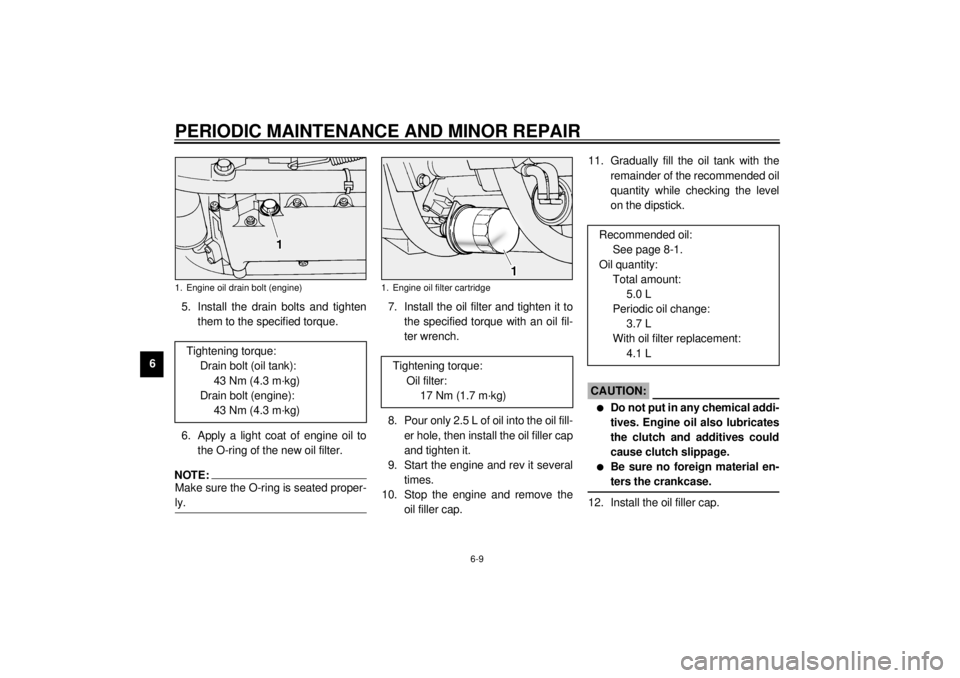
65. Install the drain bolts and tighten
them to the specified torque.
6. Apply a light coat of engine oil to
the O-ring of the new oil filter.
NOTE:@ Make sure the O-ring is seated proper-
ly. @
7. Install the oil filter and tighten it to
the specified torque with an oil fil-
ter wrench.
8. Pour only 2.5 L of oil into the oil fill-
er hole, then install the oil filler cap
and tighten it.
9. Start the engine and rev it several
times.
10. Stop the engine and remove the
oil filler cap.11. Gradually fill the oil tank with the
remainder of the recommended oil
quantity while checking the level
on the dipstick.
EC000066
CAUTION:@ l
Do not put in any chemical addi-
tives. Engine oil also lubricates
the clutch and additives could
cause clutch slippage.
l
Be sure no foreign material en-
ters the crankcase.
@12. Install the oil filler cap.
1. Engine oil drain bolt (engine)Tightening torque:
Drain bolt (oil tank):
43 Nm (4.3 m·kg)
Drain bolt (engine):
43 Nm (4.3 m·kg)
1. Engine oil filter cartridge
Tightening torque:
Oil filter:
17 Nm (1.7 m·kg)
Recommended oil:
See page 8-1.
Oil quantity:
Total amount:
5.0 L
Periodic oil change:
3.7 L
With oil filter replacement:
4.1 L
E_5ja_Periodic.fm Page 9 Saturday, October 16, 1999 10:12 AM
Page 54 of 95
PERIODIC MAINTENANCE AND MINOR REPAIR
6-10
6 13. Start the engine and warm it up for
several minutes. While warming
up, check for oil leakage. If oil
leakage is found, stop the engine
immediately and check for the
cause.
14. Stop the engine and recheck the
oil level.
EAU01828
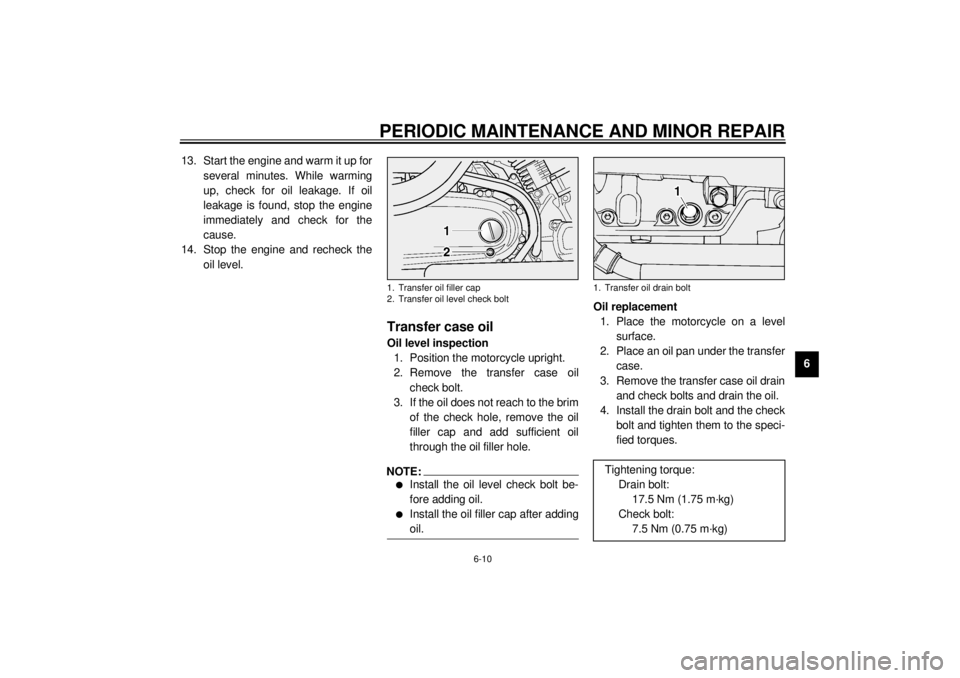
Transfer case oilOil level inspection
1. Position the motorcycle upright.
2. Remove the transfer case oil
check bolt.
3. If the oil does not reach to the brim
of the check hole, remove the oil
filler cap and add sufficient oil
through the oil filler hole.NOTE:@ l
Install the oil level check bolt be-
fore adding oil.
l
Install the oil filler cap after adding
oil.
@
Oil replacement
1. Place the motorcycle on a level
surface.
2. Place an oil pan under the transfer
case.
3. Remove the transfer case oil drain
and check bolts and drain the oil.
4. Install the drain bolt and the check
bolt and tighten them to the speci-
fied torques.
1. Transfer oil filler cap
2. Transfer oil level check bolt
1. Transfer oil drain boltTightening torque:
Drain bolt:
17.5 Nm (1.75 m·kg)
Check bolt:
7.5 Nm (0.75 m·kg)
E_5ja_Periodic.fm Page 10 Saturday, October 16, 1999 10:12 AM
Page 55 of 95
PERIODIC MAINTENANCE AND MINOR REPAIR
6-11
65. Remove the oil filler cap and fill the
transfer case with sufficient oil.
ECA00024
CAUTION:@ Be sure no foreign material enters
the transfer case. @6. Check the oil level.
7. Install the oil filler cap and tighten it.
8. Check for oil leakage. If oil leak-
age is found, check for the cause.
EAU01829
Air filterThe air filter should be cleaned at the
specified intervals.
The air filter should be cleaned more
frequently if you are riding in unusually
wet or dusty areas.
1. Remove the air filter case bolts.2. Loosen the carburetor joint screw
and slightly pull the air filter case
outward.
1. Transfer oil level check holeRecommended oil:
See page 8-2.
Oil quantity:
0.4 L
1. Bolt (´ 4)
2. Air filter case cover
1. Carburetor joint screw
E_5ja_Periodic.fm Page 11 Saturday, October 16, 1999 10:12 AM
Page 56 of 95
PERIODIC MAINTENANCE AND MINOR REPAIR
6-12
6 3. Remove the air filter case cover by
removing the screws.
4. Disconnect the hoses.5. Remove the air filter by removing
the screws.6. Tap the air filter lightly to remove
most of the dust and dirt and blow
out the remaining dirt with com-
pressed air as shown. If the air fil-
ter is damaged, replace it.
7. Reassemble by reversing the re-
moval procedure.
1. Screw (´ 2)
2. Hose (´ 2)
1. Screw (´ 2)
E_5ja_Periodic.fm Page 12 Saturday, October 16, 1999 10:12 AM