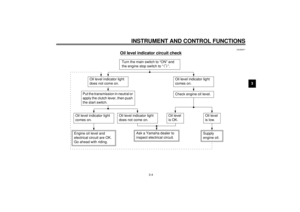
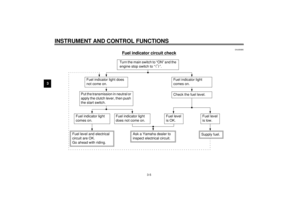
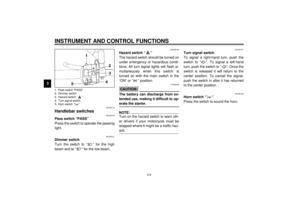
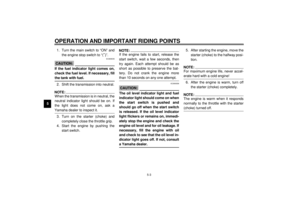
Page 73 of 97
PERIODIC MAINTENANCE AND MINOR REPAIR
6-27
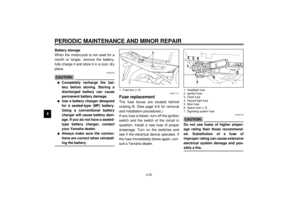
63. Put a new bulb into position and
secure it in place with the bulb
holder.
EC000105
CAUTION:@ Avoid touching the glass part of a
bulb. Keep it free from oil; other-
wise, the transparency of the glass,
life of the bulb, and luminous flux
will be adversely affected. If oil gets
on a bulb, thoroughly clean it with a
cloth moistened with alcohol or lac-
quer thinner. @
4. Install the bulb holder cover and
the headlight connector.
If a headlight beam adjustment is
necessary, ask a Yamaha dealer
to make adjustment.
EAU00869
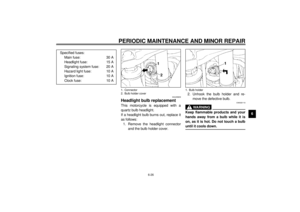
Front wheel removal
EW000122
WARNING
@ l
It is advisable to have a Yamaha
dealer service the wheel.
l
Securely support the motor-
cycle so there is no danger of it
falling over.
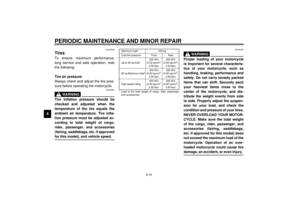
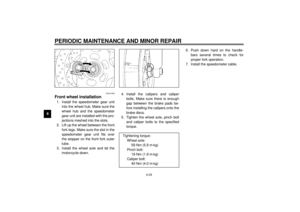
@1. Place the motorcycle on the cen-
terstand.
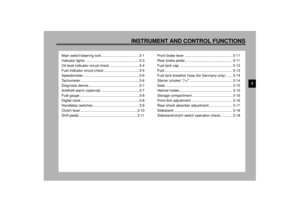
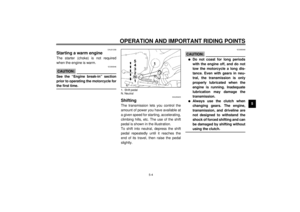
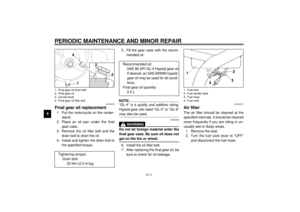
2. Remove the speedometer cable
from the front wheel side.
1. Don’t touch
1. Speedometer cable
Page 74 of 97
PERIODIC MAINTENANCE AND MINOR REPAIR
6-28
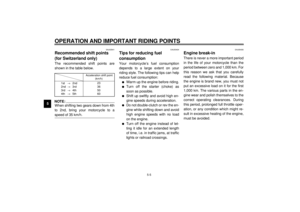
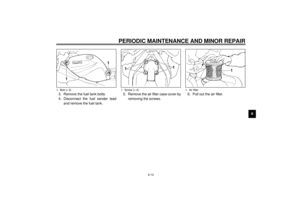
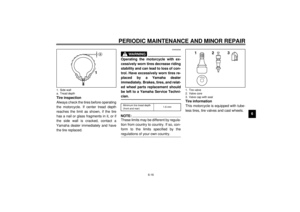
6 3. Remove the brake hose holders
and the calipers by removing the
bolts.
NOTE:@ Do not depress the brake lever when
the disc and caliper are separated. @
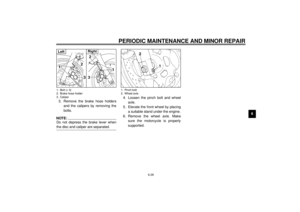
4. Loosen the pinch bolt and wheel
axle.
5. Elevate the front wheel by placing
a suitable stand under the engine.
6. Remove the wheel axle. Make
sure the motorcycle is properly
supported.
1. Bolt (´ 3)
2. Brake hose holder
3. CaliperLeft
Right
1. Pinch bolt
2. Wheel axle
Page 75 of 97
PERIODIC MAINTENANCE AND MINOR REPAIR
6-29
6
EAU01469
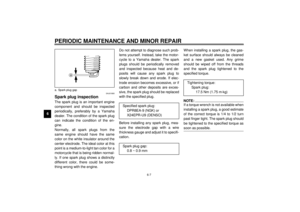
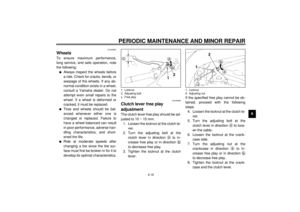
Front wheel installation1. Install the speedometer gear unit
into the wheel hub. Make sure the
wheel hub and the speedometer
gear unit are installed with the pro-
jections meshed into the slots.
2. Lift up the wheel between the front
fork legs. Make sure the slot in the
speedometer gear unit fits over
the stopper on the front fork outer
tube.
3. Install the wheel axle and let the
motorcycle down.4. Install the calipers and caliper
bolts. Make sure there is enough
gap between the brake pads be-
fore installing the calipers onto the
brake discs.
5. Tighten the wheel axle, pinch bolt
and caliper bolts to the specified
torque.6. Push down hard on the handle-
bars several times to check for
proper fork operation.
7. Install the speedometer cable.
Tightening torque:
Wheel axle:
59 Nm (5.9 m·kg)
Pinch bolt:
19 Nm (1.9 m·kg)
Caliper bolt:
40 Nm (4.0 m·kg)
Page 76 of 97
PERIODIC MAINTENANCE AND MINOR REPAIR
6-30
6
EAU01557
Rear wheel removal
EW000122
WARNING
@ l
It is advisable to have a Yamaha
dealer service the wheel.
l
Securely support the motor-
cycle so there is no danger of it
falling over.
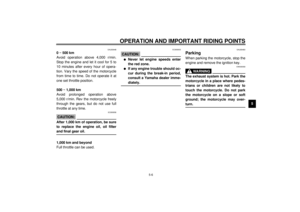
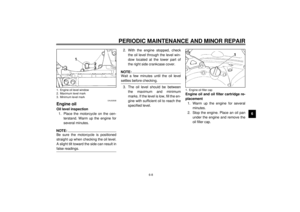
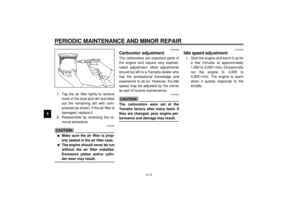
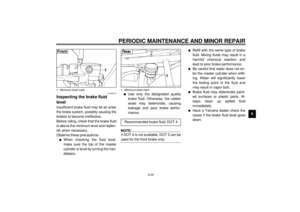
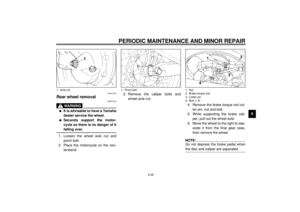
@1. Loosen the wheel axle nut and
pinch bolt.
2. Place the motorcycle on the cen-
terstand.3. Remove the caliper bolts and
wheel axle nut.
4. Remove the brake torque rod cot-
ter pin, nut and bolt.
5. While supporting the brake cali-
per, pull out the wheel axle.
6. Move the wheel to the right to sep-
arate it from the final gear case,
then remove the wheel.
NOTE:@ Do not depress the brake pedal when
the disc and caliper are separated. @
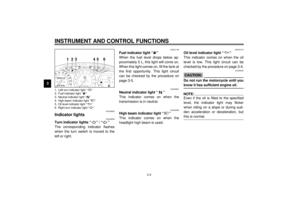
1. Axle nut
1. Pinch bolt
1. Nut
2. Brake torque rod
3. Cotter pin
4. Bolt (´ 2)
Page 77 of 97

PERIODIC MAINTENANCE AND MINOR REPAIR
6-31
6
EAU01558*
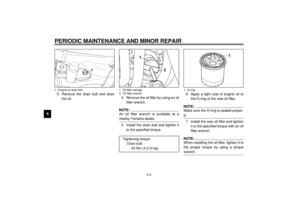
Rear wheel installation1. Apply a light coating of lithium
soap base grease to the final gear
case splines and the rear wheel
hub splines.
2. Install the wheel and the wheel ax-
le.
3. Install the caliper and caliper bolts.
Make sure there is enough gap
between the brake pads before in-
stalling the caliper onto the brake
disc.4. Install the brake torque rod bolt
and nut.
5. Install the pinch bolt and tighten it
to the specified torque.
6. Take the motorcycle off the cen-
terstand.
7. Tighten the axle nut, caliper bolts
and brake torque rod nut to the
specified torques.
8. Secure the brake torque rod nut
with a new cotter pin.
EAU01008
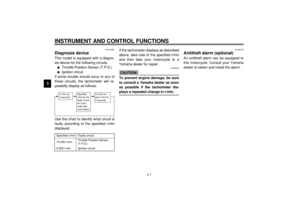
TroubleshootingAlthough Yamaha motorcycles receive
a rigid inspection before shipment from
the factory, trouble may occur during
operation.
Any problem in the fuel, compression,
or ignition systems can cause poor
starting and loss of power. The trouble-
shooting chart describes a quick, easy
procedure for making checks.
If your motorcycle requires any repair,
bring it to a Yamaha dealer. The skilled
technicians at a Yamaha dealership
have the tools, experience, and know-
how to properly service your motor-
cycle. Use only genuine Yamaha parts
on your motorcycle. Imitation parts may
look like Yamaha parts, but they are of-
ten inferior. Consequently, they have a
shorter service life and can lead to ex-
pensive repair bills.
1. Splines
Tightening torque:
Pinch bolt:
16 Nm (1.6 m·kg)
Axle nut:
105 Nm (10.5 m·kg)
Caliper bolt:
35 Nm (3.5 m·kg)
Brake torque rod nut:
23 Nm (2.3 m·kg)
Page 78 of 97
PERIODIC MAINTENANCE AND MINOR REPAIR
6-32
6
EAU01297
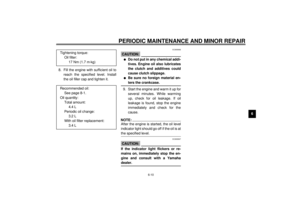
Troubleshooting chart
EW000125
WARNING
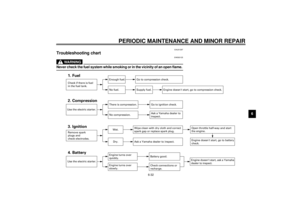
@ Never check the fuel system while smoking or in the vicinity of an open flame. @
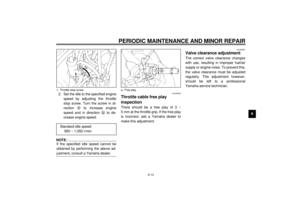
Check if there is fuel
in the fuel tank.1. Fuel
Enough fuel.
No fuel.
Go to compression check.
Supply fuel.
Use the electric starter.2. Compression
There is compression.
No compression.
Go to ignition check.
Ask a Yamaha dealer to
inspect.
Remove spark
plugs and
check electrodes.3. Ignition
Wet.
Dry.
Wipe clean with dry cloth and correct
spark gap or replace spark plug.
Ask a Yamaha dealer to inspect.
Engine doesn't start, go to battery
check.Open throttle half-way and start
the engine.
Use the electric starter.4. Battery
Engine turns over
quickly.
Engine turns over
slowly.
Battery good.Check connections or
recharge.
Engine doesn't start, ask a Yamaha
dealer to inspect.
Engine doesn't start, go to compression check.
Page 79 of 97
Page 80 of 97
7
MOTORCYCLE CARE AND STORAGE
Care ................................................................................................... 7-1
Storage............................................................................................... 7-4