2000 YAMAHA TDR 125 battery replacement
[x] Cancel search: battery replacementPage 45 of 104

PERIODIC MAINTENANCE AND MINOR REPAIR
Tool kit ...................................................................6-1
Periodic maintenance and lubrication ....................6-3
Cowling and panel removal and installation...........6-6
Cowling A, B ..........................................................6-7
Panel A ..................................................................6-7
Spark plug inspection.............................................6-8
Transmission oil .....................................................6-9
Cooling system ....................................................6-10
Changing the coolant ...........................................6-11
Air filter .................................................................6-13
Carburetor adjustment .........................................6-15
Idle speed adjustment ..........................................6-15
Throttle cable free play adjustment ......................6-16
Tires .....................................................................6-17
Wheels .................................................................6-19
Clutch lever free play adjustment.........................6-19
Front brake lever free play adjustment ................6-20
Rear brake pedal height adjustment ....................6-20
Brake light switch adjustment ..............................6-21
Checking the front and rear brake pads...............6-21
Inspecting the brake fluid level.............................6-22
Brake fluid replacement .......................................6-23
Drive chain slack check .......................................6-23
Drive chain slack adjustment ...............................6-24Drive chain lubrication............................................6-25
Cable inspection and lubrication ............................6-25
Throttle cable and grip lubrication ..........................6-26
Autolube pump adjustment ....................................6-26
Brake and shift pedal lubrication ............................6-26
Brake and clutch lever lubrication ..........................6-27
Sidestand lubrication..............................................6-27
Rear suspension lubrication...................................6-27
Front fork inspection ..............................................6-28
Steering inspection ................................................6-28
Wheel bearings ......................................................6-29
Battery....................................................................6-29
Fuse replacement ..................................................6-30
Headlight bulb replacement ...................................6-31
Taillight bulb replacement ......................................6-32
Turn signal light bulb replacement .........................6-32
Front wheel removal ..............................................6-33
Front wheel installation ..........................................6-34
Rear wheel removal ...............................................6-34
Rear wheel installation ...........................................6-35
Troubleshooting .....................................................6-36
Troubleshooting chart ............................................6-37
6
5AE-9-E3 (ENG) 4/11/0 11:06 AM Page 43
Page 75 of 104

6-30
PERIODIC MAINTENANCE AND MINOR REPAIR
1
2
3
4
5
6
7
8
9 Battery storage
When the motorcycle is not used for
a month or longer, remove the bat-
tery, fully charge it and store it in a
cool, dry place.
EC000102
cC
8
8
Completely recharge the bat-
tery before storing. Storing a
discharged battery can cause
permanent battery damage.
8 8
Use a battery charger
designed for a sealed-type
(MF) battery. Using a conven-
tional battery charger will
cause battery damage. If you
do not have a sealed-type bat-
tery charger, contact your
Yamaha dealer.
8 8
Always make sure the connec-
tions are correct when rein-
stalling the battery.
1
2
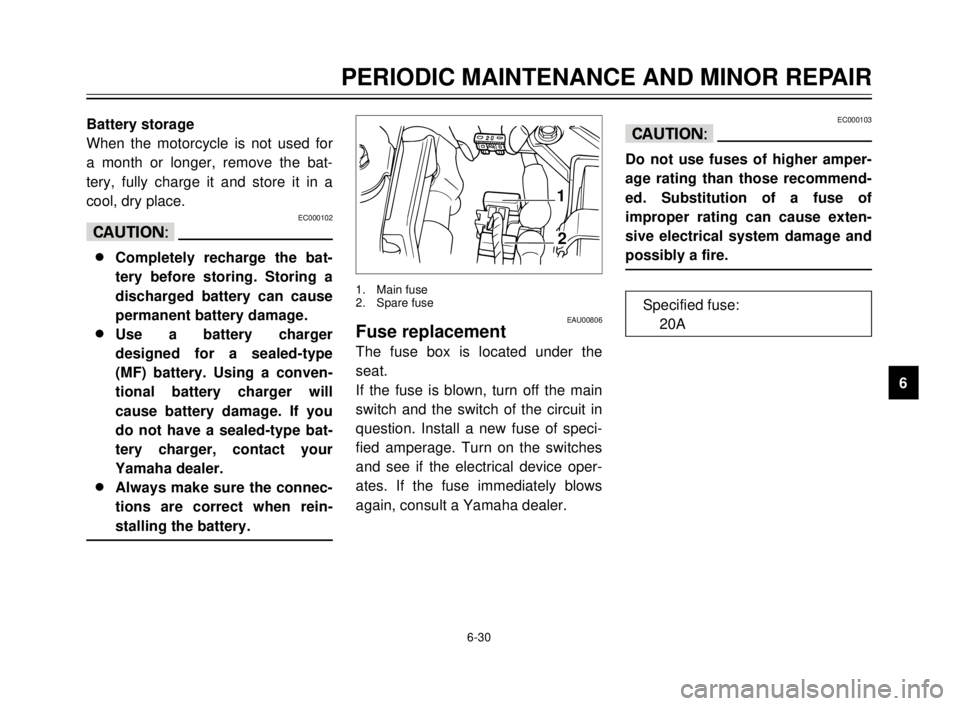
EAU00806Fuse replacement
The fuse box is located under the
seat.
If the fuse is blown, turn off the main
switch and the switch of the circuit in
question. Install a new fuse of speci-
fied amperage. Turn on the switches
and see if the electrical device oper-
ates. If the fuse immediately blows
again, consult a Yamaha dealer.
1. Main fuse
2. Spare fuse
EC000103
cC
Do not use fuses of higher amper-
age rating than those recommend-
ed. Substitution of a fuse of
improper rating can cause exten-
sive electrical system damage and
possibly a fire.
Specified fuse:
20A
5AE-9-E3 (ENG) 4/11/0 11:06 AM Page 73
Page 100 of 104

INDEX
Engine stop switch ..................................3-7
Engine temperature gauge ......................3-5
F
Front brake lever .....................................3-8
Front brake lever free play
adjustment ..........................................6-20
Front fork inspection ..............................6-28
Front wheel installation..........................6-34
Front wheel removal ..............................6-33
Fuel .......................................................3-10
Fuel cock ...............................................3-12
Fuel tank cap ...........................................3-9
Fuse replacement..................................6-30
H
Handlebar switches .................................3-5
Dimmer switch ......................................3-5
Engine stop switch ................................3-7
Headlight beam variation ......................3-6
Horn switch ...........................................3-5
Lights switch .........................................3-5
Start switch ...........................................3-7
Turn signal switch .................................3-5
Headlight beam variation.........................3-6
Headlight bulb replacement...................6-31
Helmet holder ........................................3-14
High beam indicator light .........................3-2
Horn switch..............................................3-5
How to use the conversion table .............8-5
I
Identification number records ..................9-1
Idle speed adjustment ...........................6-15
Indicator lights .........................................3-2
High beam indicator light ......................3-2Neutral indicator light ............................3-2
Oil level indicator light ...........................3-2
Turn indicator light ................................3-2
Inspecting the brake fluid level ..............6-22
K
Key identification number ........................9-1
L
Lights switch ............................................3-5
Left view ..................................................2-1
M
Main switch/Steering lock ........................3-1
Model lavel ..............................................9-2
N
Neutral indicator light...............................3-2
Note on handling of the Yamaha
Energy Induction System (Y.E.I.S.) ....3-15
O
Oil level indicator circuit check ................3-3
Oil level indicator light .............................3-2
P
Panel A ....................................................6-7
Parking ....................................................5-6
Periodic maintenance and
lubrication .............................................6-3
Pre-operation check list ...........................4-1
R
Rear brake pedal .....................................3-9
Rear brake pedal height adjustment .....6-20
Rear shock absorber adjustment ..........3-14
Rear suspension lubrication ..................6-27
Rear wheel installation ..........................6-35
Rear wheel removal ..............................6-34A
Air filter ..................................................6-13
Autolube pump adjustment....................6-26
B
Battery ...................................................6-29
Brake and clutch lever lubrication .........6-27
Brake and shift pedal lubrication ...........6-26
Brake fluid replacement.........................6-23
Brake light switch adjustment ................6-21
C
Cable inspection and lubrication ...........6-25
Carburetor adjustment...........................6-15
Care.........................................................7-1
Catalyzer
(for Switzerland and Austria) ..............3-11
Checking the front and rear brake
pads ....................................................6-21
Clutch lever .............................................3-8
Clutch lever free play adjustment ..........6-19
Controls/Instruments ...............................2-3
Cooling system ......................................6-11
Cowling A, B ............................................6-7
Cowling and panel removal and
installation .............................................6-6
D
Description ..............................................2-1
Dimmer switch .........................................3-5
Drive chain lubrication ...........................6-25
Drive chain slack adjustment.................6-24
Drive chain slack check .........................6-23
E
Engine break-in .......................................5-5
5AE-9-E3 (ENG) 4/11/0 11:06 AM Page 98