Page 49 of 84
counterclockwise), using the screwdriver supplied in the tool kit.
· Press clip D and move the direction indicator housing forward.
· With the wiring still attached, turn bulb holder slightly counterclockwise and withdraw it from the lamp housing.
· Pull the bulb to remove.
Replacement
· Insert a new bulb in the holder.
· Reinsert the bulb holder in the lamp housing and turn it clockwise until it clicks into place.
· Press the lamp housing into place.
Make sure than locating pin B fits into the hole in the fender and slotted hole (C) around the screw.
· Tighten the screw.
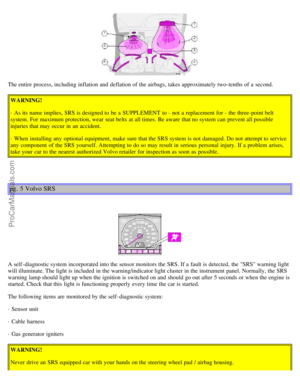
pg. 88 Replacing bulbs
1 Tail light (rear parking light) 5W
2 Direction indicator 21W
3 Brake light 21W
4 Tail light 5W
5 Backup light 21W
6 Rear fog light (left side only) 21W
Tail light bulbs
All the bulbs in the tail light unit are replaced from inside the trunk/cargo compartment.
ProCarManuals.com
Page 50 of 84

The bulb holders are behind one cover on each side.
V40: Bulbs 4,5 and 6 are located in the tailgate.
Procedure:
· Switch off the lights and turn the ignition key to position 0.
· Open the rear light cover. The cover is held in place by a clip.
· Press in catches A and B and remove the bulb holder.
· Leave the connector and cables connected to the bulb holder.
· Remove the bulb by pressing it inward and turning it slightly counterclockwise.
· Insert a new bulb into the bulb holder and replace the holder. Check that the bulb works and refit the cover.
pg. 89 Replacing bulbs
Side direction indicator
1. Slide the lens forward and pull out the rear edge.
2. Pull out the entire lens/bulb unit.
3. With the lens toward you, turn the bulb holder 1/4 turn (the wires should not be disconnected from the holder) and
pull out the bulb holder from the lens unit.
4. Pull the old bulb straight out and press a new one into place.
5. Replace the entire unit in the reverse order.
Insert screwdriver, turn and pull downward
Front courtesy lights
ProCarManuals.com
Page 51 of 84
· Switch off the ignition.
· Insert a flat screwdriver and turn carefully to loosen the glass lens.
· Replace the bulb and press the glass lens back into place.
Insert a screwdriver and turn
Rear reading lights
· Switch off the ignition.
· Insert a screwdriver and turn to loosen the lamp unit.
· Replace the bulb and press the lamp unit back into place.
Contents | Top of Page
ProCarManuals.com
Page 52 of 84

2 0 0 0
VOLVO
S & V 40
Chapter 7 - Car care
pg. 97 Car care
Car care
Car care includes not only maintaining the appearance of the car, but also protecting the car exterior from the effects of
air pollution, rain, mud or road salt. The paintwork should also be touched up immediately, if damaged, to prevent rust
formation. Paint touchup
98
Washing99
Automatic car washing, Polishing and waxing100
Cleaning the upholstery101
pg. 98 Paint touch up
Paint touchup
Paint damage requires immediate attention to avoid rusting. Make it a habit to check the finish regularly when washing
the car for instance. Touchup if necessary.
Paint repairs require special equipment and skill. Contact your Volvo retailer for any extensive damage.
Minor scratches can be repaired by using Volvo touchup paint.
NOTE: When ordering touchup paint from your Volvo retailer, use the paint code indicated on the model plate. The
plate is located in the rear wall of the engine compartment (fire wall).
Minor stone chips and scratches
Material:
Primer can
Paint touchup bottle
Brush
Masking tape
ProCarManuals.com
Page 53 of 84
.
Scratches on the surface
If the stone chip has not penetrated down to the metal")
NOTE: When touching up the car, it should be clean and dry. The surface temperature should be above 60° F (15° C).
Scratches on the surface
If the stone chip has not penetrated down to the metal and an undamaged layer of paint remains, the touchup paint can
be applied as soon as the spot has been cleaned.
Deep scratches
1. Place a strip of masking tape over the damaged surface. Pull the tape off so that any loose flakes of paint adhere to
it.
2. Thoroughly mix the primer and apply it with a small brush.
When the primer surface is dry, the paint can be applied using a brush. Mix the paint thoroughly; apply several thin
paint coats and let dry after each application.
3. If there is a longer scratch, you may want to protect surrounding paint by masking it off.
pg. 99 Washing
Washing the car
· The car should be washed at regular intervals since dirt, dust, insects and tar spots adhere to the paint and may cause
damage.
NOTE: It is particularly important to wash the car frequently in the wintertime to prevent corrosion, when salt has
been used on the roads.
· When washing the car, do not expose it to direct sunlight. Use lukewarm water to soften the dirt before you wash
with a sponge, and plenty of water, to avoid scratching.
· Bird droppings: Remove from paintwork as soon as possible. Otherwise the finish may be permanently damaged.
· A detergent can be used to facilitate the softening of dirt and oil.
· A water-soluble grease solvent may be used in cases of sticky dirt. However, use a wash place equipped with a
drainage separator.
· Dry the car with a clean chamois and remember to clean the drain holes in the doors and rocker panels.
· The power radio antenna (sedans) must be dried after washing.
ProCarManuals.com
Page 54 of 84

· Tar spots can be removed with kerosene or tar remover after the car has been washed.
· A stiff-bristle brush and lukewarm soapy water can be used to clean the wiper blades. Frequent cleaning improves
visibility considerably.
· Wash off the dirt from the underside (wheel housings fenders, etc.).
· In areas of high industrial fallout, more frequent washing is recommended.
CAUTION: During high pressure washing, the spray mouthpiece must never be closer to the vehicle than 13" (30
cm). Do not spray into the locks.
· When washing or steam cleaning the engine, avoid spraying water or steam directly on the electrical components or
toward the rear side of the engine.
· After cleaning the engine, the spark plug wells should be inspected for water and blown dry if necessary.
Suitable detergents
Special car washing detergents should be used. A suitable mixture is about 2.5 fl. oz. (8.5 cl) of detergent to 2.6 US
gal. (10 liters) of warm water. After washing with a detergent the car should be well rinsed with clean water.
WARNING!
· When the car is driven immediately after being washed, apply the brakes several times in order to remove any
moisture from the brake linings.
· Engine cleaning agents should not be used when the engine is warm. This may constitute a fire risk.
NOTE: When washing the car, remember to remove dirt from the drain holes in the doors and sills. Bumpers: Wash
the bumpers with the same cleaning agent used on the rest of the car. Never clean the bumpers with gasoline or paint
thinner. Difficult spots can be removed with denatured alcohol. To avoid scratches, do not dry the bumpers with paper.
pg. 100 Automatic car washing, Polishing and waxing
Automatic washing simple and quick
Brushless car washes are recommended. An automatic wash is a simple and quick way to clean your car, but it is
worth remembering that it may not be as thorough as when you yourself go over the car with sponge and water.
Keeping the underbody clean is most important, especially in the winter. Some automatic washers do not have
facilities for washing the underbody.
Before driving into an automatic wash, make sure that side view mirrors, auxiliary lamps, etc., are secure, otherwise
there is risk of the machine dislodging them. You should also lower the antenna (sedans).
We do NOT recommend washing your car in an automatic wash during the first six months (because the paint
will not have hardened sufficiently).
Polishing and waxing
Normally, polishing is not required during the first year after delivery, however, waxing is recommended.
ProCarManuals.com
Page 55 of 84

Before applying polish or wax the car must be washed and dried. Tar spots can be removed with kerosene or tar
remover. Difficult spots may require a fine rubbing compound.
After polishing use liquid or paste wax.
Several commercially available products contain both polish and wax.
Waxing alone does not substitute for polishing of a dull surface.
A wide range of polymerbased car waxes can be purchased today. These waxes are easy to use and produce a
longlasting, highgloss finish that protects the bodywork against oxidation, road dirt and fading.
Note: Polishing removes oxidized paint from the surface. This is normal. Therefore, when polishing, it may be noticed
that traces of paint color remain on the polishing cloth. This is also normal.
Note: Machine buffing is not recommended.
pg. 101 Cleaning the upholstery
Cleaning the upholstery
The fabric can be cleaned with soapy water or a detergent. For more difficult spots caused by oil, ice cream, shoe
polish, grease, etc., use a clothing/fabric stain remover.
The plastic in the upholstery can be cleaned with a soft cloth and mild soap solution.
Leather upholstery/suede-like upholstery (alcantera™) can be cleaned with a soft cloth and mild soap solution. For
more difficult spots, Volvo offers a leather care kit.
On no account must gasoline, naphtha or similar cleaning agents be used on the plastic or the leather since these
can cause damage.
Cleaning the seat belts
Clean only with lukewarm water and mild soap solution.
Cleaning floor mats
The floor mats should be vacuumed or brushed clean regularly, especially during winter when they should be taken out
for drying. Spots on textile mats can be removed with a mild detergent. Make sure the carpets are properly secured in
the fixation points on the floor.
Bear in mind
· Take extra care when removing stains such as ink or lipstick since the coloring can spread.
· Use solvents sparingly. Too much solvent can damage the seat padding.
· Start from the outside of the stain and work toward the center.
pg. 102 Paint touch up
ProCarManuals.com
Page 56 of 84
Contents | Top of Page
ProCarManuals.com


, using the screwdriver supplied in the tool kit.
· Press clip D and move the direction indicator housing forward.
· With the wiring still attached, turn bulb holder slightly cou")

