Page 41 of 84

· Check the tire pressure when refuelling.
· The tire pressure should be corrected only when the tires are cold.
· With warm tires, correct only when the pressure is too low. The tire temperature rises after driving just a few miles.
Vehicle loading
The tires on your Volvo will perform to specifications at all normal loads when inflated as recommended on the tire
information label* located on the inside of the fuel filler flap. This label lists both tire and vehicle design limits.
Do not load your car beyond the load limits indicated.
*Please note that the tire information label indicates pressure for both comfort and fuel economy.
Tire pressure label on fuel filler door
pg. 79 Wheels and tires
Uniform tire quality grading
All passenger car tires must conform to Federal Safety Requirements in addition to these grades
TREADWEAR
The treadwear grade is a comparative rating based on the wear rate of the tire when tested under controlled conditions
on a specified government test course. For example, a tire graded 150 would wear one and one half (1 1/2) times as
well on the government course as a tire graded 100. The relative performance of tires depends upon the actual
conditions of their use, however, and many depart significantly from the norm due to variation in driving habits,
service practices and differences in road characteristics and climate.
TRACTION
The traction grades, from highest to lowest, are AA, A, B, and C, as measured under controlled conditions on specified
government test surfaces of asphalt and concrete. A tire marked C may have poor traction performance.WARNING!
The traction grade assigned to this tire is based on braking (straight-ahead) traction tests and does not include
cornering (turning) traction.
TEMPERATURE
ProCarManuals.com
Page 42 of 84
, A, B, and C, representing the tires resistance to the generation of heat
and its ability to dissipate heat when tested under controlled conditions o")
The temperature grades are AA (the highest), A, B, and C, representing the tire's resistance to the generation of heat
and its ability to dissipate heat when tested under controlled conditions on a specified indoor laboratory test wheel.
Sustained high temperature can cause the material of the tire to degenerate and reduce tire life, and excessive
temperature can lead to sudden tire failure. The grade C corresponds to a level of performance which all passenger car
tires must meet under the Federal Motor Safety Standard No. 109. Grades B and A represent higher levels of
performance on the laboratory test wheel than the minimum required by law.WARNING!
The temperature grade for this tire is established for a tire that is properly inflated and not overloaded. Excessive
speed, underinflation, or excessive loading, either separately or in combination, can cause heat buildup and possible
tire failure.
pg. 80 Spare tire
Special Spare
The spare tire in your car is called a "Special Spare". It has the following designation: 124/90 R15 96M.
Recommended tire pressure (see decal on the inside of the fuel filler door) should be maintained irrespective of which
position on the car the Special Spare tire is used on.
In the event of damage to this tire, a new one can be purchased from your Volvo retailer.WARNING!
Current legislation prohibits the use of the "Special Spare" tire other than as a temporary replacement for a punctured
tire. In other words, it must be replaced as soon as possible by a standard tire. Roadholding, etc., may be affected
with the "Special Spare" in use. Do not, therefore, exceed 50 mph (80 km/h).
CAUTION: The car must not be driven with wheels of different dimensions or with a spare tire other than the one that
came with the car. The use of different size wheels can seriously damage your car's transmission.
CAUTION: We recomend that you switch the DSA system off whenever you use the "Special Spare" tire that does
not match the diameter of your other tires. See page 28
.
ProCarManuals.com
Page 43 of 84
Contents | Top of Page
ProCarManuals.com
Page 44 of 84
2 0 0 0
VOLVO
S & V 40
Chapter 6 - In case of an emergency
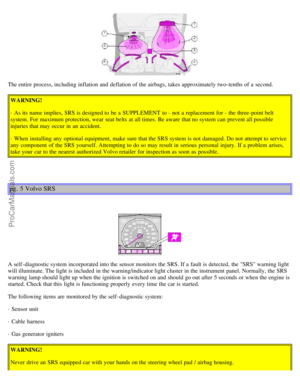
pg. 81 In case of an emergency
In case of an emergency
Even if you maintain your car in good running condition, there is always the possibility that something might go wrong
and prevent you from driving, such as a punctured tire, blown fuse or bulb, etc. For additional information, see section
"ON CALL Road Assistance". Tool kit, Jack
82
Changing a wheel83
Replacing bulbs85
Replacing fuses91
Replacing wiper blades94
In case of emergency96
Manually closing the sun roof96
pg. 82 Tool kit, Jack
Tool kit and jack
The tool kit and jack are under the carpet in the cargo space floor, next to the spare wheel.
Contents of tool kit
1. Combined screwdriver/socket wrench
2. Lug wrench
3. Crank (for the jack)
4. Gloves
ProCarManuals.com
Page 45 of 84

The screwdriver is combined with the socket wrench. The tools can be alternated by pulling the shaft out of the handle
and reinserting the opposite end of the shaft into the handle.
Removing the jack
Take the spare wheel out.
Tighten the jack slightly by turning the axle (1) and remove it from the retaining clip.
Replacing the jack
Put the jack in the clip and turn axle (1) until the jack is securely in place.
Replace the tools in the same place.
CAUTION:
· The car must not be driven with wheels of different dimensions or with a spare tire other than the one that came with
the car. The use of different size wheels can seriously damage your car's transmission.
· Correct tightening torque on wheel bolts must be observed. The wheel bolts should never be greased or lubricated.
Extended, chromed wheel bolts must not be used with steel rims, as they make it impossible to fit the hub caps.WARNING!
· The jack (see the following pages) must be correctly placed in the jack attachment.
· Be sure the jack is on a firm, level, non-slippery surface.
· Never allow any part of your body to be extended under a car supported by a jack.
· Use the jack intended for the car when replacing a wheel. For any other job, use stands to support the side of the
car being worked on.
· Apply the parking brake and put the gear selector in position P.
· Block the wheels standing on the ground, use rigid wooden blocks or large stones.
· The jack should be kept well-greased.
· Use gloves
pg. 83 Wheel changing
ProCarManuals.com
Page 46 of 84
ark.
· Get all the passengers to move to a safe place outside the car.
· Close all doors.
· Block the wheels remaining o")
Changing a wheel
· Engage the parking brake.
· Put the gear selector in (P)ark.
· Get all the passengers to move to a safe place outside the car.
· Close all doors.
· Block the wheels remaining on the ground with wooden blocks, stones or something similar.
· Pull the wheel cover off the wheel (steel rims) or use the flat end of the lug wrench in the tool kit (1) (alloy rims) and
twist it to loosen the wheel cap (2).
· With the car still on the ground, use the lug wrench to loosen the wheel bolts 1/2 1 turn. Turn the bolts
counterclockwise to loosen. Press the lug wrench with your foot to loosen the bolts if necessary (3).
pg. 84 Wheel changing
Attaching the jack
There are two jack attachment points located on each side of the car. These attachment points are marked by arrows on
the outside of the cover over the bottom sill (see illustration).
Check that the doors are closed and stay closed all the time the car is jacked up.
· Position the jack under the two notches closest to the wheel to be changed (1).
ProCarManuals.com
Page 47 of 84
.
· Attach the lug wrench (D) to the crank.
· Raise the jack by cranking it clockwise. Be sure the jack engages the attachment point correctly.
The base of the ja")
· Attach the crank to the jack (C).
· Attach the lug wrench (D) to the crank.
· Raise the jack by cranking it clockwise. Be sure the jack engages the attachment point correctly.
The base of the jack must be flat on a level, firm, non-slippery surface. Before raising the car, check that the
jack is still correctly positioned in the attachment point.
· Raise the car until the wheel to be changed is lifted off the ground.
· Unscrew the wheel bolts completely and carefully remove the wheel so as not to damage the thread on the studs.WARNING!
The jack must be correctly placed in the jack attachment.
Installing the wheel
Clean the contact surfaces on the wheel and
hub. Lift the wheel and place it on the hub. Install the wheel bolts crosswise and tighten by turning lightly clockwise.
Lower the vehicle to the ground and alternately tighten the bolts to 81 ft. lbs. (110 Nm). Install the wheel cap (where
applicable).
pg. 85 Replacing bulbs
Remove cover
Removing high/low beam headlight bulbs
· Switch off the ignition
· Turn the light switch off and open the hood.
· Lift the tab (A) to release (B) the hard plastic cover above the headlight unit and remove it.
· Pull off the rubber cover from the rear of the bulb unit to be replaced.
· Release the retaining spring and withdraw the connector/bulb from the headlight unit. Pull the bulb out of the
ProCarManuals.com
Page 48 of 84
connector.
NOTE: Never touch the glass of a bulb with your fingers: this could leave traces of grease or oil on the glass which
then evaporate and may damage the reflector.
pg. 86 Replacing bulbs
Replacing cover
Installing high/low beam headlight bulbs
· Insert the new bulb in the headlight unit
· Reconnect the connector and wiring.
· Press the retaining spring over the connector/bulb until it clicks into position.
· Reinstall the rubber cover at the rear of the headlight unit.
· Put the hard plastic cover in place above the headlight housing and press the tab down to secure the cover.
NOTE: Never touch the glass of a bulb with your fingers: this could leave traces of grease or oil on the glass which
then evaporate and may damage the reflector.
pg. 87 Replacing bulbs
Front direction indicators and parking lights
Removing the bulb:
· Loosen the screw (A) between the headlight and direction indicator housings (max. 2 complete turns
ProCarManuals.com