Page 781 of 4770

'99camry U
15
ºPANICº SWITCH
Pushing the ºPANICº switch blows the
horn intermittently and flashes the
headlights and tail lights.
The ºPANICº switch is used to deter ve-
hicle theft when you witness anyone at-
tempting to break into or damage your
vehicle.
The alarm will last for one minute. To stop
alarm midway, push the ºPANICº switch
once again, unlock any door with the key
or transmitter, or turn the ignition key from
the ºLOCKº to ºONº position.
The ºPANICº mode does not work when
the key is inserted in the ignition switch.WIRELESS REMOTE CONTROL TRANS-
MITTER
The wireless remote control transmitter is
an electronic component. Observe the fol-
lowing instructions in order not to cause
damage to the transmitter.
�Do not leave the transmitter on places
where the temperature becomes high
such as on the dashboard.
�Do not disassemble it.
�Avoid knocking it hard against other
objects or dropping it.
�Avoid putting it in water.
You can use up to 2 wireless remote con-
trol transmitters for the same vehicle.
Contact your Toyota dealer for detailed
information.
If the wireless remote control transmitter
does not actuate the doors or alarm, or
operate from a normal distance:
�Check for closeness to a radio trans-
mitter such as a radio station or an
airport which can interfere with normal
operation of the transmitter.
�The batteries may have been con-
sumed. Check the batteries in the
transmitter. To replace the batteries,
see ºReplacing transmitter batteriesº.REPLACING TRANSMITTER BATTERIES
For replacement, use DURACELL
) DL2016
batteries or equivalent.
CAUTION
Special care should be taken that
small children do not swallow the re-
moved transmitter batteries or compo-
nents.
NOTICE
When replacing the terminal batteries,
be careful not to lose the compo-
nents.
Replace the transmitter batteries by the
following procedures:
Page 787 of 4770
'99camry U
21
2. In front of the vehicle, pull up the
auxiliary catch lever and lift the
hood.3. Hold the hood open by inserting the
support rod into the slot.
Before closing the hood, check to see that
you have not forgotten any tools, rags,
etc. and return the support rod to its
clip�this prevents rattles. Then lower the
hood make sure it locks into place. If
necessary, press down gently on the front
edge to lock it.
CAUTION
After inserting the support rod into
the slot, make sure the rod supports
the hood securely from falling down
on to your head or body.
Theft deterrent system
To deter the vehicle theft, The system
is designed to give an alarm if any of
the doors, trunk or hood is forcibly un-
locked or the battery terminal is discon-
nected and then reconnected when the
vehicle is locked.
The alarm blows the horn intermittently
and flashes the headlights and tail lights.
Page 842 of 4770

'99camry U
76
Adjust the mirror so that you can just
see the rear of your vehicle in the mir-
ror.
To reduce glare from the headlights of
the vehicle behind you during night
driving, operate the lever on the lower
edge of the mirror.
Daylight drivingÐLever at position 1
The reflection in the mirror has greater
clarity at this position.
Night drivingÐLever at position 2
Remember that by reducing glare you also
lose some rear view clarity.
CAUTION
Do not adjust the mirror while the
vehicle is moving. It may cause the
driver to mishandle the vehicle and
an accident may occur resulting in
personal injuries.
Sun visorsÐ
To block out glare, move the sun visor.
To block out glare from the frontÐSwing
down the sun visor (position 1).
To block out glare from the sideÐSwing
down the sun visor, remove it from the
hook and swing it to the lateral side (posi-
tion 2).
If glare comes from obliquely behind you,
extend the plate at the end of the visor
(to position 3 or 4).
Anti±glare inside rear view
mirror
Page 845 of 4770

'99camry U
79
Part 1
OPERATION OF
INSTRUMENTS AND
CONTROLSÐ
Chapter 1±4
Lights, Wipers and
Defogger
�Headlights and turn signals
�Emergency flashers
�Instrument panel light control
�Interior light
�Ignition switch light
�Personal light
�Windshield wipers and washer
�Rear window and outside
rear view mirror defoggers
Headlights and turn signals
HEADLIGHTS
To turn on the following lights: Twist
the headlight/turn signal lever knob.
Position 1ÐParking, tail, license plate,
side marker and instrument panel lights
Position 2ÐHeadlights and all of the
above
The lights automatically turn off when the
driver 's door is opened with the ignition
turned off. To turn them on again, turn the
key to the ºONº position or actuate the
headlight switch. If you are going to park
for over one week, make sure the head-
light switch is off.
NOTICE
To prevent the battery from being dis-
charged, do not leave the lights on
for a long period when the engine is
not running.
Daytime running light system
The headlights turn on at reduced intensi-
ty when the parking brake is released with
the engine started, even with the light
switch in the ºOFFº position. They will not
go off until the ignition switch is turned
off.
To turn on the other exterior lights and
instrument panel lights, twist the knob to
the position 1.
Twist the knob to the position 2 to turn
the headlights to full intensity for driving
at night.
The headlights automatically turn to full
intensity in the twilight even with the light
switch in the ºOFFº position.
Page 846 of 4770

'99camry U
80
The daytime running light control sensor
is on the top of the passenger 's side
instrument panel.
Do not place anything on the instrument
panel, and/or do not affix anything on the
windshield to block this sensor.High±Low beamsÐFor high beams, turn
the headlights on and push the lever away
from you (position 1). Pull the lever to-
ward you (position 2) for low beams.
The headlight high beam indicator light
(blue light) on the instrument panel will
tell you that the high beams are on.
Flashing the high beam headlights
(position 3)ÐPull the lever all the way
back. The high beam headlights turn off
when you release the lever.
You can flash the high beam headlights
with the knob turned to ºOFFº.TURN SIGNALS
To signal a turn, push the headlight/
turn signal lever up or down to position
1.
The key must be in the ºONº position.
The lever automatically returns after you
make a turn, but you may have to return
it by hand after you change lanes.
To signal a lane change, move the lever
up or down to the pressure point (position
2) and hold it.
If the turn signal indicator lights (green
lights) on the instrument panel flash faster
than normal, a front or rear turn signal
bulb is burned out.
Page 847 of 4770
'99camry U
81
Emergency flashers
To turn on the emergency flashers,
push the switch.
All the turn signal lights will flash. To turn
them off, push the switch once again.
Turn on the emergency flashers to warn
other drivers if your vehicle must be
stopped where it might be a traffic hazard.
Always pull as far off the road as pos-
sible.
The turn signal light switch will not work
when the emergency flashers are operat-
ing.
NOTICE
To prevent the battery from being dis-
charged, do not leave the switch on
longer than necessary when the en-
gine is not running.
Instrument panel light control
To adjust the brightness of the instru-
ment panel lights, turn the knob.
Page 856 of 4770
 ºABSº Warning Light
This light warns that there is a problem
somewhere in your anti±lock brake sys-
tem.
If the light comes on while you are driv-
ing, have your vehicle checked")
'99camry U
90
(g) ºABSº Warning Light
This light warns that there is a problem
somewhere in your anti±lock brake sys-
tem.
If the light comes on while you are driv-
ing, have your vehicle checked by your
Toyota dealer as soon as possible.
The light will come on when the ignition
key is turned to the ºONº position. After
a few seconds, the light will go off.
When the ºABSº warning light is on (and
the brake system warning light is off), the
brake system operates conventionally but
anti±lock brake system is not assisting
brake performance so that the wheels can
lock±up during sudden braking or braking
on slippery road surfaces.
(h) Open Door Warning Light
This light remains on until all the doors
and back door are completely closed.
(i) Rear Light Failure Warning Light
If this light comes on when the headlight
switch is turned on (at the first or second
clickstop), it indicates that one or more of
the tail lights are burned out.If it comes on when the brake pedal is
depressed, one or more stop lights are
burned out.
Have defective bulbs replaced as soon as
possible.
(j) SRS Airbag Warning Light
This light will come on when the igni-
tion key is turned to the ºACCº or
ºONº position. After about 6 seconds,
the light will go off. This means the
systems of the airbag and front seat
belt pretensioner are operating properly.
The warning light system monitors the
front airbag sensors, airbag sensor as-
sembly, seat belt pretensioner assemblies,
inflators, warning light, interconnecting wir-
ing and power sources.
If either of the following conditions occurs,
this indicates a malfunction somewhere in
the parts monitored by the warning light
system. Contact your Toyota dealer as
soon as possible to service the vehicle.
�The light does not come on when the
ignition key is turned to the ºACCº or
ºONº position or remains on.
�The light comes on or flashes while
driving.(k) Low Windshield Washer Fluid Level
Warning Light
The light warns that the windshield washer
fluid level is too low. Add washer fluid at
your earliest opportunity. (For instructions,
see ºAdding washer fluidº in Chapter 7±3.)
(l) ºTRAC OFFº Indicator/Warning Light
This light comes on when the ignition key
is turned to ºONº, and will go off after 3
seconds. This means that the system is
operating properly.
If one of the following conditions occurs,
this indicates a malfunction somewhere in
the parts monitored by the warning light
system. Contact your Toyota dealer as
soon as possible to service the vehicle.
�The light remains on more than 3 se-
conds after the ignition switch is turned
on.
�The light comes on while driving even
if the ºTRAC OFFº switch is not
pushed.
�The light flashes.
Page 913 of 4770
'99camry U
147
Part 1
OPERATION OF
INSTRUMENTS AND
CONTROLSÐ
Chapter 1±8
Other equipment
�Clock
�Cigarette lighter and ashtrays
�Power outlet
�G lov e box
�Garage door opener box
�Miscellaneous box
�Auxiliary box
�Cup holder
�Traction control system
�Floor mat
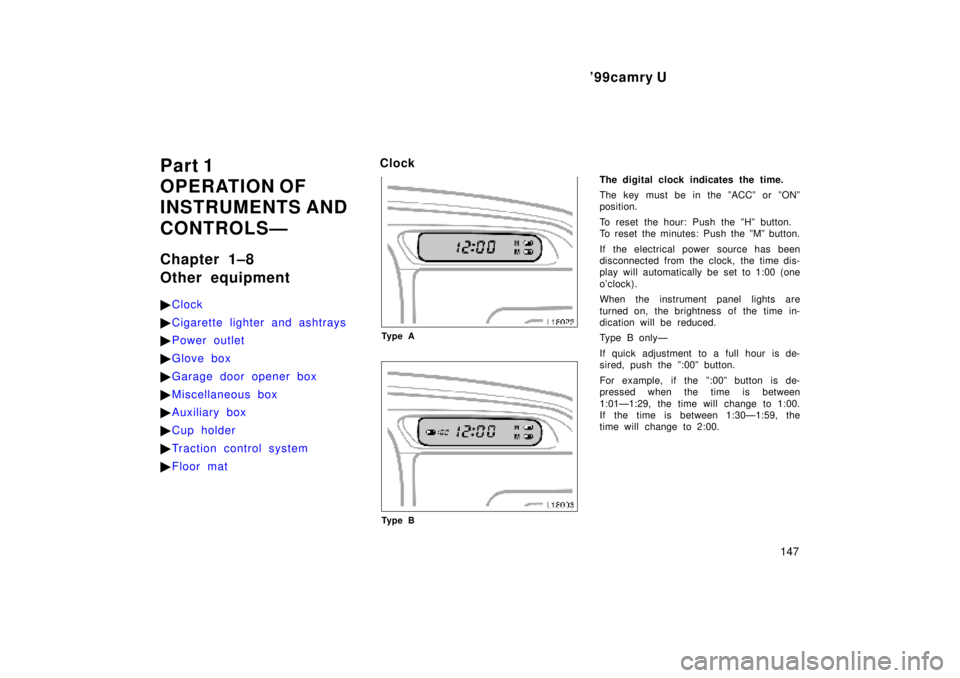
Clock
Ty p e A
Ty p e B
The digital clock indicates the time.
The key must be in the ºACCº or ºONº
position.
To reset the hour: Push the ºHº button.
To reset the minutes: Push the ºMº button.
If the electrical power source has been
disconnected from the clock, the time dis-
play will automatically be set to 1:00 (one
o'clock).
When the instrument panel lights are
turned on, the brightness of the time in-
dication will be reduced.
Type B onlyÐ
If quick adjustment to a full hour is de-
sired, push the º:00º button.
For example, if the º:00º button is de-
pressed when the time is between
1:01Ð1:29, the time will change to 1:00.
If the time is between 1:30Ð1:59, the
time will change to 2:00.